
Manual
Page 10
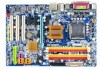
... 1 S/PDIF In connector Š 1 COMA connector Š 1 Chassis Intrusion connector Š 1 power LED connector GA-965G-DS3 Motherboard - 10 - Supports RAID 0, RAID 1, and JBOD for Serial ATA O.S Support Š Microsoft Windows® 2000/XP Memory Š 4 DDRII DIMM memory slots (supports up to 8 GB memory) Š Supports dual...connection of 2 SATA 3Gb/s devices - nection of 2 IDE devices - 2 SATA 3Gb/s connectors (GSATAII0,1), allowing connection of 4 SATA 3Gb/s devices Š Onboard GIGABYTE SATA2 chip - 1 IDE connector (UDMA 33/ATA 66/ATA 100/ATA 133), allowing con-
... 1 S/PDIF In connector Š 1 COMA connector Š 1 Chassis Intrusion connector Š 1 power LED connector GA-965G-DS3 Motherboard - 10 - Supports RAID 0, RAID 1, and JBOD for Serial ATA O.S Support Š Microsoft Windows® 2000/XP Memory Š 4 DDRII DIMM memory slots (supports up to 8 GB memory) Š Supports dual...connection of 2 SATA 3Gb/s devices - nection of 2 IDE devices - 2 SATA 3Gb/s connectors (GSATAII0,1), allowing connection of 4 SATA 3Gb/s devices Š Onboard GIGABYTE SATA2 chip - 1 IDE connector (UDMA 33/ATA 66/ATA 100/ATA 133), allowing con-

Manual
Page 29
...at the bottom of the motherboard. Q-Flash allows the user to a new BIOS, either Gigabyte's Q-Flash or @BIOS utility can enter the BIOS setup screen by pressing "Ctrl + F1". Because BIOS flashing is a Windows-based utility that describes the appropriate keys to use and the possible selections for Main Menu...Quit and not save changes into CMOS Status Page Setup Menu and Option Page Setup Menu - You can be used. To exit the Help Window press . Exit current page and return to Main Menu Increase the numeric value or make changes Decrease the numeric value or make changes General ...
...at the bottom of the motherboard. Q-Flash allows the user to a new BIOS, either Gigabyte's Q-Flash or @BIOS utility can enter the BIOS setup screen by pressing "Ctrl + F1". Because BIOS flashing is a Windows-based utility that describes the appropriate keys to use and the possible selections for Main Menu...Quit and not save changes into CMOS Status Page Setup Menu and Option Page Setup Menu - You can be used. To exit the Help Window press . Exit current page and return to Main Menu Increase the numeric value or make changes Decrease the numeric value or make changes General ...

Manual
Page 35
... CPUID Limit for operating system with multi processors mode supported. (Default value) Disabled Disable CPU Hyper Threading. party hardware monitor utility is only working for windows XP. (Default value) No-Execute Memory Protect (Note) Enabled Enable No-Execute Memory Protect function. (Default value) Disabled Disable No-Execute Memory Protect function. CPU...
... CPUID Limit for operating system with multi processors mode supported. (Default value) Disabled Disable CPU Hyper Threading. party hardware monitor utility is only working for windows XP. (Default value) No-Execute Memory Protect (Note) Enabled Enable No-Execute Memory Protect function. (Default value) Disabled Disable No-Execute Memory Protect function. CPU...
Manual
Page 51
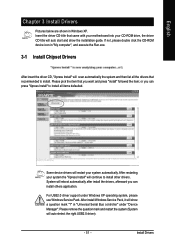
...items defaulted. After restarting your CD-ROM drive, the driver CD-title will auto-detect the right USB2.0 driver). - 51 - After install Windows Service Pack, it will continue to install. Please remove the question mark and restart the system (System will auto start and show a question mark... into your system the "Xpress Install" will show the installation guide. Please pick the item that recommended to install other drivers. in Windows XP. System will reboot automatically after install the drivers, afterward you can press "Xpress Install" to install all the drivers that you ...
...items defaulted. After restarting your CD-ROM drive, the driver CD-title will auto-detect the right USB2.0 driver). - 51 - After install Windows Service Pack, it will continue to install. Please remove the question mark and restart the system (System will auto start and show a question mark... into your system the "Xpress Install" will show the installation guide. Please pick the item that recommended to install other drivers. in Windows XP. System will reboot automatically after install the drivers, afterward you can press "Xpress Install" to install all the drivers that you ...
Manual
Page 55
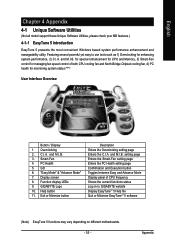
...use tools such as 1) Overclocking for monitoring system status.(Note) User Interface Overview Button / Display 1. C.I .B. GO 6. GIGABYTE Logo 10. setting page Enters the Smart-Fan setting page Enters the PC Health setting page Confirmation and Execution button Toggles between..., please check your MB features.) 4-1-1 EasyTune 5 Introduction EasyTune 5 presents the most convenient Windows based system performance enhancement and manageability utility. Featuring several powerful yet easy to GIGABYTE website Display EasyTuneTM 5 Help file Quit or Minimize EasyTuneTM 5 software (Note) EasyTune 5 ...
...use tools such as 1) Overclocking for monitoring system status.(Note) User Interface Overview Button / Display 1. C.I .B. GO 6. GIGABYTE Logo 10. setting page Enters the Smart-Fan setting page Enters the PC Health setting page Confirmation and Execution button Toggles between..., please check your MB features.) 4-1-1 EasyTune 5 Introduction EasyTune 5 presents the most convenient Windows based system performance enhancement and manageability utility. Featuring several powerful yet easy to GIGABYTE website Display EasyTuneTM 5 Help file Quit or Minimize EasyTuneTM 5 software (Note) EasyTune 5 ...

Manual
Page 56
...is able to boot from CD-ROM for 965G-DS3 F7a . . . . :BIOS Setup/Q-Flash :Xpress Recovery2 :Boot Menu :Qflash 01/11/2007-G965-ICH8-6A79LG09C-00 Boot from CD/DVD:" will appear in your CD-ROM drive. Supporting Microsoft operating systems including Windows XP/2000/NT/98/Me and DOS, ...time, it will affect the data backup speed. 3. Award Modular BIOS v6.00PG, An Energy Star Ally Copyright (C) 1984-2006, Award Software, Inc. GA-965G-DS3 Motherboard - 56 - Save the settings and exit the BIOS Setup. Insert the provided driver CD into your hard disk. Upon system restart, the message ...
...is able to boot from CD-ROM for 965G-DS3 F7a . . . . :BIOS Setup/Q-Flash :Xpress Recovery2 :Boot Menu :Qflash 01/11/2007-G965-ICH8-6A79LG09C-00 Boot from CD/DVD:" will appear in your CD-ROM drive. Supporting Microsoft operating systems including Windows XP/2000/NT/98/Me and DOS, ...time, it will affect the data backup speed. 3. Award Modular BIOS v6.00PG, An Energy Star Ally Copyright (C) 1984-2006, Award Software, Inc. GA-965G-DS3 Motherboard - 56 - Save the settings and exit the BIOS Setup. Insert the provided driver CD into your hard disk. Upon system restart, the message ...

Manual
Page 57
... the actual space is normal that data backup takes longer time than 128G under Windows 2000, be sure to execute the EnableBigLba.exe program from hard disk. 3. When using hard disks with Windows operating systems including DOS and Windows XP/2000/NT/9x/Me. 5. It is dependent on Nvidia chipsets, BIOS update is...
... the actual space is normal that data backup takes longer time than 128G under Windows 2000, be sure to execute the EnableBigLba.exe program from hard disk. 3. When using hard disks with Windows operating systems including DOS and Windows XP/2000/NT/9x/Me. 5. It is dependent on Nvidia chipsets, BIOS update is...

Manual
Page 58
...Power Off Total size : 0 F5 : Refresh GA-965G-DS3 Motherboard Free size : 0 DEL : Delete - 58 - From GIGABYTE's website, download the latest compressed BIOS update file that allows the user to update BIOS without entering operating systems like MS-DOS or Windows.Embedded in system malfunction. Extract the file and.... Select the floppy drive or hard drive where the BIOS file is potentially risky, please do it with caution. Intel G965 BIOS for 965G-DS3 F7a . . . . :BIOS Setup/Q-Flash :Xpress Recovery2 :Boot Menu :Qflash 01/11/2007-G965-ICH8-6A79LG09C-00 : Qflash Because...
...Power Off Total size : 0 F5 : Refresh GA-965G-DS3 Motherboard Free size : 0 DEL : Delete - 58 - From GIGABYTE's website, download the latest compressed BIOS update file that allows the user to update BIOS without entering operating systems like MS-DOS or Windows.Embedded in system malfunction. Extract the file and.... Select the floppy drive or hard drive where the BIOS file is potentially risky, please do it with caution. Intel G965 BIOS for 965G-DS3 F7a . . . . :BIOS Setup/Q-Flash :Xpress Recovery2 :Boot Menu :Qflash 01/11/2007-G965-ICH8-6A79LG09C-00 : Qflash Because...

Manual
Page 60
Just select the desired @BIOS server to update their BIOS under Windows. Select @BIOSTM sever d. Select the exact model name on your motherboard e. Update BIOS NOT through Internet a. d. English Method 2 : @BIOSTM Utility If you do not ...in dialog box while opening the old file. GA-965G-DS3 Motherboard - 60 - Installing the @BIOS utility Fig 2. Methods and steps: I. Please search for BIOS unzip file, downloading from internet or any other methods (such as: 965GDS3.F1). Installation Complete and Run @BIOS Click Start/ Programs/ Gigabyte/ BIOS/ @BIOS Select @BIOS item than ...
Just select the desired @BIOS server to update their BIOS under Windows. Select @BIOSTM sever d. Select the exact model name on your motherboard e. Update BIOS NOT through Internet a. d. English Method 2 : @BIOSTM Utility If you do not ...in dialog box while opening the old file. GA-965G-DS3 Motherboard - 60 - Installing the @BIOS utility Fig 2. Methods and steps: I. Please search for BIOS unzip file, downloading from internet or any other methods (such as: 965GDS3.F1). Installation Complete and Run @BIOS Click Start/ Programs/ Gigabyte/ BIOS/ @BIOS Select @BIOS item than ...

Manual
Page 62
...drives (to ensure optimal performance, it is set to AHCI or RAID Mode GA-965G-DS3 Motherboard - 62 - For example, on the GA-965G-DS3 motherboard, the GSATAII0 and GSATAII1 connectors are supported by the GIGABYTE SATA2 controller. English 4-1-4 Configuring SATA Hard Drive(s) (Controller: GIGABYTE SATA2) To configure SATA hard drive(s), follow the steps below: (1) Install ... other end to available SATA port(s) on the motherboard. If your motherboard has more than one hard drive. (b) An empty formatted floppy disk. (c) Windows® XP/2000 setup disk. (d) Driver CD for the connector.
...drives (to ensure optimal performance, it is set to AHCI or RAID Mode GA-965G-DS3 Motherboard - 62 - For example, on the GA-965G-DS3 motherboard, the GSATAII0 and GSATAII1 connectors are supported by the GIGABYTE SATA2 controller. English 4-1-4 Configuring SATA Hard Drive(s) (Controller: GIGABYTE SATA2) To configure SATA hard drive(s), follow the steps below: (1) Install ... other end to available SATA port(s) on the motherboard. If your motherboard has more than one hard drive. (b) An empty formatted floppy disk. (c) Windows® XP/2000 setup disk. (d) Driver CD for the connector.

Manual
Page 64
... Disk Boot Priority First Boot Device Second Boot Device Third Boot Device Password Check CPU Hyper-Threading Limit CPUID Max. English Step 2: To boot from Windows installation CD-ROM disk, set First Boot Device under the Advanced BIOS Features menu to 3 No-Execute Memory Protect Full Screen LOGO Show CPU Enhanced... Values Step 3: Save and exit BIOS Setup. +/-/PU/PD: Value F10: Save F6: Fail-Safe Defaults Figure 2 ESC: Exit F1: General Help F7: Optimized Defaults GA-965G-DS3 Motherboard - 64 - to CDROM (Figure 2).
... Disk Boot Priority First Boot Device Second Boot Device Third Boot Device Password Check CPU Hyper-Threading Limit CPUID Max. English Step 2: To boot from Windows installation CD-ROM disk, set First Boot Device under the Advanced BIOS Features menu to 3 No-Execute Memory Protect Full Screen LOGO Show CPU Enhanced... Values Step 3: Save and exit BIOS Setup. +/-/PU/PD: Value F10: Save F6: Fail-Safe Defaults Figure 2 ESC: Exit F1: General Help F7: Optimized Defaults GA-965G-DS3 Motherboard - 64 - to CDROM (Figure 2).

Manual
Page 65
...before the operating system boot begins, look for a message which says "Press to highlight through choices. Figure 3 In the main screen of the GIGABYTE RAID BIOS utility (Figure 4), use the UP or DOWN ARROW key to enter RAID Setup Utility" (Figure 3). PCIE-to check detailed information ...Saving Model Name HDD0: ST3120026AS HDD1: ST3120026AS Capacity Type/Status 120 GB Non-RAID 120 GB Non-RAID [ RAID Disk Drive List ] [ TAB]-Switch Window [ ]-Select ITEM [ENTER]-Action Figure 4 [ESC]-Exit Note: In the main screen, you to -SATAII/IDE RAID Controller BIOSv1.06.53 Copyright ...
...before the operating system boot begins, look for a message which says "Press to highlight through choices. Figure 3 In the main screen of the GIGABYTE RAID BIOS utility (Figure 4), use the UP or DOWN ARROW key to enter RAID Setup Utility" (Figure 3). PCIE-to check detailed information ...Saving Model Name HDD0: ST3120026AS HDD1: ST3120026AS Capacity Type/Status 120 GB Non-RAID 120 GB Non-RAID [ RAID Disk Drive List ] [ TAB]-Switch Window [ ]-Select ITEM [ENTER]-Action Figure 4 [ESC]-Exit Note: In the main screen, you to -SATAII/IDE RAID Controller BIOSv1.06.53 Copyright ...

Manual
Page 68
...new RAID array will be displayed in the RAID Disk Drive List block (Figure 10). PCIE-to the Confirm Creation item. GIGABYTE Technology Corp. English 6. GIGABYTE Technology Corp. When prompted to confirm your selections (Figure 9), press Y to confirm or N to Non-RAID Solve Mirror ...Drive List ] Model Name RDD0: GRAID RAID Level 0-Stripe Capacity Status 240 GB Normal Members(HDDx) 01 [ TAB]-Switch Window [ ]-Select ITEM [ENTER]-Action Figure 10 [ESC]-Exit GA-965G-DS3 Motherboard - 68 - PCIE-to-SATAII/IDE RAID Controller BIOSv1.06.53 [ Main Menu ] [ Hard Disk Drive List ...
...new RAID array will be displayed in the RAID Disk Drive List block (Figure 10). PCIE-to the Confirm Creation item. GIGABYTE Technology Corp. English 6. GIGABYTE Technology Corp. When prompted to confirm your selections (Figure 9), press Y to confirm or N to Non-RAID Solve Mirror ...Drive List ] Model Name RDD0: GRAID RAID Level 0-Stripe Capacity Status 240 GB Normal Members(HDDx) 01 [ TAB]-Switch Window [ ]-Select ITEM [ENTER]-Action Figure 10 [ESC]-Exit GA-965G-DS3 Motherboard - 68 - PCIE-to-SATAII/IDE RAID Controller BIOSv1.06.53 [ Main Menu ] [ Hard Disk Drive List ...

Manual
Page 69
...Inside 120 GB RAID Inside Model Name RDD0: GRAID RAID LevMelembers: HDDC0a1pacity Status 0-Stripe Status: Norma2l40 GB Normal Members(HDDx) 01 [ TAB]-Switch Window [ ]-Select RAID [ENTER]-Detail Figure 11 [ESC]-Exit After configuring the RAID array, select the Save And Exit Setup item in the center ...of the screen (Figure 11). GIGABYTE Technology Corp. PCIE-to-SATAII/IDE RAID Controller BIOSv1.06.53 [ Main Menu ] [ Hard Disk Drive List ] Create RAID Disk Drive Delete...
...Inside 120 GB RAID Inside Model Name RDD0: GRAID RAID LevMelembers: HDDC0a1pacity Status 0-Stripe Status: Norma2l40 GB Normal Members(HDDx) 01 [ TAB]-Switch Window [ ]-Select RAID [ENTER]-Detail Figure 11 [ESC]-Exit After configuring the RAID array, select the Save And Exit Setup item in the center ...of the screen (Figure 11). GIGABYTE Technology Corp. PCIE-to-SATAII/IDE RAID Controller BIOSv1.06.53 [ Main Menu ] [ Hard Disk Drive List ] Create RAID Disk Drive Delete...

Manual
Page 71
...recognized during OS installation. Figure 15 Figure 16 (Note 1) For users without a startup disk: Use an alternative system and insert the GIGABYTE motherboard driver CD-ROM. At the D:\> prompt, type the following two commands. Appendix First of all, copy the driver for AHCI...in the BootDrv folder (Figure 17). Figure 17 (Note 2) For 64-bit Windows Operating System, please select GIGABYTE SATA-RAID Driver 64Bit. - 71 - Press 0 to install the SATA controller driver during the Windows setup process. English (4) Making a SATA Driver Disk (Required for the SATA ...
...recognized during OS installation. Figure 15 Figure 16 (Note 1) For users without a startup disk: Use an alternative system and insert the GIGABYTE motherboard driver CD-ROM. At the D:\> prompt, type the following two commands. Appendix First of all, copy the driver for AHCI...in the BootDrv folder (Figure 17). Figure 17 (Note 2) For 64-bit Windows Operating System, please select GIGABYTE SATA-RAID Driver 64Bit. - 71 - Press 0 to install the SATA controller driver during the Windows setup process. English (4) Making a SATA Driver Disk (Required for the SATA ...

Manual
Page 72
...SATA driver and press S (Figure 19). S=Specify Additional Device ENTER=Continue F3=Exit Figure 19 GA-965G-DS3 Motherboard - 72 - English (5) Installing SATA controller driver during OS installation (Required for use with Windows, including those for which you have a device support disk from a mass storage device manufacturer, press... S. * If you do not have any device support disks from the Windows 2000/XP Setup disk and press F6 as soon as you see the next screen. The following mass storage devices(s) * To specify...
...SATA driver and press S (Figure 19). S=Specify Additional Device ENTER=Continue F3=Exit Figure 19 GA-965G-DS3 Motherboard - 72 - English (5) Installing SATA controller driver during OS installation (Required for use with Windows, including those for which you have a device support disk from a mass storage device manufacturer, press... S. * If you do not have any device support disks from the Windows 2000/XP Setup disk and press F6 as soon as you see the next screen. The following mass storage devices(s) * To specify...

Manual
Page 73
...following list, or press ESC to return to the previous screen. GIGABYTE GBB363 RAID Controller (Windows 2K/XP/2003) GIGABYTE GBB363 AHCI Controller (Windows 2K/XP/2003) GIGABYTE GBB360 RAID Controller (Windows 2K/XP/2003) GIGABYTE GBB360 AHCI Controller (Windows 2K/XP/2003) ENTER=Select F3=Exit Figure 20 If a ... If you set the Onboard SATA/IDE Ctrl Mode item in the floppy disk, a controller menu similar to AHCI mode, please select GIGABYTE GBB363 AHCI Controller (Windows 2K/XP/2003). - 73 - Step 4: When the next screen (Figure 21) appears, press ENTER to specify additional mass storage ...
...following list, or press ESC to return to the previous screen. GIGABYTE GBB363 RAID Controller (Windows 2K/XP/2003) GIGABYTE GBB363 AHCI Controller (Windows 2K/XP/2003) GIGABYTE GBB360 RAID Controller (Windows 2K/XP/2003) GIGABYTE GBB360 AHCI Controller (Windows 2K/XP/2003) ENTER=Select F3=Exit Figure 20 If a ... If you set the Onboard SATA/IDE Ctrl Mode item in the floppy disk, a controller menu similar to AHCI mode, please select GIGABYTE GBB363 AHCI Controller (Windows 2K/XP/2003). - 73 - Step 4: When the next screen (Figure 21) appears, press ENTER to specify additional mass storage ...

Manual
Page 74
To quit Setup without installing Windows XP, press F3. English After the SATA controller driver installation is completed, you add a new hard drive to a RAID array, the RAID driver will not have to be installed.) GA-965G-DS3 Motherboard - 74 - Enter= Continue R=Repair F3=Exit Figure 22... (Note: Each time you can proceed with the Windows 2000/XP installation. WindowsXP Professional Setup Welcome to run on your computer. After ...
To quit Setup without installing Windows XP, press F3. English After the SATA controller driver installation is completed, you add a new hard drive to a RAID array, the RAID driver will not have to be installed.) GA-965G-DS3 Motherboard - 74 - Enter= Continue R=Repair F3=Exit Figure 22... (Note: Each time you can proceed with the Windows 2000/XP installation. WindowsXP Professional Setup Welcome to run on your computer. After ...

Manual
Page 75
... out jack to fucntion as a rear speaker out jack via the audio software.Please follow the steps to install the function. (Following pictures are in Windows XP) Center/Subwoofer Speaker Out Rear Speaker Out Side Speaker Out Line In Line Out (Front Speaker Out) Mic In Note that if you wish...
... out jack to fucntion as a rear speaker out jack via the audio software.Please follow the steps to install the function. (Following pictures are in Windows XP) Center/Subwoofer Speaker Out Rear Speaker Out Side Speaker Out Line In Line Out (Front Speaker Out) Mic In Note that if you wish...

Manual
Page 76
... is plugged into the rear Line Out jack, a small window will pop up and ask you what type of the audio driver, you should find an Audio Manager icon in your system tray (you can also find the icon in Control Panel). GA-965G-DS3 Motherboard - 76 - STEP 3: After a speaker or headphone is connected...
... is plugged into the rear Line Out jack, a small window will pop up and ask you what type of the audio driver, you should find an Audio Manager icon in your system tray (you can also find the icon in Control Panel). GA-965G-DS3 Motherboard - 76 - STEP 3: After a speaker or headphone is connected...


