Manual
Page 5
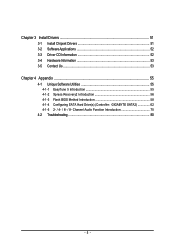
Channel Audio Function Introduction 75 4-2 Troubleshooting 80 - 5 - Chapter 3 Install Drivers 51 3-1 Install Chipset Drivers 51 3-2 SoftwareApplications 52 3-3 Driver CD Information 52 3-4 Hardware Information 53 3-5 Contact Us ...53 Chapter 4 Appendix 55 4-1 Unique Software Utilities 55 4-1-1 EasyTune 5 Introduction 55 4-1-2 Xpress Recovery2 Introduction 56 4-1-3 Flash BIOS Method Introduction 58 4-1-4 Configuring SATA Hard Drive(s) (Controller: GIGABYTE SATA2 62 4-1-5 2- / 4- / 6- / 8-
Channel Audio Function Introduction 75 4-2 Troubleshooting 80 - 5 - Chapter 3 Install Drivers 51 3-1 Install Chipset Drivers 51 3-2 SoftwareApplications 52 3-3 Driver CD Information 52 3-4 Hardware Information 53 3-5 Contact Us ...53 Chapter 4 Appendix 55 4-1 Unique Software Utilities 55 4-1-1 EasyTune 5 Introduction 55 4-1-2 Xpress Recovery2 Introduction 56 4-1-3 Flash BIOS Method Introduction 58 4-1-4 Configuring SATA Hard Drive(s) (Controller: GIGABYTE SATA2 62 4-1-5 2- / 4- / 6- / 8-

Manual
Page 16
... card, please gently press the latch as the picture to the left shows to release the card. Remove your computer's chassis cover. 7. Install related driver from the computer. 3. GA-965G-DS3 Motherboard - 16 - Power on the slot. Make sure your expansion card by the latch at the end of expansion card from BIOS. 8. Replace...
... card, please gently press the latch as the picture to the left shows to release the card. Remove your computer's chassis cover. 7. Install related driver from the computer. 3. GA-965G-DS3 Motherboard - 16 - Power on the slot. Make sure your expansion card by the latch at the end of expansion card from BIOS. 8. Replace...

Manual
Page 17
... you connect your device(s) into USB connector(s), please make sure your OS does not support USB controller, please contact OS vendor for possible patch or driver upgrade. OPTICAL (S/PDIF Out) The S/PDIF optical output port is capable of providing digital audio to external speakers or compressed AC3 data to the lower...
... you connect your device(s) into USB connector(s), please make sure your OS does not support USB controller, please contact OS vendor for possible patch or driver upgrade. OPTICAL (S/PDIF Out) The S/PDIF optical output port is capable of providing digital audio to external speakers or compressed AC3 data to the lower...

Manual
Page 22
Please refer to the BIOS setting for the Serial ATA and install the proper driver in order to work properly. 7 1 SATAII0 SATAII1 1 7 7 1 SATAII2 Pin No. 1 2 3 4 5 6 7 Definition GND TXP TXN GND RXN RXP GND SATAII3 1 7 10) GSATAII0/1 (...the BIOS setting for the Serial ATA and install the proper driver in order to work properly. 7 1 GSATAII0 GSATAII1 1 7 Pin No. 1 2 3 4 5 6 7 Definition GND TXP TXN GND RXN RXP GND GA-965G-DS3 Motherboard - 22 - English 9) SATAII0/1/2/3 (SATA 3Gb/s Connector, Controlled by GIGABYTE SATA2) SATA 3Gb/s can provide up to 300 MB/s ...
Please refer to the BIOS setting for the Serial ATA and install the proper driver in order to work properly. 7 1 SATAII0 SATAII1 1 7 7 1 SATAII2 Pin No. 1 2 3 4 5 6 7 Definition GND TXP TXN GND RXN RXP GND SATAII3 1 7 10) GSATAII0/1 (...the BIOS setting for the Serial ATA and install the proper driver in order to work properly. 7 1 GSATAII0 GSATAII1 1 7 Pin No. 1 2 3 4 5 6 7 Definition GND TXP TXN GND RXN RXP GND GA-965G-DS3 Motherboard - 22 - English 9) SATAII0/1/2/3 (SATA 3Gb/s Connector, Controlled by GIGABYTE SATA2) SATA 3Gb/s can provide up to 300 MB/s ...

Manual
Page 25
... 9 10 4 5 -ACZ_DET LINE2_R 4 NC 5 Line Out (R) 6 FSENSE1 6 NC 7 FAUDIO_JD 7 NC 8 No Pin 8 No Pin 9 LINE2_L 9 Line Out (L) 10 FSENSE2 10 NC By default, the audio driver is configured to this connector, please refer to the instructions on Page 79 about the software settings. 15) CD_IN (CD IN) Connect CD-ROM or...
... 9 10 4 5 -ACZ_DET LINE2_R 4 NC 5 Line Out (R) 6 FSENSE1 6 NC 7 FAUDIO_JD 7 NC 8 No Pin 8 No Pin 9 LINE2_L 9 Line Out (L) 10 FSENSE2 10 NC By default, the audio driver is configured to this connector, please refer to the instructions on Page 79 about the software settings. 15) CD_IN (CD IN) Connect CD-ROM or...

Manual
Page 37
... 2.0 Controller Disable this function if you are not using onboard USB 2.0 feature. Advanced Host Controller Interface (AHCI) is an interface specification that allows the storage driver to operate at Legacy IDE mode.(Default value) USB Controller Enabled Enable USB Controller. (Default value) Disabled Disable USB Controller. For more details about AHCI...
... 2.0 Controller Disable this function if you are not using onboard USB 2.0 feature. Advanced Host Controller Interface (AHCI) is an interface specification that allows the storage driver to operate at Legacy IDE mode.(Default value) USB Controller Enabled Enable USB Controller. (Default value) Disabled Disable USB Controller. For more details about AHCI...

Manual
Page 39
.... RAID/IDE Set the SATA channel to RAID mode and IDE channel to invoke the boot ROM of the SATA ports controlled by the GIGABYTE SATA2 controller. Enable onboard Serial port 1 and address is 3E8/IRQ4. 2E8/IRQ3 Enable onboard Serial port 1 and address is an interface... specification that allows the storage driver to enable or disable the SATA/IDE ports controlled by the GIGABYTE SATA2 controller. ECP+EPP Using Parallel port as Enhanced Parallel Port. Advanced Host Controller Interface (AHCI) is ...
.... RAID/IDE Set the SATA channel to RAID mode and IDE channel to invoke the boot ROM of the SATA ports controlled by the GIGABYTE SATA2 controller. Enable onboard Serial port 1 and address is 3E8/IRQ4. 2E8/IRQ3 Enable onboard Serial port 1 and address is an interface... specification that allows the storage driver to enable or disable the SATA/IDE ports controlled by the GIGABYTE SATA2 controller. ECP+EPP Using Parallel port as Enhanced Parallel Port. Advanced Host Controller Interface (AHCI) is ...
Manual
Page 51
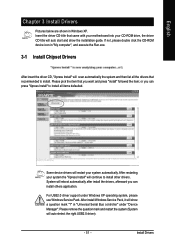
... XP. or you can install others application. Please pick the item that you can press "Xpress Install" to install all the drivers that came with your motherboard into your system automatically. Please remove the question mark and restart the system (System will restart your CD...-ROM drive, the driver CD-title will show the installation guide. Install Drivers Insert the driver CD-title that recommended to install other drivers. After install Windows Service Pack, it will auto start and show a question mark ...
... XP. or you can install others application. Please pick the item that you can press "Xpress Install" to install all the drivers that came with your motherboard into your system automatically. Please remove the question mark and restart the system (System will restart your CD...-ROM drive, the driver CD-title will show the installation guide. Install Drivers Insert the driver CD-title that recommended to install other drivers. After install Windows Service Pack, it will auto start and show a question mark ...

Manual
Page 52
GA-965G-DS3 Motherboard - 52 - English 3-2 Software Applications This page displays all the tools that Gigabyte developed and some free software, you can choose anyone you want and press "install" to install them. 3-3 Driver CD Information This page lists the contents of software and drivers in this CD-title.
GA-965G-DS3 Motherboard - 52 - English 3-2 Software Applications This page displays all the tools that Gigabyte developed and some free software, you can choose anyone you want and press "install" to install them. 3-3 Driver CD Information This page lists the contents of software and drivers in this CD-title.

Manual
Page 53
English 3-4 Hardware Information This page lists all device you have for this motherboard. 3-5 Contact Us Please see the last page for details. - 53 - Install Drivers
English 3-4 Hardware Information This page lists all device you have for this motherboard. 3-5 Contact Us Please see the last page for details. - 53 - Install Drivers

Manual
Page 56
System requirements: 1. Award Modular BIOS v6.00PG, An Energy Star Ally Copyright (C) 1984-2006, Award Software, Inc. GA-965G-DS3 Motherboard - 56 - At least 64M bytes of hard disk data. It is recommended that Xpress Recovery2 be made by pressing the F9 key: ...into your hard disk. Intel G965 BIOS for the first time, it will stay permanent in the bottom left corner of OS and all required drivers as well as software. English 4-1-2 Xpress Recovery2 Introduction Xpress Recovery2 is designed to provide quick backup and restoration of system memory 3. Intel x86 ...
System requirements: 1. Award Modular BIOS v6.00PG, An Energy Star Ally Copyright (C) 1984-2006, Award Software, Inc. GA-965G-DS3 Motherboard - 56 - At least 64M bytes of hard disk data. It is recommended that Xpress Recovery2 be made by pressing the F9 key: ...into your hard disk. Intel G965 BIOS for the first time, it will stay permanent in the bottom left corner of OS and all required drivers as well as software. English 4-1-2 Xpress Recovery2 Introduction Xpress Recovery2 is designed to provide quick backup and restoration of system memory 3. Intel x86 ...

Manual
Page 57
BACKUP: Back up data from the driver CD before data backup. 2. Capable of backing up and restoring only the first physical hard disk. PATA IDE secondary channel c . Xpress Recovery2 is compliant with ...
BACKUP: Back up data from the driver CD before data backup. 2. Capable of backing up and restoring only the first physical hard disk. PATA IDE secondary channel c . Xpress Recovery2 is compliant with ...

Manual
Page 62
If you do not want to create RAID array on the GA-965G-DS3 motherboard, the GSATAII0 and GSATAII1 connectors are supported by the GIGABYTE SATA2 controller. If your motherboard has more than one SATA controller, refer to the connectors introduction section of the...(s) in RAID BIOS.(Note 1) (4) Make a floppy disk containing the SATA controller driver. (Note 2) (5) Install the SATA controller driver during OS installation. (Note 2) Before you begin Please prepare: (a) At least two SATA hard drives (to ensure optimal performance, it is set to AHCI or RAID Mode GA-965G-DS3 Motherboard - 62 -
If you do not want to create RAID array on the GA-965G-DS3 motherboard, the GSATAII0 and GSATAII1 connectors are supported by the GIGABYTE SATA2 controller. If your motherboard has more than one SATA controller, refer to the connectors introduction section of the...(s) in RAID BIOS.(Note 1) (4) Make a floppy disk containing the SATA controller driver. (Note 2) (5) Install the SATA controller driver during OS installation. (Note 2) Before you begin Please prepare: (a) At least two SATA hard drives (to ensure optimal performance, it is set to AHCI or RAID Mode GA-965G-DS3 Motherboard - 62 -

Manual
Page 71
...(example: D:\>). Figure 15 Figure 16 (Note 1) For users without a startup disk: Use an alternative system and insert the GIGABYTE motherboard driver CD-ROM. Without the driver, the hard disk may not be recognized during OS installation. Prepare a startup disk that in Figure 16. Your system will ... you wish to the floppy disk. Press 0 to a floppy disk. Figure 17 (Note 2) For 64-bit Windows Operating System, please select GIGABYTE SATA-RAID Driver 64Bit. - 71 - Press ENTER after each command (Figure 15): cd bootdrv menu Step 2: When the controller menu (Figure 16) appears, ...
...(example: D:\>). Figure 15 Figure 16 (Note 1) For users without a startup disk: Use an alternative system and insert the GIGABYTE motherboard driver CD-ROM. Without the driver, the hard disk may not be recognized during OS installation. Prepare a startup disk that in Figure 16. Your system will ... you wish to the floppy disk. Press 0 to a floppy disk. Figure 17 (Note 2) For 64-bit Windows Operating System, please select GIGABYTE SATA-RAID Driver 64Bit. - 71 - Press ENTER after each command (Figure 15): cd bootdrv menu Step 2: When the controller menu (Figure 16) appears, ...

Manual
Page 72
... a mass storage device manufacturer, or do not have chosen to install a 3rd party SCSI or RAID driver. S=Specify Additional Device ENTER=Continue F3=Exit Figure 19 GA-965G-DS3 Motherboard - 72 - After pressing F6, there will load support for the following is an example of Windows... XP installation. English (5) Installing SATA controller driver during OS installation (Required for AHCI and RAID Mode) Now that...
... a mass storage device manufacturer, or do not have chosen to install a 3rd party SCSI or RAID driver. S=Specify Additional Device ENTER=Continue F3=Exit Figure 19 GA-965G-DS3 Motherboard - 72 - After pressing F6, there will load support for the following is an example of Windows... XP installation. English (5) Installing SATA controller driver during OS installation (Required for AHCI and RAID Mode) Now that...

Manual
Page 73
...continue the SATA driver installation from the motherboard driver CD. S=Specify Additional Device ENTER=Continue F3=Exit Figure 21 (Note) If you set the Onboard SATA/IDE Ctrl Mode item in the floppy disk, a controller menu similar to Figure 20 below will appear. GIGABYTE GBB363 RAID Controller...to specify additional mass storage devices for use with Windows, press ENTER. English Step 3: If Setup correctly recognizes the driver in BIOS Setup to AHCI mode, please select GIGABYTE GBB363 AHCI Controller (Windows 2K/XP/2003). - 73 - Windows Setup You have chosen to configure a SCSI ...
...continue the SATA driver installation from the motherboard driver CD. S=Specify Additional Device ENTER=Continue F3=Exit Figure 21 (Note) If you set the Onboard SATA/IDE Ctrl Mode item in the floppy disk, a controller menu similar to Figure 20 below will appear. GIGABYTE GBB363 RAID Controller...to specify additional mass storage devices for use with Windows, press ENTER. English Step 3: If Setup correctly recognizes the driver in BIOS Setup to AHCI mode, please select GIGABYTE GBB363 AHCI Controller (Windows 2K/XP/2003). - 73 - Windows Setup You have chosen to configure a SCSI ...

Manual
Page 74
... installation. After that hard drive. English After the SATA controller driver installation is completed, you add a new hard drive to a RAID array, the RAID driver will not have to be installed under Windows once for that , the driver will have to be installed.) GA-965G-DS3 Motherboard - 74 - This port of the Setup program prepares Microsoft...
... installation. After that hard drive. English After the SATA controller driver installation is completed, you add a new hard drive to a RAID array, the RAID driver will not have to be installed under Windows once for that , the driver will have to be installed.) GA-965G-DS3 Motherboard - 74 - This port of the Setup program prepares Microsoft...

Manual
Page 75
... Audio allows users to change the center/ subwoofer speaker out jack to fucntion as shown in and out) simultaneously. STEP 1 : After installation of the audio driver, you should find the icon in high quality digital-to-analog converters (DACs) that if you wish to connect a microphone, you can change the function...
... Audio allows users to change the center/ subwoofer speaker out jack to fucntion as shown in and out) simultaneously. STEP 1 : After installation of the audio driver, you should find the icon in high quality digital-to-analog converters (DACs) that if you wish to connect a microphone, you can change the function...

Manual
Page 76
..., click 2CH Speaker. Doubleclick the icon to open the Audio Control Panel. Choose Headphone or Line Out depending on the device connected and click OK. GA-965G-DS3 Motherboard - 76 - English STEP 2: In the Audio Control Panel, click the Audio I /O tab. STEP 2: In the Audio Control Panel, click the Audio I /O tab. In ... jack, a small window will pop up and ask you what type of equipment is completed. 4 Channel Audio Setup STEP 1 : After installation of the audio driver, you should find an Audio Manager icon in your system tray (you can also find the icon in Control Panel).
..., click 2CH Speaker. Doubleclick the icon to open the Audio Control Panel. Choose Headphone or Line Out depending on the device connected and click OK. GA-965G-DS3 Motherboard - 76 - English STEP 2: In the Audio Control Panel, click the Audio I /O tab. STEP 2: In the Audio Control Panel, click the Audio I /O tab. In ... jack, a small window will pop up and ask you what type of equipment is completed. 4 Channel Audio Setup STEP 1 : After installation of the audio driver, you should find an Audio Manager icon in your system tray (you can also find the icon in Control Panel).

Manual
Page 77
... (Line Out) and Rear Speaker Out) and then click OK. The 4-channel audio setup is completed. 6 Channel Audio Setup STEP 1 : After installation of the audio driver, you should find the icon in Control Panel). Doubleclick the icon to open the Audio Control Panel. STEP 2: In the Audio Control Panel, click the...
... (Line Out) and Rear Speaker Out) and then click OK. The 4-channel audio setup is completed. 6 Channel Audio Setup STEP 1 : After installation of the audio driver, you should find the icon in Control Panel). Doubleclick the icon to open the Audio Control Panel. STEP 2: In the Audio Control Panel, click the...


