
Manual
Page 6
You should see a screen similar to Figure 6 below after pressing 1 from the Main Menu. ¤¤ Auto Configuration Menu: You can use the ARROW keys or SPACEBAR to cycle through RAID mode options under the Setup Array Type ...) - 6 - The supported RAID modes include RAID0, RAID1, ¤å RAID0+1, JBOD, and Normal (standard ATA mode). After selecting the RAID mode, press CTRL+Y to the Main Menu. The folllowing is the simplest and fastest way to create your selection. And press any key to return to save the settings. Ác Auto...
You should see a screen similar to Figure 6 below after pressing 1 from the Main Menu. ¤¤ Auto Configuration Menu: You can use the ARROW keys or SPACEBAR to cycle through RAID mode options under the Setup Array Type ...) - 6 - The supported RAID modes include RAID0, RAID1, ¤å RAID0+1, JBOD, and Normal (standard ATA mode). After selecting the RAID mode, press CTRL+Y to the Main Menu. The folllowing is the simplest and fastest way to create your selection. And press any key to return to save the settings. Ác Auto...
Manual
Page 7
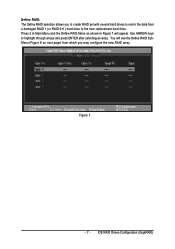
Figure 7 - 7 - Define RAID: The Define RAID selection allows you may configure the new RAID array. Press 2 in Main Menu and the Define RAID Menu as shown in Figure 7 will see the Define RAID SubMenu (Figure 8 on next page) from which you to create RAID set with several hard drives to mirror the data from a damaged RAID 1 (or RAID 0+1) hard drive to highlight through arrays and press ENTER after selecting an array. You will appear. Use ARROW keys to the new replacement hard drive. IDE RAID Drives Configuration (GigaRAID)
Figure 7 - 7 - Define RAID: The Define RAID selection allows you may configure the new RAID array. Press 2 in Main Menu and the Define RAID Menu as shown in Figure 7 will see the Define RAID SubMenu (Figure 8 on next page) from which you to create RAID set with several hard drives to mirror the data from a damaged RAID 1 (or RAID 0+1) hard drive to highlight through arrays and press ENTER after selecting an array. You will appear. Use ARROW keys to the new replacement hard drive. IDE RAID Drives Configuration (GigaRAID)
Manual
Page 10
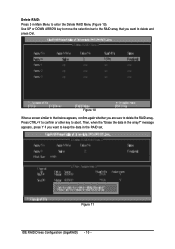
message appears, press Y if you want to delete and ¤¤ press Del. ¤å Figure 10 When a screen similar to that you are sure to delete the RAID array. Then, when the "Erase the data in the RAID set, Figure 11 IDE RAID Drives Configuration (GigaRAID) - 10 - Ác Delete RAID: Press 3 in Main Menu to enter the Delete RAID Menu (Figure 10). Åé Use UP or DOWN ARROW key to move the selection bar to the RAID array that below appears, confirm again whether you want to keep the data in the array?" Press CTRL+Y to confirm or other key to abort.
message appears, press Y if you want to delete and ¤¤ press Del. ¤å Figure 10 When a screen similar to that you are sure to delete the RAID array. Then, when the "Erase the data in the RAID set, Figure 11 IDE RAID Drives Configuration (GigaRAID) - 10 - Ác Delete RAID: Press 3 in Main Menu to enter the Delete RAID Menu (Figure 10). Åé Use UP or DOWN ARROW key to move the selection bar to the RAID array that below appears, confirm again whether you want to keep the data in the array?" Press CTRL+Y to confirm or other key to abort.
Manual
Page 11
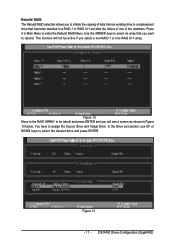
... to a replacement drive that you want to rebuild. This function will not be rebuilt and press ENTER and you will see a screen as shown in Main Menu to enter the Rebuild RAID Menu. You have to select the desired drive and press ENTER. Figure 13 - 11 - Press 4 in Figure 13 below...
... to a replacement drive that you want to rebuild. This function will not be rebuilt and press ENTER and you will see a screen as shown in Main Menu to enter the Rebuild RAID Menu. You have to select the desired drive and press ENTER. Figure 13 - 11 - Press 4 in Figure 13 below...
Manual
Page 13
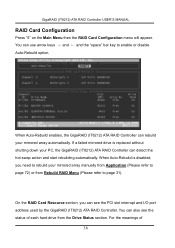
... - When Auto-Rebuild is enabled, the GigaRAID ATA RAID Controller can detect the hot-swap action and start rebuilding automatically. RAID Card Configuration: Press 5 in Main Menu to page 11). The RAID Card Resource section: This section displays PCI slot interrupt and I/O port address used by the GigaRAID ATA RAID Controller...
... - When Auto-Rebuild is enabled, the GigaRAID ATA RAID Controller can detect the hot-swap action and start rebuilding automatically. RAID Card Configuration: Press 5 in Main Menu to page 11). The RAID Card Resource section: This section displays PCI slot interrupt and I/O port address used by the GigaRAID ATA RAID Controller...
Manual
Page 4
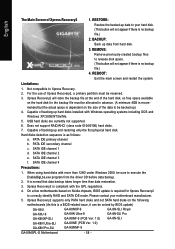
... install it . GigaRAID (IT8212) ATA RAID Controller USER'S MANUAL Introduction This manual is your problems and then you can get satisfactory results. 4 If it is mainly to help users setup the GigaRAID (IT8212) ATA RAID Controller and solve problems when they use the GigaRAID (IT8212) ATA RAID Controller and you are...
... install it . GigaRAID (IT8212) ATA RAID Controller USER'S MANUAL Introduction This manual is your problems and then you can get satisfactory results. 4 If it is mainly to help users setup the GigaRAID (IT8212) ATA RAID Controller and solve problems when they use the GigaRAID (IT8212) ATA RAID Controller and you are...

Manual
Page 10
The screen below will be shown. 10 GigaRAID (IT8212) ATA RAID Controller USER'S MANUAL Please press "Ctrl-G" keys to enter the BIOS utility Main Menu.
The screen below will be shown. 10 GigaRAID (IT8212) ATA RAID Controller USER'S MANUAL Please press "Ctrl-G" keys to enter the BIOS utility Main Menu.
Manual
Page 14
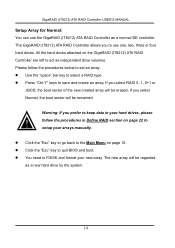
... you select Normal, the boot sector will be erased. All the hard drives attached on the GigaRAID (IT8212) ATA RAID Controller are left to the Main Menu on page 22 to FDISK and format your arrays manually. Click the "Esc" key to go back to act as a new hard drive by...
... you select Normal, the boot sector will be erased. All the hard drives attached on the GigaRAID (IT8212) ATA RAID Controller are left to the Main Menu on page 22 to FDISK and format your arrays manually. Click the "Esc" key to go back to act as a new hard drive by...
Manual
Page 16
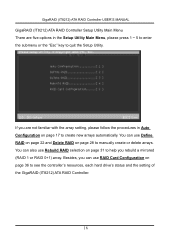
... RAID Controller. 16 GigaRAID (IT8212) ATA RAID Controller USER'S MANUAL GigaRAID (IT8212) ATA RAID Controller Setup Utility Main Menu There are not familiar with the array setting, please follow the procedures in the Setup Utility Main Menu, please press 1 ~ 5 to enter the submenu or the "Esc" key to quit the Setup Utility...
... RAID Controller. 16 GigaRAID (IT8212) ATA RAID Controller USER'S MANUAL GigaRAID (IT8212) ATA RAID Controller Setup Utility Main Menu There are not familiar with the array setting, please follow the procedures in the Setup Utility Main Menu, please press 1 ~ 5 to enter the submenu or the "Esc" key to quit the Setup Utility...

Manual
Page 17
After selecting your option, you can use arrow keys → and ← and the "space" bar key to change your option. GigaRAID (IT8212) ATA RAID Controller USER'S MANUAL Auto Configuration Click "1" on the Main Menu to the Main Menu on page 10. 17 You can press "Ctrl-Y" keys to save the setting and click the "Esc" key to leave Auto Configuration menu and go back to enter Auto Configuration.
After selecting your option, you can use arrow keys → and ← and the "space" bar key to change your option. GigaRAID (IT8212) ATA RAID Controller USER'S MANUAL Auto Configuration Click "1" on the Main Menu to the Main Menu on page 10. 17 You can press "Ctrl-Y" keys to save the setting and click the "Esc" key to leave Auto Configuration menu and go back to enter Auto Configuration.
Manual
Page 22
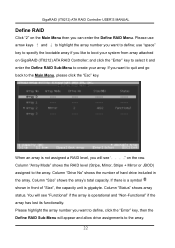
...see "Functional" if the array is a symbol shown in the array. GigaRAID (IT8212) ATA RAID Controller USER'S MANUAL Define RAID Click "2" on the Main Menu then you want to define, click the "Enter" key, then the Define RAID Sub-Menu will appear and allow drive assignments to the array.... 22 When an array is gigabyte. Column "Status" shows array status. Column "Size" shows the array's total capacity. use arrow keys ↑ and ↓ to boot your array. ...
...see "Functional" if the array is a symbol shown in the array. GigaRAID (IT8212) ATA RAID Controller USER'S MANUAL Define RAID Click "2" on the Main Menu then you want to define, click the "Enter" key, then the Define RAID Sub-Menu will appear and allow drive assignments to the array.... 22 When an array is gigabyte. Column "Status" shows array status. Column "Size" shows the array's total capacity. use arrow keys ↑ and ↓ to boot your array. ...

Manual
Page 28
GigaRAID (IT8212) ATA RAID Controller USER'S MANUAL Delete RAID Press "3" on page 22. 28 As for the detailed descriptions of "Array Mode", "Drive No", "Size" and "Status", please refer to Define RAID on the Main Menu then the Delete RAID Menu will appear. If you want to leave and go to delete your array. Please use arrow keys ↑ and ↓ to highlight the array you want to delete, press "Del" to select it and then enter the Delete RAID Sub-Menu to the Main Menu, press the "Esc" key. The "Del" key has no effect if the highlight raw is an empty array.
GigaRAID (IT8212) ATA RAID Controller USER'S MANUAL Delete RAID Press "3" on page 22. 28 As for the detailed descriptions of "Array Mode", "Drive No", "Size" and "Status", please refer to Define RAID on the Main Menu then the Delete RAID Menu will appear. If you want to leave and go to delete your array. Please use arrow keys ↑ and ↓ to highlight the array you want to delete, press "Del" to select it and then enter the Delete RAID Sub-Menu to the Main Menu, press the "Esc" key. The "Del" key has no effect if the highlight raw is an empty array.

Manual
Page 31
If you want to select is neither mirror nor stripe + mirror, the "Enter" key will appear. If the RAID Mode of the array you are at the Main Menu then the Rebuild RAID Menu will have no effect. GigaRAID (IT8212) ATA RAID Controller USER'S MANUAL Rebuild RAID Press "4" when you want to leave and go back to select an array and enter the next rebuild drive select screen. You can use ↑ and ↓ keys to highlight different arrays, press the "Enter" key to the Main Menu, press the "Esc" key. 31
If you want to select is neither mirror nor stripe + mirror, the "Enter" key will appear. If the RAID Mode of the array you are at the Main Menu then the Rebuild RAID Menu will have no effect. GigaRAID (IT8212) ATA RAID Controller USER'S MANUAL Rebuild RAID Press "4" when you want to leave and go back to select an array and enter the next rebuild drive select screen. You can use ↑ and ↓ keys to highlight different arrays, press the "Enter" key to the Main Menu, press the "Esc" key. 31
Manual
Page 36
..., the GigaRAID (IT8212) ATA RAID Controller can see the status of 36 GigaRAID (IT8212) ATA RAID Controller USER'S MANUAL RAID Card Configuration Press "5" on the Main Menu then the RAID Card Configuration menu will appear. When Auto-Rebuild enables, the GigaRAID (IT8212) ATA RAID Controller can use arrow keys → and...
..., the GigaRAID (IT8212) ATA RAID Controller can see the status of 36 GigaRAID (IT8212) ATA RAID Controller USER'S MANUAL RAID Card Configuration Press "5" on the Main Menu then the RAID Card Configuration menu will appear. When Auto-Rebuild enables, the GigaRAID (IT8212) ATA RAID Controller can use arrow keys → and...
Manual
Page 4
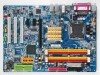
Table of Contents GA-8I945PL-G Motherboard Layout 6 Block Diagram ...7 Chapter 1 Hardware Installation 9 1-1 Considerations Prior to Installation 9 1-2 Feature Summary 10 1-3 Installation of the CPU and Heatsink 12 ... 13 1-4 Installation of Memory 14 1-5 Installation of Expansion Cards 16 1-6 I/O Back Panel Introduction 17 1-7 Connectors Introduction 18 Chapter 2 BIOS Setup 29 The Main Menu (For example: GA-8I945PL-G / BIOS Ver.: F1 30 2-1 Standard CMOS Features 32 2-2 Advanced BIOS Features 35 2-3 IntegratedPeripherals 37 2-4 Power Management Setup 40 2-5 PnP/PCI Configurations...
Table of Contents GA-8I945PL-G Motherboard Layout 6 Block Diagram ...7 Chapter 1 Hardware Installation 9 1-1 Considerations Prior to Installation 9 1-2 Feature Summary 10 1-3 Installation of the CPU and Heatsink 12 ... 13 1-4 Installation of Memory 14 1-5 Installation of Expansion Cards 16 1-6 I/O Back Panel Introduction 17 1-7 Connectors Introduction 18 Chapter 2 BIOS Setup 29 The Main Menu (For example: GA-8I945PL-G / BIOS Ver.: F1 30 2-1 Standard CMOS Features 32 2-2 Advanced BIOS Features 35 2-3 IntegratedPeripherals 37 2-4 Power Management Setup 40 2-5 PnP/PCI Configurations...

Manual
Page 19
... that all the components on the motherboard. Before connecting the power connector, please make sure that is able to the CPU. The ATX_12V power connector mainly supplies power to handle the system voltage requirements. Pin No.
... that all the components on the motherboard. Before connecting the power connector, please make sure that is able to the CPU. The ATX_12V power connector mainly supplies power to handle the system voltage requirements. Pin No.

Manual
Page 29
...backup BIOS without entering the operating system. @BIOS is displayed at the bottom of the motherboard. If you wish to upgrade to a new BIOS, either Gigabyte's Q-Flash or @BIOS utility can enter the BIOS setup screen by pressing "Ctrl + F1". To exit the Help Window press . The CMOS SETUP...download and update BIOS from BIOS default table Load the Optimized Defaults Q-Flash utility System Information Save all the CMOS changes, only for Main Menu Main Menu The on the motherboard supplies the necessary power to use and the possible selections for the first time, it with caution and ...
...backup BIOS without entering the operating system. @BIOS is displayed at the bottom of the motherboard. If you wish to upgrade to a new BIOS, either Gigabyte's Q-Flash or @BIOS utility can enter the BIOS setup screen by pressing "Ctrl + F1". To exit the Help Window press . The CMOS SETUP...download and update BIOS from BIOS default table Load the Optimized Defaults Q-Flash utility System Information Save all the CMOS changes, only for Main Menu Main Menu The on the motherboard supplies the necessary power to use and the possible selections for the first time, it with caution and ...
Manual
Page 30
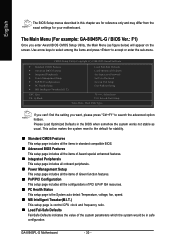
... items and press to the default for your motherboard. If you can't find the setting you enter Award BIOS CMOS Setup Utility, the Main Menu (as usual. CMOS Setup Utility-Copyright (C) 1984-2005 Award Software ` Standard CMOS Features ` Advanced BIOS Features ` Integrated Peripherals `...Without Saving ESC: Quit F8: Q-Flash KLJI: Select Item F10: Save & Exit Setup Time, Date, Hard Disk Type... GA-8I945PL-G Motherboard - 30 - The Main Menu (For example: GA-8I945PL-G / BIOS Ver.: F1) Once you want, please press "Ctrl+F1" to search the advanced option hidden. This action makes...
... items and press to the default for your motherboard. If you can't find the setting you enter Award BIOS CMOS Setup Utility, the Main Menu (as usual. CMOS Setup Utility-Copyright (C) 1984-2005 Award Software ` Standard CMOS Features ` Advanced BIOS Features ` Integrated Peripherals `...Without Saving ESC: Quit F8: Q-Flash KLJI: Select Item F10: Save & Exit Setup Time, Date, Hard Disk Type... GA-8I945PL-G Motherboard - 30 - The Main Menu (For example: GA-8I945PL-G / BIOS Ver.: F1) Once you want, please press "Ctrl+F1" to search the advanced option hidden. This action makes...
Manual
Page 58
...on the size of backing up hard disks installed with Windows operating systems including DOS and Windows XP/2000/NT/9x/Me. 5. The Main Screen of backing up and restoring only the first physical hard disk. BACKUP: Back up data to correctly identify RAID and SATA IDE...data backup. 2. Not compatible to be solved by BIOS update) GA-K8U GA-K8U-9 GA-K8NXP-SLI GA-K8N Ultra-SLI GA-K8N Pro-SLI GA-K8NXP-9 GA-K8N Ultra-9 GA-K8NF-9 (PCB Ver. 1.0) GA-K8NE (PCB Ver. 1.0) GA-K8NMF-9 GA-8N-SLI Royal GA-8N-SLI Pro GA-8N-SLI GA-8I945PL-G Motherboard - 58 - Capable of the data to Xpress Recovery...
...on the size of backing up hard disks installed with Windows operating systems including DOS and Windows XP/2000/NT/9x/Me. 5. The Main Screen of backing up and restoring only the first physical hard disk. BACKUP: Back up data to correctly identify RAID and SATA IDE...data backup. 2. Not compatible to be solved by BIOS update) GA-K8U GA-K8U-9 GA-K8NXP-SLI GA-K8N Ultra-SLI GA-K8N Pro-SLI GA-K8NXP-9 GA-K8N Ultra-9 GA-K8NF-9 (PCB Ver. 1.0) GA-K8NE (PCB Ver. 1.0) GA-K8NMF-9 GA-8N-SLI Royal GA-8N-SLI Pro GA-8N-SLI GA-8I945PL-G Motherboard - 58 - Capable of the data to Xpress Recovery...

Manual
Page 59
... the BIOS menu when they want to Part Two. In the following sections, we take GA-8KNXP Ultra as the example to avoid any claims from an older version to enter SETUP ... - Appendix Download the latest BIOS for 8KNXP Ultra Fa3 Check System Health OK , VCore = 1.5250 Main Processor : Intel Pentium(R) 4 1.6GHz (133x12) Memory Testing : 131072K OK Memory Frequency 266 MHz in... or Windows. Before You Begin: Before you how to flash BIOS from end-users. For example, from Gigabyte's website. 2. For example, 8KNXPU.Fba) to Fba. English 4-1-3 Flash BIOS Method Introduction Method 1 :...
... the BIOS menu when they want to Part Two. In the following sections, we take GA-8KNXP Ultra as the example to avoid any claims from an older version to enter SETUP ... - Appendix Download the latest BIOS for 8KNXP Ultra Fa3 Check System Health OK , VCore = 1.5250 Main Processor : Intel Pentium(R) 4 1.6GHz (133x12) Memory Testing : 131072K OK Memory Frequency 266 MHz in... or Windows. Before You Begin: Before you how to flash BIOS from end-users. For example, from Gigabyte's website. 2. For example, 8KNXPU.Fba) to Fba. English 4-1-3 Flash BIOS Method Introduction Method 1 :...