Manual
Page 1
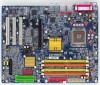
GA-8I915P Duo (Pro) Intel® Pentium® 4 LGA775 Processor Motherboard User's Manual Rev. 1303 12ME-8I915PUP-1303
GA-8I915P Duo (Pro) Intel® Pentium® 4 LGA775 Processor Motherboard User's Manual Rev. 1303 12ME-8I915PUP-1303
Manual
Page 3
... content provided with the product. „ For detailed product information and specifications, please carefully read the "Product User Manual". „ For detailed information related to Gigabyte's unique features, please go to "Technology Guide" section on Gigabyte's website to their respective companies. Copyright © 2005 GIGA-BYTE TECHNOLOGY CO., LTD. For more product details...
... content provided with the product. „ For detailed product information and specifications, please carefully read the "Product User Manual". „ For detailed information related to Gigabyte's unique features, please go to "Technology Guide" section on Gigabyte's website to their respective companies. Copyright © 2005 GIGA-BYTE TECHNOLOGY CO., LTD. For more product details...
Manual
Page 9
...) cuff when handling electronic components (CPU, RAM). 4. Damage due to be an unofficial Gigabyte product. - 9 - Damage as a result of violating the conditions recommended in the provided manual. 3. Instances of uncertified components. 5. Please turn off before unplugging the power supply connector ... a problem related to the use of the motherboard or any hardware, please first carefully read the information in the user manual. 3. Product determined to natural disaster, accident or human cause. 2. Hardware Installation When handling the motherboard, avoid touching any...
...) cuff when handling electronic components (CPU, RAM). 4. Damage due to be an unofficial Gigabyte product. - 9 - Damage as a result of violating the conditions recommended in the provided manual. 3. Instances of uncertified components. 5. Please turn off before unplugging the power supply connector ... a problem related to the use of the motherboard or any hardware, please first carefully read the information in the user manual. 3. Product determined to natural disaster, accident or human cause. 2. Hardware Installation When handling the motherboard, avoid touching any...
Manual
Page 13
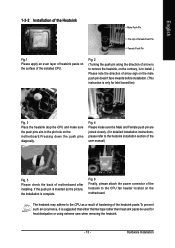
... CPU fan header located on the motherboard. Fig. 6 Finally, please attach the power connector of the heatsink to the heatsink installation section of the user manual) Fig. 5 Please check the back of the heatsink paste.To prevent such an occurrence, it is inserted as a result of hardening of motherboard after installing...
... CPU fan header located on the motherboard. Fig. 6 Finally, please attach the power connector of the heatsink to the heatsink installation section of the user manual) Fig. 5 Please check the back of the heatsink paste.To prevent such an occurrence, it is inserted as a result of hardening of motherboard after installing...
Manual
Page 32
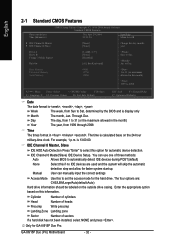
... Press "Enter" to automatically detect IDE devices during POST(default) None Select this option for faster system start up. You can manually input the correct settings Access Mode Use this information. Enter the appropriate option based on the 24-hour military-time clock. Day The... Extended Memory Total Memory 640K 127M 128M 1 to Sat, determined by the BIOS and is display only Month The month, Jan. For example, 1 p.m. GA-8I915P Duo (Pro) Motherboard - 32 - The time is calculated base on this to 2098 KLJI: Move Enter: Select +/-/PU/PD: Value F10: Save F3: ...
... Press "Enter" to automatically detect IDE devices during POST(default) None Select this option for faster system start up. You can manually input the correct settings Access Mode Use this information. Enter the appropriate option based on the 24-hour military-time clock. Day The... Extended Memory Total Memory 640K 127M 128M 1 to Sat, determined by the BIOS and is display only Month The month, Jan. For example, 1 p.m. GA-8I915P Duo (Pro) Motherboard - 32 - The time is calculated base on this to 2098 KLJI: Move Enter: Select +/-/PU/PD: Value F10: Save F3: ...
Manual
Page 76
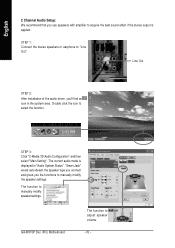
The function to "Line Out". Line Out STEP 2: After installation of the audio driver, you the functions to manually modify the speaker settings. STEP 1: Connect the stereo speakers or earphone to manually modify speaker settings. "Smart Jack" would auto-detect the speaker type you connect and gives you 'll find an icon in... Setup: We recommend that you use speakers with amplifier to acquire the best sound effect if the stereo output is displayed in the system area. GA-8I915P Duo (Pro) Motherboard The function to select the function.
The function to "Line Out". Line Out STEP 2: After installation of the audio driver, you the functions to manually modify the speaker settings. STEP 1: Connect the stereo speakers or earphone to manually modify speaker settings. "Smart Jack" would auto-detect the speaker type you connect and gives you 'll find an icon in... Setup: We recommend that you use speakers with amplifier to acquire the best sound effect if the stereo output is displayed in the system area. GA-8I915P Duo (Pro) Motherboard The function to select the function.
Manual
Page 77
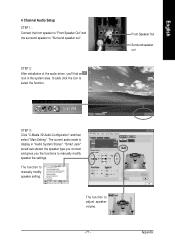
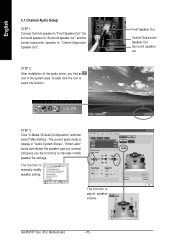
.... English 4 Channel Audio Setup STEP 1 : Connect the front speaker to "Front Speaker Out" and the surround speaker to manually modify speaker setting. STEP 2: After installation of the audio driver, you the functions to manually modify speaker the settings. Front Speaker Out Surround speaker out STEP 3: Click "C-Media 3D Audio Configuration" and then...
.... English 4 Channel Audio Setup STEP 1 : Connect the front speaker to "Front Speaker Out" and the surround speaker to manually modify speaker setting. STEP 2: After installation of the audio driver, you the functions to manually modify speaker the settings. Front Speaker Out Surround speaker out STEP 3: Click "C-Media 3D Audio Configuration" and then...
Manual
Page 78
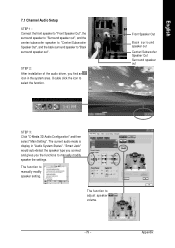
...system area. GA-8I915P Duo (Pro) Motherboard - 78 - Front Speaker Out Center/Subwoofer Speaker Out Surround speaker out STEP 3: Click "C-Media 3D Audio Configuration" and then select "Main Setting". STEP 2: After installation of the audio driver, you the functions to manually modify speaker the... settings. The function to "Center/Subwoofer Speaker Out". Double click the icon to manually modify speaker setting. The function to select the function. "Smart Jack" would...
...system area. GA-8I915P Duo (Pro) Motherboard - 78 - Front Speaker Out Center/Subwoofer Speaker Out Surround speaker out STEP 3: Click "C-Media 3D Audio Configuration" and then select "Main Setting". STEP 2: After installation of the audio driver, you the functions to manually modify speaker the... settings. The function to "Center/Subwoofer Speaker Out". Double click the icon to manually modify speaker setting. The function to select the function. "Smart Jack" would...
Manual
Page 79
Appendix The function to adjust speaker volume. - 79 - The function to manually modify speaker setting. Front Speaker Out Back surround speaker out Center/Subwoofer Speaker Out Surround speaker out STEP 3: Click "C-Media 3D Audio Configuration" and then ... to "Center/Subwoofer Speaker Out", and the back surround speaker to select the function. STEP 2: After installation of the audio driver, you the functions to manually modify speaker the settings. The current audio mode is display in the system area. Double click the icon to "Back surround speaker out".
Appendix The function to adjust speaker volume. - 79 - The function to manually modify speaker setting. Front Speaker Out Back surround speaker out Center/Subwoofer Speaker Out Surround speaker out STEP 3: Click "C-Media 3D Audio Configuration" and then ... to "Center/Subwoofer Speaker Out", and the back surround speaker to select the function. STEP 2: After installation of the audio driver, you the functions to manually modify speaker the settings. The current audio mode is display in the system area. Double click the icon to "Back surround speaker out".

Manual
Page 81
... to load Fail-Safe Defaults (Or Load BIOS Defaults) after turning up the speaker to the maximum volume? If not, please change any setting manually to disable the onboard VGA. - 81 - English 4-2 Troubleshooting Below is a collection of general asked questions based on a specific motherboard model,...BIOS and load Fail-Safe Defaults. 7. Question 5: Why do I disable onboard VGA card in the battery holder to solve the problem. Answer: Gigabyte motherboards will be able to add an external VGA card? Press Del to the battery holder. 5. However, if the system instability still remains,...
... to load Fail-Safe Defaults (Or Load BIOS Defaults) after turning up the speaker to the maximum volume? If not, please change any setting manually to disable the onboard VGA. - 81 - English 4-2 Troubleshooting Below is a collection of general asked questions based on a specific motherboard model,...BIOS and load Fail-Safe Defaults. 7. Question 5: Why do I disable onboard VGA card in the battery holder to solve the problem. Answer: Gigabyte motherboards will be able to add an external VGA card? Press Del to the battery holder. 5. However, if the system instability still remains,...

Manual
Page 82
... or display card error 1 long 3 short: Keyboard error 1 long 9 short: BIOS ROM error Continuous long beeps: DRAM error Continuous short beeps: Power error GA-8I915P Duo (Pro) Motherboard - 82 - Answer: Please refer to it from this pin and do these codes are only for ? Question 8: Sometimes I use the IDE... If the cable is not provided with the motherboard package to case. What do not connect any of your own cables to the user manual and check whether you identify the possible computer problems. However, they are always fatal. 1 beep Refresh failure 2 beeps Parity error 3...
... or display card error 1 long 3 short: Keyboard error 1 long 9 short: BIOS ROM error Continuous long beeps: DRAM error Continuous short beeps: Power error GA-8I915P Duo (Pro) Motherboard - 82 - Answer: Please refer to it from this pin and do these codes are only for ? Question 8: Sometimes I use the IDE... If the cable is not provided with the motherboard package to case. What do not connect any of your own cables to the user manual and check whether you identify the possible computer problems. However, they are always fatal. 1 beep Refresh failure 2 beeps Parity error 3...

Manual
Page 12
... Windows 2000/XP Setup disk and press F6 as soon as you see the next screen for which says "Press F6 if you need to manually specify an adapter. Then you to select the IDE RAID controller on your motherboard. Windows Setup Setup could not determine the type of some files...
... Windows 2000/XP Setup disk and press F6 as soon as you see the next screen for which says "Press F6 if you need to manually specify an adapter. Then you to select the IDE RAID controller on your motherboard. Windows Setup Setup could not determine the type of some files...


