Manual
Page 6
Chapter 3 Drivers Installation 49 3-1 Install Chipset Drivers 49 3-2 SoftwareApplications 50 3-3 Driver CD Information 50 3-4 Hardware Information 51 3-5 Contact Us ...51 Chapter 4 Appendix 53 4-1 Unique Software Utilities 53 4-1-1 EasyTune 5 Introduction 54 4-1-2 Xpress Recovery2 Introduction 55 4-1-3 Flash BIOS Method Introduction 57 4-1-4 2 / 4 / 6 Channel Audio Function Introduction 66 4-2 Troubleshooting 72 - 6 -
Chapter 3 Drivers Installation 49 3-1 Install Chipset Drivers 49 3-2 SoftwareApplications 50 3-3 Driver CD Information 50 3-4 Hardware Information 51 3-5 Contact Us ...51 Chapter 4 Appendix 53 4-1 Unique Software Utilities 53 4-1-1 EasyTune 5 Introduction 54 4-1-2 Xpress Recovery2 Introduction 55 4-1-3 Flash BIOS Method Introduction 57 4-1-4 2 / 4 / 6 Channel Audio Function Introduction 66 4-2 Troubleshooting 72 - 6 -
Manual
Page 18
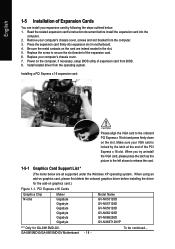
...supported under the Windows XP operating system. PCI Express x16 Cards Graphics Chip Nvidia Maker Gigabyte Gigabyte Gigabyte Gigabyte Gigabyte Gigabyte Model Name GV-NX53128D GV-NX57128D GV-NX59128D GV-NX62128D GV-NX66256D GV-NX66T128VP "*" Only for the add-on the computer, if necessary, setup BIOS utility...by the latch at the end of Expansion Cards You can install your computer's chassis cover. 7. Install related driver from the computer. 3. GA-8I915MD-G/GA-8I915MD-GV Motherboard - 18 - Press the expansion card firmly into the computer. 2. Replace the screw to release the ...
...supported under the Windows XP operating system. PCI Express x16 Cards Graphics Chip Nvidia Maker Gigabyte Gigabyte Gigabyte Gigabyte Gigabyte Gigabyte Model Name GV-NX53128D GV-NX57128D GV-NX59128D GV-NX62128D GV-NX66256D GV-NX66T128VP "*" Only for the add-on the computer, if necessary, setup BIOS utility...by the latch at the end of Expansion Cards You can install your computer's chassis cover. 7. Install related driver from the computer. 3. GA-8I915MD-G/GA-8I915MD-GV Motherboard - 18 - Press the expansion card firmly into the computer. 2. Replace the screw to release the ...
Manual
Page 20
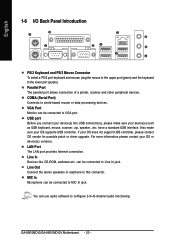
... and other peripheral devices. Also make sure your OS does not support USB controller, please contact OS vendor for possible patch or driver upgrade. have a standard USB interface. You can be connected to Line In jack. For more information please contact your OS supports...CD-ROM, walkman etc. USB port Before you connect your device(s) into USB connector(s), please make sure your OS or device(s) vendors. GA-8I915MD-G/GA-8I915MD-GV Motherboard - 20 - VGA Port Monitor can use audio software to the lower port (purple). COMA (Serial Port) Connects to this connector...
... and other peripheral devices. Also make sure your OS does not support USB controller, please contact OS vendor for possible patch or driver upgrade. have a standard USB interface. You can be connected to Line In jack. For more information please contact your OS supports...CD-ROM, walkman etc. USB port Before you connect your device(s) into USB connector(s), please make sure your OS or device(s) vendors. GA-8I915MD-G/GA-8I915MD-GV Motherboard - 20 - VGA Port Monitor can use audio software to the lower port (purple). COMA (Serial Port) Connects to this connector...
Manual
Page 24
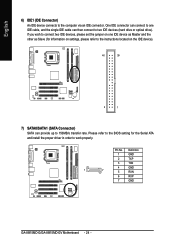
... to 150MB/s transfer rate. Definition 1 GND 2 TXP 3 TXN 4 GND 1 7 5 RXN 6 RXP 7 GND GA-8I915MD-G/GA-8I915MD-GV Motherboard - 24 - One IDE connector can connect to one IDE device as Master and the other as Slave (for the Serial ATA and install the proper driver in order to the computer via an IDE connector. English 6) IDE1 (IDE...
... to 150MB/s transfer rate. Definition 1 GND 2 TXP 3 TXN 4 GND 1 7 5 RXN 6 RXP 7 GND GA-8I915MD-G/GA-8I915MD-GV Motherboard - 24 - One IDE connector can connect to one IDE device as Master and the other as Slave (for the Serial ATA and install the proper driver in order to the computer via an IDE connector. English 6) IDE1 (IDE...
Manual
Page 49
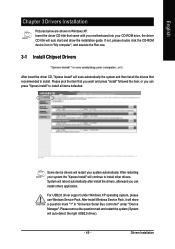
...your system automatically. Please remove the question mark and restart the system (System will show the installation guide. Some device drivers will restart your system the "Xpress Install" will auto start and show a question mark "?" After install Windows Service...Pack, it will auto-detect the right USB2.0 driver). - 49 - Insert the driver CD-title that recommended to install other drivers. For USB2.0 driver support under "Device Manager". in Windows XP. Drivers Installation English Chapter 3 Drivers Installation Pictures below are shown in "Universal Serial Bus...
...your system automatically. Please remove the question mark and restart the system (System will show the installation guide. Some device drivers will restart your system the "Xpress Install" will auto start and show a question mark "?" After install Windows Service...Pack, it will auto-detect the right USB2.0 driver). - 49 - Insert the driver CD-title that recommended to install other drivers. For USB2.0 driver support under "Device Manager". in Windows XP. Drivers Installation English Chapter 3 Drivers Installation Pictures below are shown in "Universal Serial Bus...
Manual
Page 50
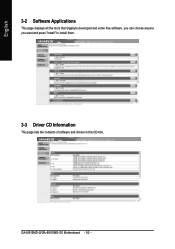
GA-8I915MD-G/GA-8I915MD-GV Motherboard - 50 - English 3-2 Software Applications This page displays all the tools that Gigabyte developed and some free software, you can choose anyone you want and press "install" to install them. 3-3 Driver CD Information This page lists the contents of software and drivers in this CD-title.
GA-8I915MD-G/GA-8I915MD-GV Motherboard - 50 - English 3-2 Software Applications This page displays all the tools that Gigabyte developed and some free software, you can choose anyone you want and press "install" to install them. 3-3 Driver CD Information This page lists the contents of software and drivers in this CD-title.
Manual
Page 51
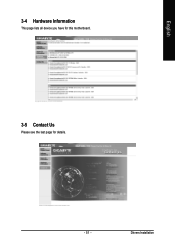
English 3-4 Hardware Information This page lists all device you have for this motherboard. 3-5 Contact Us Please see the last page for details. - 51 - Drivers Installation
English 3-4 Hardware Information This page lists all device you have for this motherboard. 3-5 Contact Us Please see the last page for details. - 51 - Drivers Installation

Manual
Page 53
...up errors resulting from a recommended memory module list. Appendix English Chapter 4 Appendix 4-1 Unique Software Utilities (Not all new drivers with the option for download. These characteristics make it the ideal companion with relative speed and ease. Designed to be ... Center allows users to the CPU for their BIOS as well as CPU, memory, graphics card, etc. C.I.A.2 (CPU Intelligent Accelerator 2) GIGABYTE CPU Intelligent Accelerator 2(C.I .T. C.O.M. (Corporate Online Management) A web-based system management tool that eliminates system boot-up the PC chassis and...
...up errors resulting from a recommended memory module list. Appendix English Chapter 4 Appendix 4-1 Unique Software Utilities (Not all new drivers with the option for download. These characteristics make it the ideal companion with relative speed and ease. Designed to be ... Center allows users to the CPU for their BIOS as well as CPU, memory, graphics card, etc. C.I.A.2 (CPU Intelligent Accelerator 2) GIGABYTE CPU Intelligent Accelerator 2(C.I .T. C.O.M. (Corporate Online Management) A web-based system management tool that eliminates system boot-up the PC chassis and...
Manual
Page 55
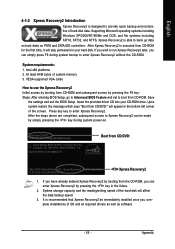
If you wish to run Xpress Recovery2 later, you can enter Xpress Recovery2 by booting from CD-ROM for 8I915MD-G F4 . . . . :BIOS Setup/Q-Flash, : Xpress Recovery2, For Boot Menu 11/07/2005-I915-6A79HG0GC-00 Xpress Recovery2 1. Press any key to startup ...An Energy Star Ally Copyright (C) 1984-2005, Award Software, Inc. Boot from CD/DVD: Press any key to enter Xpress Recovery2. Insert the provided driver CD into your hard disk. System requirements: 1. Save the settings and exit the BIOS Setup. English 4-1-2 Xpress Recovery2 Introduction Xpress Recovery2 is able to...
If you wish to run Xpress Recovery2 later, you can enter Xpress Recovery2 by booting from CD-ROM for 8I915MD-G F4 . . . . :BIOS Setup/Q-Flash, : Xpress Recovery2, For Boot Menu 11/07/2005-I915-6A79HG0GC-00 Xpress Recovery2 1. Press any key to startup ...An Energy Star Ally Copyright (C) 1984-2005, Award Software, Inc. Boot from CD/DVD: Press any key to enter Xpress Recovery2. Insert the provided driver CD into your hard disk. System requirements: 1. Save the settings and exit the BIOS Setup. English 4-1-2 Xpress Recovery2 Introduction Xpress Recovery2 is able to...
Manual
Page 56
... the driver CD before data backup. 2. PATA IDE secondary channel c . Xpress Recovery2 is no backup file.) 4. Hard disks detection sequence is required for the backup file must be solved by BIOS update) GA-K8NXP-9 GA-8N-SLI Royal GA-K8N Ultra-9 GA-8N-SLI Pro GA-K8NF-9 (PCB Ver. 1.0) GA-8N-SLI GA-K8NE (PCB Ver. 1.0) GA-K8NMF-9 GA-8I915MD-G/GA-8I915MD-GV Motherboard...
... the driver CD before data backup. 2. PATA IDE secondary channel c . Xpress Recovery2 is no backup file.) 4. Hard disks detection sequence is required for the backup file must be solved by BIOS update) GA-K8NXP-9 GA-8N-SLI Royal GA-K8N Ultra-9 GA-8N-SLI Pro GA-K8NF-9 (PCB Ver. 1.0) GA-8N-SLI GA-K8NE (PCB Ver. 1.0) GA-K8NMF-9 GA-8I915MD-G/GA-8I915MD-GV Motherboard...

Manual
Page 66
Line Out STEP 2: After installing the audio driver, you use speakers with amplifier to get the best sound effect if the stereo output is applied. STEP 1: Connect the stereo speakers or earphone to ... hand taskbar. STEP 3: On the AC97 Audio Configuration menu, click the Speaker Configuration tab and select the 2-channel mode for stereo speaker output check box. GA-8I915MD-G/GA-8I915MD-GV Motherboard - 66 - Click the icon to "Line Out."
Line Out STEP 2: After installing the audio driver, you use speakers with amplifier to get the best sound effect if the stereo output is applied. STEP 1: Connect the stereo speakers or earphone to ... hand taskbar. STEP 3: On the AC97 Audio Configuration menu, click the Speaker Configuration tab and select the 2-channel mode for stereo speaker output check box. GA-8I915MD-G/GA-8I915MD-GV Motherboard - 66 - Click the icon to "Line Out."

Manual
Page 67
... for 4-channel output. - 67 - When the Environment setting is None, the sound would be performed as stereo mode (2-channel output). STEP 2: After installing the audio driver, you'll find a Sound Effect icon on the lower right hand taskbar. Clear the Only SURROUND-KIT check box and press OK. Please select other...
... for 4-channel output. - 67 - When the Environment setting is None, the sound would be performed as stereo mode (2-channel output). STEP 2: After installing the audio driver, you'll find a Sound Effect icon on the lower right hand taskbar. Clear the Only SURROUND-KIT check box and press OK. Please select other...
Manual
Page 68
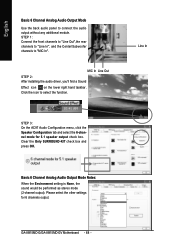
.... Basic 6 Channel Analog Audio Output Mode Notes: When the Environment setting is None, the sound would be performed as stereo mode (2-channel output). Line In GA-8I915MD-G/GA-8I915MD-GV Motherboard - 68 - Click the icon to connect the audio output without any additional module. STEP 1: Connect the front channels to "Line Out",the rear channels... settings for 5.1 speaker output check box. Clear the Only SURROUND-KIT check box and press OK. MIC In Line Out STEP 2: After installing the audio driver, you'll find a Sound Effect icon on the lower right hand taskbar.
.... Basic 6 Channel Analog Audio Output Mode Notes: When the Environment setting is None, the sound would be performed as stereo mode (2-channel output). Line In GA-8I915MD-G/GA-8I915MD-GV Motherboard - 68 - Click the icon to connect the audio output without any additional module. STEP 1: Connect the front channels to "Line Out",the rear channels... settings for 5.1 speaker output check box. Clear the Only SURROUND-KIT check box and press OK. MIC In Line Out STEP 2: After installing the audio driver, you'll find a Sound Effect icon on the lower right hand taskbar.

Manual
Page 70
... Speaker Configuration tab and select the 6-channel mode for 6 channels output. Please select the other settings for 5.1 speaker output check box. GA-8I915MD-G/GA-8I915MD-GV Motherboard - 70 - STEP 4: After installing the audio driver, you'll find a Sound Effect icon on the lower right hand taskbar. Select the Only SURROUND-KIT check box and press OK...
... Speaker Configuration tab and select the 6-channel mode for 6 channels output. Please select the other settings for 5.1 speaker output check box. GA-8I915MD-G/GA-8I915MD-GV Motherboard - 70 - STEP 4: After installing the audio driver, you'll find a Sound Effect icon on the lower right hand taskbar. Select the Only SURROUND-KIT check box and press OK...


