Manual
Page 16
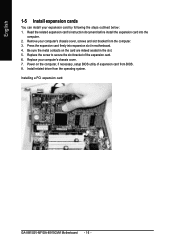
Remove your computer's chassis cover, screws and slot bracket from the operating system. Installing a PCI expansion card: GA-8I915GV-MF/GA-8I915GVM Motherboard - 16 - Read the related expansion card's instruction document before install the expansion card into expansion slot in the ...computer, if necessary, setup BIOS utility of the expansion card. 6. Replace your expansion card by following the steps outlined below: 1. Install related driver from the computer. 3. Press the expansion card firmly into the computer. 2. Replace the screw to secure the slot bracket of expansion card from...
Remove your computer's chassis cover, screws and slot bracket from the operating system. Installing a PCI expansion card: GA-8I915GV-MF/GA-8I915GVM Motherboard - 16 - Read the related expansion card's instruction document before install the expansion card into expansion slot in the ...computer, if necessary, setup BIOS utility of the expansion card. 6. Replace your expansion card by following the steps outlined below: 1. Install related driver from the computer. 3. Press the expansion card firmly into the computer. 2. Replace the screw to secure the slot bracket of expansion card from...
Manual
Page 17
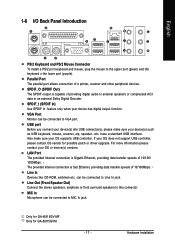
...USB keyboard, mouse, scanner, zip, speaker...etc. LAN Port The provided Internet connection is capable of 10/100/ 1000Mbps. Only for GA-8I915GV-MF. MIC In Microphone can be connected to VGA port. Parallel Port The parallel port allows connection of 10/100Mbps. USB port Before you... your device(s) into USB connector(s), please make sure your OS does not support USB controller, please contact OS vendor for possible patch or driver upgrade. English 1-6 I/O Back Panel Introduction PS/2 Keyboard and PS/2 Mouse Connector To install a PS/2 port keyboard and mouse, plug the...
...USB keyboard, mouse, scanner, zip, speaker...etc. LAN Port The provided Internet connection is capable of 10/100/ 1000Mbps. Only for GA-8I915GV-MF. MIC In Microphone can be connected to VGA port. Parallel Port The parallel port allows connection of 10/100Mbps. USB port Before you... your device(s) into USB connector(s), please make sure your OS does not support USB controller, please contact OS vendor for possible patch or driver upgrade. English 1-6 I/O Back Panel Introduction PS/2 Keyboard and PS/2 Mouse Connector To install a PS/2 port keyboard and mouse, plug the...
Manual
Page 48
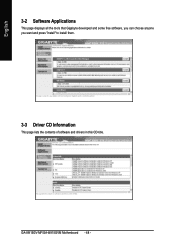
GA-8I915GV-MF/GA-8I915GVM Motherboard - 48 - English 3-2 Software Applications This page displays all the tools that Gigabyte developed and some free software, you can choose anyone you want and press "install" to install them. 3-3 Driver CD Information This page lists the contents of software and drivers in this CD-title.
GA-8I915GV-MF/GA-8I915GVM Motherboard - 48 - English 3-2 Software Applications This page displays all the tools that Gigabyte developed and some free software, you can choose anyone you want and press "install" to install them. 3-3 Driver CD Information This page lists the contents of software and drivers in this CD-title.
Manual
Page 54
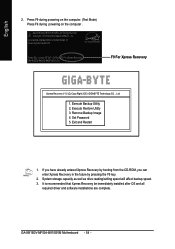
...6A69YG01C-00 F9 For Xpress Recovery Xpress Recovery V1.0 (C) Copy Right 2003. GIGABYTE Technology CO. , Ltd. 1. Execute Backup Utility 2. Set Password 5. Press F9 during powering on the computer. (Text Mode) Press F9 during powering on the computer . Exit and Restart 1. GA-8I915GV-MF/GA-8I915GVM Motherboard - 54 - Intel 865PE AGPSet BIOS for 8IPE1000MT F1 Check..., An Energy Star Ally Copyright (C) 1984-2004, Award Software, Inc. It is recommended that Xpress Recovery be immediately installed after OS and all required driver and software installations are complete.
...6A69YG01C-00 F9 For Xpress Recovery Xpress Recovery V1.0 (C) Copy Right 2003. GIGABYTE Technology CO. , Ltd. 1. Execute Backup Utility 2. Set Password 5. Press F9 during powering on the computer. (Text Mode) Press F9 during powering on the computer . Exit and Restart 1. GA-8I915GV-MF/GA-8I915GVM Motherboard - 54 - Intel 865PE AGPSet BIOS for 8IPE1000MT F1 Check..., An Energy Star Ally Copyright (C) 1984-2004, Award Software, Inc. It is recommended that Xpress Recovery be immediately installed after OS and all required driver and software installations are complete.
Manual
Page 66
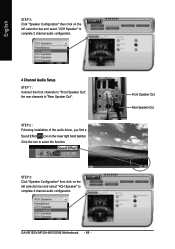
... driver, you find a Sound Effect icon on the lower right hand taskbar. STEP 3: Click "Speaker Configuration" then click on the left selection bar and select "2CH Speaker" to complete 2 channel audio configuration. 4 Channel Audio Setup STEP 1 : Connect the front channels to "Front Speaker Out", the rear channels to "Rear Speaker Out". GA-8I915GV-MF/GA...
... driver, you find a Sound Effect icon on the lower right hand taskbar. STEP 3: Click "Speaker Configuration" then click on the left selection bar and select "2CH Speaker" to complete 2 channel audio configuration. 4 Channel Audio Setup STEP 1 : Connect the front channels to "Front Speaker Out", the rear channels to "Rear Speaker Out". GA-8I915GV-MF/GA...
Manual
Page 68
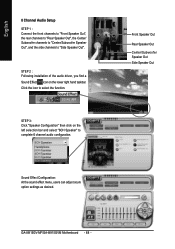
Click the icon to "Side Speaker Out". Front Speaker Out Rear Speaker Out Center/Subwoofer Speaker Out Side Speaker Out GA-8I915GV-MF/GA-8I915GVM Motherboard - 68 - English 8 Channel Audio Setup STEP 1 : Connect the front channels to "Front Speaker Out", the rear channels to "Rear Speaker Out", ... option settings as desired. STEP 3: Click "Speaker Configuration" then click on the lower right hand taskbar. STEP 2 : Following installation of the audio driver, you find a Sound Effect icon on the left selection bar and select "6CH Speaker" to complete 6 channel audio configuration.
Click the icon to "Side Speaker Out". Front Speaker Out Rear Speaker Out Center/Subwoofer Speaker Out Side Speaker Out GA-8I915GV-MF/GA-8I915GVM Motherboard - 68 - English 8 Channel Audio Setup STEP 1 : Connect the front channels to "Front Speaker Out", the rear channels to "Rear Speaker Out", ... option settings as desired. STEP 3: Click "Speaker Configuration" then click on the lower right hand taskbar. STEP 2 : Following installation of the audio driver, you find a Sound Effect icon on the left selection bar and select "6CH Speaker" to complete 6 channel audio configuration.


