
Manual
Page 5
Channel Audio Function Introduction 64 4-2 Troubleshooting 69 - 5 - Chapter 3 Install Drivers 47 3-1 Install Chipset Drivers 47 3-2 SoftwareApplications 48 3-3 Driver CD Information 48 3-4 Hardware Information 49 3-5 Contact Us ...49 Chapter 4 Appendix 51 4-1 Unique Software Utilities 51 4-1-1 Xpress Recovery Introduction 52 4-1-2 Flash BIOS Method Introduction 55 4-1-3 2- / 4- / 6- / 8-
Channel Audio Function Introduction 64 4-2 Troubleshooting 69 - 5 - Chapter 3 Install Drivers 47 3-1 Install Chipset Drivers 47 3-2 SoftwareApplications 48 3-3 Driver CD Information 48 3-4 Hardware Information 49 3-5 Contact Us ...49 Chapter 4 Appendix 51 4-1 Unique Software Utilities 51 4-1-1 Xpress Recovery Introduction 52 4-1-2 Flash BIOS Method Introduction 55 4-1-3 2- / 4- / 6- / 8-

Manual
Page 17
...please contact OS vendor for possible patch or driver upgrade. For more information please contact your device has digital output function. can be connected to VGA port. MIC In Microphone can be connected to MIC In jack. Only for GA-8I915GM. - 17 - Hardware Installation If your ... an external Dolby Digital Decoder. SPDIF_O (SPDIF Out) The SPDIF output is Gigabit Ethernet, providing data transfer speeds of providing digital audio to external speakers or compressed AC3 data to this connector. have a standard USB interface. LAN Port The provided Internet connection is...
...please contact OS vendor for possible patch or driver upgrade. For more information please contact your device has digital output function. can be connected to VGA port. MIC In Microphone can be connected to MIC In jack. Only for GA-8I915GM. - 17 - Hardware Installation If your ... an external Dolby Digital Decoder. SPDIF_O (SPDIF Out) The SPDIF output is Gigabit Ethernet, providing data transfer speeds of providing digital audio to external speakers or compressed AC3 data to this connector. have a standard USB interface. LAN Port The provided Internet connection is...

Manual
Page 65
...and Settings: We recommend that you set the Front Panel Type option to HD Audio in BIOS, make sure to connect your audio front panel cable(optional for Windows 2000 / XP is applied. Introduction of the audio driver, you 'll not be connected to "Line Out". STEP 1: Connect the.... Connect the side channels to see the front panel options from the Sound Effect application. English 4-1-4 2- / 4- / 6- / 8- The installation of audio software for different models) connector to the motherboard before system start-up or you find a Sound Effect icon on the lower right hand taskbar.
...and Settings: We recommend that you set the Front Panel Type option to HD Audio in BIOS, make sure to connect your audio front panel cable(optional for Windows 2000 / XP is applied. Introduction of the audio driver, you 'll not be connected to "Line Out". STEP 1: Connect the.... Connect the side channels to see the front panel options from the Sound Effect application. English 4-1-4 2- / 4- / 6- / 8- The installation of audio software for different models) connector to the motherboard before system start-up or you find a Sound Effect icon on the lower right hand taskbar.
Manual
Page 66
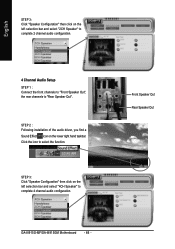
... audio driver, you find a Sound Effect icon on the lower right hand taskbar. STEP 3: Click "Speaker Configuration" then click on the left selection bar and select "2CH Speaker" to complete 2 channel audio configuration. 4 Channel Audio Setup STEP 1 : Connect the front channels to "Front Speaker Out", the rear channels to complete 4 channel audio configuration. GA-8I915G-MF/GA-8I915GM...
... audio driver, you find a Sound Effect icon on the lower right hand taskbar. STEP 3: Click "Speaker Configuration" then click on the left selection bar and select "2CH Speaker" to complete 2 channel audio configuration. 4 Channel Audio Setup STEP 1 : Connect the front channels to "Front Speaker Out", the rear channels to complete 4 channel audio configuration. GA-8I915G-MF/GA-8I915GM...

Manual
Page 67
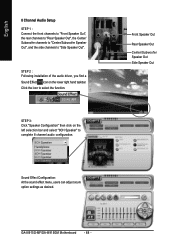
English 6 Channel Audio Setup STEP 1 : Connect the front channels to "Front Speaker Out", the rear channels to "Rear Speaker Out", and the Center/Subwoofer channels to select the function. STEP 3: Click "Speaker Configuration" then click on the lower right hand taskbar. STEP 2 : Following installation of the audio driver, you find a Sound Effect icon on the left selection bar and select "6CH Speaker" to complete 6 channel audio configuration. Appendix Front Speaker Out Rear Speaker Out Center/Subwoofer Speaker Out - 67 - Click the icon to "Center/Subwoofer Speaker Out".
English 6 Channel Audio Setup STEP 1 : Connect the front channels to "Front Speaker Out", the rear channels to "Rear Speaker Out", and the Center/Subwoofer channels to select the function. STEP 3: Click "Speaker Configuration" then click on the lower right hand taskbar. STEP 2 : Following installation of the audio driver, you find a Sound Effect icon on the left selection bar and select "6CH Speaker" to complete 6 channel audio configuration. Appendix Front Speaker Out Rear Speaker Out Center/Subwoofer Speaker Out - 67 - Click the icon to "Center/Subwoofer Speaker Out".
Manual
Page 68
... to select the function. STEP 2 : Following installation of the audio driver, you find a Sound Effect icon on the left selection bar and select "8CH Speaker" to complete 8 channel audio configuration. Front Speaker Out Rear Speaker Out Center/Subwoofer Speaker Out Side Speaker Out GA-8I915G-MF/GA-8I915GM Motherboard - 68 - Click the icon to "Side Speaker...
... to select the function. STEP 2 : Following installation of the audio driver, you find a Sound Effect icon on the left selection bar and select "8CH Speaker" to complete 8 channel audio configuration. Front Speaker Out Rear Speaker Out Center/Subwoofer Speaker Out Side Speaker Out GA-8I915G-MF/GA-8I915GM Motherboard - 68 - Click the icon to "Side Speaker...


