Manual
Page 16
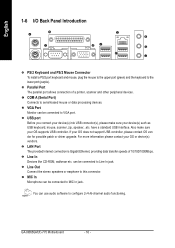
... your OS does not support USB controller, please contact OS ven dor for possible patch or driver upgrade. Line In Devices like CD-ROM, walkman etc. You can be connected to configure 2-/4-/6-channel audio functioning. GA-8I865GM(F)-775 Motherboard - 16 - VGA Port Monitor can use audio software to VGA port. have a standard USB interface...
... your OS does not support USB controller, please contact OS ven dor for possible patch or driver upgrade. Line In Devices like CD-ROM, walkman etc. You can be connected to configure 2-/4-/6-channel audio functioning. GA-8I865GM(F)-775 Motherboard - 16 - VGA Port Monitor can use audio software to VGA port. have a standard USB interface...
Manual
Page 20
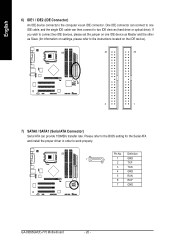
... No. One IDE connector can connect to one IDE device as Master and the other as Slave (for the Serial ATA and install the proper driver in order to the computer via an IDE connector. If you wish to two IDE devices (hard drive or optical drive). Please refer to the... set the jumper on one IDE cable, and the single IDE cable can provide 150MB/s transfer rate. Definition 7 1 1 GND 2 TXP 3 TXN 4 GND 5 RXN 6 RXP 7 GND GA-8I865GM(F)-775 Motherboard - 20 - English 6) IDE1 / IDE2 (IDE Connector) An IDE device connects to work properly.
... No. One IDE connector can connect to one IDE device as Master and the other as Slave (for the Serial ATA and install the proper driver in order to the computer via an IDE connector. If you wish to two IDE devices (hard drive or optical drive). Please refer to the... set the jumper on one IDE cable, and the single IDE cable can provide 150MB/s transfer rate. Definition 7 1 1 GND 2 TXP 3 TXN 4 GND 5 RXN 6 RXP 7 GND GA-8I865GM(F)-775 Motherboard - 20 - English 6) IDE1 / IDE2 (IDE Connector) An IDE device connects to work properly.

Manual
Page 46
English 3-2 Software Application This page displays all the tools that Gigabyte developed and some free software, you can choose anyone you want and press "install" to install them. 3-3 Software Information This page lists the contents of software and drivers in this CD-title. GA-8I865GM(F)-775 Motherboard - 46 -
English 3-2 Software Application This page displays all the tools that Gigabyte developed and some free software, you can choose anyone you want and press "install" to install them. 3-3 Software Information This page lists the contents of software and drivers in this CD-title. GA-8I865GM(F)-775 Motherboard - 46 -

Manual
Page 50
...booting from the CD-ROM, you can enter Xpress Recovery in the future by pressing the F9 key. 2. GA-8I865GM(F)-775 Motherboard - 50 - Award Modular BIOS v6.00PG, An Energy Star Al ly Copyright (C) 1984-2004, Award Software...Restart 1. Set Password 5. Press F9 during powering on the computer. (Text Mode) Press F9 during powering on the computer . GIGABYTE Technology CO. , Ltd. 1. Execute Backup Utility 2. Press DEL to enter SETUP / Q-Flash, F9 For Xpress Recovery 08... that Xpress Recovery be immediately installed after OS and all required driver and software installations are complete.
...booting from the CD-ROM, you can enter Xpress Recovery in the future by pressing the F9 key. 2. GA-8I865GM(F)-775 Motherboard - 50 - Award Modular BIOS v6.00PG, An Energy Star Al ly Copyright (C) 1984-2004, Award Software...Restart 1. Set Password 5. Press F9 during powering on the computer. (Text Mode) Press F9 during powering on the computer . GIGABYTE Technology CO. , Ltd. 1. Execute Backup Utility 2. Press DEL to enter SETUP / Q-Flash, F9 For Xpress Recovery 08... that Xpress Recovery be immediately installed after OS and all required driver and software installations are complete.
Manual
Page 62
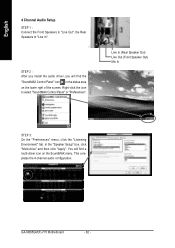
STEP 2 : After you install the audio driver, you will find the "SoundMAX Control Panel" icon in the status area on the SoundMAX menu. Line In (Rear Speaker Out) Line Out (Front Speaker ... 4 Channel Audio Setup STEP 1 : Connect the Front Speakers to "Line Out", the Rear Speakers to select "SoundMAX Control Panel" or "Preferences". You will find a multi-driver icon on the lower right of the screen. GA-8I865GM(F)-775 Motherboard - 62 -
STEP 2 : After you install the audio driver, you will find the "SoundMAX Control Panel" icon in the status area on the SoundMAX menu. Line In (Rear Speaker Out) Line Out (Front Speaker ... 4 Channel Audio Setup STEP 1 : Connect the Front Speakers to "Line Out", the Rear Speakers to select "SoundMAX Control Panel" or "Preferences". You will find a multi-driver icon on the lower right of the screen. GA-8I865GM(F)-775 Motherboard - 62 -


