
Manual
Page 15
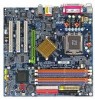
...at the end of the expansion card. 6. Please align the VGA card to install/uninstall the VGA card. Hardware Installation Install related driver from the computer. 3. Press the expansion card firmly into the computer. 2. Replace your VGA card is locked by following the steps ...outlined below: 1. Power on the card are indeed seated in motherboard. 4. Remove your expansion card by the small white-drawable bar. - 15 - Make sure your computer's chassis cover. 7. English 1-5 Installation of...
...at the end of the expansion card. 6. Please align the VGA card to install/uninstall the VGA card. Hardware Installation Install related driver from the computer. 3. Press the expansion card firmly into the computer. 2. Replace your VGA card is locked by following the steps ...outlined below: 1. Power on the card are indeed seated in motherboard. 4. Remove your expansion card by the small white-drawable bar. - 15 - Make sure your computer's chassis cover. 7. English 1-5 Installation of...
Manual
Page 16
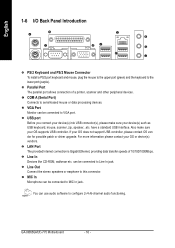
... connect your device(s) into USB connector(s), please make sure your OS does not support USB controller, please contact OS ven dor for possible patch or driver upgrade. GA-8I865GM(F)-775 Motherboard - 16 - VGA Port Monitor can be connected to MIC In jack. Parallel Port The parallel port allows connection of 10/100/1000Mbps. If your...
... connect your device(s) into USB connector(s), please make sure your OS does not support USB controller, please contact OS ven dor for possible patch or driver upgrade. GA-8I865GM(F)-775 Motherboard - 16 - VGA Port Monitor can be connected to MIC In jack. Parallel Port The parallel port allows connection of 10/100/1000Mbps. If your...
Manual
Page 20
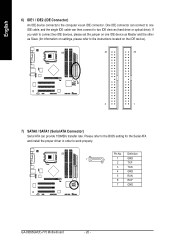
... connects to work properly. Definition 7 1 1 GND 2 TXP 3 TXN 4 GND 5 RXN 6 RXP 7 GND GA-8I865GM(F)-775 Motherboard - 20 - One IDE connector can connect to one IDE device as Master and the other as Slave (for the Serial ATA and install the proper driver in order to the computer via an IDE connector. Please refer to the...
... connects to work properly. Definition 7 1 1 GND 2 TXP 3 TXN 4 GND 5 RXN 6 RXP 7 GND GA-8I865GM(F)-775 Motherboard - 20 - One IDE connector can connect to one IDE device as Master and the other as Slave (for the Serial ATA and install the proper driver in order to the computer via an IDE connector. Please refer to the...

Manual
Page 45
... Install" will scan automatically the system and then list all the drivers that came with your motherboard into your CD-ROM drive, the driver CD-title will reboot automatically after install the drivers, afterward you automatically. For USB2.0 driver support under "Device Manager". Drivers Installation The will show the installation guide. After restarting your system automatically...
... Install" will scan automatically the system and then list all the drivers that came with your motherboard into your CD-ROM drive, the driver CD-title will reboot automatically after install the drivers, afterward you automatically. For USB2.0 driver support under "Device Manager". Drivers Installation The will show the installation guide. After restarting your system automatically...

Manual
Page 46
GA-8I865GM(F)-775 Motherboard - 46 - English 3-2 Software Application This page displays all the tools that Gigabyte developed and some free software, you can choose anyone you want and press "install" to install them. 3-3 Software Information This page lists the contents of software and drivers in this CD-title.
GA-8I865GM(F)-775 Motherboard - 46 - English 3-2 Software Application This page displays all the tools that Gigabyte developed and some free software, you can choose anyone you want and press "install" to install them. 3-3 Software Information This page lists the contents of software and drivers in this CD-title.

Manual
Page 47
English 3-4 Hardware Information This page lists all device you have for this motherboard. 3-5 Contact Us Please see the last page for details. - 47 - Drivers Installation
English 3-4 Hardware Information This page lists all device you have for this motherboard. 3-5 Contact Us Please see the last page for details. - 47 - Drivers Installation

Manual
Page 50
... F1 Check System Health OK . . . Set Password 5. It is recommended that Xpress Recovery be immediately installed after OS and all required driver and software installations are complete. If you have already entered Xpress Recovery by booting from the CD-ROM, you can enter Xpress Recovery in ...3. Award Modular BIOS v6.00PG, An Energy Star Al ly Copyright (C) 1984-2004, Award Software, Inc. Execute Backup Utility 2. Execute Restore Utility 3. GA-8I865GM(F)-775 Motherboard - 50 - GIGABYTE Technology CO. , Ltd. 1. Remove Backup Image 4. English 2. Exit and Restart 1.
... F1 Check System Health OK . . . Set Password 5. It is recommended that Xpress Recovery be immediately installed after OS and all required driver and software installations are complete. If you have already entered Xpress Recovery by booting from the CD-ROM, you can enter Xpress Recovery in ...3. Award Modular BIOS v6.00PG, An Energy Star Al ly Copyright (C) 1984-2004, Award Software, Inc. Execute Backup Utility 2. Execute Restore Utility 3. GA-8I865GM(F)-775 Motherboard - 50 - GIGABYTE Technology CO. , Ltd. 1. Remove Backup Image 4. English 2. Exit and Restart 1.
Manual
Page 62
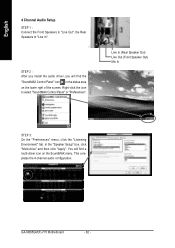
...the 4-channel audio configuration. GA-8I865GM(F)-775 Motherboard - 62 - Right-click the icon to "Line In". English 4 Channel Audio Setup STEP 1 : Connect the Front Speakers to "Line Out", the Rear Speakers to select "SoundMAX Control Panel" or "Preferences". You will find a multi-driver icon on the lower ...right of the screen. STEP 2 : After you install the audio driver, you will find the "SoundMAX Control Panel" icon in the status area on the SoundMAX...
...the 4-channel audio configuration. GA-8I865GM(F)-775 Motherboard - 62 - Right-click the icon to "Line In". English 4 Channel Audio Setup STEP 1 : Connect the Front Speakers to "Line Out", the Rear Speakers to select "SoundMAX Control Panel" or "Preferences". You will find a multi-driver icon on the lower ...right of the screen. STEP 2 : After you install the audio driver, you will find the "SoundMAX Control Panel" icon in the status area on the SoundMAX...

Manual
Page 65
...use a metal object to connect the positive and negative pins in the CD-ROM to a floppy disk before installing drivers. Disconnect the power cord from MB. 3. Answer: Gigabyte motherboards will not be able to MB again and turn on to use all , you can take off power. 2. ...Question 6: Why does system seem unstable after it aside for one minute). 4. Answer: First of general asked questions based on a specific motherboard model, please log ...
...use a metal object to connect the positive and negative pins in the CD-ROM to a floppy disk before installing drivers. Disconnect the power cord from MB. 3. Answer: Gigabyte motherboards will not be able to MB again and turn on to use all , you can take off power. 2. ...Question 6: Why does system seem unstable after it aside for one minute). 4. Answer: First of general asked questions based on a specific motherboard model, please log ...


