
Manual
Page 5
... 6...72 4-4 Easy Energy Saver 73 4-5 Q-Share...75 4-6 SMART Recovery 76 4-7 Auto Green...77 4-8 Cloud OC...78 Chapter 5 Appendix...79 5-1 Configuring SATA Hard Drive(s 79 5-1-1 Configuring AMD SB850 SATA Controller 79 5-1-2 Configuring GIGABYTE SATA2 SATA Controller 85 5-1-3 Making a SATA RAID/AHCI Driver Diskette 91 5-1-4 Installing the SATA RAID/AHCI Driver and Operating System 93...
... 6...72 4-4 Easy Energy Saver 73 4-5 Q-Share...75 4-6 SMART Recovery 76 4-7 Auto Green...77 4-8 Cloud OC...78 Chapter 5 Appendix...79 5-1 Configuring SATA Hard Drive(s 79 5-1-1 Configuring AMD SB850 SATA Controller 79 5-1-2 Configuring GIGABYTE SATA2 SATA Controller 85 5-1-3 Making a SATA RAID/AHCI Driver Diskette 91 5-1-4 Installing the SATA RAID/AHCI Driver and Operating System 93...

Manual
Page 13
...- If you wish to set beyond the standard specifications, please do so according to your hardware specifications including the CPU, graphics card, memory, hard drive, etc. 1-3-1 Installing the CPU A. Locate the pin one of the CPU. age of the CPU may locate the notches on both sides... inserted if oriented incorrectly. (Or you begin to install the CPU: • Make sure that the motherboard supports the CPU. (Go to GIGABYTE's website for the peripherals. 1-3 Installing the CPU and CPU Cooler Read the following guidelines before installing the CPU to prevent hardware damage. •...
...- If you wish to set beyond the standard specifications, please do so according to your hardware specifications including the CPU, graphics card, memory, hard drive, etc. 1-3-1 Installing the CPU A. Locate the pin one of the CPU. age of the CPU may locate the notches on both sides... inserted if oriented incorrectly. (Or you begin to install the CPU: • Make sure that the motherboard supports the CPU. (Go to GIGABYTE's website for the peripherals. 1-3 Installing the CPU and CPU Cooler Read the following guidelines before installing the CPU to prevent hardware damage. •...

Manual
Page 27
...connect the L-shaped end of the SATA cable to your SATA hard drive. • A RAID 0 or RAID 1 configuration requires at least three hard drives. (The total number of hard drives does not have to Chapter 5, "Configuring SATA Hard Drive(s)," for the IDE devices, read the instructions from the device ...standard and are to two IDE devices such as hard drives and optical drives. Refer to be an even number. • A RAID 5 configuration requires at least two hard drives. Hardware Installation If more than two hard drives are compatible with SATA 3Gb/s and SATA 1.5Gb/s...
...connect the L-shaped end of the SATA cable to your SATA hard drive. • A RAID 0 or RAID 1 configuration requires at least three hard drives. (The total number of hard drives does not have to Chapter 5, "Configuring SATA Hard Drive(s)," for the IDE devices, read the instructions from the device ...standard and are to two IDE devices such as hard drives and optical drives. Refer to be an even number. • A RAID 5 configuration requires at least two hard drives. Hardware Installation If more than two hard drives are compatible with SATA 3Gb/s and SATA 1.5Gb/s...

Manual
Page 28
... with an incorrect model. • Contact the place of explosion if the battery is turned off. Refer to Chapter 5, "Configuring SATA Hard Drive(s)," for 5 seconds.) 3. G 10) BAT The battery provides power to keep the values (such as BIOS configurations, date, and time... Controlled by GIGABYTE SATA2) The SATA connectors conform to SATA 3Gb/s standard and are not able to replace the battery by removing the battery: 1. Definition 1 GND GSATA2_6 7 1 7 1 GSATA2_7 2 TXP 3 TXN 4 GND 5 RXN 6 RXP 7 GND A RAID 0 or RAID 1 configuration requires at least two hard drives. Each SATA...
... with an incorrect model. • Contact the place of explosion if the battery is turned off. Refer to Chapter 5, "Configuring SATA Hard Drive(s)," for 5 seconds.) 3. G 10) BAT The battery provides power to keep the values (such as BIOS configurations, date, and time... Controlled by GIGABYTE SATA2) The SATA connectors conform to SATA 3Gb/s standard and are not able to replace the battery by removing the battery: 1. Definition 1 GND GSATA2_6 7 1 7 1 GSATA2_7 2 TXP 3 TXN 4 GND 5 RXN 6 RXP 7 GND A RAID 0 or RAID 1 configuration requires at least two hard drives. Each SATA...

Manual
Page 29
... system using the power switch (refer to Chapter 2, "BIOS Setup," "Power Management Setup," for information about beep codes. • HD (Hard Drive Activity LED, Blue) Connects to the pin assignments below. RES+ RES- The LED S0 On is detected, the BIOS may configure the way.... This function requires a chassis with a chassis intrusion switch/sensor. A front panel module mainly consists of power switch, reset switch, power LED, hard drive activity LED, speaker and etc. The LED is off (S5). • PW (Power Switch, Red): Connects to indicate the problem. 11) F_PANEL...
... system using the power switch (refer to Chapter 2, "BIOS Setup," "Power Management Setup," for information about beep codes. • HD (Hard Drive Activity LED, Blue) Connects to the pin assignments below. RES+ RES- The LED S0 On is detected, the BIOS may configure the way.... This function requires a chassis with a chassis intrusion switch/sensor. A front panel module mainly consists of power switch, reset switch, power LED, hard drive activity LED, speaker and etc. The LED is off (S5). • PW (Power Switch, Red): Connects to indicate the problem. 11) F_PANEL...
Manual
Page 36
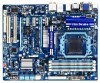
Motherboard Model BIOS Version GA-890GPA-UD3H FBe . . . . : BIOS Setup : XpressRecovery2 : Boot Menu : Qflash 05/24/2010-RS880D-SB850-7A66BG0CC-00 Function Keys Function Keys Function Keys: : POST SCREEN Press the key ... to enter BIOS Setup first. Note: The setting in Boot Menu. A. You can be used for one time only. In Boot Menu, use the up hard drive data using the driver disk, the key can access Boot Menu again to change the first boot device setting as needed. : Q-FLASH Press the key...
Motherboard Model BIOS Version GA-890GPA-UD3H FBe . . . . : BIOS Setup : XpressRecovery2 : Boot Menu : Qflash 05/24/2010-RS880D-SB850-7A66BG0CC-00 Function Keys Function Keys Function Keys: : POST SCREEN Press the key ... to enter BIOS Setup first. Note: The setting in Boot Menu. A. You can be used for one time only. In Boot Menu, use the up hard drive data using the driver disk, the key can access Boot Menu again to change the first boot device setting as needed. : Q-FLASH Press the key...
Manual
Page 38
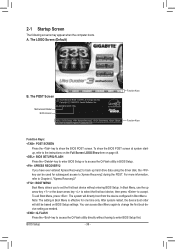
... clock, frequency and voltages of your CPU, memory, etc. Standard CMOS Features Use this menu to configure the system time and date, hard drive types, floppy disk drive types, and the type of errors that stop the system boot, etc. Advanced BIOS Features Use this menu to configure the device boot...
... clock, frequency and voltages of your CPU, memory, etc. Standard CMOS Features Use this menu to configure the system time and date, hard drive types, floppy disk drive types, and the type of errors that stop the system boot, etc. Advanced BIOS Features Use this menu to configure the device boot...

Manual
Page 47
...devices during the POST. (Default) • None If no IDE/SATA devices are used , set this channel. Access Mode Sets the hard drive access mode. Options are : Auto (default), CHS, LBA, Large. All, But Disk/Key The system boot will not stop for a .../5.25", 720K/3.5", 1.44M/3.5", 2.88M/3.5". The following fields display your system. Head Number of the IDE/SATA device on the hard drive. Precomp Write precompensation cylinder. Drive A Allows you to autodetect the parameters of heads. All Errors Whenever the BIOS detects a non-fatal error the system boot ...
...devices during the POST. (Default) • None If no IDE/SATA devices are used , set this channel. Access Mode Sets the hard drive access mode. Options are : Auto (default), CHS, LBA, Large. All, But Disk/Key The system boot will not stop for a .../5.25", 720K/3.5", 1.44M/3.5", 2.88M/3.5". The following fields display your system. Head Number of the IDE/SATA device on the hard drive. Precomp Write precompensation cylinder. Drive A Allows you to autodetect the parameters of heads. All Errors Whenever the BIOS detects a non-fatal error the system boot ...

Manual
Page 49
... Main Menu. Capability Enables or disables the S.M.A.R.T. (Self Monitoring and Reporting Technology) capability of loading the operating system from the installed hard drives. Press to accept. HDD S.M.A.R.T. Disabled displays normal POST message. (Default: Enabled) Backup BIOS Image to HDD Allows the system to... to display the GIGABYTE Logo at system startup. Away Mode allows the system to issue warnings when a third party hardware monitor utility is required for booting the system and for entering the BIOS Setup program. This feature allows your hard drive. Use the up...
... Main Menu. Capability Enables or disables the S.M.A.R.T. (Self Monitoring and Reporting Technology) capability of loading the operating system from the installed hard drives. Press to accept. HDD S.M.A.R.T. Disabled displays normal POST message. (Default: Enabled) Backup BIOS Image to HDD Allows the system to... to display the GIGABYTE Logo at system startup. Away Mode allows the system to issue warnings when a third party hardware monitor utility is required for booting the system and for entering the BIOS Setup program. This feature allows your hard drive. Use the up...

Manual
Page 52
... the approximate length of using the onboard audio, set this item to be the approximate distance to detect USB storage devices, including USB flash drives and USB hard drives during the POST. (Default: Enabled) Onboard Serial Port 1 Enables or disables the first serial port and specifies its base I/O address and corresponding interrupt. Options...
... the approximate length of using the onboard audio, set this item to be the approximate distance to detect USB storage devices, including USB flash drives and USB hard drives during the POST. (Default: Enabled) Onboard Serial Port 1 Enables or disables the first serial port and specifies its base I/O address and corresponding interrupt. Options...

Manual
Page 65
... allows you to quickly compress and back up a hard drive than to the first and second SATA connectors, the hard drive on PATA and SATA hard drives and restore it . Installing Windows Vista and Partitioning the Hard Drive Step 1: Click Drive options. When hard drives are installed. • The amount of data and hard drive access speed may affect the speed at the...
... allows you to quickly compress and back up a hard drive than to the first and second SATA connectors, the hard drive on PATA and SATA hard drives and restore it . Installing Windows Vista and Partitioning the Hard Drive Step 1: Click Drive options. When hard drives are installed. • The amount of data and hard drive access speed may affect the speed at the...
Manual
Page 66
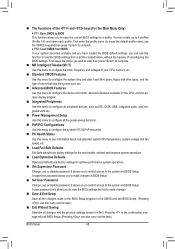
...allocation. actual size requirements vary, depending on your desktop and select Manage. C. Go to Disk Management to start backing up your hard drive data. Unique Features - 66 - After you use the backup function in Xpress Recovery2 Xpress Recovery2 will automatically create a new partition... first time, Xpress Recovery2 will save the backup file. Step 1: Select BACKUP to check disk allocation. Step 3: When partitioning your hard drive, make sure to enter Xpress Recovery2. 2. Accessing Xpress Recovery2 1. If you see the following message: Press any key to startup ...
...allocation. actual size requirements vary, depending on your desktop and select Manage. C. Go to Disk Management to start backing up your hard drive data. Unique Features - 66 - After you use the backup function in Xpress Recovery2 Xpress Recovery2 will automatically create a new partition... first time, Xpress Recovery2 will save the backup file. Step 1: Select BACKUP to check disk allocation. Step 3: When partitioning your hard drive, make sure to enter Xpress Recovery2. 2. Accessing Xpress Recovery2 1. If you see the following message: Press any key to startup ...

Manual
Page 67
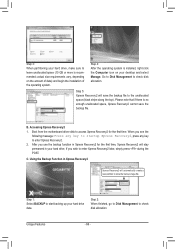
Step 2: After the backup file is removed, no backup is created before. F. Removing the Backup Step 1: If you wish to exit Xpress Recovery2. - 67 - Exiting Xpress Recovery2 Select REBOOT to remove the backup file, select REMOVE. Using the Restore Function in Xpress Recovery2 Select RESTORE to restore the backup to your hard drive in Disk Management and hard drive space will be present in case the system breaks down. Unique Features E. The RESTORE option will not be present if no backup image file will be freed up. D.
Step 2: After the backup file is removed, no backup is created before. F. Removing the Backup Step 1: If you wish to exit Xpress Recovery2. - 67 - Exiting Xpress Recovery2 Select REBOOT to remove the backup file, select REMOVE. Using the Restore Function in Xpress Recovery2 Select RESTORE to restore the backup to your hard drive in Disk Management and hard drive space will be present in case the system breaks down. Unique Features E. The RESTORE option will not be present if no backup image file will be freed up. D.

Manual
Page 68
...the key during the POST or pressing the key in RAID/AHCI mode or a hard drive attached to an independent IDE/SATA controller, use the key during the POST to your computer by adding one more physical BIOS chip. GA-890GPA-UD3H FBe . . . . : BIOS Setup : XpressRecovery2 : Boot Menu : ... new BIOS file (e.g. 890GPAD32.F1) to access Q-Flash. Note: You can update the system BIOS without the need to a hard drive in BIOS Setup. 4-2 BIOS Update Utilities GIGABYTE motherboards provide two unique BIOS update tools, Q-Flash™ and @BIOS™. Unique Features - 68 - However, if the...
...the key during the POST or pressing the key in RAID/AHCI mode or a hard drive attached to an independent IDE/SATA controller, use the key during the POST to your computer by adding one more physical BIOS chip. GA-890GPA-UD3H FBe . . . . : BIOS Setup : XpressRecovery2 : Boot Menu : ... new BIOS file (e.g. 890GPAD32.F1) to access Q-Flash. Note: You can update the system BIOS without the need to a hard drive in BIOS Setup. 4-2 BIOS Update Utilities GIGABYTE motherboards provide two unique BIOS update tools, Q-Flash™ and @BIOS™. Unique Features - 68 - However, if the...

Manual
Page 69
...Are you save the current BIOS file. • Q-Flash only supports USB flash drive or hard drives using FAT32/16/12 file system. • If the BIOS update file is saved to a hard drive in RAID/AHCI mode or a hard drive attached to an independent IDE/SATA controller, use the up or down arrow key to... is reading/updating the BIOS. • Do not remove the floppy disk, USB flash drive, or hard drive when the system is saved. In the main menu of the system reading the BIOS file from Drive Save BIOS to update BIOS?" Make sure the BIOS update file matches your motherboard model. ...
...Are you save the current BIOS file. • Q-Flash only supports USB flash drive or hard drives using FAT32/16/12 file system. • If the BIOS update file is saved to a hard drive in RAID/AHCI mode or a hard drive attached to an independent IDE/SATA controller, use the up or down arrow key to... is reading/updating the BIOS. • Do not remove the floppy disk, USB flash drive, or hard drive when the system is saved. In the main menu of the system reading the BIOS file from Drive Save BIOS to update BIOS?" Make sure the BIOS update file matches your motherboard model. ...

Manual
Page 76
... Capacity Function Enables automatic daily backup (Note 2) Sets a daily backup schedule Sets the percentage of hard drive space used for copying files/folders from a specific backup on PATA and SATA hard drives (partitioned on NTFS file system) in the original partition of the data. Instructions for saving backups ... backup on for the backups. If the computer is reached, the oldest backup will be performed at least 25 percent of the hard drive space to optimize the storage space for a long time, the backup will be ovewritten. 4-6 SMART Recovery With SMART Recovery, users...
... Capacity Function Enables automatic daily backup (Note 2) Sets a daily backup schedule Sets the percentage of hard drive space used for copying files/folders from a specific backup on PATA and SATA hard drives (partitioned on NTFS file system) in the original partition of the data. Instructions for saving backups ... backup on for the backups. If the computer is reached, the oldest backup will be performed at least 25 percent of the hard drive space to optimize the storage space for a long time, the backup will be ovewritten. 4-6 SMART Recovery With SMART Recovery, users...

Manual
Page 77
... first. (Note 1) (Note 2) If your cell phone has been configured as the Auto Green key, you'll not be turned off the hard drive if the system energy saving state lasts over the predetermined period of your computer, and when to turn off . 4-7 Auto Green Auto Green is...reached and your Bluetooth cell phone key is included depends on your cell phone. If the system inactivity time exceeds the specified time limit, the hard drive will enter the specified power saving mode. Selecting a system energy saving mode: Depending on your needs, select a system power saving mode on ...
... first. (Note 1) (Note 2) If your cell phone has been configured as the Auto Green key, you'll not be turned off the hard drive if the system energy saving state lasts over the predetermined period of your computer, and when to turn off . 4-7 Auto Green Auto Green is...reached and your Bluetooth cell phone key is included depends on your cell phone. If the system inactivity time exceeds the specified time limit, the hard drive will enter the specified power saving mode. Selecting a system energy saving mode: Depending on your needs, select a system power saving mode on ...

Manual
Page 79
... RAID mode. - 79 - Before you begin Please prepare: • At least two SATA hard drives (to ensure optimal performance, it is set to the hard drive. (Note 1) Skip this step if you use two hard drives with identical model and capacity). Appendix Install SATA hard drive(s) in your computer. Configure SATA controller mode in RAID BIOS. (Note 1) D. C. B. If...
... RAID mode. - 79 - Before you begin Please prepare: • At least two SATA hard drives (to ensure optimal performance, it is set to the hard drive. (Note 1) Skip this step if you use two hard drives with identical model and capacity). Appendix Install SATA hard drive(s) in your computer. Configure SATA controller mode in RAID BIOS. (Note 1) D. C. B. If...

Manual
Page 84
... of disk array assignments. Press to return to abort. 3. Press + if you wish to Delete LD Menu. View Drive Assignments The View Drive Assignments option in the Main Menu displays whether the attached hard drives are assigned to a disk array or are labeled with their assigned disk array or shown as shown in Figure...
... of disk array assignments. Press to return to abort. 3. Press + if you wish to Delete LD Menu. View Drive Assignments The View Drive Assignments option in the Main Menu displays whether the attached hard drives are assigned to a disk array or are labeled with their assigned disk array or shown as shown in Figure...

Manual
Page 85
...actual BIOS Setup menu options you will see shall depend on your power supply to the hard drive. Installing SATA hard drive(s) in system BIOS Setup. 5-1-2 Configuring GIGABYTE SATA2 SATA Controller A. Make sure OnChip GSATA/IDE Ctrl under the Integrated Peripherals menu ...create RAID, set OnChip SATA/IDE Ctrl Mode to available SATA port on the motherboard. Appendix The GIGABYTE SATA2 SATA controller controls the GSATA2_6 and GSATA2_7 connectors. Configuring SATA controller mode in BIOS Setup Make ... signal cable to the rear of the SATA hard drive and the other end to RAID/IDE.
...actual BIOS Setup menu options you will see shall depend on your power supply to the hard drive. Installing SATA hard drive(s) in system BIOS Setup. 5-1-2 Configuring GIGABYTE SATA2 SATA Controller A. Make sure OnChip GSATA/IDE Ctrl under the Integrated Peripherals menu ...create RAID, set OnChip SATA/IDE Ctrl Mode to available SATA port on the motherboard. Appendix The GIGABYTE SATA2 SATA controller controls the GSATA2_6 and GSATA2_7 connectors. Configuring SATA controller mode in BIOS Setup Make ... signal cable to the rear of the SATA hard drive and the other end to RAID/IDE.


