Manual
Page 3
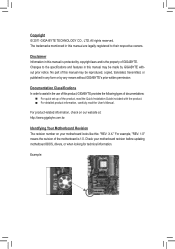
... like this manual may be made by any form or by GIGABYTE without GIGABYTE's prior written permission. For product-related information, check on our website at: http://www.gigabyte.com.tw Identifying Your Motherboard Revision The revision number on your motherboard revision before updating motherboard BIOS, drivers, or when looking for technical information. Changes to the specifications...
... like this manual may be made by any form or by GIGABYTE without GIGABYTE's prior written permission. For product-related information, check on our website at: http://www.gigabyte.com.tw Identifying Your Motherboard Revision The revision number on your motherboard revision before updating motherboard BIOS, drivers, or when looking for technical information. Changes to the specifications...
Manual
Page 6
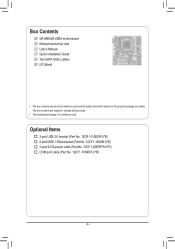
Box Contents GA-880GM-USB3 motherboard Motherboard driver disk User's Manual Quick Installation Guide Two SATA 3Gb/s cables I/O Shield • The box contents above are subject to change without notice. • The motherboard image is for reference only and the actual items shall depend on the product package you obtain. Optional Items 2-port USB 2.0 bracket (Part No. 12CR1-1UB030-5*R) 2-port IEEE 1394a bracket (Part No. 12CF1-1IE008-0*R) 2-port SATA power cable (Part No. 12CF1-2SERPW-0*R) COM port cable (Part No. 12CF1-1CM001-3*R) - 6 - The box contents are for reference only.
Box Contents GA-880GM-USB3 motherboard Motherboard driver disk User's Manual Quick Installation Guide Two SATA 3Gb/s cables I/O Shield • The box contents above are subject to change without notice. • The motherboard image is for reference only and the actual items shall depend on the product package you obtain. Optional Items 2-port USB 2.0 bracket (Part No. 12CR1-1UB030-5*R) 2-port IEEE 1394a bracket (Part No. 12CF1-1IE008-0*R) 2-port SATA power cable (Part No. 12CF1-2SERPW-0*R) COM port cable (Part No. 12CF1-1CM001-3*R) - 6 - The box contents are for reference only.
Manual
Page 18
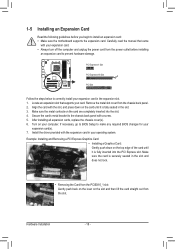
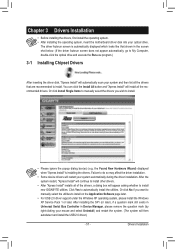
Locate an expansion slot that came with your card. Install the driver provided with the expansion card in the slot and does not rock. • Removing the Card from the slot. Example: Installing and Removing a PCI Express ... outlet before you begin to the chassis back panel with a screw. 5. Secure the card's metal bracket to install an expansion card: • Make sure the motherboard supports the expansion card. Hardware Installation - 18 - PCI Express x1 Slot PCI Express x16 Slot PCI Slot Follow the steps below to prevent hardware damage...
Locate an expansion slot that came with your card. Install the driver provided with the expansion card in the slot and does not rock. • Removing the Card from the slot. Example: Installing and Removing a PCI Express ... outlet before you begin to the chassis back panel with a screw. 5. Secure the card's metal bracket to install an expansion card: • Make sure the motherboard supports the expansion card. Hardware Installation - 18 - PCI Express x1 Slot PCI Express x16 Slot PCI Slot Follow the steps below to prevent hardware damage...
Manual
Page 19
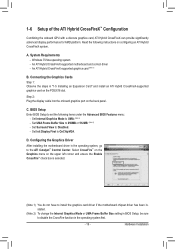
... the Enable CrossFire™ check box is selected. (Note 1) You do not have to install the graphics card driver if the motherboard chipset driver has been installed. (Note 2) To change the Internal Graphics Mode or UMA Frame Buffer Size setting in BIOS Setup... items under the Advanced BIOS Features menu: - An ATI Hybrid CrossFireX-supported motherboard and correct driver - An ATI Hybrid CrossFireX-supported graphics card (Note 1) B. Configuring the Graphics Driver After installing the motherboard driver in the operating system, go to disable the CrossFire function in "1-5 Installing ...
... the Enable CrossFire™ check box is selected. (Note 1) You do not have to install the graphics card driver if the motherboard chipset driver has been installed. (Note 2) To change the Internal Graphics Mode or UMA Frame Buffer Size setting in BIOS Setup... items under the Advanced BIOS Features menu: - An ATI Hybrid CrossFireX-supported motherboard and correct driver - An ATI Hybrid CrossFireX-supported graphics card (Note 1) B. Configuring the Graphics Driver After installing the motherboard driver in the operating system, go to disable the CrossFire function in "1-5 Installing ...
Manual
Page 57
... Yes to install other drivers. • After "Xpress Install" installs all the recommended drivers. Drivers Installation Chapter 3 Drivers Installation • Before installing the drivers, first install the operating system. • After installing the operating system, insert the motherboard driver disk into your mouse... Install" will automatically scan your system automatically during the driver installation. Or click Install Single Items to manually select the drivers you want to manually select the utilities to install new GIGABYTE utilities. After installing the SP1 (or later), if...
... Yes to install other drivers. • After "Xpress Install" installs all the recommended drivers. Drivers Installation Chapter 3 Drivers Installation • Before installing the drivers, first install the operating system. • After installing the operating system, insert the motherboard driver disk into your mouse... Install" will automatically scan your system automatically during the driver installation. Or click Install Single Items to manually select the drivers you want to manually select the utilities to install new GIGABYTE utilities. After installing the SP1 (or later), if...
Manual
Page 58
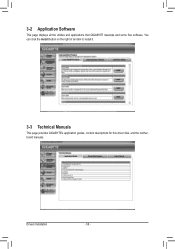
Drivers Installation - 58 - You can click the Install button on the right of an item to install it. 3-3 Technical Manuals This page provides GIGABYTE's application guides, content descriptions for this driver disk, and the motherboard manuals. 3-2 Application Software This page displays all the utilities and applications that GIGABYTE develops and some free software.
Drivers Installation - 58 - You can click the Install button on the right of an item to install it. 3-3 Technical Manuals This page provides GIGABYTE's application guides, content descriptions for this driver disk, and the motherboard manuals. 3-2 Application Software This page displays all the utilities and applications that GIGABYTE develops and some free software.
Manual
Page 62
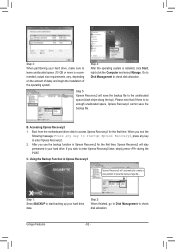
... for the first time. C. Using the Backup Function in your hard drive. Accessing Xpress Recovery2 1. Step 3: When partitioning your hard drive data. Boot from the motherboard driver disk to access Xpress Recovery2 for the first time, Xpress Recovery2 will stay permanent in Xpress Recovery2 Xpress Recovery2 will save the backup file. Unique...
... for the first time. C. Using the Backup Function in your hard drive. Accessing Xpress Recovery2 1. Step 3: When partitioning your hard drive data. Boot from the motherboard driver disk to access Xpress Recovery2 for the first time, Xpress Recovery2 will stay permanent in Xpress Recovery2 Xpress Recovery2 will save the backup file. Unique...
Manual
Page 71
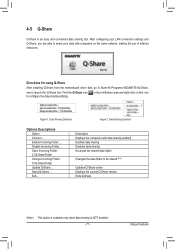
... area and right-click on the same network, making full use of Internet resources. About Q-Share ... Directions for using Q-Share After installing Q-Share from the motherboard driver disk, go to be shared (Note) Updates Q-Share online Displays the current Q-Share version Exits Q-Share (Note) This option is available only when data sharing... your data with data sharing enabled Enables data sharing Disables data sharing Accesses the shared data folder Changes the data folder to Start>All Programs>GIGABYTE>Q-Share.
... area and right-click on the same network, making full use of Internet resources. About Q-Share ... Directions for using Q-Share After installing Q-Share from the motherboard driver disk, go to be shared (Note) Updates Q-Share online Displays the current Q-Share version Exits Q-Share (Note) This option is available only when data sharing... your data with data sharing enabled Enables data sharing Disables data sharing Accesses the shared data folder Changes the data folder to Start>All Programs>GIGABYTE>Q-Share.
Manual
Page 75
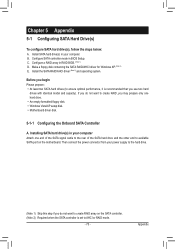
...hard drive. • An empty formatted floppy disk. • Windows Vista/XP setup disk. • Motherboard driver disk. 5-1-1 Configuring the Onboard SATA Controller A. Install the SATA RAID/AHCI driver (Note 2) and operating system. Before you may prepare only one end of the SATA signal cable to ...drive(s) in your power supply to the hard drive. (Note 1) Skip this step if you do not want to create RAID array on the motherboard. Configure SATA controller mode in RAID BIOS. (Note 1) D. Configure a RAID array in BIOS Setup. Chapter 5 Appendix 5-1 Configuring SATA Hard Drive...
...hard drive. • An empty formatted floppy disk. • Windows Vista/XP setup disk. • Motherboard driver disk. 5-1-1 Configuring the Onboard SATA Controller A. Install the SATA RAID/AHCI driver (Note 2) and operating system. Before you may prepare only one end of the SATA signal cable to ...drive(s) in your power supply to the hard drive. (Note 1) Skip this step if you do not want to create RAID array on the motherboard. Configure SATA controller mode in RAID BIOS. (Note 1) D. Configure a RAID array in BIOS Setup. Chapter 5 Appendix 5-1 Configuring SATA Hard Drive...
Manual
Page 81
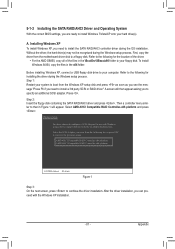
... disk provided by an adapter manufacturer. Before installing Windows XP, connect a USB floppy disk drive to continue the driver installation. Refer to the following list, or press ESC to return to the previous screen. AMD AHCI Compatible RAID... configure a SCSI Adapter for use with the Windows XP installation. - 81 - Refer to the following for installing the driver during the Windows setup process. To install Windows 64-Bit, copy the files in the \BootDrv\SBxxx\x86 folder to ... to install Windows 7/Vista/XP onto your system to boot from the motherboard driver disk to a floppy disk.
... disk provided by an adapter manufacturer. Before installing Windows XP, connect a USB floppy disk drive to continue the driver installation. Refer to the following list, or press ESC to return to the previous screen. AMD AHCI Compatible RAID... configure a SCSI Adapter for use with the Windows XP installation. - 81 - Refer to the following for installing the driver during the Windows setup process. To install Windows 64-Bit, copy the files in the \BootDrv\SBxxx\x86 folder to ... to install Windows 7/Vista/XP onto your system to boot from the motherboard driver disk to a floppy disk.
Manual
Page 82
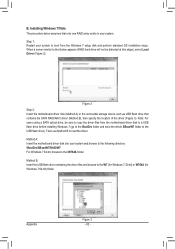
...-bit) or W764A (for Windows 7 64-bit) folder. Method B: Insert the USB flash drive containing the driver files and browse to load the driver. Method A: Insert the motherboard driver disk into your system and browse to the following directory: \BootDrv\SBxxxW7\RAID\W7 For Windows 7 64-bit... folder and save the whole SBxxxW7 folder to that contains the SATA RAID/AHCI driver (Method B), then specify the location of the driver (Figure 3). Appendix Figure 3 - 82 - Figure 2 Step 2: Insert the motherboard driver disk (Method A) or the removable storage device such as USB flash drive that...
...-bit) or W764A (for Windows 7 64-bit) folder. Method B: Insert the USB flash drive containing the driver files and browse to load the driver. Method A: Insert the motherboard driver disk into your system and browse to the following directory: \BootDrv\SBxxxW7\RAID\W7 For Windows 7 64-bit... folder and save the whole SBxxxW7 folder to that contains the SATA RAID/AHCI driver (Method B), then specify the location of the driver (Figure 3). Appendix Figure 3 - 82 - Figure 2 Step 2: Insert the motherboard driver disk (Method A) or the removable storage device such as USB flash drive that...
Manual
Page 84
... RAID array to use a new drive of restoring data to launch AMD RAIDXpert. To replace the old drive, make sure the chipset drivers have been installed from the motherboard driver disk. Then launch the AMD RAIDXpert from other drives in the Logical Drive Information pane will display as RAID 1, or RAID 10. Appendix...
... RAID array to use a new drive of restoring data to launch AMD RAIDXpert. To replace the old drive, make sure the chipset drivers have been installed from the motherboard driver disk. Then launch the AMD RAIDXpert from other drives in the Logical Drive Information pane will display as RAID 1, or RAID 10. Appendix...
Manual
Page 85
...page. If you can listen to the following instructions use Windows 7 as the example operating system.) Step 1: After installing the audio driver, the HD Audio Manager icon will be Side speaker out. • To install a microphone, connect your microphone to the Mic ... example, in the notification area. Configuring Speakers (The following for each jack through the audio driver. 5-2 Configuring Audio Input and Output 5-2-1 Configuring 2/4/5.1/7.1-Channel Audio The motherboard provides six audio jacks on both of the front and back panel audio connections simultaneously. Double-...
...page. If you can listen to the following instructions use Windows 7 as the example operating system.) Step 1: After installing the audio driver, the HD Audio Manager icon will be Side speaker out. • To install a microphone, connect your microphone to the Mic ... example, in the notification area. Configuring Speakers (The following for each jack through the audio driver. 5-2 Configuring Audio Input and Output 5-2-1 Configuring 2/4/5.1/7.1-Channel Audio The motherboard provides six audio jacks on both of the front and back panel audio connections simultaneously. Double-...
Manual
Page 92
..., which will clear the CMOS values after about one minute. For motherboards that 's why the light is still on GIGABYTE's website. Q: Why cannot I install the onboard HD audio driver successfully? (For Windows XP only) A: Step 1: First, make sure the Microsoft UAA Bus Driver for High Definition Audio has been installed successfully (check in Chapter...
..., which will clear the CMOS values after about one minute. For motherboards that 's why the light is still on GIGABYTE's website. Q: Why cannot I install the onboard HD audio driver successfully? (For Windows XP only) A: Step 1: First, make sure the Microsoft UAA Bus Driver for High Definition Audio has been installed successfully (check in Chapter...


