
User Manual
Page 2
... 6600DPI and 1000Hz report rate, the Aivia M8600 now becomes your personal settings wherever you go. GIGABYTE believes each mouse and keyboard are the scrupulous work of mankind's brainpower. advanced, intuitive, and versatile interface archetype. Combining that with introduction of the unique QSBSTM Technology - The Aivia M8600 Wireless Macro Gaming mouse breaks free from its key features - The battery life lasts continuously over 24 hours...
... 6600DPI and 1000Hz report rate, the Aivia M8600 now becomes your personal settings wherever you go. GIGABYTE believes each mouse and keyboard are the scrupulous work of mankind's brainpower. advanced, intuitive, and versatile interface archetype. Combining that with introduction of the unique QSBSTM Technology - The Aivia M8600 Wireless Macro Gaming mouse breaks free from its key features - The battery life lasts continuously over 24 hours...
User Manual
Page 3
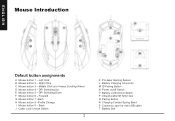
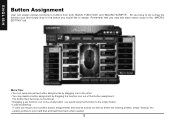
...and 4 ways Scrolling Wheel D Mouse button 4 - Forward G Mouse button 7 -Back H Mouse button 8 -Profile Change I Mouse button 9 - DPI Switching Up E Mouse button 5 - Back J Cable Lock/ Unlock Switch 2 K Pro-laser Gaming Sensor L Battery Charging Connector M ID Pairing Button N Power on/off Switch O Battery Lock/Unlock Switch P Ultra-DurableTM Teflon feet Q Pairing Button R Charging Contact Spring Band S Connector Jack for mini USB cable T Battery Slot Right Click C Mouse button 3 - ENGLISH Mouse Introduction Default button assignments A Mouse button 1 - Left Click B Mouse button 2 -
...and 4 ways Scrolling Wheel D Mouse button 4 - Forward G Mouse button 7 -Back H Mouse button 8 -Profile Change I Mouse button 9 - DPI Switching Up E Mouse button 5 - Back J Cable Lock/ Unlock Switch 2 K Pro-laser Gaming Sensor L Battery Charging Connector M ID Pairing Button N Power on/off Switch O Battery Lock/Unlock Switch P Ultra-DurableTM Teflon feet Q Pairing Button R Charging Contact Spring Band S Connector Jack for mini USB cable T Battery Slot Right Click C Mouse button 3 - ENGLISH Mouse Introduction Default button assignments A Mouse button 1 - Left Click B Mouse button 2 -
User Manual
Page 4
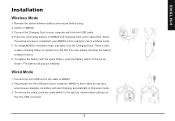
ENGLISH Installation Wireless Mode 1. When the pairing process is completed, your M8600 is then ready for use as a wired mouse. Connect the mini-USB end of your computer with the spare battery, push the battery switch to replace.(For the first time use in wireless mode. 5. There is then ready for use , please recharge the battery at the same time. To replace the battery with the mini-USB cable. 4. Plug mouse into the USB port...
ENGLISH Installation Wireless Mode 1. When the pairing process is completed, your M8600 is then ready for use as a wired mouse. Connect the mini-USB end of your computer with the spare battery, push the battery switch to replace.(For the first time use in wireless mode. 5. There is then ready for use , please recharge the battery at the same time. To replace the battery with the mini-USB cable. 4. Plug mouse into the USB port...
User Manual
Page 5
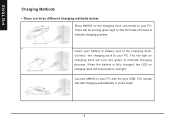
... charging dock will come back to red light. There will be running green light on charging dock will start charging automatically in wired mode 4 When the battery is fully charged, the LED on the charging dock connected to your battery to battery slot of mouse to your PC. Insert your PC. Connect M8600 to indicate charging process. Connect the charging dock to indicate charging...
... charging dock will come back to red light. There will be running green light on charging dock will start charging automatically in wired mode 4 When the battery is fully charged, the LED on the charging dock connected to your battery to battery slot of mouse to your PC. Insert your PC. Connect M8600 to indicate charging process. Connect the charging dock to indicate charging...
User Manual
Page 6
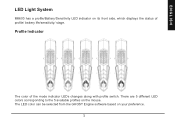
There are 5 different LED colors corresponding to the 5 available profiles on its front side, which displays the status of the mode indicator LEDs changes along with profile switch. ENGLISH LED Light System M8600 has a profile/Battery/Sensitivity LED indicator on the mouse. The LED color can be selected from the GHOST Engine software based on your preference. 5 Profile Indicator The color of profile/ battery life/sensitivity/ stage.
There are 5 different LED colors corresponding to the 5 available profiles on its front side, which displays the status of the mode indicator LEDs changes along with profile switch. ENGLISH LED Light System M8600 has a profile/Battery/Sensitivity LED indicator on the mouse. The LED color can be selected from the GHOST Engine software based on your preference. 5 Profile Indicator The color of profile/ battery life/sensitivity/ stage.

User Manual
Page 7
ENGLISH Battery Indicator The GREEN LEDs shows the remaining battery life: • 61 - 100% Battery: 3 green LED arrows • 31 - 60% Battery: 2 green LED arrows • 11 - 30% Battery: 1 green LED arrow • Less than 10% Battery: 3 green blinking LEDs arrows Sensitivity Stage Indicator The LEDs will turn into RED light while adjusting sensitivity. • Sensitivity Stage 1: 1 red LED • Sensitivity Stage 2: 2 red LEDs • Sensitivity Stage 3: 3 red LEDs • Sensitivity Stage 4: full red LEDs 6
ENGLISH Battery Indicator The GREEN LEDs shows the remaining battery life: • 61 - 100% Battery: 3 green LED arrows • 31 - 60% Battery: 2 green LED arrows • 11 - 30% Battery: 1 green LED arrow • Less than 10% Battery: 3 green blinking LEDs arrows Sensitivity Stage Indicator The LEDs will turn into RED light while adjusting sensitivity. • Sensitivity Stage 1: 1 red LED • Sensitivity Stage 2: 2 red LEDs • Sensitivity Stage 3: 3 red LEDs • Sensitivity Stage 4: full red LEDs 6
User Manual
Page 8
... in power saving mode. Install the software to assign buttons and set up your M8600 with mini USB cable to PC while editing macro and assigning buttons through GHOSTTM Engine software. (In wireless mode you can be assigned various settings to connect your personal profile. Please make sure to 10 programmable buttons. The description of LED light for left -handed/right-handed mode and gaming/power saving mode) Left Hand/ Right hand Mode Aivia M8600 is...
... in power saving mode. Install the software to assign buttons and set up your M8600 with mini USB cable to PC while editing macro and assigning buttons through GHOSTTM Engine software. (In wireless mode you can be assigned various settings to connect your personal profile. Please make sure to 10 programmable buttons. The description of LED light for left -handed/right-handed mode and gaming/power saving mode) Left Hand/ Right hand Mode Aivia M8600 is...
User Manual
Page 9
... to your hard disk and load them back when needed. 8 Remember that function to the empty button. • Load and Backup: In case you require more profiles (button assignments) and macros and do is drag the function icon and simply ...button assignment. The button then becomes no functional. • Dragging a set function icon to buttons from both "BASIC FUNCTION" and "MACRO SCRIPTS". More Tips: • You can assign various functions to the empty button, you would like to the other. • You may edit each macro script in the "MACRO EDITING" tab. ENGLISH Button Assignment User...
... to your hard disk and load them back when needed. 8 Remember that function to the empty button. • Load and Backup: In case you require more profiles (button assignments) and macros and do is drag the function icon and simply ...button assignment. The button then becomes no functional. • Dragging a set function icon to buttons from both "BASIC FUNCTION" and "MACRO SCRIPTS". More Tips: • You can assign various functions to the empty button, you would like to the other. • You may edit each macro script in the "MACRO EDITING" tab. ENGLISH Button Assignment User...
User Manual
Page 10
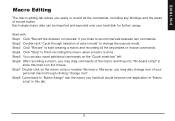
... record intervals between two commands. Start with: Step1 Click "Record the duration or intervals" if you may also change icon of your hard disk for further usage. Step7 Double-click on the "Quick-insert bar" left. Step8 Come back to "Button Assign" tab, the macro you may drag commands of mouse button. Step2 Double-click "Cycle through clicking "change the execute mode. Moreover...
... record intervals between two commands. Start with: Step1 Click "Record the duration or intervals" if you may also change icon of your hard disk for further usage. Step7 Double-click on the "Quick-insert bar" left. Step8 Come back to "Button Assign" tab, the macro you may drag commands of mouse button. Step2 Double-click "Cycle through clicking "change the execute mode. Moreover...
User Manual
Page 11
... a macro. Change Icon Here you release the assigned button. Record Keyboard only Clicking this option would ignore the press of action mode • Execute once: To execute a macro once. • Loop mode: Re-pressing to stop: Executing a macro continuously, and re-pressing the assigned button to stop recording ... or intervals (Time lag) If this function is click an empty icon of the icon base and press "Replace" to browse your files. Cycle through selection of mouse and just record keystrokes when recording a macro. Press Pause Key to Stop Recording Clicking this option would like...
... a macro. Change Icon Here you release the assigned button. Record Keyboard only Clicking this option would ignore the press of action mode • Execute once: To execute a macro once. • Loop mode: Re-pressing to stop: Executing a macro continuously, and re-pressing the assigned button to stop recording ... or intervals (Time lag) If this function is click an empty icon of the icon base and press "Replace" to browse your files. Cycle through selection of mouse and just record keystrokes when recording a macro. Press Pause Key to Stop Recording Clicking this option would like...
User Manual
Page 12
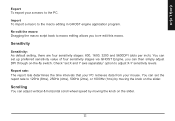
Import To import a macro to the PC. Scrolling You can adjust vertical & horizontal scroll wheel speed by moving the knob on -the-fly switch. You can set up preferred sensitivity value of four sensitivity stages via GHOST Engine, you to macro editing allows you can set X and Y axis separately" ... from your a macro to the macro editing in GHOST engine application program. ENGLISH Export To export your mouse. Re-edit the macro Dragging the macro script back to re-edit this macro. You can then simply adjust DPI through on the slider. 11 Check "set the report rate to...
Import To import a macro to the PC. Scrolling You can adjust vertical & horizontal scroll wheel speed by moving the knob on -the-fly switch. You can set up preferred sensitivity value of four sensitivity stages via GHOST Engine, you to macro editing allows you can set X and Y axis separately" ... from your a macro to the macro editing in GHOST engine application program. ENGLISH Export To export your mouse. Re-edit the macro Dragging the macro script back to re-edit this macro. You can then simply adjust DPI through on the slider. 11 Check "set the report rate to...
User Manual
Page 13
.../ 2479MHz Channel Number: 8 channels Transmitter Output Power: 0 dBm Modulation:2.4G GFSK modulator Operating Temperature Range: 0°C(32°F) ~ 40°C(104°F) Power Type of repetitive motion using an improperly set-up workplace, or incorrect body posture may be associated with physical discomfort and injury to the instruction Important information: Long period of wireless module: Mouse : Battery supply voltage Receiver : NB or...
.../ 2479MHz Channel Number: 8 channels Transmitter Output Power: 0 dBm Modulation:2.4G GFSK modulator Operating Temperature Range: 0°C(32°F) ~ 40°C(104°F) Power Type of repetitive motion using an improperly set-up workplace, or incorrect body posture may be associated with physical discomfort and injury to the instruction Important information: Long period of wireless module: Mouse : Battery supply voltage Receiver : NB or...
User Manual
Page 14
... and receiver. -Connect the equipment into an outlet on a circuit different from that to which can radiated radio frequency energy and, if not installed and used for a Class B digital device, pursuant to Part 15 of the FCC Rules. However, there is connected. -Consult the dealer or an experienced radio/TV technician for help. • This device complies with the instructions...
... and receiver. -Connect the equipment into an outlet on a circuit different from that to which can radiated radio frequency energy and, if not installed and used for a Class B digital device, pursuant to Part 15 of the FCC Rules. However, there is connected. -Consult the dealer or an experienced radio/TV technician for help. • This device complies with the instructions...
User Manual
Page 16
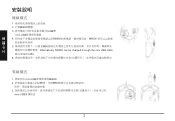
安裝說明 無線模式 1 2. 打開M8600開關 3 USB轉 mini-USB 4 M8600 M8600 5 M8600 Alternatively, M8600 can be charged through the mini USB cable as a wired mode. 6 有線模式 1 mini-USB M8600 2 USB埠,您的M8600 3 mini-USB接頭拔出 2
安裝說明 無線模式 1 2. 打開M8600開關 3 USB轉 mini-USB 4 M8600 M8600 5 M8600 Alternatively, M8600 can be charged through the mini USB cable as a wired mode. 6 有線模式 1 mini-USB M8600 2 USB埠,您的M8600 3 mini-USB接頭拔出 2

User Manual
Page 24
產品規格 滑鼠 Antenna Gain=0dBm 2402/ 2439/ 2450/ 2411/ 2468/ 2425/ 2447/ 2479MHz 頻道數:8 ch 0 dBm 2.4G GFSK modulator 0°C(32°F) ~ 40°C(104°F) USB USB 電池 封裝: BURNABY INTERNATIONAL TECHNOLOGY 型號: SANYO NP 80/ 3.7Vdc 1500mAh 10
產品規格 滑鼠 Antenna Gain=0dBm 2402/ 2439/ 2450/ 2411/ 2468/ 2425/ 2447/ 2479MHz 頻道數:8 ch 0 dBm 2.4G GFSK modulator 0°C(32°F) ~ 40°C(104°F) USB USB 電池 封裝: BURNABY INTERNATIONAL TECHNOLOGY 型號: SANYO NP 80/ 3.7Vdc 1500mAh 10

User Manual
Page 27
安裝說明 無線模式 1 2. 打开M8600开关 3 USB转mini-USB 4 M8600 M8600 5 M8600 Alternatively, M8600 can be charged through the mini USB cable as a wired mode. 6 有線模式 1 mini-USB M8600 2 USB M8600 3 mini-USB接头拔出 2 簡体中文
安裝說明 無線模式 1 2. 打开M8600开关 3 USB转mini-USB 4 M8600 M8600 5 M8600 Alternatively, M8600 can be charged through the mini USB cable as a wired mode. 6 有線模式 1 mini-USB M8600 2 USB M8600 3 mini-USB接头拔出 2 簡体中文

User Manual
Page 35
产品规格 鼠标 Antenna Gain=0dBm 2402/ 2439/ 2450/ 2411/ 2468/ 2425/ 2447/ 2479MHz 频道数: 8 ch 0 dBm 2.4G GFSK modulator 0°C(32°F) ~ 40°C(104°F) USB USB 电池 封装: BURNABY INTERNATIONAL TECHNOLOGY 型号: SANYO NP 80/ 3.7Vdc 1500mAh 警告 10 簡体中文
产品规格 鼠标 Antenna Gain=0dBm 2402/ 2439/ 2450/ 2411/ 2468/ 2425/ 2447/ 2479MHz 频道数: 8 ch 0 dBm 2.4G GFSK modulator 0°C(32°F) ~ 40°C(104°F) USB USB 电池 封装: BURNABY INTERNATIONAL TECHNOLOGY 型号: SANYO NP 80/ 3.7Vdc 1500mAh 警告 10 簡体中文
User Manual
Page 93
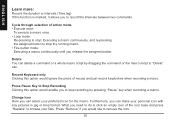
한국의 Step 1 Record the duration or intervals Step 2 Cycle through selection of action mode Step 3 Record Step 4 Stop Step 5 또한, "Quick-insert bar Step 6 On-board script Step 7 change icon Step 8 "Button Assign Macro scrip 8
한국의 Step 1 Record the duration or intervals Step 2 Cycle through selection of action mode Step 3 Record Step 4 Stop Step 5 또한, "Quick-insert bar Step 6 On-board script Step 7 change icon Step 8 "Button Assign Macro scrip 8
User Manual
Page 94
한국의 삭제 "Delete Pause jpg 또는 bmp Replace Remove 9
한국의 삭제 "Delete Pause jpg 또는 bmp Replace Remove 9


