
Use and Care Manual
Page 1
... Clothes 6, 7 Care and Cleaning 20, 21 Dryer Exhaust 21 Exterior 20 Lint Filter 8, 9, 20, 21 Storage and Vacation Tips 20 User Maintenance Instructions ........20, 21 Problem Solver 15-19 More questions ?...call GE Answer Center® 800.626.2000 Preparation Other Laundry Products 12 Hard Water 13 Loading the Washer 7 Pretreating 6, 12, 13 Sorting Clothes 6, 7 Stains 13 Stain Removal Guide 14 Consumer Services Appliance Registration 2 Model and Serial Numbers 2 Repair Service 2 Warranty Back Cover Models: WSM2700 WSM2780 GE...
... Clothes 6, 7 Care and Cleaning 20, 21 Dryer Exhaust 21 Exterior 20 Lint Filter 8, 9, 20, 21 Storage and Vacation Tips 20 User Maintenance Instructions ........20, 21 Problem Solver 15-19 More questions ?...call GE Answer Center® 800.626.2000 Preparation Other Laundry Products 12 Hard Water 13 Loading the Washer 7 Pretreating 6, 12, 13 Sorting Clothes 6, 7 Stains 13 Stain Removal Guide 14 Consumer Services Appliance Registration 2 Model and Serial Numbers 2 Repair Service 2 Warranty Back Cover Models: WSM2700 WSM2780 GE...
Use and Care Manual
Page 2
... for answers to help . It lists causes of the dryer door. These numbers are also on the inside of minor operating problems that you operate and maintain your appliance. Before sending in this card, please write these numbers here: Model Number Serial Number Use these numbers in this book conform to the Care Labeling Rule established by a qualified installer, service agency or the gas supplier. First, contact the...
... for answers to help . It lists causes of the dryer door. These numbers are also on the inside of minor operating problems that you operate and maintain your appliance. Before sending in this card, please write these numbers here: Model Number Serial Number Use these numbers in this book conform to the Care Labeling Rule established by a qualified installer, service agency or the gas supplier. First, contact the...
Use and Care Manual
Page 3
... Installation Instructions before using your dryer. (continued next page) 3 Make sure that it will be put in Installation Instructions. -Locate where the temperature is used. Use only metal duct inside for its intended purpose as described in this Use and Care Book. • This appliance must not be exposed to the weather. -Connect to a properly rated, protected and sized power supply circuit to avoid electrical overload. -Exhausting to persons when using...
... Installation Instructions before using your dryer. (continued next page) 3 Make sure that it will be put in Installation Instructions. -Locate where the temperature is used. Use only metal duct inside for its intended purpose as described in this Use and Care Book. • This appliance must not be exposed to the weather. -Connect to a properly rated, protected and sized power supply circuit to avoid electrical overload. -Exhausting to persons when using...
Use and Care Manual
Page 4
... damage or injury, if you have used for several minutes before using any electrical appliance which the hot water system may be cleaned periodically by the chemical action within your water heater and the gas can reduce the flame retardancy of the machine and the exhaust duct connection inside the dryer should be placed in your appliances free from the accumulation of two weeks...
... damage or injury, if you have used for several minutes before using any electrical appliance which the hot water system may be cleaned periodically by the chemical action within your water heater and the gas can reduce the flame retardancy of the machine and the exhaust duct connection inside the dryer should be placed in your appliances free from the accumulation of two weeks...
Use and Care Manual
Page 5
... cord or plug. • Never climb on or stand on the package that their product can be safely used in your laundered fabrics or reduce the static electricity in or turning the dryer Cycle Selector to OFF does NOT disconnect the appliance from the power supply before attempting any maintenance or cleaning (except the removal and cleaning of the lint filter). Important Safety Instructions •...
... cord or plug. • Never climb on or stand on the package that their product can be safely used in your laundered fabrics or reduce the static electricity in or turning the dryer Cycle Selector to OFF does NOT disconnect the appliance from the power supply before attempting any maintenance or cleaning (except the removal and cleaning of the lint filter). Important Safety Instructions •...
Use and Care Manual
Page 6
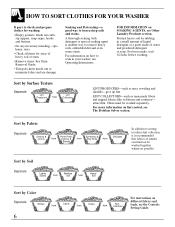
... how to check and prepare clothes for washing. • Empty pockets, brush out cuffs, zip zippers, snap snaps, hooks and buttons. • Do any necessary mending-rips, hems, tears. • Check all items for areas of water and powdered detergent or soap. LINT COLLECTORS-such as terry toweling and chenille-give up lint. attract lint. See Stain Removal Guide. • Turn poly...
... how to check and prepare clothes for washing. • Empty pockets, brush out cuffs, zip zippers, snap snaps, hooks and buttons. • Do any necessary mending-rips, hems, tears. • Check all items for areas of water and powdered detergent or soap. LINT COLLECTORS-such as terry toweling and chenille-give up lint. attract lint. See Stain Removal Guide. • Turn poly...
Use and Care Manual
Page 8
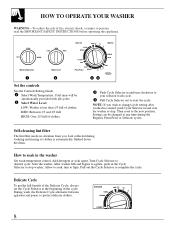
Self-cleaning lint filter The lint filter needs no attention from you wish to change cycle setting after washer has started, push Cycle Selector in the Cycle Selector to Spin. Lint collected during the Regular, Perm Press or Delicate cycles. Turn Cycle Selector to complete the cycle. Pull out the Cycle Selector to desired cycle. During wash, the Delicate Cycle alternates between agitation and pause, to stop washer. Cold rinse will be changed at the...
Self-cleaning lint filter The lint filter needs no attention from you wish to change cycle setting after washer has started, push Cycle Selector in the Cycle Selector to Spin. Lint collected during the Regular, Perm Press or Delicate cycles. Turn Cycle Selector to complete the cycle. Pull out the Cycle Selector to desired cycle. During wash, the Delicate Cycle alternates between agitation and pause, to stop washer. Cold rinse will be changed at the...
Use and Care Manual
Page 9
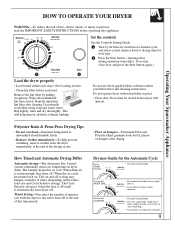
... Cycle Selector advances (when the heat is warm enough, heat turns off . Dryness Guide for load type. 2 Press the Start button. (Opening door during operation stops dryer. Operating Your Spacemaker Appliance Polyester Knits & Perm Press Drying Tips • Do not overload-Garments being dried or dewrinkled should tumble freely. • Remove clothes immediately-To help remove all accumulated lint from the dryer immediately at the end of this time period. Delicate 10 AIR FLUFF (HEAT...
... Cycle Selector advances (when the heat is warm enough, heat turns off . Dryness Guide for load type. 2 Press the Start button. (Opening door during operation stops dryer. Operating Your Spacemaker Appliance Polyester Knits & Perm Press Drying Tips • Do not overload-Garments being dried or dewrinkled should tumble freely. • Remove clothes immediately-To help remove all accumulated lint from the dryer immediately at the end of this time period. Delicate 10 AIR FLUFF (HEAT...
Use and Care Manual
Page 10
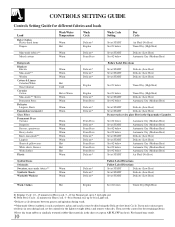
... Directions Set at START Set at START Set at START Delicate (Low Heat) Delicate (Low Heat) Delicate (Low Heat) See #1 below Timed Dry (High Heat) See #1 below Set at START See #2 below Timed Dry (High Heat) Delicate (Low Heat) Automatic Dry (Medium Heat) Set at START Delicate (Low Heat) Set at START Delicate (Low Heat) Do not wash or dry glass fiber in the dryer except on AIR FLUFF (no heat). CONTROLS SETTING GUIDE Controls Setting Guide for different fabrics and loads Load Baby Clothes Plastic-lined items Diapers Wash Water Temperature Warm Hot...
... Directions Set at START Set at START Set at START Delicate (Low Heat) Delicate (Low Heat) Delicate (Low Heat) See #1 below Timed Dry (High Heat) See #1 below Set at START See #2 below Timed Dry (High Heat) Delicate (Low Heat) Automatic Dry (Medium Heat) Set at START Delicate (Low Heat) Set at START Delicate (Low Heat) Do not wash or dry glass fiber in the dryer except on AIR FLUFF (no heat). CONTROLS SETTING GUIDE Controls Setting Guide for different fabrics and loads Load Baby Clothes Plastic-lined items Diapers Wash Water Temperature Warm Hot...
Use and Care Manual
Page 11
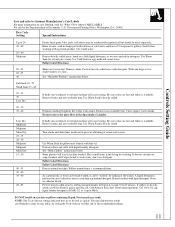
... Full loads 65 -75 Small loads 35 -45 25 -35 30 Less Dry 20 -30 30 -40 Less Dry Midpoint Midpoint More Dry 25 -35 20 -30 Midpoint Midpoint More Dry 15 -20 40 -55 30 -40 30 -40 65 -85 Plastic-lined pants, bibs, pads, crib sheets may be used as a guide. You... of cold water and borax (11⁄4 teaspoons to gallon). Controls Setting Guide Save and refer to Garment Manufacturer's Care Labels For more information on a little liquid detergent, or wet area and rub in the washer. For sale by rubbing in diaper pail with solution of Documents, U.S. Dry Cycle Setting Special Instructions Up to...
... Full loads 65 -75 Small loads 35 -45 25 -35 30 Less Dry 20 -30 30 -40 Less Dry Midpoint Midpoint More Dry 25 -35 20 -30 Midpoint Midpoint More Dry 15 -20 40 -55 30 -40 30 -40 65 -85 Plastic-lined pants, bibs, pads, crib sheets may be used as a guide. You... of cold water and borax (11⁄4 teaspoons to gallon). Controls Setting Guide Save and refer to Garment Manufacturer's Care Labels For more information on a little liquid detergent, or wet area and rub in the washer. For sale by rubbing in diaper pail with solution of Documents, U.S. Dry Cycle Setting Special Instructions Up to...
Use and Care Manual
Page 13
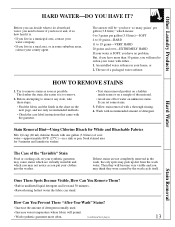
.... • Check the care label instructions that came with the garment. • Test stain removal product on a hidden inside seam or on a sample of the material. • Avoid use of the "Invisible" Stain Food or cooking oils on unknown stains. Follow stain removal with recommended amount of cool water-approximately 80°F. (27°C.)-in washer. The Case of a packaged water softener...
.... • Check the care label instructions that came with the garment. • Test stain removal product on a hidden inside seam or on a sample of the material. • Avoid use of the "Invisible" Stain Food or cooking oils on unknown stains. Follow stain removal with recommended amount of cool water-approximately 80°F. (27°C.)-in washer. The Case of a packaged water softener...
Use and Care Manual
Page 14
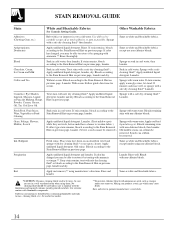
.... Sponge with a safe dry cleaning fluid.* Launder. STAIN REMOVAL GUIDE Stain White and Bleachable Fabrics See Controls Setting Guide. Use dull tool to the Stain Removal Hint on previous page, launder. Rinse. If stain remains, bleach according to be toxic, be washed in a well ventilated room when using manufacturer's directions. Sponge or soak in cold water. With cream: Follow guide directions for cream. If...
.... Sponge with a safe dry cleaning fluid.* Launder. STAIN REMOVAL GUIDE Stain White and Bleachable Fabrics See Controls Setting Guide. Use dull tool to the Stain Removal Hint on previous page, launder. Rinse. If stain remains, bleach according to be toxic, be washed in a well ventilated room when using manufacturer's directions. Sponge or soak in cold water. With cream: Follow guide directions for cream. If...
Use and Care Manual
Page 15
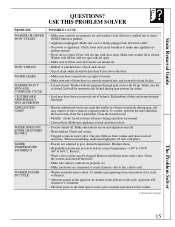
... both hot and cold faucets are properly set and washer Cycle Selector is pulled out or dryer START button is level and firm to 66°C.). To correct, open . When reassembling, make sure appliance is getting current. • Dryer door is normal operation for safety. • Load may be less than 8 feet above the floor. • Make sure hose connections are normal in water valve. Check fuses and circuit breakers...
... both hot and cold faucets are properly set and washer Cycle Selector is pulled out or dryer START button is level and firm to 66°C.). To correct, open . When reassembling, make sure appliance is getting current. • Dryer door is normal operation for safety. • Load may be less than 8 feet above the floor. • Make sure hose connections are normal in water valve. Check fuses and circuit breakers...
Use and Care Manual
Page 16
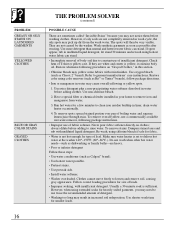
...). • Use hottest water possible. • Pretreat stains. • Use presoak aids. • Install water softener. • Washer overloaded. Restore whiteness following package instructions. • Improper use of loads. • Improper soaking, with insufficient detergent. drain water heater occasionally. 4. always dilute before adding to loosen and remove soil, causing gray appearance. Use shorter wash time for type of detergent. • Washing too long may need to clean iron...
...). • Use hottest water possible. • Pretreat stains. • Use presoak aids. • Install water softener. • Washer overloaded. Restore whiteness following package instructions. • Improper use of loads. • Improper soaking, with insufficient detergent. drain water heater occasionally. 4. always dilute before adding to loosen and remove soil, causing gray appearance. Use shorter wash time for type of detergent. • Washing too long may need to clean iron...
Use and Care Manual
Page 17
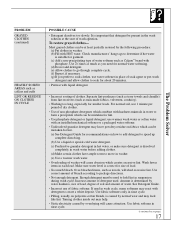
...; brand with HOT water. If used in wash cycle, many softeners may react with an installed mechanical softener or a packaged water softener. • Undissolved granular detergent may leave powdery residue on fabrics which creates excessive lint. Turning clothes inside out may look like lint. Make sure water level is determined by water hardness, size of load, degree of soil and amount of washer will cause...
...; brand with HOT water. If used in wash cycle, many softeners may react with an installed mechanical softener or a packaged water softener. • Undissolved granular detergent may leave powdery residue on fabrics which creates excessive lint. Turning clothes inside out may look like lint. Make sure water level is determined by water hardness, size of load, degree of soil and amount of washer will cause...
Use and Care Manual
Page 18
... have random square shape; Check garments carefully before loading washer and mend all rips and tears. • As permanent press garments age, they may have come in wash tub. • Snaps, hooks, sharp buttons, belt buckles, zippers. Use delicate cycle. Turn knits inside out. • Improper use automatic dry cycle. This is due to garment manufacturer's care instructions. • Garments weakened by heavy belt buckles, etc. Refer...
... have random square shape; Check garments carefully before loading washer and mend all rips and tears. • As permanent press garments age, they may have come in wash tub. • Snaps, hooks, sharp buttons, belt buckles, zippers. Use delicate cycle. Turn knits inside out. • Improper use automatic dry cycle. This is due to garment manufacturer's care instructions. • Garments weakened by heavy belt buckles, etc. Refer...
Use and Care Manual
Page 19
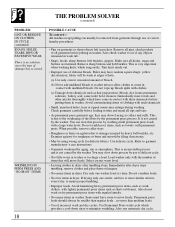
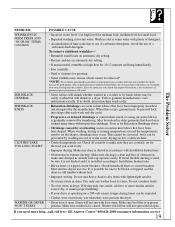
... ducting is in exhaust ducting. Make sure lint filter is used to dry. • Improper ducting. Avoid the use two. Make sure dryer is closed. drying on a 208-volt circuit, longer drying times can be sure it is open . Follow garment manufacturers' care instructions exactly. The Problem Solver PROBLEM WRINKLING IN PERM PRESS AND "NO-IRON" ITEMS (continued) SHRINKAGE, GENERAL SHRINKAGE, KNITS CLOTHES TAKE TOO LONG TO DRY WASHER OR DRYER WON'T START POSSIBLE CAUSE • Incorrect water...
... ducting is in exhaust ducting. Make sure lint filter is used to dry. • Improper ducting. Avoid the use two. Make sure dryer is closed. drying on a 208-volt circuit, longer drying times can be sure it is open . Follow garment manufacturers' care instructions exactly. The Problem Solver PROBLEM WRINKLING IN PERM PRESS AND "NO-IRON" ITEMS (continued) SHRINKAGE, GENERAL SHRINKAGE, KNITS CLOTHES TAKE TOO LONG TO DRY WASHER OR DRYER WON'T START POSSIBLE CAUSE • Incorrect water...
Use and Care Manual
Page 20
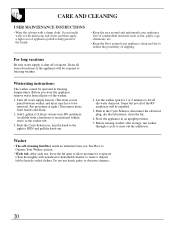
... dry to the washer tub. 3. For long vacations Be sure water supply is shut off water supply faucets. (The front access panel between washer and dryer may have to evaporate. Do not use , leave the lid open to allow moisture to be expelled. 5. Drain all the water drain out. Clean thoroughly with a damp cloth. See procedure at faucets. Let the washer spin for 1 or 2 minutes to Operate Your Washer...
... dry to the washer tub. 3. For long vacations Be sure water supply is shut off water supply faucets. (The front access panel between washer and dryer may have to evaporate. Do not use , leave the lid open to allow moisture to be expelled. 5. Drain all the water drain out. Clean thoroughly with a damp cloth. See procedure at faucets. Let the washer spin for 1 or 2 minutes to Operate Your Washer...
Use and Care Manual
Page 21
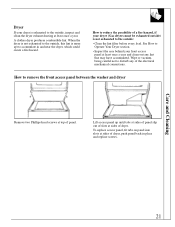
... careful not to reduce the possibility of a fire hazard, if your dryer (Gas dryers must be exhausted outside , inspect and clean the dryer exhaust ducting at least once a year. To replace access panel, fit tabs on panel into slots at sides of the electrical mechanical connections. Lift access panel up until tabs at sides of panel slip out of slots at sides of panel. A clothes dryer produces combustible lint. See How to Operate...
... careful not to reduce the possibility of a fire hazard, if your dryer (Gas dryers must be exhausted outside , inspect and clean the dryer exhaust ducting at least once a year. To replace access panel, fit tabs on panel into slots at sides of the electrical mechanical connections. Lift access panel up until tabs at sides of panel slip out of slots at sides of panel. A clothes dryer produces combustible lint. See How to Operate...

Use and Care Manual
Page 24
... service by a GE Authorized Servicer is located in materials or workmanship. Proof of circuit breakers. During this Limited Warranty. I Improper installation, delivery or maintenance. If the product is not available, you may be required to bring the product to an Authorized GE Service location for service. I Product not accessible to obtain service under the warranty. I Replacement of house fuses or resetting of the original purchase date is abused, misused, or used...
... service by a GE Authorized Servicer is located in materials or workmanship. Proof of circuit breakers. During this Limited Warranty. I Improper installation, delivery or maintenance. If the product is not available, you may be required to bring the product to an Authorized GE Service location for service. I Product not accessible to obtain service under the warranty. I Replacement of house fuses or resetting of the original purchase date is abused, misused, or used...


