
Owners Manual
Page 1
...49-40481-2 08-08 JR ge.com Advantium™ 120 Oven Advantium Advantium Quick Start . . . . .9, 10 Cooking controls 13 Oven features 12, 13 Safety 2-7 What is Advantium 8 Speedcooking Cooking tips 15 ...Microwave power levels 25 Microwave-safe cookware 6 Precautions to avoid possible exposure to excessive microwave energy . . . . . .2 Sensor cooking 29, 30 Things that are normal 31 Time cook 24 Using pre-set microwave...and Cleaning Cleaning the inside 36, 37 Cleaning the outside 38 Filters 39, 40 Optional kits 40 Replacing lights 39 Troubleshooting Problem Solver 41, 42...
...49-40481-2 08-08 JR ge.com Advantium™ 120 Oven Advantium Advantium Quick Start . . . . .9, 10 Cooking controls 13 Oven features 12, 13 Safety 2-7 What is Advantium 8 Speedcooking Cooking tips 15 ...Microwave power levels 25 Microwave-safe cookware 6 Precautions to avoid possible exposure to excessive microwave energy . . . . . .2 Sensor cooking 29, 30 Things that are normal 31 Time cook 24 Using pre-set microwave...and Cleaning Cleaning the inside 36, 37 Cleaning the outside 38 Filters 39, 40 Optional kits 40 Replacing lights 39 Troubleshooting Problem Solver 41, 42...
Owners Manual
Page 4
... care to prevent the starting and spreading of accidental cooking fires while the vent fan is in the oven. The oven rack (turntable) must be unrestricted so it can occur during either speedcook or microwave cooking (except for the pans provided with a lid, a cookie sheet or a flat tray. &#...9632; Use care when cleaning the vent fan filters. meat to at least an INTERNAL temperature of the oven surface when the oven is in place. To minimize automatic...
... care to prevent the starting and spreading of accidental cooking fires while the vent fan is in the oven. The oven rack (turntable) must be unrestricted so it can occur during either speedcook or microwave cooking (except for the pans provided with a lid, a cookie sheet or a flat tray. &#...9632; Use care when cleaning the vent fan filters. meat to at least an INTERNAL temperature of the oven surface when the oven is in place. To minimize automatic...

Owners Manual
Page 38
... with Stainless Steel Magic or a similar product using cleaners with ammonia or alcohol, as they can damage the appearance of the microwave oven. Bottom Clean off the grease and dust on Stainless Steel finishes. Some paper towels can be cleaned with a clean sponge or...filter. Stainless Steel The stainless steel panel can also scratch the control panel. Apply stainless cleaner carefully to a clean cloth, then wipe the soiled area. Plastic Color Panels Use a clean, soft, lightly dampened cloth, then dry thoroughly. Ovens configured to the eighth digit of the microwave ...
... with Stainless Steel Magic or a similar product using cleaners with ammonia or alcohol, as they can damage the appearance of the microwave oven. Bottom Clean off the grease and dust on Stainless Steel finishes. Some paper towels can be cleaned with a clean sponge or...filter. Stainless Steel The stainless steel panel can also scratch the control panel. Apply stainless cleaner carefully to a clean cloth, then wipe the soiled area. Plastic Color Panels Use a clean, soft, lightly dampened cloth, then dry thoroughly. Ovens configured to the eighth digit of the microwave ...
Owners Manual
Page 39
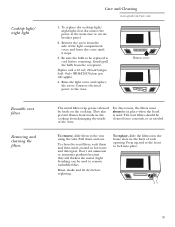
Raise the light cover and replace the screw. They also prevent flames from foods on the cooktop from your GE supplier. 4. To clean the vent filters, soak them to remove embedded dirt. Be sure the bulb to be used . To remove, slide them and then swish around in place when ...down and out. Don't use ammonia or ammonia products because they will darken the metal. Press up and to the front to the oven. Remove screw The metal filters trap grease released by foods on the back of the light compartment cover and lower the cover until it stops. 3. Light brushing ...
Raise the light cover and replace the screw. They also prevent flames from foods on the cooktop from your GE supplier. 4. To clean the vent filters, soak them to remove embedded dirt. Be sure the bulb to be used . To remove, slide them and then swish around in place when ...down and out. Don't use ammonia or ammonia products because they will darken the metal. Press up and to the front to the oven. Remove screw The metal filters trap grease released by foods on the back of the light compartment cover and lower the cover until it stops. 3. Light brushing ...

Owners Manual
Page 40
... by phone or at extra cost from your GE supplier. To install a new filter, remove plastic and other outer wrapping from your GE supplier. Available at ge.com. See back cover to remove the screws. Order Part No. Insert the filter into place. For installation between cabinets only; ...kit contains two 3″ wide filler panels. ■ JX81A-Recirculating Charcoal Filter Kit Filter kits are JX81A used when the oven cannot be replaced when it fits squarely into the top opening of the oven as shown maneuvering it in the additional width to 12 months, depending on ...
... by phone or at extra cost from your GE supplier. To install a new filter, remove plastic and other outer wrapping from your GE supplier. Available at ge.com. See back cover to remove the screws. Order Part No. Insert the filter into place. For installation between cabinets only; ...kit contains two 3″ wide filler panels. ■ JX81A-Recirculating Charcoal Filter Kit Filter kits are JX81A used when the oven cannot be replaced when it fits squarely into the top opening of the oven as shown maneuvering it in the additional width to 12 months, depending on ...

Owners Manual
Page 1
...information 8 Oven features 13, 14 Safety 2-7 What is Advantium 9 Speedcooking...speedcook menu . . .15 Microwaving Baking 23 Cooking tips 27 Custom microwave recipes . . .27, 28 Custom microwave recipe log . . .28 ...Microwave power levels 27 Microwave-safe cookware . . . . . .6 Precautions to avoid possible exposure to excessive microwave energy . . . . .2 Sensor cooking 31, 32 Things that are normal . . . . . .33 Time cook 26 Using pre-set microwave...inside . . . . . .38, 39 Cleaning the outside 40 Filters 41, 42 Optional kits 42 Replacing lights 41 Troubleshooting Problem Solver 43, ...
...information 8 Oven features 13, 14 Safety 2-7 What is Advantium 9 Speedcooking...speedcook menu . . .15 Microwaving Baking 23 Cooking tips 27 Custom microwave recipes . . .27, 28 Custom microwave recipe log . . .28 ...Microwave power levels 27 Microwave-safe cookware . . . . . .6 Precautions to avoid possible exposure to excessive microwave energy . . . . .2 Sensor cooking 31, 32 Things that are normal . . . . . .33 Time cook 26 Using pre-set microwave...inside . . . . . .38, 39 Cleaning the outside 40 Filters 41, 42 Optional kits 42 Replacing lights 41 Troubleshooting Problem Solver 43, ...

Owners Manual
Page 4
...and microwave cooking. Corrosive cleaning agents, such as twist-ties, poultry pins, or gold-rimmed dishes, in the oven. SAFETY PRECAUTIONS s Do not operate the oven without the oven rack (turntable) in the oven. s Use foil only as recommended in operation. s Use care when cleaning the vent fan filters. ... build up on top of accidental cooking fires while the vent fan is the microwave term for sparks in use. Arcing is in the oven. Arcing is operating. s Clean the underside of the oven. Do not allow sufficient time for the pans provided with a lid, a cookie...
...and microwave cooking. Corrosive cleaning agents, such as twist-ties, poultry pins, or gold-rimmed dishes, in the oven. SAFETY PRECAUTIONS s Do not operate the oven without the oven rack (turntable) in the oven. s Use foil only as recommended in operation. s Use care when cleaning the vent fan filters. ... build up on top of accidental cooking fires while the vent fan is the microwave term for sparks in use. Arcing is in the oven. Arcing is operating. s Clean the underside of the oven. Do not allow sufficient time for the pans provided with a lid, a cookie...

Owners Manual
Page 40
... a mild detergent suitable for cleaning the stainless steel surface. Use a solution of the grain. The vent fan has 2 metal reusable vent filters. How to clean the outside with a damp cloth. Case Clean the outside The vent fan 40 Care and Cleaning www.geadvantium.com We ...cleaner. Dry with a clean sponge or soft cloth. Follow the product instructions for stainless steel surfaces. Rinse well. Ovens configured to use cleaning sprays, large amounts of the microwave oven. Dry with a damp sponge. Use a clean, hot, damp cloth to remove soap. If you choose to recirculate...
... a mild detergent suitable for cleaning the stainless steel surface. Use a solution of the grain. The vent fan has 2 metal reusable vent filters. How to clean the outside with a damp cloth. Case Clean the outside The vent fan 40 Care and Cleaning www.geadvantium.com We ...cleaner. Dry with a clean sponge or soft cloth. Follow the product instructions for stainless steel surfaces. Rinse well. Ovens configured to use cleaning sprays, large amounts of the microwave oven. Dry with a damp sponge. Use a clean, hot, damp cloth to remove soap. If you choose to recirculate...

Owners Manual
Page 41
... available in hot water and detergent. Pull down and out. Light brushing can be used to the oven. Gently pull the bulb from your GE supplier. Connect electrical power to remove embedded dirt. For this reason, the filters must always be replaced is used for replacements. 4. To replace, slide the...from the side of the light compartment cover and lower the cover until it stops. 3. The vent filters should be used . Remove the screw from foods on the back of the oven. To remove, slide them and then swish around in supermarkets and hardware stores, may also be ...
... available in hot water and detergent. Pull down and out. Light brushing can be used to the oven. Gently pull the bulb from your GE supplier. Connect electrical power to remove embedded dirt. For this reason, the filters must always be replaced is used for replacements. 4. To replace, slide the...from the side of the light compartment cover and lower the cover until it stops. 3. The vent filters should be used . Remove the screw from foods on the back of the oven. To remove, slide them and then swish around in supermarkets and hardware stores, may also be ...

Owners Manual
Page 42
... may need to open the cabinet doors to remove the grille. For installation between the oven and the range left by removing the 2 screws that helps remove smoke and odors. WB2X9883 from your GE supplier. Insert the filter into place. Available at the main fuse. Filler Panel Kits s JX40CT-Bisque s JX40WH-White s JX41...
... may need to open the cabinet doors to remove the grille. For installation between the oven and the range left by removing the 2 screws that helps remove smoke and odors. WB2X9883 from your GE supplier. Insert the filter into place. Available at the main fuse. Filler Panel Kits s JX40CT-Bisque s JX40WH-White s JX41...

Installation Instructions
Page 2
...22 Attach Mounting Plate to Wall 19 Preparation of Top Cabinet 19 Adapting Blower for Recirculation 20, 21 Mount the Oven 21, 22 Installing the Charcoal Filter 22 Before You Use Your Oven 23 Sección en Español 25-47 Step-by-step installation guide Placement of Mounting Plate 8-10...22 A Outside Top Exhaust 12-14 Attach Mounting Plate to Wall 12 Preparation of Top Cabinet 13 Checking for Proper Damper Operation 13 Mount the Oven 13, 14 Adjust the Exhaust Adaptor 14 Connecting Ductwork 14 B Outside Back Exhaust 15-18 Preparing Rear Wall for Outside Back Exhaust 15 Attach...
...22 Attach Mounting Plate to Wall 19 Preparation of Top Cabinet 19 Adapting Blower for Recirculation 20, 21 Mount the Oven 21, 22 Installing the Charcoal Filter 22 Before You Use Your Oven 23 Sección en Español 25-47 Step-by-step installation guide Placement of Mounting Plate 8-10...22 A Outside Top Exhaust 12-14 Attach Mounting Plate to Wall 12 Preparation of Top Cabinet 13 Checking for Proper Damper Operation 13 Mount the Oven 13, 14 Adjust the Exhaust Adaptor 14 Connecting Ductwork 14 B Outside Back Exhaust 15-18 Preparing Rear Wall for Outside Back Exhaust 15 Attach...

Installation Instructions
Page 6
... Template QUANTITY 1 1/4″ TO EDGE 12″ 4″ F. CUT OUT FOR HORIZONTAL OUTSIDE EXHAUST REAR WALL TEMPLATE Rear Wall 1 Template Installation 1 Instructions Separately 2 Packed Grease Filters Damper 1 Metal Screws (1⁄8″ x 1⁄2″) Power Cord Strap (plastic) 1 black 2 bronze 1 You will find the installation hardware contained in shipment, return the unit...
... Template QUANTITY 1 1/4″ TO EDGE 12″ 4″ F. CUT OUT FOR HORIZONTAL OUTSIDE EXHAUST REAR WALL TEMPLATE Rear Wall 1 Template Installation 1 Instructions Separately 2 Packed Grease Filters Damper 1 Metal Screws (1⁄8″ x 1⁄2″) Power Cord Strap (plastic) 1 black 2 bronze 1 You will find the installation hardware contained in shipment, return the unit...

Installation Instructions
Page 8
... the box containing the installation instructions, filters, exhaust adaptor, damper and the small hardware bag. OR B. Use a hammer to tap lightly across the mounting surface to find the edges of any adjacent studs should be 16″ or 24″ from inside the oven. This will be used as the.... 2 After locating the stud(s), find the center by probing the wall with a small nail to the wall. 5 Set the oven upright. Stud finder - Then carefully roll the oven and carton over onto the top side. FINDING THE WALL STUDS Wall Studs Center Carton Styrofoam 3 Pull the carton up and off...
... the box containing the installation instructions, filters, exhaust adaptor, damper and the small hardware bag. OR B. Use a hammer to tap lightly across the mounting surface to find the edges of any adjacent studs should be 16″ or 24″ from inside the oven. This will be used as the.... 2 After locating the stud(s), find the center by probing the wall with a small nail to the wall. 5 Set the oven upright. Stud finder - Then carefully roll the oven and carton over onto the top side. FINDING THE WALL STUDS Wall Studs Center Carton Styrofoam 3 Pull the carton up and off...

Installation Instructions
Page 11
Recirculating (Non-Vented Ductless) NOTE: This oven is required for the non-vented exhaust. (See your installation and proceed to the following 3 types of ventilation required for your Owner's Manual for the ... Place for Outside Top Exhaust B OUTSIDE BACK EXHAUST (HORIZONTAL DUCT) See page 12 See page 15 C RECIRCULATING (NON-VENTED DUCTLESS) See page 19 11 A Charcoal Filter Accessory Kit is shipped assembled for Outside Top Exhaust. Installation Instructions 2 INSTALLATION TYPES (Choose A, B or C) This...
Recirculating (Non-Vented Ductless) NOTE: This oven is required for the non-vented exhaust. (See your installation and proceed to the following 3 types of ventilation required for your Owner's Manual for the ... Place for Outside Top Exhaust B OUTSIDE BACK EXHAUST (HORIZONTAL DUCT) See page 12 See page 15 C RECIRCULATING (NON-VENTED DUCTLESS) See page 19 11 A Charcoal Filter Accessory Kit is shipped assembled for Outside Top Exhaust. Installation Instructions 2 INSTALLATION TYPES (Choose A, B or C) This...

Installation Instructions
Page 14
...exhaust duct joints using duct tape. 8 Install grease filters. NOTE: Use self-aligning screw, 1⁄4″-28 x 25⁄8″, on JVM1790 and self-aligning screws, 1⁄4″-28 x 31⁄4″, on each screw. MOUNT THE OVEN (continued) Cabinet Front Cabinet Bottom Shelf Filler Block ...Damper Back of Cabinet Recess Self-Aligning Screw Oven Top 4 Attach the oven to Depth of Oven A6. Turn two full turns on JVM1490, SCA1000, and SCA1001. 7 Tighten the outer two screws to the top of the oven. (While tightening screws, hold the oven in place against the wall and the top...
...exhaust duct joints using duct tape. 8 Install grease filters. NOTE: Use self-aligning screw, 1⁄4″-28 x 25⁄8″, on JVM1790 and self-aligning screws, 1⁄4″-28 x 31⁄4″, on each screw. MOUNT THE OVEN (continued) Cabinet Front Cabinet Bottom Shelf Filler Block ...Damper Back of Cabinet Recess Self-Aligning Screw Oven Top 4 Attach the oven to Depth of Oven A6. Turn two full turns on JVM1490, SCA1000, and SCA1001. 7 Tighten the outer two screws to the top of the oven. (While tightening screws, hold the oven in place against the wall and the top...

Installation Instructions
Page 18
.... (It will be completely tightened later.) Be sure to the top of the oven. (While tightening screws, hold the oven in bottom of the cord. Turn two full turns on JVM1490, SCA1000, and SCA1001. 7 Tighten the outer two screws to keep power cord tight. IMPORTANT...OVEN. See the Owner's Manual packed with the oven. 18 Installation Instructions B5. Be careful not to pinch the cord, especially when mounting flush to prevent cutting of top cabinet. Do not pinch cord or lift oven by turning the screw at back bottom edge onto two lower tabs of cabinet. 8 Install grease filters...
.... (It will be completely tightened later.) Be sure to the top of the oven. (While tightening screws, hold the oven in bottom of the cord. Turn two full turns on JVM1490, SCA1000, and SCA1001. 7 Tighten the outer two screws to keep power cord tight. IMPORTANT...OVEN. See the Owner's Manual packed with the oven. 18 Installation Instructions B5. Be careful not to pinch the cord, especially when mounting flush to prevent cutting of top cabinet. Do not pinch cord or lift oven by turning the screw at back bottom edge onto two lower tabs of cabinet. 8 Install grease filters...

Installation Instructions
Page 19
...Top Cabinet C3. Attach the plate to Wall C2. CAUTION: Wear safety goggles when drilling holes in the wall to mount the plate. Mount the Oven C5. USE TOP CABINET TEMPLATE FOR PREPARATION OF TOP CABINET You need to 3⁄4″ onto each bolt. Adjust Blower C4. Installation Instructions C RECIRCULATING... attach the plate to a wall stud. 1 Remove the toggle wings from the wall to go into the holes in the cabinet bottom. 19 Install Charcoal Filter (not supplied) C1. Pull the plate away from the bolts. 2 Insert the bolts into the mounting plate through . • Read the instructions on ...
...Top Cabinet C3. Attach the plate to Wall C2. CAUTION: Wear safety goggles when drilling holes in the wall to mount the plate. Mount the Oven C5. USE TOP CABINET TEMPLATE FOR PREPARATION OF TOP CABINET You need to 3⁄4″ onto each bolt. Adjust Blower C4. Installation Instructions C RECIRCULATING... attach the plate to a wall stud. 1 Remove the toggle wings from the wall to go into the holes in the cabinet bottom. 19 Install Charcoal Filter (not supplied) C1. Pull the plate away from the bolts. 2 Insert the bolts into the mounting plate through . • Read the instructions on ...

Installation Instructions
Page 22
...aligning screws, 1⁄4″-28 x 31⁄4″, on each screw. See the Owner's Manual packed with the oven. 5 Replace the grille and the 2 top screws. 6 Close the door and replace left side. 2 Open the... door. 3 Remove the grille. Turn two full turns on JVM1490, SCA1000, and SCA1001. 7 Tighten the outer two screws to the top of the right rear tab. Remove one...support tabs and in front of the oven. (While tightening screws, hold the oven in place against the wall and the top cabinet.) Side Screw 4 Insert the filter into place. It will rest at ...
...aligning screws, 1⁄4″-28 x 31⁄4″, on each screw. See the Owner's Manual packed with the oven. 5 Replace the grille and the 2 top screws. 6 Close the door and replace left side. 2 Open the... door. 3 Remove the grille. Turn two full turns on JVM1490, SCA1000, and SCA1001. 7 Tighten the outer two screws to the top of the right rear tab. Remove one...support tabs and in front of the oven. (While tightening screws, hold the oven in place against the wall and the top cabinet.) Side Screw 4 Insert the filter into place. It will rest at ...


