Owners Manual
Page 3
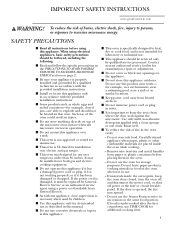
...this appliance. ■ This oven is specifically designed to excessive microwave energy: SAFETY PRECAUTIONS ■ Read all instructions before placing them in this manual. ■ Do not use the oven for examination, repair or ...installation instructions. ■ Some products such as described in the oven. - It may spread. - Contact nearest authorized service facility for storage purposes. Do not leave paper products, cooking utensils or food in the oven when not in use the Sensor Features twice in succession on top of the microwave oven surface when the microwave oven...
...this appliance. ■ This oven is specifically designed to excessive microwave energy: SAFETY PRECAUTIONS ■ Read all instructions before placing them in this manual. ■ Do not use the oven for examination, repair or ...installation instructions. ■ Some products such as described in the oven. - It may spread. - Contact nearest authorized service facility for storage purposes. Do not leave paper products, cooking utensils or food in the oven when not in use the Sensor Features twice in succession on top of the microwave oven surface when the microwave oven...

Owners Manual
Page 3
...MICROWAVE ENERGY section on the same food portion. s Keep power cord away from paper or plastic containers before using this manual. s To reduce the risk of this appliance. Such use this appliance. s This oven is not intended for example, in accordance with the provided installation instructions. s This oven...or vapors in this product near a sink or in accordance with the provided installation instructions. s Install or locate this oven. s Do not use the oven for installation over ranges no wider than 36 inches. Contact nearest authorized service facility for...
...MICROWAVE ENERGY section on the same food portion. s Keep power cord away from paper or plastic containers before using this manual. s To reduce the risk of this appliance. Such use this appliance. s This oven is not intended for example, in accordance with the provided installation instructions. s This oven...or vapors in this product near a sink or in accordance with the provided installation instructions. s Install or locate this oven. s Do not use the oven for installation over ranges no wider than 36 inches. Contact nearest authorized service facility for...
Installation Instructions
Page 7
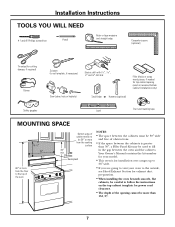
...If the space between the cabinets is for installation over ranges up to 36″ wide. • If you are going to vent your model. • This oven is greater than 13-1/2″. 7 Your Owner's Manual contains the kit number for your oven to the outside, see Hood Exhaust Section ...for exhaust duct preparation. • When installing the oven beneath smooth, flat cabinets, be careful to fill in the...
...If the space between the cabinets is for installation over ranges up to 36″ wide. • If you are going to vent your model. • This oven is greater than 13-1/2″. 7 Your Owner's Manual contains the kit number for your oven to the outside, see Hood Exhaust Section ...for exhaust duct preparation. • When installing the oven beneath smooth, flat cabinets, be careful to fill in the...

Installation Instructions
Page 11
Select the type of ventilation required for your Owner's Manual for the kit number.) Recirculating (Non-Vented Ductless) NOTE: This oven is required for the non-vented exhaust. (See your installation and proceed to the following 3 types of ventilation: A. Outside Back Exhaust (Horizontal Duct) C. A OUTSIDE TOP EXHAUST (... See page 19 11 A Charcoal Filter Accessory Kit is shipped assembled for Outside Top Exhaust. Outside Top Exhaust (Vertical Duct) B. Installation Instructions 2 INSTALLATION TYPES (Choose A, B or C) This oven is designed for adaptation to that section.
Select the type of ventilation required for your Owner's Manual for the kit number.) Recirculating (Non-Vented Ductless) NOTE: This oven is required for the non-vented exhaust. (See your installation and proceed to the following 3 types of ventilation: A. Outside Back Exhaust (Horizontal Duct) C. A OUTSIDE TOP EXHAUST (... See page 19 11 A Charcoal Filter Accessory Kit is shipped assembled for Outside Top Exhaust. Outside Top Exhaust (Vertical Duct) B. Installation Instructions 2 INSTALLATION TYPES (Choose A, B or C) This oven is designed for adaptation to that section.

Installation Instructions
Page 14
See the Owner's Manual packed with the oven. 14 A5. Damper Back of Cabinet Recess Self-Aligning Screw Oven Top 4 Attach the oven to the top cabinet. 5 Insert 2 self-aligning screws (1⁄4″-28 x 31⁄4″) through outer top cabinet holes. NOTE: Use self... exhaust duct joints using duct tape. 8 Install grease filters. CONNECTING DUCTWORK House Duct 6 Tighten center screw completely. Turn two full turns on JVM1490, SCA1000, and SCA1001. 7 Tighten the outer two screws to the top of the oven. (While tightening screws, hold the oven in place against the wall and the top...
See the Owner's Manual packed with the oven. 14 A5. Damper Back of Cabinet Recess Self-Aligning Screw Oven Top 4 Attach the oven to the top cabinet. 5 Insert 2 self-aligning screws (1⁄4″-28 x 31⁄4″) through outer top cabinet holes. NOTE: Use self... exhaust duct joints using duct tape. 8 Install grease filters. CONNECTING DUCTWORK House Duct 6 Tighten center screw completely. Turn two full turns on JVM1490, SCA1000, and SCA1001. 7 Tighten the outer two screws to the top of the oven. (While tightening screws, hold the oven in place against the wall and the top...

Installation Instructions
Page 18
... front of mounting plate. Turn two full turns on JVM1490, SCA1000, and SCA1001. 7 Tighten the outer two screws to keep power cord tight. MOUNT THE OVEN FOR EASIER INSTALLATION AND PERSONAL SAFETY, WE RECOMMEND THAT TWO PEOPLE INSTALL THIS OVEN. NOTE: Use self-aligning screw, 1⁄4″-28 x ...oven, thread power cord through top center cabinet hole. Cabinet Front Cabinet Bottom Shelf Filler Block Equivalent to Depth of top cabinet. IMPORTANT: Do not grip or use the nylon grommet around the power cord hole to bottom of the cord. See the Owner's Manual packed with the oven...
... front of mounting plate. Turn two full turns on JVM1490, SCA1000, and SCA1001. 7 Tighten the outer two screws to keep power cord tight. MOUNT THE OVEN FOR EASIER INSTALLATION AND PERSONAL SAFETY, WE RECOMMEND THAT TWO PEOPLE INSTALL THIS OVEN. NOTE: Use self-aligning screw, 1⁄4″-28 x ...oven, thread power cord through top center cabinet hole. Cabinet Front Cabinet Bottom Shelf Filler Block Equivalent to Depth of top cabinet. IMPORTANT: Do not grip or use the nylon grommet around the power cord hole to bottom of the cord. See the Owner's Manual packed with the oven...

Installation Instructions
Page 22
... above the grille panel, using a Phillips screwdriver. See the Owner's Manual packed with the oven. 5 Replace the grille and the 2 top screws. 6 Close the door and replace left side. 2 Open the door. 3 Remove the grille. INSTALLING THE CHARCOAL FILTER 1 Remove 2 screws on each screw. It will rest... screws, 1⁄4″-28 x 31⁄4″, on JVM1490, SCA1000, and SCA1001. 7 Tighten the outer two screws to the top of the oven. (While tightening screws, hold the oven in front of the filter should be visible from the front. 8 Install grease filters. Insert mesh-side down 22...
... above the grille panel, using a Phillips screwdriver. See the Owner's Manual packed with the oven. 5 Replace the grille and the 2 top screws. 6 Close the door and replace left side. 2 Open the door. 3 Remove the grille. INSTALLING THE CHARCOAL FILTER 1 Remove 2 screws on each screw. It will rest... screws, 1⁄4″-28 x 31⁄4″, on JVM1490, SCA1000, and SCA1001. 7 Tighten the outer two screws to the top of the oven. (While tightening screws, hold the oven in front of the filter should be visible from the front. 8 Install grease filters. Insert mesh-side down 22...

Installation Instructions
Page 23
Install turntable and wheeled ring in cavity. 4. Replace house fuse or turn breaker back on. 7. Make sure the oven has been installed according to 20 amp electrical outlet. Remove all packing material from the oven. 3. Insure proper ground exists before use 23 Plug power cord into a dedicated 15 to instructions. 6. KEEP INSTALLATION INSTRUCTIONS FOR THE LOCAL INSPECTOR'S USE. 5. Installation Instructions BEFORE YOU USE YOUR OVEN 1. Read the Owner's Manual. 2.
Install turntable and wheeled ring in cavity. 4. Replace house fuse or turn breaker back on. 7. Make sure the oven has been installed according to 20 amp electrical outlet. Remove all packing material from the oven. 3. Insure proper ground exists before use 23 Plug power cord into a dedicated 15 to instructions. 6. KEEP INSTALLATION INSTRUCTIONS FOR THE LOCAL INSPECTOR'S USE. 5. Installation Instructions BEFORE YOU USE YOUR OVEN 1. Read the Owner's Manual. 2.


