Owners Manual
Page 1
...20 Other Features 24 Helpful Information 29 Microwave Terms 29 Care and Cleaning 30 If Something Goes Wrong 35 Before You Call For Service 35 Hotpoint Service Numbers 37 Warranty Back Cover Write the model and serial numbers here: Model Serial Find these numbers on a label... inside the oven. RVM1535 Over the Range Microwave Oven Owner's Manual Important Safety Information 2 Precautions to Avoid Possible Exposure to...
...20 Other Features 24 Helpful Information 29 Microwave Terms 29 Care and Cleaning 30 If Something Goes Wrong 35 Before You Call For Service 35 Hotpoint Service Numbers 37 Warranty Back Cover Write the model and serial numbers here: Model Serial Find these numbers on a label... inside the oven. RVM1535 Over the Range Microwave Oven Owner's Manual Important Safety Information 2 Precautions to Avoid Possible Exposure to...
Owners Manual
Page 10
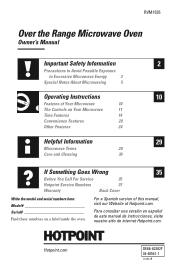
...door must be in the oven. 4 Touch Control Panel. 5 Cooktop Light. 6 Grease Filter. 7 Removable Turntable. The turntable may vary from your model.) Features 23 1 4 5687 1 Door Handle. Turntable and support must be securely latched for cleaning. 8 Convenience Guide. Screen allows cooking to open ...the door. The interior light is located on the inside walls of the microwave oven. Pull to be viewed while keeping microwaves confined in place when using the oven. NOTE: The rating plate and oven vent are located on the top of...
...door must be in the oven. 4 Touch Control Panel. 5 Cooktop Light. 6 Grease Filter. 7 Removable Turntable. The turntable may vary from your model.) Features 23 1 4 5687 1 Door Handle. Turntable and support must be securely latched for cleaning. 8 Convenience Guide. Screen allows cooking to open ...the door. The interior light is located on the inside walls of the microwave oven. Pull to be viewed while keeping microwaves confined in place when using the oven. NOTE: The rating plate and oven vent are located on the top of...
Owners Manual
Page 11
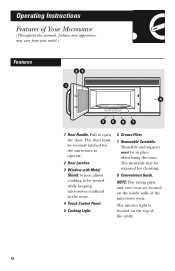
Power level 1-10. Amount of cooking time. Quick Start The Controls on Your Microwave Oven (Throughout this manual, features and appearance may vary from your model.) You can microwave by time, temperature or with the convenience features. 1 Time Features Time Cooking Press TIME COOK I & II (Press once or twice) TIME DEFROST MINUTE COOK (Press 1-6) POWER LEVEL ADD 30 SEC. Enter Amount of defrosting time. Starts immediately! 11 Starts immediately!
Power level 1-10. Amount of cooking time. Quick Start The Controls on Your Microwave Oven (Throughout this manual, features and appearance may vary from your model.) You can microwave by time, temperature or with the convenience features. 1 Time Features Time Cooking Press TIME COOK I & II (Press once or twice) TIME DEFROST MINUTE COOK (Press 1-6) POWER LEVEL ADD 30 SEC. Enter Amount of defrosting time. Starts immediately! 11 Starts immediately!

Owners Manual
Page 24
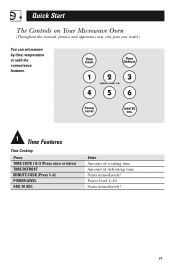
Clock Press to enter the time of day or to check the time of day while microwaving. 1 Press CLOCK. 2 Enter time of day. 3 Press START or CLOCK. 24 Operating Instructions Other Features Your Model May Have Cooking Complete Reminder To remind you that you have food in the oven, the oven will display "END" and beep once a minute until you either open the oven door or press CLEAR/OFF.
Clock Press to enter the time of day or to check the time of day while microwaving. 1 Press CLOCK. 2 Enter time of day. 3 Press START or CLOCK. 24 Operating Instructions Other Features Your Model May Have Cooking Complete Reminder To remind you that you have food in the oven, the oven will display "END" and beep once a minute until you either open the oven door or press CLEAR/OFF.

Owners Manual
Page 26
... count down. 3 Wait 5 seconds. To use the timer as a minute timer and can be lit while the timer is operating. Operating Instructions Other Features Your Model May Have Timer On/Off Timer On/Off operates as a minute timer when the oven is not operating: 1 Press TIMER ON/OFF. 2 Enter the time...
... count down. 3 Wait 5 seconds. To use the timer as a minute timer and can be lit while the timer is operating. Operating Instructions Other Features Your Model May Have Timer On/Off Timer On/Off operates as a minute timer when the oven is not operating: 1 Press TIMER ON/OFF. 2 Enter the time...
Owners Manual
Page 28
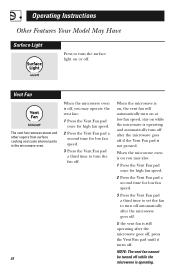
... vent fan is operating. Vent Fan The vent fan removes steam and other vapors from surface cooking and cools internal parts in the microwave oven. 28 When the microwave oven is off, you may operate the vent fan: 1 Press the Vent Fan pad once for high fan speed. 2 Press the Vent.... 3 Press the Vent Fan pad a third time to turn the surface light on while the microwave is operating and automatically turn off after the microwave goes off, press the Vent Fan pad until it turns off. Operating Instructions Other Features Your Model May Have Surface Light Press to turn the fan off.
... vent fan is operating. Vent Fan The vent fan removes steam and other vapors from surface cooking and cools internal parts in the microwave oven. 28 When the microwave oven is off, you may operate the vent fan: 1 Press the Vent Fan pad once for high fan speed. 2 Press the Vent.... 3 Press the Vent Fan pad a third time to turn the surface light on while the microwave is operating and automatically turn off after the microwave goes off, press the Vent Fan pad until it turns off. Operating Instructions Other Features Your Model May Have Surface Light Press to turn the fan off.

Owners Manual
Page 31
... Before cleaning the front door panel, make sure you know what type of panel you choose to use cleaning sprays, large amounts of the microwave oven. Apply stainless cleaner carefully to keep the area clean where the door seals against using a clean, soft cloth. Do not use a..., then wipe the soiled area. Dry thoroughly. Use a solution of the model number. Wipe the window clean with a clean sponge or soft cloth. Care and Cleaning How to Clean the Outside We recommend against the microwave. Refer to the eighth digit of warm water and detergent. 31 Bottom Clean...
... Before cleaning the front door panel, make sure you know what type of panel you choose to use cleaning sprays, large amounts of the microwave oven. Apply stainless cleaner carefully to keep the area clean where the door seals against using a clean, soft cloth. Do not use a..., then wipe the soiled area. Dry thoroughly. Use a solution of the model number. Wipe the window clean with a clean sponge or soft cloth. Care and Cleaning How to Clean the Outside We recommend against the microwave. Refer to the eighth digit of warm water and detergent. 31 Bottom Clean...

Owners Manual
Page 33
.... Light brushing can be used . For this reason, the filter must ALWAYS be cleaned once a month, or as needed. Pull the filter down and out. Models that recirculate air back into the left side. To replace, slide the filter into the room also use ammonia or ammonia products because they will... then swish it dry before replacing. Rinse, shake and let it around in place when the hood is used to the left side of the microwave. The grease filter should be in hot water and detergent. Reusable Grease Filter Reusable Grease Filter The metal filter traps grease released by foods on...
.... Light brushing can be used . For this reason, the filter must ALWAYS be cleaned once a month, or as needed. Pull the filter down and out. Models that recirculate air back into the left side. To replace, slide the filter into the room also use ammonia or ammonia products because they will... then swish it dry before replacing. Rinse, shake and let it around in place when the hood is used to the left side of the microwave. The grease filter should be in hot water and detergent. Reusable Grease Filter Reusable Grease Filter The metal filter traps grease released by foods on...
Owners Manual
Page 34
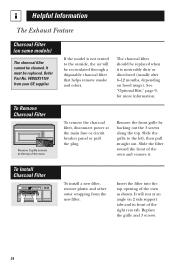
If the model is noticeably dirty or discolored (usually after 6-12 months, depending on hood usage). Remove the front grille by backing out the 3 screws along the top. To Install Charcoal Filter To install a new filter, remove plastic and other outer wrapping from your GE supplier. To Remove... and remove it is not vented to the left, then pull straight out. Helpful Information The Exhaust Feature Charcoal Filter (on some models) The charcoal filter cannot be replaced. Order Part No. The charcoal filter should be recirculated through a disposable charcoal filter that helps ...
If the model is noticeably dirty or discolored (usually after 6-12 months, depending on hood usage). Remove the front grille by backing out the 3 screws along the top. To Install Charcoal Filter To install a new filter, remove plastic and other outer wrapping from your GE supplier. To Remove... and remove it is not vented to the left, then pull straight out. Helpful Information The Exhaust Feature Charcoal Filter (on some models) The charcoal filter cannot be replaced. Order Part No. The charcoal filter should be recirculated through a disposable charcoal filter that helps ...
Owners Manual
Page 40
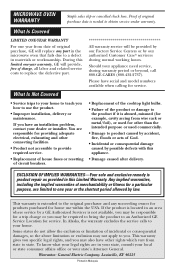
...hours. To know what your home. What Is Covered LIMITED ONE-YEAR WARRANTY For one -year warranty, GE will replace any succeeding owner for products purchased for other connecting facilities. • Product not accessible to provide...implied warranties, including the implied warranties of charge, all labor and related service costs to state. MICROWAVE OVEN WARRANTY Staple sales slip or cancelled check here. If you may be required to bring the... for a trip charge or you have serial and model numbers available when calling for a particular purpose, are in Malaysia
...hours. To know what your home. What Is Covered LIMITED ONE-YEAR WARRANTY For one -year warranty, GE will replace any succeeding owner for products purchased for other connecting facilities. • Product not accessible to provide...implied warranties, including the implied warranties of charge, all labor and related service costs to state. MICROWAVE OVEN WARRANTY Staple sales slip or cancelled check here. If you may be required to bring the... for a trip charge or you have serial and model numbers available when calling for a particular purpose, are in Malaysia
Dimensions
Page 2
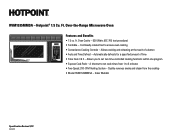
... Cook I & II - Quickly removes smoke and steam from 1 to set cook times from the cooktop • Model RVM1535MMSA - Continually rotates food to set two time-controlled cooking functions within one program • Express Cook Pads - Allows ...Microwave Oven RVM1535MMSA Clock Time Cook AM/PM scroll speed Defrost AUTO/TIME Reminder Popcorn Timer ON/OFF Reheat 1 23 4 56 7 89 0 display on - Silver Metallic Specification Revised 1/07 440023 off START Pause CLEAR OFF Features and Benefits • 1.5 cu. ft. off Vent Fan hi - RVM1535MMSA - Hotpoint® 1.5 Cu. Ft...
... Cook I & II - Quickly removes smoke and steam from 1 to set cook times from the cooktop • Model RVM1535MMSA - Continually rotates food to set two time-controlled cooking functions within one program • Express Cook Pads - Allows ...Microwave Oven RVM1535MMSA Clock Time Cook AM/PM scroll speed Defrost AUTO/TIME Reminder Popcorn Timer ON/OFF Reheat 1 23 4 56 7 89 0 display on - Silver Metallic Specification Revised 1/07 440023 off START Pause CLEAR OFF Features and Benefits • 1.5 cu. ft. off Vent Fan hi - RVM1535MMSA - Hotpoint® 1.5 Cu. Ft...

Installation Instructions
Page 7
...;2″ 30″ 2″ 66″ or More from the Cooking Surface 30″ min. Your Owner's Manual contains the kit number for your model. • This microwave oven is greater than 30″, a Filler Panel Kit may be used to fill in the gap between the cabinets is for installation over... ranges up to 36″ wide. • When installing the microwave oven beneath smooth, flat cabinets, be 30″ wide and free of Cabinet Needs to cut template, if necessary) Electric drill with 3⁄16&#...
...;2″ 30″ 2″ 66″ or More from the Cooking Surface 30″ min. Your Owner's Manual contains the kit number for your model. • This microwave oven is greater than 30″, a Filler Panel Kit may be used to fill in the gap between the cabinets is for installation over... ranges up to 36″ wide. • When installing the microwave oven beneath smooth, flat cabinets, be 30″ wide and free of Cabinet Needs to cut template, if necessary) Electric drill with 3⁄16&#...
Installation Instructions
Page 11
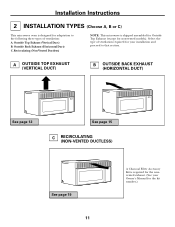
... is designed for adaptation to that section. Outside Back Exhaust (Horizontal Duct) C. Recirculating (Non-Vented Ductless) NOTE: This microwave is required for non-vented models). A OUTSIDE TOP EXHAUST (VERTICAL DUCT) B OUTSIDE BACK EXHAUST (HORIZONTAL DUCT) See page 12 See page 15 C RECIRCULATING (NON-VENTED DUCTLESS) See page 19 11 A Charcoal ...
... is designed for adaptation to that section. Outside Back Exhaust (Horizontal Duct) C. Recirculating (Non-Vented Ductless) NOTE: This microwave is required for non-vented models). A OUTSIDE TOP EXHAUST (VERTICAL DUCT) B OUTSIDE BACK EXHAUST (HORIZONTAL DUCT) See page 12 See page 15 C RECIRCULATING (NON-VENTED DUCTLESS) See page 19 11 A Charcoal ...


