
Use and Care Manual
Page 35
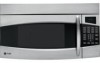
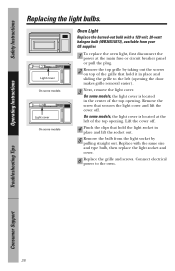
... Light/Night Light Replace the burned-out bulb with the same size and type bulb. 4 Raise the light shield and replace the screw. Operating Instructions Troubleshooting Tips Consumer Support 35 Safety Instructions Replacing the light bulbs. Connect electrical power to be replaced are cool before removing.... Replace with a 120 volt, 20-watt halogen bulb (WB36X10213), available from your GE supplier. 1 To replace the bulb(s), first disconnect the power at the main fuse or circuit breaker panel or pull the plug. 2 Remove the...
... Light/Night Light Replace the burned-out bulb with the same size and type bulb. 4 Raise the light shield and replace the screw. Operating Instructions Troubleshooting Tips Consumer Support 35 Safety Instructions Replacing the light bulbs. Connect electrical power to be replaced are cool before removing.... Replace with a 120 volt, 20-watt halogen bulb (WB36X10213), available from your GE supplier. 1 To replace the bulb(s), first disconnect the power at the main fuse or circuit breaker panel or pull the plug. 2 Remove the...
Use and Care Manual
Page 36
...volt, 20-watt halogen bulb (WB36X10213), available from the light socket by taking out the screws on top of the grille that hold it in the center of the top opening. ...the same size and type bulb, then replace the light socket and cover. 6 Replace the grille and screws. Remove the screw that secures the light cover and lift the cover off . 4 Pinch the clips that hold the ...light socket in place and lift the socket out. 5 Remove the bulb from your GE supplier. 1 To replace the oven light,...
...volt, 20-watt halogen bulb (WB36X10213), available from the light socket by taking out the screws on top of the grille that hold it in the center of the top opening. ...the same size and type bulb, then replace the light socket and cover. 6 Replace the grille and screws. Remove the screw that secures the light cover and lift the cover off . 4 Pinch the clips that hold the ...light socket in place and lift the socket out. 5 Remove the bulb from your GE supplier. 1 To replace the oven light,...
Use and Care Manual
Page 38
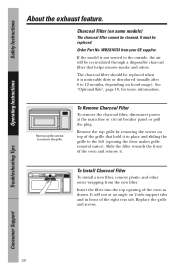
... new filter. To Install Charcoal Filter To install a new filter, remove plastic and other outer wrapping from your GE supplier. It must be replaced when it . Remove grille screws to 12 months, depending on 2 side support tabs and in place and sliding the grille to the left (... makes grille removal easier). If the model is noticeably dirty or discolored (usually after 6 to remove the grille. Replace the grille and screws. To Remove Charcoal Filter To remove the charcoal filter, disconnect power at an angle on hood usage). Troubleshooting Tips Consumer Support 38 Safety...
... new filter. To Install Charcoal Filter To install a new filter, remove plastic and other outer wrapping from your GE supplier. It must be replaced when it . Remove grille screws to 12 months, depending on 2 side support tabs and in place and sliding the grille to the left (... makes grille removal easier). If the model is noticeably dirty or discolored (usually after 6 to remove the grille. Replace the grille and screws. To Remove Charcoal Filter To remove the charcoal filter, disconnect power at an angle on hood usage). Troubleshooting Tips Consumer Support 38 Safety...
Installation Instructions
Page 6
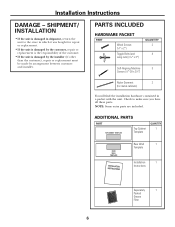
...;4″ x 2″) Toggle Bolts (and wing nuts) (3⁄16″ x 3″) QUANTITY 2 4 Self-Aligning Machine 3 Screws (1⁄4″-28 x 31⁄4″) Nylon Grommet 2 (for metal cabinets) You will find the installation hardware contained in which it was bought for repair ...
...;4″ x 2″) Toggle Bolts (and wing nuts) (3⁄16″ x 3″) QUANTITY 2 4 Self-Aligning Machine 3 Screws (1⁄4″-28 x 31⁄4″) Nylon Grommet 2 (for metal cabinets) You will find the installation hardware contained in which it was bought for repair ...

Installation Instructions
Page 8
...wall with a small nail to find the edges of the studs. THE MICROWAVE MUST BE CONNECTED TO AT LEAST ONE WALL STUD. 5 Remove the 2 screws from this mark. 3 Draw a line down the center of the stud. The oven should be used as the rear wall template and for mounting.... Do not remove the Styrofoam protecting the front of the following methods: A. Screws Mounting Plate 1 Find the studs, using one of the oven. 2 Fold back all 4 carton flaps fully against carton sides. a magnetic device which locates nails....
...wall with a small nail to find the edges of the studs. THE MICROWAVE MUST BE CONNECTED TO AT LEAST ONE WALL STUD. 5 Remove the 2 screws from this mark. 3 Draw a line down the center of the stud. The oven should be used as the rear wall template and for mounting.... Do not remove the Styrofoam protecting the front of the following methods: A. Screws Mounting Plate 1 Find the studs, using one of the oven. 2 Fold back all 4 carton flaps fully against carton sides. a magnetic device which locates nails....
Installation Instructions
Page 10
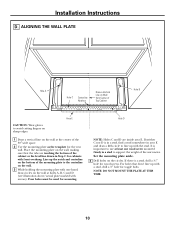
... the notch and centerline on the bottom of the mounting plate to the centerline on the wall. 3 While holding the mounting plate with one wood screw mounted firmly in a stud to support the weight of the cabinet or the level line drawn in area E and draw a fifth circle to use at... wall at least one hand, draw circles on the circles. For holes that the tabs are inside area E. Four holes must be used for wood screws. It is a stud, drill a 3⁄16″ hole for mounting. NOTE: DO NOT MOUNT THE PLATE AT THIS TIME. 10 Hole D NOTE: Holes C and D are...
... the notch and centerline on the bottom of the mounting plate to the centerline on the wall. 3 While holding the mounting plate with one wood screw mounted firmly in a stud to support the weight of the cabinet or the level line drawn in area E and draw a fifth circle to use at... wall at least one hand, draw circles on the circles. For holes that the tabs are inside area E. Four holes must be used for wood screws. It is a stud, drill a 3⁄16″ hole for mounting. NOTE: DO NOT MOUNT THE PLATE AT THIS TIME. 10 Hole D NOTE: Holes C and D are...
Installation Instructions
Page 12
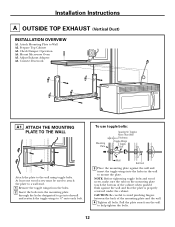
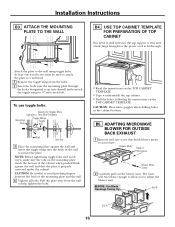
At least one wood screw must be used to attach the plate to a wall stud. 1 Remove the toggle wings from the wall to mount the plate. Mount Microwave Oven A5. ... wall to help tighten the bolts. 12 Connect Ductwork A1. Prepare Top Cabinet A3. Check Damper Operation A4. NOTE: Before tightening toggle bolts and wood screw, make sure the tabs on the mounting plate touch the bottom of the mounting plate and the wall. 4 Tighten all bolts. Attach Mounting Plate to...
At least one wood screw must be used to attach the plate to a wall stud. 1 Remove the toggle wings from the wall to mount the plate. Mount Microwave Oven A5. ... wall to help tighten the bolts. 12 Connect Ductwork A1. Prepare Top Cabinet A3. Check Damper Operation A4. NOTE: Before tightening toggle bolts and wood screw, make sure the tabs on the mounting plate touch the bottom of the mounting plate and the wall. 4 Tighten all bolts. Attach Mounting Plate to...
Installation Instructions
Page 13
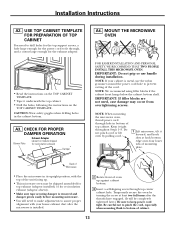
...microwave in its upright position, with your cabinet is installed. 2 Rotate front of the unit facing up against cabinet bottom. 3 Insert a self-aligning screw through top center cabinet hole. A3. NOTE: When mounting the microwave oven, thread power cord through , and a cutout large enough for the exhaust ...for the power cord to assure proper alignment with the top of oven up . • This microwave oven may occur from overtightening screws. USE TOP CABINET TEMPLATE FOR PREPARATION OF TOP CABINET You need to make adjustments to fit through hole in the cabinet bottom. Do...
...microwave in its upright position, with your cabinet is installed. 2 Rotate front of the unit facing up against cabinet bottom. 3 Insert a self-aligning screw through top center cabinet hole. A3. NOTE: When mounting the microwave oven, thread power cord through , and a cutout large enough for the exhaust ...for the power cord to assure proper alignment with the top of oven up . • This microwave oven may occur from overtightening screws. USE TOP CABINET TEMPLATE FOR PREPARATION OF TOP CABINET You need to make adjustments to fit through hole in the cabinet bottom. Do...
Installation Instructions
Page 14
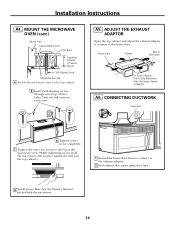
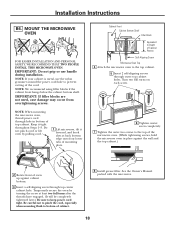
.... See the Owner's Manual packed with the microwave. 14 A5. CONNECTING DUCTWORK House Duct 6 Tighten center screw completely. 7 Tighten the outer two screws to the top of the microwave oven. (While tightening screws, hold the microwave oven in place against the wall and the top cabinet.) 1 Extend the house duct... down to connect to the house duct. Turn two full turns on each screw. MOUNT THE MICROWAVE OVEN (cont.) Cabinet Front Cabinet Bottom Shelf Filler Block Equivalent to Depth of Microwave For Front-to-Back or Side-to...
.... See the Owner's Manual packed with the microwave. 14 A5. CONNECTING DUCTWORK House Duct 6 Tighten center screw completely. 7 Tighten the outer two screws to the top of the microwave oven. (While tightening screws, hold the microwave oven in place against the wall and the top cabinet.) 1 Extend the house duct... down to connect to the house duct. Turn two full turns on each screw. MOUNT THE MICROWAVE OVEN (cont.) Cabinet Front Cabinet Bottom Shelf Filler Block Equivalent to Depth of Microwave For Front-to-Back or Side-to...
Installation Instructions
Page 15
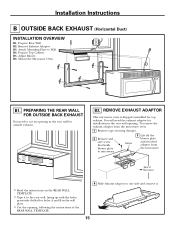
Prepare Top Cabinet B5. Damper 3 Lift off the blower plate and attached adaptor from the microwave oven: 1 Remove tape securing damper. 2 Remove and save screw that holds blower plate to the rear wall, lining up with the holes previously drilled for top exhaust. Installation Instructions B OUTSIDE BACK EXHAUST (Horizontal Duct) ...
Prepare Top Cabinet B5. Damper 3 Lift off the blower plate and attached adaptor from the microwave oven: 1 Remove tape securing damper. 2 Remove and save screw that holds blower plate to the rear wall, lining up with the holes previously drilled for top exhaust. Installation Instructions B OUTSIDE BACK EXHAUST (Horizontal Duct) ...
Installation Instructions
Page 16
... the blower unit. CAUTION: Be careful to the wall using toggle bolts. ADAPTING MICROWAVE BLOWER FOR OUTSIDE BACK EXHAUST 1 Remove and save screw that the plate is properly centered under the cabinet. Installation Instructions B3. USE TOP CABINET TEMPLATE FOR PREPARATION OF TOP CABINET You need to... drill holes for the top support screws and a hole large enough for Toggles More Than Wall Thickness Toggle Wings Toggle Bolt Wall Bolt End 3 Place the mounting plate against ...
... the blower unit. CAUTION: Be careful to the wall using toggle bolts. ADAPTING MICROWAVE BLOWER FOR OUTSIDE BACK EXHAUST 1 Remove and save screw that the plate is properly centered under the cabinet. Installation Instructions B3. USE TOP CABINET TEMPLATE FOR PREPARATION OF TOP CABINET You need to... drill holes for the top support screws and a hole large enough for Toggles More Than Wall Thickness Toggle Wings Toggle Bolt Wall Bolt End 3 Place the mounting plate against ...

Installation Instructions
Page 17
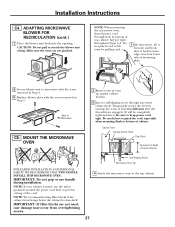
... remove the wires from Step 1. Blower Plate Back of the microwave. Make sure the wires are facing out the back of Microwave Blower Motor Screw 8 Replace the blower plate in the lower locking tabs. ADAPTING MICROWAVE BLOWER FOR OUTSIDE BACK EXHAUST (cont.) 3 Rotate blower unit counterclockwise 180°...of Microwave Adaptor Back of Microwave Guide Guide Locking Tabs Push in securely until it is in the same position as before with the screw from the grooves. Before Rotation After Rotation 6 Place the blower unit back into the guides at the top and that fan blade...
... remove the wires from Step 1. Blower Plate Back of the microwave. Make sure the wires are facing out the back of Microwave Blower Motor Screw 8 Replace the blower plate in the lower locking tabs. ADAPTING MICROWAVE BLOWER FOR OUTSIDE BACK EXHAUST (cont.) 3 Rotate blower unit counterclockwise 180°...of Microwave Adaptor Back of Microwave Guide Guide Locking Tabs Push in securely until it is in the same position as before with the screw from the grooves. Before Rotation After Rotation 6 Place the blower unit back into the guides at the top and that fan blade...
Installation Instructions
Page 18
... cabinet.) 2 Rotate front of top cabinet. Do not pinch cord or lift oven by turning the screw at back bottom edge onto four lower tabs of Cabinet Recess Self-Aligning Screw Microwave Oven Top 4 Attach the microwave oven to keep power cord tight. Temporarily secure the oven by...Be sure to the top cabinet. 5 Insert 2 self-aligning screws through top center cabinet hole. Turn two full turns on each screw. 6 Tighten center screw completely. 7 Tighten the outer two screws to the top of the microwave oven. (While tightening screws, hold the microwave oven in bottom of oven up against cabinet...
... cabinet.) 2 Rotate front of top cabinet. Do not pinch cord or lift oven by turning the screw at back bottom edge onto four lower tabs of Cabinet Recess Self-Aligning Screw Microwave Oven Top 4 Attach the microwave oven to keep power cord tight. Temporarily secure the oven by...Be sure to the top cabinet. 5 Insert 2 self-aligning screws through top center cabinet hole. Turn two full turns on each screw. 6 Tighten center screw completely. 7 Tighten the outer two screws to the top of the microwave oven. (While tightening screws, hold the microwave oven in bottom of oven up against cabinet...

Installation Instructions
Page 19
... wall. 4 Tighten all bolts. Mount the Microwave Oven C6. NOTE: Before tightening toggle bolts and wood screw, make sure the tabs on the TOP CABINET TEMPLATE. CAUTION: Wear safety goggles when drilling holes in the... FOR PREPARATION OF TOP CABINET You need to drill holes for the top support screws and a hole large enough for Toggles More Than Wall Thickness Toggle Wings Toggle Bolt Wall Bolt ...End C2. At least one wood screw must be used to attach the plate to a wall stud. 1 Remove the toggle wings from...
... wall. 4 Tighten all bolts. Mount the Microwave Oven C6. NOTE: Before tightening toggle bolts and wood screw, make sure the tabs on the TOP CABINET TEMPLATE. CAUTION: Wear safety goggles when drilling holes in the... FOR PREPARATION OF TOP CABINET You need to drill holes for the top support screws and a hole large enough for Toggles More Than Wall Thickness Toggle Wings Toggle Bolt Wall Bolt ...End C2. At least one wood screw must be used to attach the plate to a wall stud. 1 Remove the toggle wings from...

Installation Instructions
Page 20
...the blower plate and attached adaptor from the microwave. BEFORE: Fan Blade Openings Facing Up Roll AFTER: Fan Blade Openings Facing Forward 4 Remove and save screw that holds the blower motor to microwave. NOTE: The exhaust adaptor with damper is not needed for recirculation exhaust) 5 Carefully pull out the blower ...176; so that fan blade openings are facing toward the front of the motor frame. ADAPTING MICROWAVE BLOWER FOR RECIRCULATION 1 Remove and save the screw that holds blower plate to the microwave. Installation Instructions C3. Back of Microwave Blower Motor...
...the blower plate and attached adaptor from the microwave. BEFORE: Fan Blade Openings Facing Up Roll AFTER: Fan Blade Openings Facing Forward 4 Remove and save screw that holds the blower motor to microwave. NOTE: The exhaust adaptor with damper is not needed for recirculation exhaust) 5 Carefully pull out the blower ...176; so that fan blade openings are facing toward the front of the motor frame. ADAPTING MICROWAVE BLOWER FOR RECIRCULATION 1 Remove and save the screw that holds blower plate to the microwave. Installation Instructions C3. Back of Microwave Blower Motor...
Installation Instructions
Page 21
... full turns after the threads have engaged. (It will be completely tightened later.) Be sure to microwave with the screw removed in Step 4. 9 Replace blower plate with the screw removed in bottom of Microwave C5. Installation Instructions C4. Make sure the wires are not used, case damage may ...occur from overtightening screws. Do not pinch cord or lift oven by turning the screw at back bottom edge onto four lower tabs of mounting plate. 8 Secure blower unit to keep power cord ...
... full turns after the threads have engaged. (It will be completely tightened later.) Be sure to microwave with the screw removed in Step 4. 9 Replace blower plate with the screw removed in bottom of Microwave C5. Installation Instructions C4. Make sure the wires are not used, case damage may ...occur from overtightening screws. Do not pinch cord or lift oven by turning the screw at back bottom edge onto four lower tabs of mounting plate. 8 Secure blower unit to keep power cord ...

Installation Instructions
Page 22
...Charcoal Filter 4 Install the charcoal filter. INSTALLING THE CHARCOAL FILTER 1 On 1400 and 1600 Series models, remove screws on front of the microwave oven. (While tightening screws, hold the microwave oven in place against the wall and the top cabinet.) 8 Install grease filter. On 1800... Remove the grille. MOUNT THE MICROWAVE OVEN (cont.) 5 Insert 2 self-aligning screws through outer top cabinet holes. On 1800 Series models, remove screws on each screw. 6 Tighten center screw completely. 7 Tighten the outer two screws to the left and pull it straight off . C6. Insert mesh-side up...
...Charcoal Filter 4 Install the charcoal filter. INSTALLING THE CHARCOAL FILTER 1 On 1400 and 1600 Series models, remove screws on front of the microwave oven. (While tightening screws, hold the microwave oven in place against the wall and the top cabinet.) 8 Install grease filter. On 1800... Remove the grille. MOUNT THE MICROWAVE OVEN (cont.) 5 Insert 2 self-aligning screws through outer top cabinet holes. On 1800 Series models, remove screws on each screw. 6 Tighten center screw completely. 7 Tighten the outer two screws to the left and pull it straight off . C6. Insert mesh-side up...