Use and Care Manual
Page 1
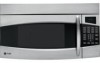
... Website at GEAppliance.com. DE68-03448A 49-40570-2 04-09 JR Para consultar una version en español de este manual de instrucciones, visite nuestro sitio de internet GEAppliance.com. Owner's Manual PVM1870 PNM1871 PVM1873 Write the model and serial numbers here: Model Serial Find these numbers on a label inside the oven.
... Website at GEAppliance.com. DE68-03448A 49-40570-2 04-09 JR Para consultar una version en español de este manual de instrucciones, visite nuestro sitio de internet GEAppliance.com. Owner's Manual PVM1870 PNM1871 PVM1873 Write the model and serial numbers here: Model Serial Find these numbers on a label inside the oven.
Use and Care Manual
Page 3
...- for additional cooking time. ■ See door surface cleaning instructions in the Care and cleaning of the microwave oven section of this manual. ■ This appliance should be serviced only by qualified service personnel. This microwave oven is specifically designed to heat, dry or cook...Operating Instructions IMPORTANT SAFETY INSTRUCTIONS READ ALL INSTRUCTIONS BEFORE USING GEAppliances.com Use this appliance only for its intended purpose as described in this Owner's Manual. ■ Do not mount this appliance over a sink. ■ To reduce the risk of fire in the oven cavity: &#...
...- for additional cooking time. ■ See door surface cleaning instructions in the Care and cleaning of the microwave oven section of this manual. ■ This appliance should be serviced only by qualified service personnel. This microwave oven is specifically designed to heat, dry or cook...Operating Instructions IMPORTANT SAFETY INSTRUCTIONS READ ALL INSTRUCTIONS BEFORE USING GEAppliances.com Use this appliance only for its intended purpose as described in this Owner's Manual. ■ Do not mount this appliance over a sink. ■ To reduce the risk of fire in the oven cavity: &#...
Use and Care Manual
Page 44
... and schedule your service at your appliance? Schedule Service GEAppliances.com Expert GE repair service is still in Malaysia For details of physical and mental abilities and impairments. Caution must be referred to their own appliances can now download Owner's Manuals, order parts or even schedule service on -line anytime, or call 800...
... and schedule your service at your appliance? Schedule Service GEAppliances.com Expert GE repair service is still in Malaysia For details of physical and mental abilities and impairments. Caution must be referred to their own appliances can now download Owner's Manuals, order parts or even schedule service on -line anytime, or call 800...

Installation Instructions
Page 7
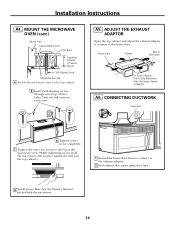
Your Owner's Manual contains the kit number for your microwave oven to the outside, see Hood Exhaust Section for exhaust duct preparation. • When installing the microwave oven ...
Your Owner's Manual contains the kit number for your microwave oven to the outside, see Hood Exhaust Section for exhaust duct preparation. • When installing the microwave oven ...

Installation Instructions
Page 11
... A Charcoal Filter Accessory Kit is required for the nonvented exhaust. (See your installation and proceed to the following three types of ventilation required for your Owner's Manual for the kit number.)
... A Charcoal Filter Accessory Kit is required for the nonvented exhaust. (See your installation and proceed to the following three types of ventilation required for your Owner's Manual for the kit number.)
Installation Instructions
Page 14
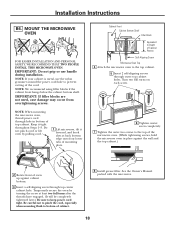
... to Depth of Microwave For Front-to-Back or Side-to the top cabinet. 5 Insert 2 self-aligning screws through outer top cabinet holes. See the Owner's Manual packed with the microwave. 14 Blower Plate Damper Back of Cabinet Recess Self-Aligning Screw Microwave Oven Top 4 Attach the microwave oven to -Side Adjustment...
... to Depth of Microwave For Front-to-Back or Side-to the top cabinet. 5 Insert 2 self-aligning screws through outer top cabinet holes. See the Owner's Manual packed with the microwave. 14 Blower Plate Damper Back of Cabinet Recess Self-Aligning Screw Microwave Oven Top 4 Attach the microwave oven to -Side Adjustment...
Installation Instructions
Page 18
Do not pinch cord or lift oven by turning the screw at back bottom edge onto four lower tabs of the cord. See the Owner's Manual packed with the microwave. 18 MOUNT THE MICROWAVE OVEN FOR EASIER INSTALLATION AND PERSONAL SAFETY, WE RECOMMEND THAT TWO PEOPLE INSTALL THIS MICROWAVE OVEN. NOTE: ...
Do not pinch cord or lift oven by turning the screw at back bottom edge onto four lower tabs of the cord. See the Owner's Manual packed with the microwave. 18 MOUNT THE MICROWAVE OVEN FOR EASIER INSTALLATION AND PERSONAL SAFETY, WE RECOMMEND THAT TWO PEOPLE INSTALL THIS MICROWAVE OVEN. NOTE: ...

Installation Instructions
Page 22
... door. On 1400 and 1600 Series models, pull the grille straight off . When properly installed, the wire mesh of grille using a #1 Phillips screwdriver. See the Owner's Manual packed with the microwave. On 1800 Series models, slide the grille to the top of grille using a #2 Phillips screwdriver. 2 Open the door. 3 Remove the grille...
... door. On 1400 and 1600 Series models, pull the grille straight off . When properly installed, the wire mesh of grille using a #1 Phillips screwdriver. See the Owner's Manual packed with the microwave. On 1800 Series models, slide the grille to the top of grille using a #2 Phillips screwdriver. 2 Open the door. 3 Remove the grille...
Installation Instructions
Page 23
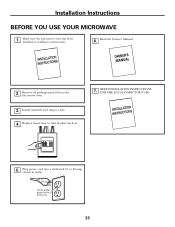
Replace house fuse or turn breaker back on. 7. Make sure the microwave oven has been installed according to 20-amp electrical outlet. Remove all packing material from the microwave oven. 3. Install turntable and ring in cavity. 4. to instructions. 6. Ensure proper ground exists before use 23 KEEP INSTALLATION INSTRUCTIONS FOR THE LOCAL INSPECTOR'S USE. 5. Plug power cord into a dedicated 15- Installation Instructions BEFORE YOU USE YOUR MICROWAVE 1. Read the Owner's Manual. 2.
Replace house fuse or turn breaker back on. 7. Make sure the microwave oven has been installed according to 20-amp electrical outlet. Remove all packing material from the microwave oven. 3. Install turntable and ring in cavity. 4. to instructions. 6. Ensure proper ground exists before use 23 KEEP INSTALLATION INSTRUCTIONS FOR THE LOCAL INSPECTOR'S USE. 5. Plug power cord into a dedicated 15- Installation Instructions BEFORE YOU USE YOUR MICROWAVE 1. Read the Owner's Manual. 2.


