Use and Care Manual
Page 1
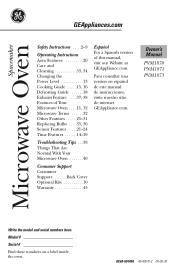
Owner's Manual PVM1870 PNM1871 PVM1873 Write the model and serial numbers here: Model Serial Find these numbers on a label inside the oven. DE68-03448A 49-40570-2 04-09 JR Microwave Spacemaker Oven GEAppliances.com Safety Instructions . . . .2-9 Operating Instructions Auto Features 20 Care and ... .14-19 Troubleshooting Tips . . .39 Things That Are Normal With Your Microwave Oven 40 Consumer Support Consumer Support Back Cover Optional Kits 10 Warranty 43 Español For a Spanish version of this manual, visit our Website at GEAppliance.com. Para consultar una version en españ...
Owner's Manual PVM1870 PNM1871 PVM1873 Write the model and serial numbers here: Model Serial Find these numbers on a label inside the oven. DE68-03448A 49-40570-2 04-09 JR Microwave Spacemaker Oven GEAppliances.com Safety Instructions . . . .2-9 Operating Instructions Auto Features 20 Care and ... .14-19 Troubleshooting Tips . . .39 Things That Are Normal With Your Microwave Oven 40 Consumer Support Consumer Support Back Cover Optional Kits 10 Warranty 43 Español For a Spanish version of this manual, visit our Website at GEAppliance.com. Para consultar una version en españ...
Use and Care Manual
Page 3
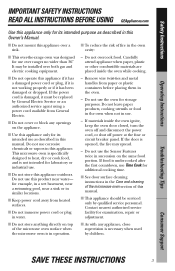
... Use this appliance only for its intended use as described in this Owner's Manual. ■ Do not mount this appliance over a sink. ■ To reduce the risk of the microwave oven surface when the microwave oven is opened, the fire may be serviced only by General Electric Service...authorized service agent using a power cord available from paper or plastic containers before placing them in the Care and cleaning of the microwave oven section of this manual. ■ This appliance should be installed over ranges no wider than 36″. Do not leave paper products, cooking utensils...
... Use this appliance only for its intended use as described in this Owner's Manual. ■ Do not mount this appliance over a sink. ■ To reduce the risk of the microwave oven surface when the microwave oven is opened, the fire may be serviced only by General Electric Service...authorized service agent using a power cord available from paper or plastic containers before placing them in the Care and cleaning of the microwave oven section of this manual. ■ This appliance should be installed over ranges no wider than 36″. Do not leave paper products, cooking utensils...

Use and Care Manual
Page 7
.... When cooking with containers tightly covered with the cookware manufacturer's recommendations. 2 Do not microwave empty containers. 3 Do not permit children to use them in the microwave oven, keep the foil at least partially uncovered because they are glass or ceramic materials ... could burst during or immediately after cooking, possibly resulting in this manual. Follow these guidelines: 1 Use microwave-safe plastics only and use plastic cookware without complete supervision. Plastic cookware designed for microwave cooking is very useful, but should be used carefully. In longer...
.... When cooking with containers tightly covered with the cookware manufacturer's recommendations. 2 Do not microwave empty containers. 3 Do not permit children to use them in the microwave oven, keep the foil at least partially uncovered because they are glass or ceramic materials ... could burst during or immediately after cooking, possibly resulting in this manual. Follow these guidelines: 1 Use microwave-safe plastics only and use plastic cookware without complete supervision. Plastic cookware designed for microwave cooking is very useful, but should be used carefully. In longer...
Use and Care Manual
Page 11
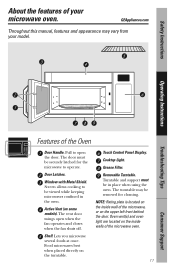
...manual, features and appearance may be in the oven. Shelf. Grease Filter. Removable Turntable. The turntable may vary from your microwave oven. The vent door swings open the door. Food microwaves best when placed directly on some models). NOTE: Rating plate is located on the inside walls of the microwave.... Active Vent (on the turntable. Turntable and support must be viewed while keeping microwaves confined in place when using the oven. The door must be removed for the microwave to open when the fan operates and closes when the fan shuts off. Safety ...
...manual, features and appearance may be in the oven. Shelf. Grease Filter. Removable Turntable. The turntable may vary from your microwave oven. The vent door swings open the door. Food microwaves best when placed directly on some models). NOTE: Rating plate is located on the inside walls of the microwave.... Active Vent (on the turntable. Turntable and support must be viewed while keeping microwaves confined in place when using the oven. The door must be removed for the microwave to open when the fan operates and closes when the fan shuts off. Safety ...
Installation Instructions
Page 1
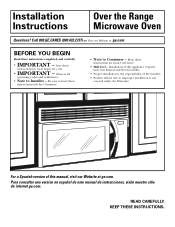
...Spanish version of this appliance requires basic mechanical and electrical skills. • Proper installation is the responsibility of this manual, visit our Website at : ge.com BEFORE YOU BEGIN Read these instructions for future reference. • Skill level - Para consultar una version en... español de este manual de instrucciones, visite nuestro sitio de internet ge.com. Installation Instructions Over the Range Microwave Oven Questions? Save these instructions completely and carefully. • IMPORTANT - Keep these ...
...Spanish version of this appliance requires basic mechanical and electrical skills. • Proper installation is the responsibility of this manual, visit our Website at : ge.com BEFORE YOU BEGIN Read these instructions for future reference. • Skill level - Para consultar una version en... español de este manual de instrucciones, visite nuestro sitio de internet ge.com. Installation Instructions Over the Range Microwave Oven Questions? Save these instructions completely and carefully. • IMPORTANT - Keep these ...

Installation Instructions
Page 7
...Your Owner's Manual contains the kit number for your model. • This microwave oven is for installation over ranges up to 36″ wide. • If you are going to vent your microwave oven to the outside, see Hood Exhaust Section for exhaust duct preparation. • When installing the microwave oven beneath...Panel Kit may be 30″ or More from the Floor to the Top of the Microwave Bottom Edge of Cabinet Needs to block the airflow of obstructions. • If the space between the microwave oven and the cabinets. Backsplash NOTES: • The space between the cabinets must be ...
...Your Owner's Manual contains the kit number for your model. • This microwave oven is for installation over ranges up to 36″ wide. • If you are going to vent your microwave oven to the outside, see Hood Exhaust Section for exhaust duct preparation. • When installing the microwave oven beneath...Panel Kit may be 30″ or More from the Floor to the Top of the Microwave Bottom Edge of Cabinet Needs to block the airflow of obstructions. • If the space between the microwave oven and the cabinets. Backsplash NOTES: • The space between the cabinets must be ...

Installation Instructions
Page 11
... nonvented exhaust. (See your installation and proceed to the following three types of ventilation required for your Owner's Manual for the kit number.) Select the type of ventilation: A. Recirculating (Non-Vented Ductless) NOTE: This microwave is shipped assembled for Outside Top Exhaust (except for non-vented models). Installation Instructions 2 INSTALLATION TYPES (Choose...
... nonvented exhaust. (See your installation and proceed to the following three types of ventilation required for your Owner's Manual for the kit number.) Select the type of ventilation: A. Recirculating (Non-Vented Ductless) NOTE: This microwave is shipped assembled for Outside Top Exhaust (except for non-vented models). Installation Instructions 2 INSTALLATION TYPES (Choose...
Installation Instructions
Page 14
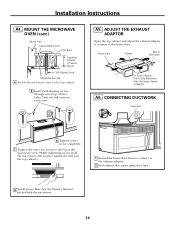
Turn two full turns on each screw. A5. See the Owner's Manual packed with the microwave. 14 Installation Instructions A4. ADJUST THE EXHAUST ADAPTOR Open the top cabinet and adjust the exhaust adaptor to connect to -Side Adjustment, Slide the Exhaust ...the exhaust adaptor. 2 Seal exhaust duct joints using duct tape. 8 Install grease filter. MOUNT THE MICROWAVE OVEN (cont.) Cabinet Front Cabinet Bottom Shelf Filler Block Equivalent to Depth of the microwave oven. (While tightening screws, hold the microwave oven in place against the wall and the top cabinet.) 1 Extend the house duct down...
Turn two full turns on each screw. A5. See the Owner's Manual packed with the microwave. 14 Installation Instructions A4. ADJUST THE EXHAUST ADAPTOR Open the top cabinet and adjust the exhaust adaptor to connect to -Side Adjustment, Slide the Exhaust ...the exhaust adaptor. 2 Seal exhaust duct joints using duct tape. 8 Install grease filter. MOUNT THE MICROWAVE OVEN (cont.) Cabinet Front Cabinet Bottom Shelf Filler Block Equivalent to Depth of the microwave oven. (While tightening screws, hold the microwave oven in place against the wall and the top cabinet.) 1 Extend the house duct down...
Installation Instructions
Page 18
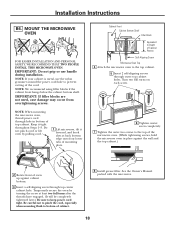
... If filler blocks are not used, case damage may occur from overtightening screws. See the Owner's Manual packed with the microwave. 18 Temporarily secure the oven by pulling cord. 1 Lift microwave, tilt it tight throughout Steps 1-3. NOTE: If your cabinet is metal, use handle during installation....against the wall and the top cabinet.) 2 Rotate front of mounting plate. MOUNT THE MICROWAVE OVEN FOR EASIER INSTALLATION AND PERSONAL SAFETY, WE RECOMMEND THAT TWO PEOPLE INSTALL THIS MICROWAVE OVEN. Installation Instructions B6. Do not pinch cord or lift oven by turning the ...
... If filler blocks are not used, case damage may occur from overtightening screws. See the Owner's Manual packed with the microwave. 18 Temporarily secure the oven by pulling cord. 1 Lift microwave, tilt it tight throughout Steps 1-3. NOTE: If your cabinet is metal, use handle during installation....against the wall and the top cabinet.) 2 Rotate front of mounting plate. MOUNT THE MICROWAVE OVEN FOR EASIER INSTALLATION AND PERSONAL SAFETY, WE RECOMMEND THAT TWO PEOPLE INSTALL THIS MICROWAVE OVEN. Installation Instructions B6. Do not pinch cord or lift oven by turning the ...

Installation Instructions
Page 22
...Manual packed with the microwave. INSTALLING THE CHARCOAL FILTER 1 On 1400 and 1600 Series models, remove screws on front of grille using a #1 Phillips screwdriver. On 1400 and 1600 Series models, pull the grille straight off . When properly installed, the wire mesh of the microwave oven. (While tightening screws, hold the microwave.... 7 Tighten the outer two screws to the left and pull it straight off . C6. Installation Instructions C5. MOUNT THE MICROWAVE OVEN (cont.) 5 Insert 2 self-aligning screws through outer top cabinet holes. On 1800 Series models, slide the grille to...
...Manual packed with the microwave. INSTALLING THE CHARCOAL FILTER 1 On 1400 and 1600 Series models, remove screws on front of grille using a #1 Phillips screwdriver. On 1400 and 1600 Series models, pull the grille straight off . When properly installed, the wire mesh of the microwave oven. (While tightening screws, hold the microwave.... 7 Tighten the outer two screws to the left and pull it straight off . C6. Installation Instructions C5. MOUNT THE MICROWAVE OVEN (cont.) 5 Insert 2 self-aligning screws through outer top cabinet holes. On 1800 Series models, slide the grille to...
Installation Instructions
Page 23
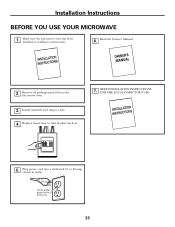
Read the Owner's Manual. 2. Install turntable and ring in cavity. 4. Plug power cord into a dedicated 15- KEEP INSTALLATION INSTRUCTIONS FOR THE LOCAL INSPECTOR'S USE. 5. Make sure the microwave oven has been installed according to 20-amp electrical outlet. Replace house fuse or turn breaker back on. 7. to instructions. 6. Remove all packing material from the microwave oven. 3. Ensure proper ground exists before use 23 Installation Instructions BEFORE YOU USE YOUR MICROWAVE 1.
Read the Owner's Manual. 2. Install turntable and ring in cavity. 4. Plug power cord into a dedicated 15- KEEP INSTALLATION INSTRUCTIONS FOR THE LOCAL INSPECTOR'S USE. 5. Make sure the microwave oven has been installed according to 20-amp electrical outlet. Replace house fuse or turn breaker back on. 7. to instructions. 6. Remove all packing material from the microwave oven. 3. Ensure proper ground exists before use 23 Installation Instructions BEFORE YOU USE YOUR MICROWAVE 1.


