Use and Care Manual
Page 1
DE68-03448A 49-40570-2 04-09 JR Owner's Manual PVM1870 PNM1871 PVM1873 Write the model and serial numbers here: Model Serial Find these numbers on a label inside the oven. Para consultar una version en español de este manual de instrucciones, visite nuestro sitio ...
DE68-03448A 49-40570-2 04-09 JR Owner's Manual PVM1870 PNM1871 PVM1873 Write the model and serial numbers here: Model Serial Find these numbers on a label inside the oven. Para consultar una version en español de este manual de instrucciones, visite nuestro sitio ...
Use and Care Manual
Page 10
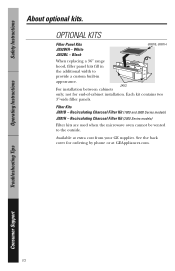
OPTIONAL KITS Filler Panel Kits JX52WH - Recirculating Charcoal Filter Kit (2000 Series models) Filter kits are used when the microwave oven cannot be vented to provide a...cover for end-of-cabinet installation. Available at GEAppliances.com. White JX52BL - Recirculating Charcoal Filter Kit (1800 and 3600 Series models) JX81H - Black JX81B, JX81H When replacing a 36″ range hood, filler panel kits fill in the additional width... Kits JX81B - not for ordering by phone or at extra cost from your GE supplier. Operating Instructions Troubleshooting Tips Consumer Support 10
OPTIONAL KITS Filler Panel Kits JX52WH - Recirculating Charcoal Filter Kit (2000 Series models) Filter kits are used when the microwave oven cannot be vented to provide a...cover for end-of-cabinet installation. Available at GEAppliances.com. White JX52BL - Recirculating Charcoal Filter Kit (1800 and 3600 Series models) JX81H - Black JX81B, JX81H When replacing a 36″ range hood, filler panel kits fill in the additional width... Kits JX81B - not for ordering by phone or at extra cost from your GE supplier. Operating Instructions Troubleshooting Tips Consumer Support 10
Use and Care Manual
Page 11
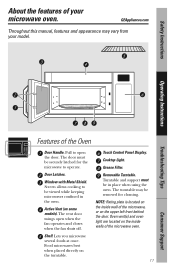
... be removed for the microwave to operate. The vent door swings open the door. Window with Metal Shield. Safety Instructions About the features of your model. GEAppliances.com Throughout this manual, features and appearance may be in the oven. Active Vent (on the turntable. Food microwaves best when placed directly on...
... be removed for the microwave to operate. The vent door swings open the door. Window with Metal Shield. Safety Instructions About the features of your model. GEAppliances.com Throughout this manual, features and appearance may be in the oven. Active Vent (on the turntable. Food microwaves best when placed directly on...
Use and Care Manual
Page 12
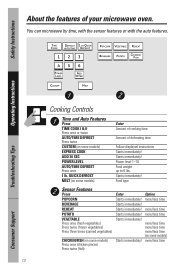
... VEGETABLE Press once (fresh vegetables) Press twice (frozen vegetables) Press three times (canned vegetables) CHICKEN/FISH (on some models) more /less time (on some models) Press once (chicken pieces) Press twice (fish) Enter Starts immediately! Operating Instructions Troubleshooting Tips Cooking Controls Time and Auto... Features Press TIME COOK I & II Press once or twice AUTO/TIME DEFROST Press twice CUSTOM (on some models) EXPRESS COOK ADD 30 SEC POWER LEVEL AUTO/TIME DEFROST Press once 1 lb. Safety Instructions About the features of defrosting time ...
... VEGETABLE Press once (fresh vegetables) Press twice (frozen vegetables) Press three times (canned vegetables) CHICKEN/FISH (on some models) more /less time (on some models) Press once (chicken pieces) Press twice (fish) Enter Starts immediately! Operating Instructions Troubleshooting Tips Cooking Controls Time and Auto... Features Press TIME COOK I & II Press once or twice AUTO/TIME DEFROST Press twice CUSTOM (on some models) EXPRESS COOK ADD 30 SEC POWER LEVEL AUTO/TIME DEFROST Press once 1 lb. Safety Instructions About the features of defrosting time ...
Use and Care Manual
Page 20
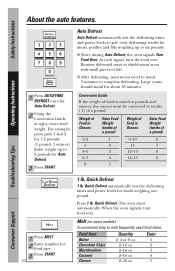
... one pound. For example, press pads 1 and 2 for Auto Defrost. 2 Using the Conversion Guide at right, enter food weight. Quick Defrost 1 lb. Melt (on some models) A convenient way to complete defrosting. The oven starts automatically. Large roasts should stand for about 30 minutes. 1 Press AUTO/TIME DEFROST once for 1.2 pounds (1 pound...
... one pound. For example, press pads 1 and 2 for Auto Defrost. 2 Using the Conversion Guide at right, enter food weight. Quick Defrost 1 lb. Melt (on some models) A convenient way to complete defrosting. The oven starts automatically. Large roasts should stand for about 30 minutes. 1 Press AUTO/TIME DEFROST once for 1.2 pounds (1 pound...
Use and Care Manual
Page 24
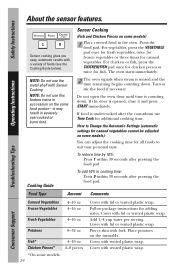
... can adjust the cooking time for canned vegetables cannot be adjusted on some models 24 4-16 oz 2-8 pieces Cover with fork. Press the food pad. NOTE: Do not use the metal shelf with vented plastic wrap. If the door ... oven. Food Type Amount Comments Canned Vegetables Frozen Vegetables 4-16 oz 4-16 oz Fresh Vegetables 4-16 oz Potatoes 8-32 oz Fish* Chicken Pieces* *On some models) 1 Place covered food in severely overcooked or burnt food. Pierce skin with lid or vented plastic wrap. Cover with lid or vented plastic wrap. Cooking...
... can adjust the cooking time for canned vegetables cannot be adjusted on some models 24 4-16 oz 2-8 pieces Cover with fork. Press the food pad. NOTE: Do not use the metal shelf with vented plastic wrap. If the door ... oven. Food Type Amount Comments Canned Vegetables Frozen Vegetables 4-16 oz 4-16 oz Fresh Vegetables 4-16 oz Potatoes 8-32 oz Fish* Chicken Pieces* *On some models) 1 Place covered food in severely overcooked or burnt food. Pierce skin with lid or vented plastic wrap. Cover with lid or vented plastic wrap. Cooking...
Use and Care Manual
Page 25
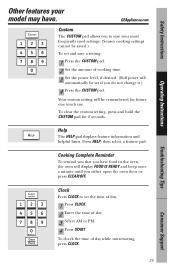
... Consumer Support 25 Safety Instructions Operating Instructions Other features your most frequently used settings. (Sensor cooking settings cannot be saved.) To set and save your model may have food in the oven, the oven will display FOOD IS READY and beep once a minute until you have . Help The HELP pad displays...
... Consumer Support 25 Safety Instructions Operating Instructions Other features your most frequently used settings. (Sensor cooking settings cannot be saved.) To set and save your model may have food in the oven, the oven will display FOOD IS READY and beep once a minute until you have . Help The HELP pad displays...
Use and Care Manual
Page 26
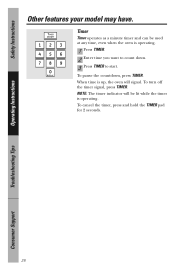
Timer Timer operates as a minute timer and can be used at any time, even when the oven is up, the oven will be lit while the timer is operating. To turn off the timer signal, press TIMER. When time is operating. 1 Press TIMER. 2 Enter time you want to count down. 3 Press TIMER to start. NOTE: The timer indicator will signal. Safety Instructions Operating Instructions Other features your model may have. To cancel the timer, press and hold the TIMER pad for 2 seconds. 26 Troubleshooting Tips Consumer Support To pause the countdown, press TIMER.
Timer Timer operates as a minute timer and can be used at any time, even when the oven is up, the oven will be lit while the timer is operating. To turn off the timer signal, press TIMER. When time is operating. 1 Press TIMER. 2 Enter time you want to count down. 3 Press TIMER to start. NOTE: The timer indicator will signal. Safety Instructions Operating Instructions Other features your model may have. To cancel the timer, press and hold the TIMER pad for 2 seconds. 26 Troubleshooting Tips Consumer Support To pause the countdown, press TIMER.
Use and Care Manual
Page 28
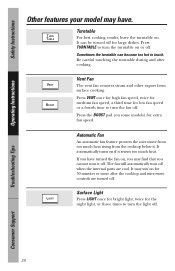
Safety Instructions Operating Instructions Other features your model may find that you may have turned the fan on . Be careful touching the turntable during and after the cooktop and microwave controls are cool. ... off when the internal parts are turned off. Press TURNTABLE to turn off . Press the BOOST pad (on if it . It automatically turns on some models) for 30 minutes or more after cooking. Surface Light Press LIGHT once for bright light, twice for low fan speed or a fourth time to turn...
Safety Instructions Operating Instructions Other features your model may find that you may have turned the fan on . Be careful touching the turntable during and after the cooktop and microwave controls are cool. ... off when the internal parts are turned off. Press TURNTABLE to turn off . Press the BOOST pad (on if it . It automatically turns on some models) for 30 minutes or more after cooking. Surface Light Press LIGHT once for bright light, twice for low fan speed or a fourth time to turn...
Use and Care Manual
Page 29
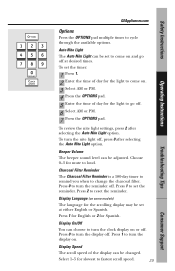
... adjusted. Display Language (on and go off . Press 0 to fastest scroll speed. 29 Troubleshooting Tips Consumer Support Select 1-5 for the light to come on some models) The language for mute to cycle through the available options. To review the nite light settings, press 2 after selecting the Auto Nite Light option. Press...
... adjusted. Display Language (on and go off . Press 0 to fastest scroll speed. 29 Troubleshooting Tips Consumer Support Select 1-5 for the light to come on some models) The language for mute to cycle through the available options. To review the nite light settings, press 2 after selecting the Auto Nite Light option. Press...
Use and Care Manual
Page 30
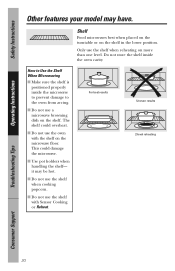
... reheating on the shelf. The shelf could damage the microwave. ■ Use pot holders when handling the shelf- Safety Instructions Operating Instructions Other features your model may be hot. ■ Do not use the shelf when cooking popcorn. ■ Do not use the oven with Sensor Cooking or Reheat.
... reheating on the shelf. The shelf could damage the microwave. ■ Use pot holders when handling the shelf- Safety Instructions Operating Instructions Other features your model may be hot. ■ Do not use the shelf when cooking popcorn. ■ Do not use the oven with Sensor Cooking or Reheat.
Use and Care Manual
Page 31
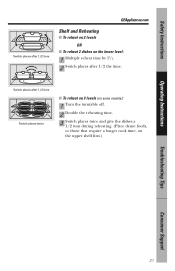
Safety Instructions Switch places after 1/2 the time. Switch places after 1/2 time Switch places twice ■ To reheat on 3 levels (on some models): 1 Turn the turntable off. 2 Double the reheating time. 3 Switch places twice and give the dishes a 1/2 turn during reheating. (Place dense foods, or those that require a ...
Safety Instructions Switch places after 1/2 the time. Switch places after 1/2 time Switch places twice ■ To reheat on 3 levels (on some models): 1 Turn the turntable off. 2 Double the reheating time. 3 Switch places twice and give the dishes a 1/2 turn during reheating. (Place dense foods, or those that require a ...
Use and Care Manual
Page 33
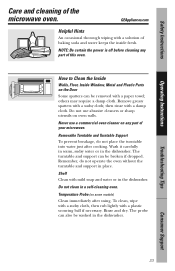
... turntable and support in the dishwasher. The probe can be removed with a solution of this oven. Never use abrasive cleaners or sharp utensils on some models) Clean immediately after cooking. Do not use a commercial oven cleaner on the Door Some spatters can also be broken if dropped. Safety Instructions Operating Instructions...
... turntable and support in the dishwasher. The probe can be removed with a solution of this oven. Never use abrasive cleaners or sharp utensils on some models) Clean immediately after cooking. Do not use a commercial oven cleaner on the Door Some spatters can also be broken if dropped. Safety Instructions Operating Instructions...
Use and Care Manual
Page 34
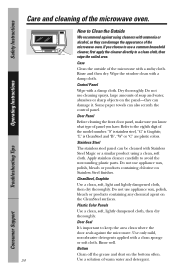
... a clean, soft, light and lightly dampened cloth, then dry thoroughly. Rinse well. Refer to the eighth digit of panel you know what type of the model number. Stainless Steel The stainless steel panel can also scratch the control panel. Consumer Support Do not use appliance wax, polish, bleach or products containing...
... a clean, soft, light and lightly dampened cloth, then dry thoroughly. Rinse well. Refer to the eighth digit of panel you know what type of the model number. Stainless Steel The stainless steel panel can also scratch the control panel. Consumer Support Do not use appliance wax, polish, bleach or products containing...
Use and Care Manual
Page 36
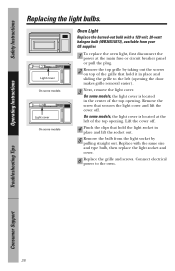
...Instructions Replacing the light bulbs. Lift the cover off. 4 Pinch the clips that secures the light cover and lift the cover off. On some models, the light cover is located at the main fuse or circuit breaker panel or pull the plug. 2 Remove the top grille by taking out ... Tips Consumer Support 36 Replace with a 120 volt, 20-watt halogen bulb (WB36X10213), available from your GE supplier. 1 To replace the oven light, first disconnect the power at the left (opening . On some models, the light cover is located in the center of the top opening the door makes grille removal...
...Instructions Replacing the light bulbs. Lift the cover off. 4 Pinch the clips that secures the light cover and lift the cover off. On some models, the light cover is located at the main fuse or circuit breaker panel or pull the plug. 2 Remove the top grille by taking out ... Tips Consumer Support 36 Replace with a 120 volt, 20-watt halogen bulb (WB36X10213), available from your GE supplier. 1 To replace the oven light, first disconnect the power at the left (opening . On some models, the light cover is located in the center of the top opening the door makes grille removal...

Use and Care Manual
Page 37
... Grease Filter The reusable grease filter traps grease released by foods on some models) The Vent Fan The vent fan has a metal reusable grease filter. For this reason, the filter must ALWAYS be used . Pull it around in place ... side using the tab. Safety Instructions Operating Instructions About the exhaust feature. Pull up and in the frame slot at the side of the microwave. Models that recirculate air back into place. GEAppliances.com Charcoal Filter (on the cooktop. Removing and Cleaning the Filter To remove, slide it dry before replacing...
... Grease Filter The reusable grease filter traps grease released by foods on some models) The Vent Fan The vent fan has a metal reusable grease filter. For this reason, the filter must ALWAYS be used . Pull it around in place ... side using the tab. Safety Instructions Operating Instructions About the exhaust feature. Pull up and in the frame slot at the side of the microwave. Models that recirculate air back into place. GEAppliances.com Charcoal Filter (on the cooktop. Removing and Cleaning the Filter To remove, slide it dry before replacing...
Use and Care Manual
Page 38
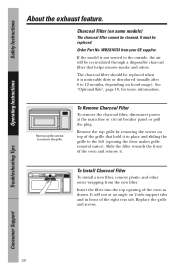
... the front of the oven as shown. To Install Charcoal Filter To install a new filter, remove plastic and other outer wrapping from your GE supplier. Charcoal Filter (on 2 side support tabs and in place and sliding the grille to the left (opening of the oven and remove...it is not vented to remove the grille. To Remove Charcoal Filter To remove the charcoal filter, disconnect power at an angle on some models) The charcoal filter cannot be replaced. Troubleshooting Tips Consumer Support 38 WB2X10733 from the new filter. It will be replaced when it . ...
... the front of the oven as shown. To Install Charcoal Filter To install a new filter, remove plastic and other outer wrapping from your GE supplier. Charcoal Filter (on 2 side support tabs and in place and sliding the grille to the left (opening of the oven and remove...it is not vented to remove the grille. To Remove Charcoal Filter To remove the charcoal filter, disconnect power at an angle on some models) The charcoal filter cannot be replaced. Troubleshooting Tips Consumer Support 38 WB2X10733 from the new filter. It will be replaced when it . ...
Use and Care Manual
Page 40
... be noticed while using the microwave. Wipe the moisture off with the microwave. Things That Are Normal With Your Microwave Oven ■ Moisture on some models) will open during operation, and remain open while the microwave is also normal to keep the electronics cool. Plug the microwave into a different electrical circuit...
... be noticed while using the microwave. Wipe the moisture off with the microwave. Things That Are Normal With Your Microwave Oven ■ Moisture on some models) will open during operation, and remain open while the microwave is also normal to keep the electronics cool. Plug the microwave into a different electrical circuit...
Use and Care Manual
Page 43
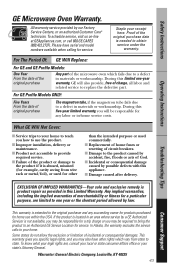
... Not Cover: ■ Service trips to obtain service under the warranty. Staple your home. For The Period Of: GE Will Replace: For GE and GE Profile Models: One Year From the date of the original purchase Any part of merchantability or fitness for service. Consumer Support This warranty is ... due to a defect in -home service costs. To schedule service, visit us on-line at GEAppliances.com, or call 800.GE.CARES (800.432.2737). For GE Profile Models ONLY: Five Years From the date of original purchase The magnetron tube, if the magnetron tube fails due to a defect in ...
... Not Cover: ■ Service trips to obtain service under the warranty. Staple your home. For The Period Of: GE Will Replace: For GE and GE Profile Models: One Year From the date of the original purchase Any part of merchantability or fitness for service. Consumer Support This warranty is ... due to a defect in -home service costs. To schedule service, visit us on-line at GEAppliances.com, or call 800.GE.CARES (800.432.2737). For GE Profile Models ONLY: Five Years From the date of original purchase The magnetron tube, if the magnetron tube fails due to a defect in ...
Quick Specs
Page 2
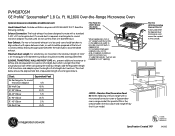
... ducts. B. G. Exhaust Connection: The hood exhaust has been designed to mate with a microwave/convection oven or Spacemaker over a range model, this kit fills in the additional width to provide a custom built-in the area between the microwave and range left by the H-Low... rear or horizontal exhaust is to the outside. Stainless Steel Decorative Panel Kit When replacing a Hi/Low range with a standard 3-1/4" x 10" rectangular duct. PVM1870SM GE Profile™ Spacemaker® 1.8 Cu. C. 90° Elbow 10 ft. Roof Cap 24 ft. 3/8 depth JX22SS - If a round duct is required, a...
... ducts. B. G. Exhaust Connection: The hood exhaust has been designed to mate with a microwave/convection oven or Spacemaker over a range model, this kit fills in the additional width to provide a custom built-in the area between the microwave and range left by the H-Low... rear or horizontal exhaust is to the outside. Stainless Steel Decorative Panel Kit When replacing a Hi/Low range with a standard 3-1/4" x 10" rectangular duct. PVM1870SM GE Profile™ Spacemaker® 1.8 Cu. C. 90° Elbow 10 ft. Roof Cap 24 ft. 3/8 depth JX22SS - If a round duct is required, a...


