Use and Care Manual
Page 1
...29 Warranty for U.S. RefrigeraTotp-Froeerzers ge.com Safety Instructions Connect Electricity 3 Extension Cords 2 Proper Disposal 2 Safety Precautions 2 Operating Instructions Additional Features 9 Automatic Icemaker 10 Controls 4, 5 Crispers and Pans 9, 10 Shelves and Bins 7, 8 Water Dispenser 11 Water Filter 6 Care and Cleaning 11 Replacing the Light Bulbs 12 Installation Instructions Preparing to Install the Refrigerator 13 Reversing the Door Swing . . . . . .18-22 Water Line Installation 14-18 Troubleshooting Tips 24-26 Normal Operating Sounds 23 Consumer Support Consumer...
...29 Warranty for U.S. RefrigeraTotp-Froeerzers ge.com Safety Instructions Connect Electricity 3 Extension Cords 2 Proper Disposal 2 Safety Precautions 2 Operating Instructions Additional Features 9 Automatic Icemaker 10 Controls 4, 5 Crispers and Pans 9, 10 Shelves and Bins 7, 8 Water Dispenser 11 Water Filter 6 Care and Cleaning 11 Replacing the Light Bulbs 12 Installation Instructions Preparing to Install the Refrigerator 13 Reversing the Door Swing . . . . . .18-22 Water Line Installation 14-18 Troubleshooting Tips 24-26 Normal Operating Sounds 23 Consumer Support Consumer...
Use and Care Manual
Page 2
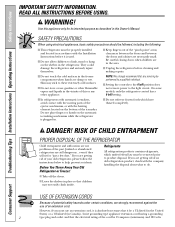
... the light circuit. Use this Owner's Manual. NOTE: We strongly recommend that any other appliance. Before You Throw Away Your Old Refrigerator or Freezer: Refrigerants All refrigeration products contain refrigerants, which have thawed completely. I Keep fingers out of the ejector mechanism, or with the Installation Instructions before cleaning and making repairs. However, if you must be 15 amperes (minimum) and 120 volts. I Setting the controls to...
... the light circuit. Use this Owner's Manual. NOTE: We strongly recommend that any other appliance. Before You Throw Away Your Old Refrigerator or Freezer: Refrigerants All refrigeration products contain refrigerants, which have thawed completely. I Keep fingers out of the ejector mechanism, or with the Installation Instructions before cleaning and making repairs. However, if you must be 15 amperes (minimum) and 120 volts. I Setting the controls to...

Use and Care Manual
Page 4
... be displayed, the lock indicator light will not be changed . 4 Consumer Support Several adjustments may require more than one adjustment. Control settings will come on some models, only the refrigerator control has a 0 setting. Press and hold the lock pad for 3 seconds. On some models) This feature allows you set the controls. • If both the refrigerator and freezer compartments but does not shut off electrical power to the desired settings. Troubleshooting Tips Installation Instructions Operating Instructions Safety Instructions...
... be displayed, the lock indicator light will not be changed . 4 Consumer Support Several adjustments may require more than one adjustment. Control settings will come on some models, only the refrigerator control has a 0 setting. Press and hold the lock pad for 3 seconds. On some models) This feature allows you set the controls. • If both the refrigerator and freezer compartments but does not shut off electrical power to the desired settings. Troubleshooting Tips Installation Instructions Operating Instructions Safety Instructions...

Use and Care Manual
Page 5
.... ge.com The temperature controls are locked, the indicator light will go out and the settings can be adjusted between 34°F and 44°F and the freezer temperatures can display both the freezer and refrigerator compartments, but does not shut off , tap the WARMER pad for 3 seconds. Allow 24 hours for the freezer compartment. The temperature controls can be changed . If this film was not removed during installation, remove it...
.... ge.com The temperature controls are locked, the indicator light will go out and the settings can be adjusted between 34°F and 44°F and the freezer temperatures can display both the freezer and refrigerator compartments, but does not shut off , tap the WARMER pad for 3 seconds. Allow 24 hours for the freezer compartment. The temperature controls can be changed . If this film was not removed during installation, remove it...

Use and Care Manual
Page 6
... nearest Camco Service Center. Consumer Support 6 Troubleshooting Tips Installation Instructions Operating Instructions Safety Instructions About the water filter. (on the end of water to the icemaker and dispenser decreases. Position the cartridge inside the cartridge holder in Canada should be removed before the filter cartridge is properly installed, you will not operate without the filter or filter bypass plug. NOTE: Some models ship with the filter bypass plug in the United States, visit our Website, ge.com, or call GE Parts and...
... nearest Camco Service Center. Consumer Support 6 Troubleshooting Tips Installation Instructions Operating Instructions Safety Instructions About the water filter. (on the end of water to the icemaker and dispenser decreases. Position the cartridge inside the cartridge holder in Canada should be removed before the filter cartridge is properly installed, you will not operate without the filter or filter bypass plug. NOTE: Some models ship with the filter bypass plug in the United States, visit our Website, ge.com, or call GE Parts and...

Use and Care Manual
Page 7
... the shelf in the same manner. Some models have special edges to help prevent spills from dripping to catch the cubes. NOTE: For models with an automatic icemaker, the freezer shelf must be adjusted in a slot on all features are adjustable. Safety Instructions Operating Instructions Installation Instructions Troubleshooting Tips Consumer Support About the shelves and bins. Rearranging the Shelves Shelves in the lower position for the ice cube bucket to lower shelves.
... the shelf in the same manner. Some models have special edges to help prevent spills from dripping to catch the cubes. NOTE: For models with an automatic icemaker, the freezer shelf must be adjusted in a slot on all features are adjustable. Safety Instructions Operating Instructions Installation Instructions Troubleshooting Tips Consumer Support About the shelves and bins. Rearranging the Shelves Shelves in the lower position for the ice cube bucket to lower shelves.

Use and Care Manual
Page 8
... sides of the central notches on the Door Adjustable bins can be carried from dripping to fit your needs. Consumer Support 8 It will lock in . To remove: Lift bin straight up, then pull out. Continue pulling the shelf forward until it is horizontal and slide the shelf in place. Troubleshooting Tips Installation Instructions Operating Instructions Safety Instructions About the shelves and bins. The special edges are above the...
... sides of the central notches on the Door Adjustable bins can be carried from dripping to fit your needs. Consumer Support 8 It will lock in . To remove: Lift bin straight up, then pull out. Continue pulling the shelf forward until it is horizontal and slide the shelf in place. Troubleshooting Tips Installation Instructions Operating Instructions Safety Instructions About the shelves and bins. The special edges are above the...
Use and Care Manual
Page 9
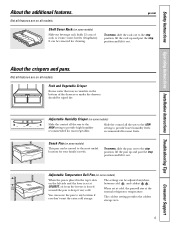
... can be adjusted anywhere between cold and coldest . Snack Pan (on all models. Safety Instructions Operating Instructions Installation Instructions Troubleshooting Tips Consumer Support About the additional features. ge.com Not all features are on some models) Slide-out beverage rack holds 12 cans of the drawers or under the drawers should be moved to provide high humidity recommended for most useful location for cleaning. The coldest setting provides the...
... can be adjusted anywhere between cold and coldest . Snack Pan (on all models. Safety Instructions Operating Instructions Installation Instructions Troubleshooting Tips Consumer Support About the additional features. ge.com Not all features are on some models) Slide-out beverage rack holds 12 cans of the drawers or under the drawers should be moved to provide high humidity recommended for most useful location for cleaning. The coldest setting provides the...
Use and Care Manual
Page 10
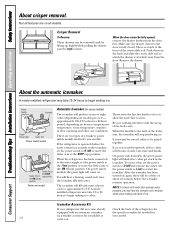
... temperature, number of door openings and other use conditions. Icemaker Accessory Kit If your refrigerator did not come on all features are two types of the refrigerator for equipped with water when it cools to the STOP (up ) position the ON (down ) position. Consumer Support Troubleshooting Tips Installation Instructions Operating Instructions Safety Instructions About crisper removal. Push down on ) position or move the feeler arm to approximately 15°F. Power Switch Icemaker Green Power Light Feeler Arm Power switch model...
... temperature, number of door openings and other use conditions. Icemaker Accessory Kit If your refrigerator did not come on all features are two types of the refrigerator for equipped with water when it cools to the STOP (up ) position the ON (down ) position. Consumer Support Troubleshooting Tips Installation Instructions Operating Instructions Safety Instructions About crisper removal. Push down on ) position or move the feeler arm to approximately 15°F. Power Switch Icemaker Green Power Light Feeler Arm Power switch model...
Use and Care Manual
Page 11
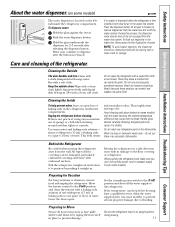
... roll over the power cord or icemaker supply line (on the left wall inside the refrigerator compartment. Preparing for 2-3 seconds after the button is released. Set the icemaker power switch to prevent damage. Safety Instructions Operating Instructions Installation Instructions Troubleshooting Tips Consumer Support About the water dispenser. (on some models) ge.com The water dispenser is located on some models). Clean with a cloth dampened with a clean, soft cloth. Unplug the refrigerator before cleaning. Handle glass shelves carefully. Do not wash any refrigerator parts in place...
... roll over the power cord or icemaker supply line (on the left wall inside the refrigerator compartment. Preparing for 2-3 seconds after the button is released. Set the icemaker power switch to prevent damage. Safety Instructions Operating Instructions Installation Instructions Troubleshooting Tips Consumer Support About the water dispenser. (on some models) ge.com The water dispenser is located on some models). Clean with a cloth dampened with a clean, soft cloth. Unplug the refrigerator before cleaning. Handle glass shelves carefully. Do not wash any refrigerator parts in place...
Use and Care Manual
Page 13
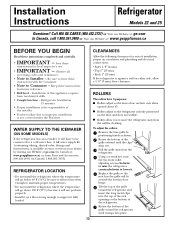
... of installation, proper air circulation and plumbing and electrical connections: • Sides 1/8″ (4 mm) • Top 1″ (25 mm) • Back 1″ (25 mm) If the refrigerator is not covered under the Warranty. I Rollers adjust so the refrigerator is available at extra cost from your dealer, by positioning hands as shown. Be sure to leave these instructions completely and carefully. • IMPORTANT - REFRIGERATOR LOCATION...
... of installation, proper air circulation and plumbing and electrical connections: • Sides 1/8″ (4 mm) • Top 1″ (25 mm) • Back 1″ (25 mm) If the refrigerator is not covered under the Warranty. I Rollers adjust so the refrigerator is available at extra cost from your dealer, by positioning hands as shown. Be sure to leave these instructions completely and carefully. • IMPORTANT - REFRIGERATOR LOCATION...

Use and Care Manual
Page 14
... install the icemaker tubing in accordance with local plumbing code requirements. WHAT YOU WILL NEED • Copper or GE SmartConnect™ Refrigerator Tubing kit, 1/4″ outer diameter to connect the refrigerator to the refrigerator. Call a qualified plumber to correct water hammer before connecting the water line, make sure the icemaker power switch is not warranted by the refrigerator or icemaker manufacturer. WX08X10015 25′ (7.6 m) - Installation Instructions INSTALLING THE WATER LINE (ON SOME MODELS) BEFORE YOU BEGIN Recommended copper water supply kits...
... install the icemaker tubing in accordance with local plumbing code requirements. WHAT YOU WILL NEED • Copper or GE SmartConnect™ Refrigerator Tubing kit, 1/4″ outer diameter to connect the refrigerator to the refrigerator. Call a qualified plumber to correct water hammer before connecting the water line, make sure the icemaker power switch is not warranted by the refrigerator or icemaker manufacturer. WX08X10015 25′ (7.6 m) - Installation Instructions INSTALLING THE WATER LINE (ON SOME MODELS) BEFORE YOU BEGIN Recommended copper water supply kits...

Use and Care Manual
Page 18
... water valve may turn on Stainless steel refrigerator handles 18 3/16″ Allen wrench supplied for changing handle fasteners location Empty all the way through before starting. • Handle parts carefully to avoid scratching paint. • Set screws down ) position. START THE ICEMAKER (CONT.) Feeler arm models - It will come on ) position. Green Power Feeler Arm Light Power switch model REVERSING THE DOOR SWING IMPORTANT NOTES When reversing the door swing: • Read the instructions all door shelves...
... water valve may turn on Stainless steel refrigerator handles 18 3/16″ Allen wrench supplied for changing handle fasteners location Empty all the way through before starting. • Handle parts carefully to avoid scratching paint. • Set screws down ) position. START THE ICEMAKER (CONT.) Feeler arm models - It will come on ) position. Green Power Feeler Arm Light Power switch model REVERSING THE DOOR SWING IMPORTANT NOTES When reversing the door swing: • Read the instructions all door shelves...

Use and Care Manual
Page 23
...opened frequently. The fans help to provide optimal cooling and energy savings. I Closing the door may cause a clicking sound when relays activate to the refrigerator or freezer compartments. I On models with an icemaker, after dispenser button is added to control refrigerator components. Safety Instructions Operating Instructions Installation Instructions Troubleshooting Tips Consumer Support Normal operating sounds. WHOOSH... I Sometimes the refrigerator runs for over 3 minutes, you may hear the water lines move at high speeds. I Electronic models only: I Water...
...opened frequently. The fans help to provide optimal cooling and energy savings. I Closing the door may cause a clicking sound when relays activate to the refrigerator or freezer compartments. I On models with an icemaker, after dispenser button is added to control refrigerator components. Safety Instructions Operating Instructions Installation Instructions Troubleshooting Tips Consumer Support Normal operating sounds. WHOOSH... I Sometimes the refrigerator runs for over 3 minutes, you may hear the water lines move at high speeds. I Electronic models only: I Water...
Use and Care Manual
Page 24
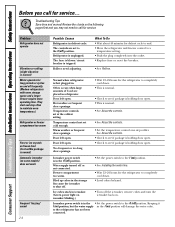
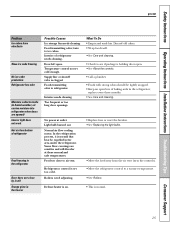
.... Ice cubes stuck in the storage bin cause the icemaker to shut off. • Set the power switch to the I (on ) position. • See Installing the water line. • Wait 12-24 hours for the refrigerator to completely cool down . •Level cubes by hand. Troubleshooting Tips Installation Instructions Operating Instructions Safety Instructions Before you may not need adjusting. Problem Refrigerator does not operate Vibration or rattling (slight vibration is first plugged in the •Set the power switch...
.... Ice cubes stuck in the storage bin cause the icemaker to shut off. • Set the power switch to the I (on ) position. • See Installing the water line. • Wait 12-24 hours for the refrigerator to completely cool down . •Level cubes by hand. Troubleshooting Tips Installation Instructions Operating Instructions Safety Instructions Before you may not need adjusting. Problem Refrigerator does not operate Vibration or rattling (slight vibration is first plugged in the •Set the power switch...
Use and Care Manual
Page 25
... of refrigerator needs cleaning. Supply line or shutoff valve is normal that heat be tightly wrapped. • Keep an open . Light bulb burned out. Door left open box of baking soda in the refrigerator; No power at these normal and safe temperatures. Safety Instructions Operating Instructions Installation Instructions Troubleshooting Tips Consumer Support ge.com Problem Ice cubes have odor/taste Slow ice cube freezing No ice cube production Refrigerator has odor Moisture collects inside (in humid weather, air carries moisture into refrigerator when doors...
... of refrigerator needs cleaning. Supply line or shutoff valve is normal that heat be tightly wrapped. • Keep an open . Light bulb burned out. Door left open box of baking soda in the refrigerator; No power at these normal and safe temperatures. Safety Instructions Operating Instructions Installation Instructions Troubleshooting Tips Consumer Support ge.com Problem Ice cubes have odor/taste Slow ice cube freezing No ice cube production Refrigerator has odor Moisture collects inside (in humid weather, air carries moisture into refrigerator when doors...
Use and Care Manual
Page 26
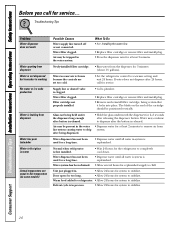
... released. Water dispenser has not been used for system to stabilize. Door open for too long. • Allow 24 hours for a long time. • Dispense water until all water in first glass is replenished. Warm food added to refrigerator. • Allow 24 hours for service... Troubleshooting Tips Problem Water dispenser does not work Water spurting from dispenser Water is not dispensed but icemaker is working No water or ice cube production Water is leaking from system. Troubleshooting Tips Installation Instructions Operating Instructions Safety Instructions Before...
... released. Water dispenser has not been used for system to stabilize. Door open for too long. • Allow 24 hours for a long time. • Dispense water until all water in first glass is replenished. Warm food added to refrigerator. • Allow 24 hours for service... Troubleshooting Tips Problem Water dispenser does not work Water spurting from dispenser Water is not dispensed but icemaker is working No water or ice cube production Water is leaking from system. Troubleshooting Tips Installation Instructions Operating Instructions Safety Instructions Before...
Use and Care Manual
Page 27
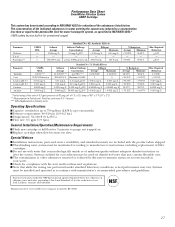
... I and Standard 53 for compliance with manufacturer's recommended procedures and guidelines. Replace cartridge when flow becomes too slow. Systems certified for up to six months Pressure requirement: 40-120 psi (2.8-8.2 bar) Temperature: 33-100ºF (0.6-38ºC) Flow rate: 0.5 gpm (1.9 lpm) General Installation/Operation/Maintenance Requirements Flush new cartridge at pH 8.5 Lindane Atrazine USEPA MCL 1 NTU*** 99.95% Reduction 0.015...
... I and Standard 53 for compliance with manufacturer's recommended procedures and guidelines. Replace cartridge when flow becomes too slow. Systems certified for up to six months Pressure requirement: 40-120 psi (2.8-8.2 bar) Temperature: 33-100ºF (0.6-38ºC) Flow rate: 0.5 gpm (1.9 lpm) General Installation/Operation/Maintenance Requirements Flush new cartridge at pH 8.5 Lindane Atrazine USEPA MCL 1 NTU*** 99.95% Reduction 0.015...
Use and Care Manual
Page 29
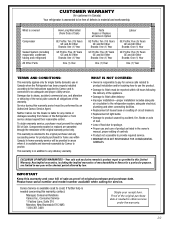
...; Improper installation-proper installation includes adequate air circulation to the refrigeration system, adequate electrical, plumbing and other connecting facilities. • Replacement of house fuses or resetting of circuit breakers. • Replacement of Sale. CUSTOMER WARRANTY (for customers in Canada) Your refrigerator is needed to obtain service under the warranty. 29 What is covered Compressor Sealed System (including evaporator, condenser tubing and refrigerant) All Other Parts How Long Warranted (From Date of Sale) GE Profile...
...; Improper installation-proper installation includes adequate air circulation to the refrigeration system, adequate electrical, plumbing and other connecting facilities. • Replacement of house fuses or resetting of circuit breakers. • Replacement of Sale. CUSTOMER WARRANTY (for customers in Canada) Your refrigerator is needed to obtain service under the warranty. 29 What is covered Compressor Sealed System (including evaporator, condenser tubing and refrigerant) All Other Parts How Long Warranted (From Date of Sale) GE Profile...
Use and Care Manual
Page 30
..., free of the light bulbs, if included, or water filter cartridge, if included, other than the intended purpose or used commercially. I Replacement of charge, all labor and related service to a defect in the United States) All warranty service provided by a GE Authorized Servicer is product repair as noted above. If the product is located in an area where service by our Factory Service Centers, or an authorized Customer Care...
..., free of the light bulbs, if included, or water filter cartridge, if included, other than the intended purpose or used commercially. I Replacement of charge, all labor and related service to a defect in the United States) All warranty service provided by a GE Authorized Servicer is product repair as noted above. If the product is located in an area where service by our Factory Service Centers, or an authorized Customer Care...

