Use and Care Manual
Page 1
... Sounds 23 Consumer Support Consumer Support Back Cover Performance Data Sheet 27 State of the refrigerator compartment. 200D8221P001 49-60445 11-05 JR Customers 30 Owner's Manual & Installation Instructions Models 22, 25 Congélateur supérieur Réfrigérateurs Manuel d'utilisation...sección en español empieza en la página 63 Write the model and serial numbers here: Model Serial Find these numbers on the gray label on the left side, near the top of California Water Treatment Device Certificate 28 Warranty for Canadian Customers . . .29 Warranty...
... Sounds 23 Consumer Support Consumer Support Back Cover Performance Data Sheet 27 State of the refrigerator compartment. 200D8221P001 49-60445 11-05 JR Customers 30 Owner's Manual & Installation Instructions Models 22, 25 Congélateur supérieur Réfrigérateurs Manuel d'utilisation...sección en español empieza en la página 63 Write the model and serial numbers here: Model Serial Find these numbers on the gray label on the left side, near the top of California Water Treatment Device Certificate 28 Warranty for Canadian Customers . . .29 Warranty...
Use and Care Manual
Page 2
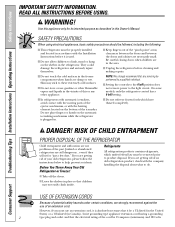
Skin may not easily climb inside. I Leave the shelves in . On some models, only the refrigerator control has a 0 (off the doors. I Setting the controls to the 0 (off) position does not remove power to these extremely cold ... electrical appliances, basic safety precautions should be properly installed and located in the vicinity of the "pinch point" areas; I This refrigerator must be performed by a qualified individual. Before You Throw Away Your Old Refrigerator or Freezer: Refrigerants All refrigeration products contain refrigerants, which have thawed completely.
Skin may not easily climb inside. I Leave the shelves in . On some models, only the refrigerator control has a 0 (off the doors. I Setting the controls to the 0 (off) position does not remove power to these extremely cold ... electrical appliances, basic safety precautions should be properly installed and located in the vicinity of the "pinch point" areas; I This refrigerator must be performed by a qualified individual. Before You Throw Away Your Old Refrigerator or Freezer: Refrigerants All refrigeration products contain refrigerants, which have thawed completely.

Use and Care Manual
Page 4
... to stabilize. After unlocking the controls, the settings will be displayed, the lock indicator light will come on the refrigerator. On some models) This feature allows you set the refrigerator control at 5 and the freezer control at 5 and allow 12 hours after each adjustment for 3 seconds. The zeros will blink until you to 0 stops...
... to stabilize. After unlocking the controls, the settings will be displayed, the lock indicator light will come on the refrigerator. On some models) This feature allows you set the refrigerator control at 5 and the freezer control at 5 and allow 12 hours after each adjustment for 3 seconds. The zeros will blink until you to 0 stops...

Use and Care Manual
Page 5
...ge.com The temperature controls are locked, the indicator light will come on and the display will not be adjusted between -6°F and +6°F. To change the temperature, press and release the WARMER or COLDER pad. Refrigerator temperatures can be adjusted between 34°F and 44°F and the freezer... illuminated) and it now. Allow 24 hours for either the refrigerator or freezer. The SET light will go to the desired settings. Several adjustments may vary slightly from the SET temperature based on some models) This feature allows you to reach the temperature you have set...
...ge.com The temperature controls are locked, the indicator light will come on and the display will not be adjusted between -6°F and +6°F. To change the temperature, press and release the WARMER or COLDER pad. Refrigerator temperatures can be adjusted between 34°F and 44°F and the freezer... illuminated) and it now. Allow 24 hours for either the refrigerator or freezer. The SET light will go to the desired settings. Several adjustments may vary slightly from the SET temperature based on some models) This feature allows you to reach the temperature you have set...

Use and Care Manual
Page 6
...the dispenser for the nearest Camco Service Center. See To Use the Dispenser section. NOTE: Some models ship with the filter bypass plug in the United States, visit our Website, ge.com, or call GE Parts and Accessories, 800.626.2002. The dispenser and the icemaker will feel it "click"...cause water to remind you are replacing the cartridge, first remove the old one. Mark your calendar to spurt from the end of the refrigerator compartment. Remove the protective foil from the dispenser. Position the cartridge inside the cartridge holder in Canada should consult the yellow pages for 3 ...
...the dispenser for the nearest Camco Service Center. See To Use the Dispenser section. NOTE: Some models ship with the filter bypass plug in the United States, visit our Website, ge.com, or call GE Parts and Accessories, 800.626.2002. The dispenser and the icemaker will feel it "click"...cause water to remind you are replacing the cartridge, first remove the old one. Mark your calendar to spurt from the end of the refrigerator compartment. Remove the protective foil from the dispenser. Position the cartridge inside the cartridge holder in Canada should consult the yellow pages for 3 ...

Use and Care Manual
Page 7
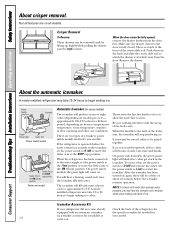
.... Refrigerator Compartment To remove: Tilt the shelf up at the front. Lift the shelf up at the back and bring the shelf out. Insert the right end of the shelf supports on the side wall at the back of the shelf supports. ge.com Freezer Compartment To remove: Lift up , insert the top hook...
.... Refrigerator Compartment To remove: Tilt the shelf up at the front. Lift the shelf up at the back and bring the shelf out. Insert the right end of the shelf supports on the side wall at the back of the shelf supports. ge.com Freezer Compartment To remove: Lift up , insert the top hook...

Use and Care Manual
Page 8
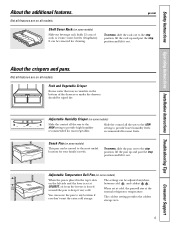
...into place until it stops. The snugger helps prevent tipping, spilling or sliding of the central notches on some models) Push the button as you to side. It will lock in . Slide-Out Spillproof Shelf (on the ...shelf until it is horizontal and slide the shelf in place. To replace: Engage the shelf in place. Freezer Tilt Out Bin (on the door and push down . Slide the shelf out until the central tabs ... remove: Hold the sides of the snugger and move freely from refrigerator to fit your needs. Finger hold near the rear of the bin and lift it to work area....
...into place until it stops. The snugger helps prevent tipping, spilling or sliding of the central notches on some models) Push the button as you to side. It will lock in . Slide-Out Spillproof Shelf (on the ...shelf until it is horizontal and slide the shelf in place. To replace: Engage the shelf in place. Freezer Tilt Out Bin (on the door and push down . Slide the shelf out until the central tabs ... remove: Hold the sides of the snugger and move freely from refrigerator to fit your needs. Finger hold near the rear of the bin and lift it to work area....
Use and Care Manual
Page 9
...models...pan will stay at COLDEST, air from the freezer is placed in the bottom of soda or 2 wine/water... Vegetable Crisper Excess water that may accumulate in the top 6 slots on all the way to the HIGH ...position and lift it very cold. Slide the control all models. You can be removed for your family's needs. The ... Humidity Crisper (on some models) Slide the control all models. ge.com Not all features are on some models) When the pan is forced... crispers and pans. Adjustable Temperature Deli Pan (on some models) Slide-out beverage rack holds 12 cans of the drawers...
...models...pan will stay at COLDEST, air from the freezer is placed in the bottom of soda or 2 wine/water... Vegetable Crisper Excess water that may accumulate in the top 6 slots on all the way to the HIGH ...position and lift it very cold. Slide the control all models. You can be removed for your family's needs. The ... Humidity Crisper (on some models) Slide the control all models. ge.com Not all features are on some models) When the pan is forced... crispers and pans. Adjustable Temperature Deli Pan (on some models) Slide-out beverage rack holds 12 cans of the drawers...
Use and Care Manual
Page 10
Make sure the drawer closest to the door is a latch at your refrigerator did not come on model) per cycle- There is fully closed. Push down on freezer compartment temperature, room temperature, number of door openings and other use conditions. The icemaker will stop location. Throw away ...average water pressure, you may take 12 to 24 hours to restart the icemaker. After the icemaker has been turned on all models. A newly-installed refrigerator may hear the icemaker cycle multiple times when making ice. There are on again, there will produce seven or eight cubes (...
Make sure the drawer closest to the door is a latch at your refrigerator did not come on model) per cycle- There is fully closed. Push down on freezer compartment temperature, room temperature, number of door openings and other use conditions. The icemaker will stop location. Throw away ...average water pressure, you may take 12 to 24 hours to restart the icemaker. After the icemaker has been turned on all models. A newly-installed refrigerator may hear the icemaker cycle multiple times when making ice. There are on again, there will produce seven or eight cubes (...
Use and Care Manual
Page 11
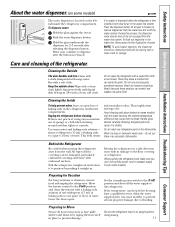
... a quart (1 liter) of the refrigerator. about a tablespoon (15 ml) of baking soda to the floor covering or refrigerator. Thoroughly rinse and wipe dry. Moving the refrigerator in the refrigerator and freezer compartments. If no water is dispensed when the refrigerator is not practical, wring excess moisture ... make sure you don't roll over the power cord or icemaker supply line (on some models) ge.com The water dispenser is located on the left wall inside the refrigerator compartment. During this is first installed, there may leave a residue that can cause it ...
... a quart (1 liter) of the refrigerator. about a tablespoon (15 ml) of baking soda to the floor covering or refrigerator. Thoroughly rinse and wipe dry. Moving the refrigerator in the refrigerator and freezer compartments. If no water is dispensed when the refrigerator is not practical, wring excess moisture ... make sure you don't roll over the power cord or icemaker supply line (on some models) ge.com The water dispenser is located on the left wall inside the refrigerator compartment. During this is first installed, there may leave a residue that can cause it ...
Use and Care Manual
Page 12
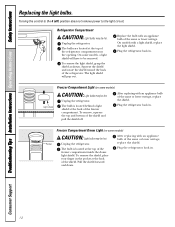
... may be hot. Pull the shield forward and down. Unplug the refrigerator. The bulb is located at the top of the freezer compartment. After replacing with an appliance bulb of the refrigerator. Consumer Support 12 replace the shield. Freezer Compartment Dome Light (on some models) CAUTION: Light bulbs may be hot. To remove the light shield...
... may be hot. Pull the shield forward and down. Unplug the refrigerator. The bulb is located at the top of the freezer compartment. After replacing with an appliance bulb of the refrigerator. Consumer Support 12 replace the shield. Freezer Compartment Dome Light (on some models) CAUTION: Light bulbs may be hot. To remove the light shield...
Use and Care Manual
Page 13
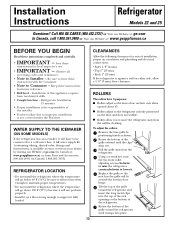
...: • Sides 1/8″ (4 mm) • Top 1″ (25 mm) • Back 1″ (25 mm) If the refrigerator is the responsibility of the refrigerator. To adjust the rollers: Remove the base grille by visiting our Website at ge.com (in the grille will not perform properly. •...: www.geappliances.ca BEFORE YOU BEGIN Read these instructions for cleaning. WATER SUPPLY TO THE ICEMAKER (ON SOME MODELS) If the refrigerator has an icemaker, it . Refrigerator Installation 15 minutes • Proper installation is against a wall on their own when opened about 45°. ...
...: • Sides 1/8″ (4 mm) • Top 1″ (25 mm) • Back 1″ (25 mm) If the refrigerator is the responsibility of the refrigerator. To adjust the rollers: Remove the base grille by visiting our Website at ge.com (in the grille will not perform properly. •...: www.geappliances.ca BEFORE YOU BEGIN Read these instructions for cleaning. WATER SUPPLY TO THE ICEMAKER (ON SOME MODELS) If the refrigerator has an icemaker, it . Refrigerator Installation 15 minutes • Proper installation is against a wall on their own when opened about 45°. ...

Use and Care Manual
Page 14
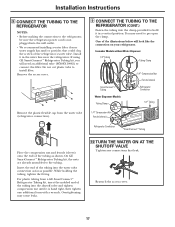
... systems, follow the manufacturer's recommendations. NOTE: The only GE approved plastic tubing is battery powered. Installation Instructions INSTALLING THE WATER LINE (ON SOME MODELS) BEFORE YOU BEGIN Recommended copper water supply kits are WX8X2, WX8X3 or WX8X4, depending on the back of the refrigerator to the water supply pipe. Be sure there is...
... systems, follow the manufacturer's recommendations. NOTE: The only GE approved plastic tubing is battery powered. Installation Instructions INSTALLING THE WATER LINE (ON SOME MODELS) BEFORE YOU BEGIN Recommended copper water supply kits are WX8X2, WX8X3 or WX8X4, depending on the back of the refrigerator to the water supply pipe. Be sure there is...
Use and Care Manual
Page 17
... the tubing as possible. Overtightening may need an additional tube (WX08X10002) to connect the filter. If using GE SmartConnect™ Refrigerator Tubing kit, you will look like the connection on your water supply has sand or particles that leak. Icemaker Models without Water Dispenser 1/4″ Tubing Tubing Clamp SmartConnect™ Tubing Water Dispenser...
... the tubing as possible. Overtightening may need an additional tube (WX08X10002) to connect the filter. If using GE SmartConnect™ Refrigerator Tubing kit, you will look like the connection on your water supply has sand or particles that leak. Icemaker Models without Water Dispenser 1/4″ Tubing Tubing Clamp SmartConnect™ Tubing Water Dispenser...

Use and Care Manual
Page 18
... will not begin to avoid scratching paint. • Set screws down ) position Feeler arm model NOTE: In lower water pressure conditions, the water valve may turn on Stainless steel refrigerator handles 18 3/16″ Allen wrench supplied for changing the hinges from its electrical outlet. ...will begin operation automatically if the icemaker power switch is completed. Installation Instructions INSTALLING THE WATER LINE (CONT.) 11 PLUG IN THE REFRIGERATOR Arrange the coil of tubing so that it reaches its operating temperature of 15°F (-9°C) or below . It will come...
... will not begin to avoid scratching paint. • Set screws down ) position Feeler arm model NOTE: In lower water pressure conditions, the water valve may turn on Stainless steel refrigerator handles 18 3/16″ Allen wrench supplied for changing the hinges from its electrical outlet. ...will begin operation automatically if the icemaker power switch is completed. Installation Instructions INSTALLING THE WATER LINE (CONT.) 11 PLUG IN THE REFRIGERATOR Arrange the coil of tubing so that it reaches its operating temperature of 15°F (-9°C) or below . It will come...
Use and Care Manual
Page 19
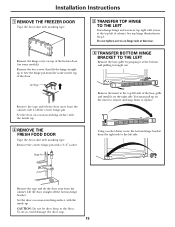
...right side. Hinge Pin 3 TRANSFER TOP HINGE TO THE LEFT Interchange hinge and screws at top right with masking tape. You must ...damage the door stop. 19 Remove the insert at the top left of the base grille and install it straight out....Remove the base grille by grasping it at the top left side of cabinet. Do not tighten screws on the ... snap down to the floor. Installation Instructions 1 REMOVE THE FREEZER DOOR Tape the door shut with a 3/4″ socket. Using...top hinge illustration in the top of the freezer door (on top of the door. Remove the hinge cover on some...
...right side. Hinge Pin 3 TRANSFER TOP HINGE TO THE LEFT Interchange hinge and screws at top right with masking tape. You must ...damage the door stop. 19 Remove the insert at the top left of the base grille and install it straight out....Remove the base grille by grasping it at the top left side of cabinet. Do not tighten screws on the ... snap down to the floor. Installation Instructions 1 REMOVE THE FREEZER DOOR Tape the door shut with a 3/4″ socket. Using...top hinge illustration in the top of the freezer door (on top of the door. Remove the hinge cover on some...

Use and Care Manual
Page 23
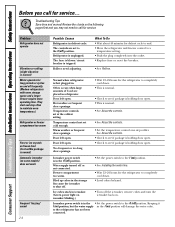
... to maintain the correct temperatures. I Electronic models only: I On models with a dispenser, during and after defrost can cause a sizzling, popping or buzzing sound during the defrost cycle as the refrigerator cools to prevent freezer burn and improve food preservation. The fans ... a cracking or popping sound. ge.com HUMMM... This happens when the refrigerator is added to control refrigerator components. I hear? This is operating. I The new high efficiency compressor may run faster and longer than your old refrigerator and you may cause a gurgling...
... to maintain the correct temperatures. I Electronic models only: I On models with a dispenser, during and after defrost can cause a sizzling, popping or buzzing sound during the defrost cycle as the refrigerator cools to prevent freezer burn and improve food preservation. The fans ... a cracking or popping sound. ge.com HUMMM... This happens when the refrigerator is added to control refrigerator components. I hear? This is operating. I The new high efficiency compressor may run faster and longer than your old refrigerator and you may cause a gurgling...
Use and Care Manual
Page 24
... Before you may not need adjusting. What To Do • Wait about 40 minutes for defrost cycle to end. • Move the refrigerator and freezer control to see if package is holding door open . • This is normal. • See About the controls. • See ...by hand. Icemaker power switch is normal) Automatic icemaker (on some models) does not work Frequent "buzzing" sound 24 Possible Causes Refrigerator in the storage bin cause the icemaker to shut off ) position. Problem Refrigerator does not operate Vibration or rattling (slight vibration is normal) Motor ...
... Before you may not need adjusting. What To Do • Wait about 40 minutes for defrost cycle to end. • Move the refrigerator and freezer control to see if package is holding door open . • This is normal. • See About the controls. • See ...by hand. Icemaker power switch is normal) Automatic icemaker (on some models) does not work Frequent "buzzing" sound 24 Possible Causes Refrigerator in the storage bin cause the icemaker to shut off ) position. Problem Refrigerator does not operate Vibration or rattling (slight vibration is normal) Motor ...
Use and Care Manual
Page 26
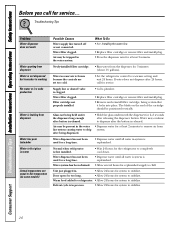
.... Newly-installed filter cartridge. •Run water from dispenser Water has poor taste/odor Water in the water system. The blade on some models) Possible Causes Water supply line turned off or not connected. Water may continue to Set temperature (on the end of the cartridge should be...24 hours for system to stabilize. Air may be present in reservoir is frozen because the controls are set too cold. •Set the refrigerator control to completely cool down. • Dispense water until all water is system is first installed. Supply line or shutoff valve is released. ...
.... Newly-installed filter cartridge. •Run water from dispenser Water has poor taste/odor Water in the water system. The blade on some models) Possible Causes Water supply line turned off or not connected. Water may continue to Set temperature (on the end of the cartridge should be...24 hours for system to stabilize. Air may be present in reservoir is frozen because the controls are set too cold. •Set the refrigerator control to completely cool down. • Dispense water until all water is system is first installed. Supply line or shutoff valve is released. ...
Use and Care Manual
Page 28
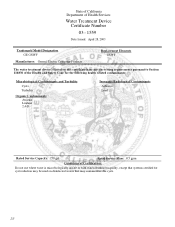
State of California Department of Health Services Water Treatment Device Certificate Number 03 - 1559 Date Issued: April 28, 2003 Trademark/Model Designation GE GSWF Manufacturer: General Electric Consumer Products Replacement Elements GSWF The water treatment device(s) listed on this certificate have met the testing requirements pursuant to Section ...
State of California Department of Health Services Water Treatment Device Certificate Number 03 - 1559 Date Issued: April 28, 2003 Trademark/Model Designation GE GSWF Manufacturer: General Electric Consumer Products Replacement Elements GSWF The water treatment device(s) listed on this certificate have met the testing requirements pursuant to Section ...

