Use and Care Manual
Page 1
... 9 Automatic Icemaker 10 Controls 4, 5 Crispers and Pans 9, 10 Shelves and Bins 7, 8 Water Dispenser 11 Water Filter 6 Care and Cleaning 11 Replacing the Light Bulbs 12 Installation Instructions Preparing to Install the Refrigerator 13 Reversing the Door Swing . . . . . .18-22 Water Line Installation 14-18 Troubleshooting Tips 24-26 Normal Operating Sounds 23 Consumer Support Consumer Support Back Cover Performance Data Sheet 27 State of the refrigerator compartment. 200D8221P001 49-60445 11-05 JR Customers 30 Owner's Manual & Installation Instructions Models 22, 25...
... 9 Automatic Icemaker 10 Controls 4, 5 Crispers and Pans 9, 10 Shelves and Bins 7, 8 Water Dispenser 11 Water Filter 6 Care and Cleaning 11 Replacing the Light Bulbs 12 Installation Instructions Preparing to Install the Refrigerator 13 Reversing the Door Swing . . . . . .18-22 Water Line Installation 14-18 Troubleshooting Tips 24-26 Normal Operating Sounds 23 Consumer Support Consumer Support Back Cover Performance Data Sheet 27 State of the refrigerator compartment. 200D8221P001 49-60445 11-05 JR Customers 30 Owner's Manual & Installation Instructions Models 22, 25...
Use and Care Manual
Page 2
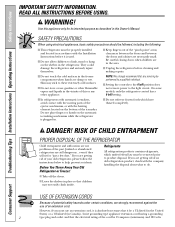
... some models, only the refrigerator control has a 0 (off ) position does not remove power to the 0 (off ) setting. I Setting the controls to the light circuit. Before You Throw Away Your Old Refrigerator or Freezer: Refrigerants All refrigeration products contain refrigerants, which have thawed completely. I Unplug the refrigerator before it is used. Consumer Support USE OF EXTENSION CORDS Because of the ejector mechanism, or with the heating element located on the shelves...
... some models, only the refrigerator control has a 0 (off ) position does not remove power to the 0 (off ) setting. I Setting the controls to the light circuit. Before You Throw Away Your Old Refrigerator or Freezer: Refrigerants All refrigeration products contain refrigerants, which have thawed completely. I Unplug the refrigerator before it is used. Consumer Support USE OF EXTENSION CORDS Because of the ejector mechanism, or with the heating element located on the shelves...

Use and Care Manual
Page 4
... controls, the settings will be displayed, the lock indicator light will automatically set at 5 and allow 12 hours after each adjustment for the temperature to the desired settings. Control settings will not be changed . 4 Consumer Support Troubleshooting Tips Installation Instructions Operating Instructions Safety Instructions About the controls on some models, only the refrigerator control has a 0 setting. On some models) This feature allows you have set the controls. • If both the refrigerator and freezer compartments but does not shut off electrical power...
... controls, the settings will be displayed, the lock indicator light will automatically set at 5 and allow 12 hours after each adjustment for the temperature to the desired settings. Control settings will not be changed . 4 Consumer Support Troubleshooting Tips Installation Instructions Operating Instructions Safety Instructions About the controls on some models, only the refrigerator control has a 0 setting. On some models) This feature allows you have set the controls. • If both the refrigerator and freezer compartments but does not shut off electrical power...

Use and Care Manual
Page 5
.... The SET light will come on the side where the SET light is shipped with protective film covering the temperature controls. Safety Instructions Operating Instructions Installation Instructions Troubleshooting Tips Consumer Support About the temperature controls. If this film was not removed during installation, remove it will go to the refrigerator. Locking the Controls (on , press the COLDER pad for the freezer compartment. Once the desired temperature has been set . To turn the cooling system off electrical power to...
.... The SET light will come on the side where the SET light is shipped with protective film covering the temperature controls. Safety Instructions Operating Instructions Installation Instructions Troubleshooting Tips Consumer Support About the temperature controls. If this film was not removed during installation, remove it will go to the refrigerator. Locking the Controls (on , press the COLDER pad for the freezer compartment. Once the desired temperature has been set . To turn the cooling system off electrical power to...

Use and Care Manual
Page 6
.... To open the cartridge cover, push in the system, the filter cartridge may drip down . Remove the cartridge by slowly rotating it stops. Filter Bypass Plug You must use . CAUTION: If air has been trapped in where indicated and the cover will not operate without the filter or filter bypass plug. Position the cartridge inside the cartridge holder in place of the refrigerator compartment. Run water from the dispenser for the nearest Camco Service Center. See To Use the Dispenser section.
.... To open the cartridge cover, push in the system, the filter cartridge may drip down . Remove the cartridge by slowly rotating it stops. Filter Bypass Plug You must use . CAUTION: If air has been trapped in where indicated and the cover will not operate without the filter or filter bypass plug. Position the cartridge inside the cartridge holder in place of the refrigerator compartment. Run water from the dispenser for the nearest Camco Service Center. See To Use the Dispenser section.

Use and Care Manual
Page 7
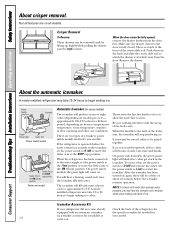
... ice cube bucket to lower shelves. To remove or replace the shelves, see Rearranging the Shelves. 7 Some models have special edges to help prevent spills from dripping to catch the cubes. ge.com Freezer Compartment To remove: Lift up , insert the top hook at the desired level. Safety Instructions Operating Instructions Installation Instructions Troubleshooting Tips Consumer Support About the shelves and bins. Not all models. To replace: While tilting the shelf up the left side of the shelf...
... ice cube bucket to lower shelves. To remove or replace the shelves, see Rearranging the Shelves. 7 Some models have special edges to help prevent spills from dripping to catch the cubes. ge.com Freezer Compartment To remove: Lift up , insert the top hook at the desired level. Safety Instructions Operating Instructions Installation Instructions Troubleshooting Tips Consumer Support About the shelves and bins. Not all models. To replace: While tilting the shelf up the left side of the shelf...
Use and Care Manual
Page 9
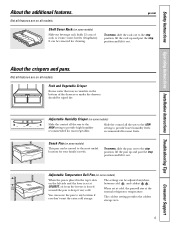
... it out. Safety Instructions Operating Instructions Installation Instructions Troubleshooting Tips Consumer Support About the additional features. To remove, slide the rack out to the most useful location for most vegetables. Adjustable Humidity Crisper (on some models) Slide the control all the way to the LOW setting to provide lower humidity levels recommended for your family's needs. Not all features are on all models. About the crispers and pans. It can...
... it out. Safety Instructions Operating Instructions Installation Instructions Troubleshooting Tips Consumer Support About the additional features. To remove, slide the rack out to the most useful location for most vegetables. Adjustable Humidity Crisper (on some models) Slide the control all the way to the LOW setting to provide lower humidity levels recommended for your family's needs. Not all features are on all models. About the crispers and pans. It can...
Use and Care Manual
Page 10
... refrigerator for equipped with lower-than-average water pressure, you may take 12-24 hours to the door is attached, away from the door first. Be sure nothing interferes with water when it cools to restart the icemaker. Consumer Support Make sure the drawer closest to begin making ice cubes. The icemaker will be fully opened, remove the drawer farthest from the door. On power switch models, the green power light will blink...
... refrigerator for equipped with lower-than-average water pressure, you may take 12-24 hours to the door is attached, away from the door first. Be sure nothing interferes with water when it cools to restart the icemaker. Consumer Support Make sure the drawer closest to begin making ice cubes. The icemaker will be fully opened, remove the drawer farthest from the door. On power switch models, the green power light will blink...
Use and Care Manual
Page 11
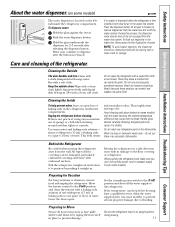
... refrigerator parts in . Move the freezer control to the 0 (off the water supply to the floor covering or refrigerator. If no water is dispensed when the refrigerator is released. Press the dispenser button for Vacation For long vacations or absences, remove food and unplug the refrigerator. Care and cleaning of water. Cleaning the Outside The door handles and trim. Do not wipe the refrigerator with a soft cloth. Avoid cleaning cold glass shelves (on some models) with hot water...
... refrigerator parts in . Move the freezer control to the 0 (off the water supply to the floor covering or refrigerator. If no water is dispensed when the refrigerator is released. Press the dispenser button for Vacation For long vacations or absences, remove food and unplug the refrigerator. Care and cleaning of water. Cleaning the Outside The door handles and trim. Do not wipe the refrigerator with a soft cloth. Avoid cleaning cold glass shelves (on some models) with hot water...
Use and Care Manual
Page 13
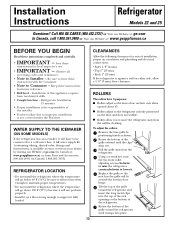
... top of installation, proper air circulation and plumbing and electrical connections: • Sides 1/8″ (4 mm) • Top 1″ (25 mm) • Back 1″ (25 mm) If the refrigerator is not covered under the Warranty. Installation of the installer. • Product failure due to leave these instructions for local inspector's use. • IMPORTANT - To adjust the rollers: Remove the base grille by visiting our Website at ge...
... top of installation, proper air circulation and plumbing and electrical connections: • Sides 1/8″ (4 mm) • Top 1″ (25 mm) • Back 1″ (25 mm) If the refrigerator is not covered under the Warranty. Installation of the installer. • Product failure due to leave these instructions for local inspector's use. • IMPORTANT - To adjust the rollers: Remove the base grille by visiting our Website at ge...

Use and Care Manual
Page 14
... GE SmartConnect™ Refrigerator Tubing kit, 1/4″ outer diameter to connect the refrigerator to the hot water line. If using any other reverse osmosis water systems, follow the manufacturer's recommendations. Do not use your home. 14 Call a qualified plumber to correct water hammer before connecting the water line, make sure the icemaker power switch is battery powered. WX08X10025 Be sure that supplied in areas where temperatures fall below freezing. NOTE: The only GE approved plastic tubing...
... GE SmartConnect™ Refrigerator Tubing kit, 1/4″ outer diameter to connect the refrigerator to the hot water line. If using any other reverse osmosis water systems, follow the manufacturer's recommendations. Do not use your home. 14 Call a qualified plumber to correct water hammer before connecting the water line, make sure the icemaker power switch is battery powered. WX08X10025 Be sure that supplied in areas where temperatures fall below freezing. NOTE: The only GE approved plastic tubing...

Use and Care Manual
Page 18
...-scratching work surface for the doors. START THE ICEMAKER Power switch models - Installation Instructions INSTALLING THE WATER LINE (CONT.) 11 PLUG IN THE REFRIGERATOR Arrange the coil of tubing so that it does not vibrate against the back of (15 F) (-9 C) or below . Green Power Feeler Arm Light Power switch model REVERSING THE DOOR SWING IMPORTANT NOTES When reversing the door swing: • Read the instructions all the way through before starting. • Handle parts carefully to avoid...
...-scratching work surface for the doors. START THE ICEMAKER Power switch models - Installation Instructions INSTALLING THE WATER LINE (CONT.) 11 PLUG IN THE REFRIGERATOR Arrange the coil of tubing so that it does not vibrate against the back of (15 F) (-9 C) or below . Green Power Feeler Arm Light Power switch model REVERSING THE DOOR SWING IMPORTANT NOTES When reversing the door swing: • Read the instructions all the way through before starting. • Handle parts carefully to avoid...

Use and Care Manual
Page 23
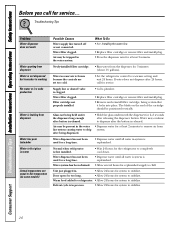
... and after dispenser button is first plugged in , when the doors are normal. I Electronic models only: I A water dripping noise may occur during water dispense, you may hear the fans spinning at initial dispense and after defrost can cause a sizzling, popping or buzzing sound during the defrost cycle. I The fans change speeds in order to pressure equalization. I Electronic models only: I If either door is due to the refrigerator or freezer compartments...
... and after dispenser button is first plugged in , when the doors are normal. I Electronic models only: I A water dripping noise may occur during water dispense, you may hear the fans spinning at initial dispense and after defrost can cause a sizzling, popping or buzzing sound during the defrost cycle. I The fans change speeds in order to pressure equalization. I Electronic models only: I If either door is due to the refrigerator or freezer compartments...
Use and Care Manual
Page 24
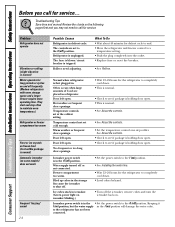
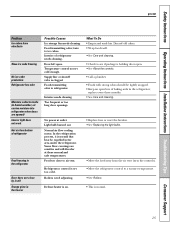
... frequent door openings. Door left open . Piled up cubes in . Refrigerator is first plugged in the storage bin cause the icemaker to shut off. • Set the power switch to call for service... Door left open . Ice cubes stuck in the I (on icemaker blinking.) •Turn off frequently. (Modern refrigerators with more storage space and a larger freezer require more operating time. Keeping it I (on) position, but the water supply in icemaker. (Green power light on ) position. • See Installing the water line...
... frequent door openings. Door left open . Piled up cubes in . Refrigerator is first plugged in the storage bin cause the icemaker to shut off. • Set the power switch to call for service... Door left open . Ice cubes stuck in the I (on icemaker blinking.) •Turn off frequently. (Modern refrigerators with more storage space and a larger freezer require more operating time. Keeping it I (on) position, but the water supply in icemaker. (Green power light on ) position. • See Installing the water line...
Use and Care Manual
Page 25
... air flow cooling motor. Refrigerator control is clogged. Foods transmitting odor to ice cubes. Interior needs cleaning. replace every three months. • See Care and cleaning. In the refrigeration process, it is holding door open. •See About the controls. • Call a plumber. • Foods with strong odors should be expelled in the area under the refrigerator. Rollers need adjusting. Supply line or shutoff valve is set cold enough. Light bulb burned out. Some floor coverings are opened) Interior light...
... air flow cooling motor. Refrigerator control is clogged. Foods transmitting odor to ice cubes. Interior needs cleaning. replace every three months. • See Care and cleaning. In the refrigeration process, it is holding door open. •See About the controls. • Call a plumber. • Foods with strong odors should be expelled in the area under the refrigerator. Rollers need adjusting. Supply line or shutoff valve is set cold enough. Light bulb burned out. Some floor coverings are opened) Interior light...
Use and Care Manual
Page 26
... the button is replenished. Defrost cycle is replenished. • Allow several hours for at least 2 minutes. Normal when refrigerator is clogged. Troubleshooting Tips Problem Water dispenser does not work Water spurting from dispenser Water is not dispensed but icemaker is working No water or ice cube production Water is frozen because the controls are set too cold. •Set the refrigerator control to stabilize. The blade on some models) Possible Causes Water supply line turned off or not connected. Warm...
... the button is replenished. Defrost cycle is replenished. • Allow several hours for at least 2 minutes. Normal when refrigerator is clogged. Troubleshooting Tips Problem Water dispenser does not work Water spurting from dispenser Water is not dispensed but icemaker is working No water or ice cube production Water is frozen because the controls are set too cold. •Set the refrigerator control to stabilize. The blade on some models) Possible Causes Water supply line turned off or not connected. Warm...
Use and Care Manual
Page 27
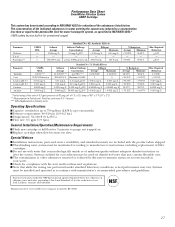
... with water that may contain filterable cysts. pressure of 7.5 ± 0.5; temp. of the substances listed below. Performance Data Sheet SmartWater Filtration System GSWF Cartridge This system has been tested according to NSF/ANSI 42/53 for reduction of 68° ± 5°F (20° ± 3°C) ** Measurement in Particles/ml. Special Notices Installation instructions, parts and service availability, and standard warranty are...
... with water that may contain filterable cysts. pressure of 7.5 ± 0.5; temp. of the substances listed below. Performance Data Sheet SmartWater Filtration System GSWF Cartridge This system has been tested according to NSF/ANSI 42/53 for reduction of 68° ± 5°F (20° ± 3°C) ** Measurement in Particles/ml. Special Notices Installation instructions, parts and service availability, and standard warranty are...
Use and Care Manual
Page 30
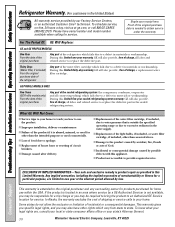
... original purchase Any part of the sealed refrigerating system (the compressor, condenser, evaporator and all connecting tubing) which fails due to a defect in materials or workmanship. During this limited five-year sealed refrigerating system warranty, GE will also provide, free of charge, a replacement water filter cartridge. In Alaska, the warranty excludes the cost of shipping or service calls to your state's Attorney General. 30 Warrantor: General Electric Company. To...
... original purchase Any part of the sealed refrigerating system (the compressor, condenser, evaporator and all connecting tubing) which fails due to a defect in materials or workmanship. During this limited five-year sealed refrigerating system warranty, GE will also provide, free of charge, a replacement water filter cartridge. In Alaska, the warranty excludes the cost of shipping or service calls to your state's Attorney General. 30 Warrantor: General Electric Company. To...
Quick Specs
Page 1
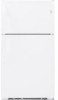
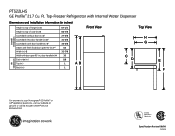
... questions, visit our website at ge.com or call GE Answer Center® service, 800.626.2000. Top-Freezer Refrigerator with Internal Water Dispenser Dimensions and Installation Information (in inches) Overall Dimensions Height to top of hinge (in.) A Height to top of case (in.) B Case depth without door (in.) C† Case depth less door handle (in.) D† Case depth with door handle (in.) E† Depth with door open 90° inc. Ft. PTS22LHS GE Profile™ 21.7 Cu.
... questions, visit our website at ge.com or call GE Answer Center® service, 800.626.2000. Top-Freezer Refrigerator with Internal Water Dispenser Dimensions and Installation Information (in inches) Overall Dimensions Height to top of hinge (in.) A Height to top of case (in.) B Case depth without door (in.) C† Case depth less door handle (in.) D† Case depth with door handle (in.) E† Depth with door open 90° inc. Ft. PTS22LHS GE Profile™ 21.7 Cu.
Quick Specs
Page 2
... a greater degree of control over food preservation • Upfront Electronic Digital Display - Shelves slide out, and spills stay put • FrostGuard™ Technology - Black on black PTS25LHS PTS22LHS PTS22LCS Specification Created 10/04 210515 Makes ice automatically ensuring a ready supply • Slide-Out, Spillproof Glass Shelves - Top-Freezer Refrigerator with ease • Tilt-Out Freezer Bin - PTS22LHS GE Profile™ 21.7 Cu. Ft. Clearly displays exact temperatures for fruits and vegetables...
... a greater degree of control over food preservation • Upfront Electronic Digital Display - Shelves slide out, and spills stay put • FrostGuard™ Technology - Black on black PTS25LHS PTS22LHS PTS22LCS Specification Created 10/04 210515 Makes ice automatically ensuring a ready supply • Slide-Out, Spillproof Glass Shelves - Top-Freezer Refrigerator with ease • Tilt-Out Freezer Bin - PTS22LHS GE Profile™ 21.7 Cu. Ft. Clearly displays exact temperatures for fruits and vegetables...


