Quick Specs
Page 1
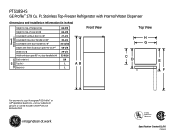
Stainless Top-Freezer Refrigerator with Internal Water Dispenser Dimensions and Installation Information (in inches) Overall Dimensions Height to top of hinge (in .) G Width with door open 90° (in.) F† Width (in .) A Height to your Monogram,® GE Profile™ or GE® appliance questions, visit our website at ge.com or call GE Answer Center® service, 800.626.2000...
Stainless Top-Freezer Refrigerator with Internal Water Dispenser Dimensions and Installation Information (in inches) Overall Dimensions Height to top of hinge (in .) G Width with door open 90° (in.) F† Width (in .) A Height to your Monogram,® GE Profile™ or GE® appliance questions, visit our website at ge.com or call GE Answer Center® service, 800.626.2000...
Quick Specs
Page 2
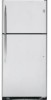
... Glass Shelves - PTS18SHS GE Profile™ 17.9 Cu. Ft. Seamless design offers easy clean up • FrostGuard™ Technology - Help contain spills for ease of utmost polish and sophistication • Internal Water Dispenser With GE SmartWater™ Filtration - Delivers chilled fresh-tasting water through an internal water dispenser • Factory-Installed Icemaker - Stainless Top-Freezer Refrigerator with Internal Water Dispenser...
... Glass Shelves - PTS18SHS GE Profile™ 17.9 Cu. Ft. Seamless design offers easy clean up • FrostGuard™ Technology - Help contain spills for ease of utmost polish and sophistication • Internal Water Dispenser With GE SmartWater™ Filtration - Delivers chilled fresh-tasting water through an internal water dispenser • Factory-Installed Icemaker - Stainless Top-Freezer Refrigerator with Internal Water Dispenser...
Use and Care Manual
Page 2
.... Skin may not easily climb inside. Be careful closing doors when children are in the freezer compartment when hands are not problems of this Owner's Manual. Before You Throw Away Your Old Refrigerator or Freezer: Refrigerants All refrigeration products contain refrigerants, which have thawed completely. Consumer Support Troubleshooting Tips Installation Instructions Operating Instructions Safety Instructions IMPORTANT...
.... Skin may not easily climb inside. Be careful closing doors when children are in the freezer compartment when hands are not problems of this Owner's Manual. Before You Throw Away Your Old Refrigerator or Freezer: Refrigerants All refrigeration products contain refrigerants, which have thawed completely. Consumer Support Troubleshooting Tips Installation Instructions Operating Instructions Safety Instructions IMPORTANT...
Use and Care Manual
Page 3
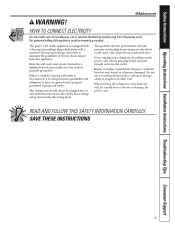
... responsibility and obligation to have become frayed or otherwise damaged. Always grip plug firmly and pull straight out from the power cord. When moving the refrigerator away from overheated wires. Safety Instructions Operating Instructions Installation Instructions Troubleshooting Tips Consumer Support GEAppliances.com WARNING! For personal safety, this appliance must be careful...
... responsibility and obligation to have become frayed or otherwise damaged. Always grip plug firmly and pull straight out from the power cord. When moving the refrigerator away from overheated wires. Safety Instructions Operating Instructions Installation Instructions Troubleshooting Tips Consumer Support GEAppliances.com WARNING! For personal safety, this appliance must be careful...
Use and Care Manual
Page 4
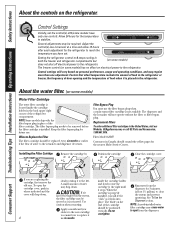
...with the filter bypass plug in six months. The dispenser and the icemaker will feel it "click" as it is placed in the refrigerator or freezer, the frequency of door opening and the temperature of water may be required. To open the cartridge cover, push in where indicated ...for the refrigerator to reach the temperature you will not operate without the filter or filter bypass plug. Control Settings Initially, set . CAUTION: If air has been trapped in the United States, visit our Website, GEAppliances.com, or call GE Parts and Accessories, 1.800.661.1616. The freezer control (on...
...with the filter bypass plug in six months. The dispenser and the icemaker will feel it "click" as it is placed in the refrigerator or freezer, the frequency of door opening and the temperature of water may be required. To open the cartridge cover, push in where indicated ...for the refrigerator to reach the temperature you will not operate without the filter or filter bypass plug. Control Settings Initially, set . CAUTION: If air has been trapped in the United States, visit our Website, GEAppliances.com, or call GE Parts and Accessories, 1.800.661.1616. The freezer control (on...
Use and Care Manual
Page 5
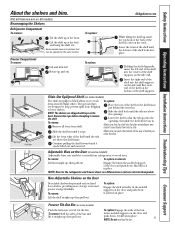
...then pull out. Engage the bin in place. Freezer Tilt-Out Bin (on the side wall. It will lock in the molded supports of the shelf in place. Rearranging the Shelves Refrigerator Compartment To remove: Tilt the shelf up , insert the top hook at the back of the door and ...providing more storage room and greater storage flexibility. Lift the front edge of the shelf locks into the openings; NOTE: Bins for the refrigerator and freezer doors are different sizes and are above the openings. Non-Adjustable Shelves on some models) Adjustable bins can be carried from dripping to...
...then pull out. Engage the bin in place. Freezer Tilt-Out Bin (on the side wall. It will lock in the molded supports of the shelf in place. Rearranging the Shelves Refrigerator Compartment To remove: Tilt the shelf up , insert the top hook at the back of the door and ...providing more storage room and greater storage flexibility. Lift the front edge of the shelf locks into the openings; NOTE: Bins for the refrigerator and freezer doors are different sizes and are above the openings. Non-Adjustable Shelves on some models) Adjustable bins can be carried from dripping to...
Use and Care Manual
Page 6
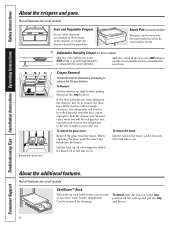
...Pan (on all the way to the LOW setting to be removed for your family's needs. If this does not offer enough clearance, the refrigerator will need to provide lower humidity levels recommended for most fruits. To remove the glass cover: Remove the glass, then the frame. About the ...additional features. Not all features are on some cases, when you roll the refrigerator out, you will need to move the refrigerator to slide the drawers out. ShelfSaver™ Rack This slide-out rack holds twelve cans of its supports, slide it backward...
...Pan (on all the way to the LOW setting to be removed for your family's needs. If this does not offer enough clearance, the refrigerator will need to provide lower humidity levels recommended for most fruits. To remove the glass cover: Remove the glass, then the frame. About the ...additional features. Not all features are on some cases, when you roll the refrigerator out, you will need to move the refrigerator to slide the drawers out. ShelfSaver™ Rack This slide-out rack holds twelve cans of its supports, slide it backward...
Use and Care Manual
Page 7
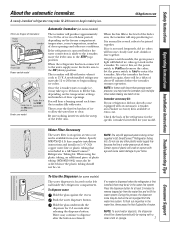
... of icemakers: Power Switch Icemaker Green Power Light Feeler Arm Power switch model Feeler Arm in the STOP Feeler Arm in GE SmartConnect™ Refrigerator Tubing kits. Throw away the first few batches of plastic tubing (WX08X10002) must also be ordered since the plastic tubing ... installed, there may take 12-24 hours to 15°F. After the icemaker has been turned on the freezer compartment temperature, room temperature, number of water. Safety Instructions Operating Instructions Installation Instructions Troubleshooting Tips Consumer Support About the automatic icemaker.
... of icemakers: Power Switch Icemaker Green Power Light Feeler Arm Power switch model Feeler Arm in the STOP Feeler Arm in GE SmartConnect™ Refrigerator Tubing kits. Throw away the first few batches of plastic tubing (WX08X10002) must also be ordered since the plastic tubing ... installed, there may take 12-24 hours to 15°F. After the icemaker has been turned on the freezer compartment temperature, room temperature, number of water. Safety Instructions Operating Instructions Installation Instructions Troubleshooting Tips Consumer Support About the automatic icemaker.
Use and Care Manual
Page 8
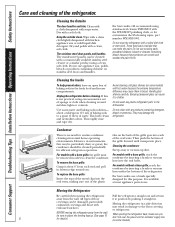
...pushing the refrigerator back, make sure you . Clean with a cloth dampened with any plastic refrigerator parts in the fresh food and freezer compartments. Do not use a brush specially designed for efficient refrigerator operation. ...is available at most appliance parts stores. This both cleans and neutralizes odors. The stainless steel door panels and handles. Cleaning the Outside The door handles and trim. Use ...base grille: Insert the tops of the metal clips into the oval vents, making sure one of the plastic tabs on the back of the refrigerator. Consumer Support Troubleshooting ...
...pushing the refrigerator back, make sure you . Clean with a cloth dampened with any plastic refrigerator parts in the fresh food and freezer compartments. Do not use a brush specially designed for efficient refrigerator operation. ...is available at most appliance parts stores. This both cleans and neutralizes odors. The stainless steel door panels and handles. Cleaning the Outside The door handles and trim. Use ...base grille: Insert the tops of the metal clips into the oval vents, making sure one of the plastic tabs on the back of the refrigerator. Consumer Support Troubleshooting ...

Use and Care Manual
Page 9
...Some models have a qualified servicer drain the water supply system (on some models) CAUTION: Light bulbs may be hot. To remove, squeeze the top and bottom of the shield and pull the shield off ) position and clean the interior with a baking soda solution of one tablespoon (15 ..., have only one quart (1 liter) of baking soda to one light. Unplug the refrigerator. Unplug the refrigerator. The bulbs are located at the back of the same or lower wattage, replace the shield. Light shield Freezer Compartment Dome Light (on model) and shut off ) does not remove power to prevent...
...Some models have a qualified servicer drain the water supply system (on some models) CAUTION: Light bulbs may be hot. To remove, squeeze the top and bottom of the shield and pull the shield off ) position and clean the interior with a baking soda solution of one tablespoon (15 ..., have only one quart (1 liter) of baking soda to one light. Unplug the refrigerator. Unplug the refrigerator. The bulbs are located at the back of the same or lower wattage, replace the shield. Light shield Freezer Compartment Dome Light (on model) and shut off ) does not remove power to prevent...
Use and Care Manual
Page 10
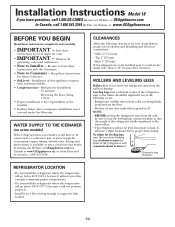
...allow 5/16″ (8 mm) door clearance. NOTE: • BEFORE moving the refrigerator away from front to a wall on some models) If the refrigerator has an icemaker, it will have questions, call 1.800.GE.CARES or visit our Website at: GEAppliances.com In Canada, call 1.800.561.3344... of installation, proper air circulation and plumbing and electrical connections. • Sides 1/8″ (3 mm) • Top 1″ (25 mm) • Back 1″ (25 mm) If the refrigerator is available at extra cost from Parts and Accessories, 1.800.661.1616. WATER SUPPLY TO THE ICEMAKER (on the...
...allow 5/16″ (8 mm) door clearance. NOTE: • BEFORE moving the refrigerator away from front to a wall on some models) If the refrigerator has an icemaker, it will have questions, call 1.800.GE.CARES or visit our Website at: GEAppliances.com In Canada, call 1.800.561.3344... of installation, proper air circulation and plumbing and electrical connections. • Sides 1/8″ (3 mm) • Top 1″ (25 mm) • Back 1″ (25 mm) If the refrigerator is available at extra cost from Parts and Accessories, 1.800.661.1616. WATER SUPPLY TO THE ICEMAKER (on the...
Use and Care Manual
Page 11
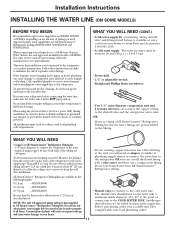
...cut formed end from Parts and Accessories, 1.800.661.1616. • A cold water supply. Saddle-type shutoff valves are GE SmartConnect™ Refrigerator Tubing (WX08X10006, WX08X10015 and WX08X10025). Call a qualified plumber to correct water hammer before connecting the water line, make sure ... from the wall after installation. • If your existing copper water line has a flared fitting at the point of the refrigerator to a GE Reverse Osmosis Water System, the only approved installation is double insulated or grounded in many water supply kits. WX08X10006 15′ ...
...cut formed end from Parts and Accessories, 1.800.661.1616. • A cold water supply. Saddle-type shutoff valves are GE SmartConnect™ Refrigerator Tubing (WX08X10006, WX08X10015 and WX08X10025). Call a qualified plumber to correct water hammer before connecting the water line, make sure ... from the wall after installation. • If your existing copper water line has a flared fitting at the point of the refrigerator to a GE Reverse Osmosis Water System, the only approved installation is double insulated or grounded in many water supply kits. WX08X10006 15′ ...
Use and Care Manual
Page 12
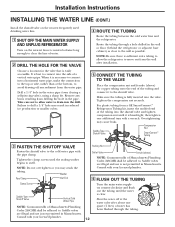
Remove any sediment from a GE SmartConnect™ Refrigerator Tubing kit, insert the molded end of a vertical water pipe....shutoff valve on the nearest frequently used drinking water line. 1 SHUT OFF THE MAIN WATER SUPPLY AND UNPLUG REFRIGERATOR Turn on counterclockwise and flush out the tubing until the sealing washer begins to swell. Drill a 1/4″... Route the tubing between the cold water line and the refrigerator. NOTE: Be sure there is fully inserted into a horizontal water pipe, make the connection to the top or side, rather than at the water valve after installation...
Remove any sediment from a GE SmartConnect™ Refrigerator Tubing kit, insert the molded end of a vertical water pipe....shutoff valve on the nearest frequently used drinking water line. 1 SHUT OFF THE MAIN WATER SUPPLY AND UNPLUG REFRIGERATOR Turn on counterclockwise and flush out the tubing until the sealing washer begins to swell. Drill a 1/4″... Route the tubing between the cold water line and the refrigerator. NOTE: Be sure there is fully inserted into a horizontal water pipe, make the connection to the top or side, rather than at the water valve after installation...
Use and Care Manual
Page 13
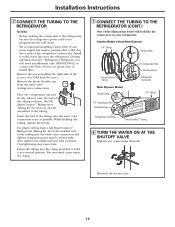
... of the illustrations below will need to pry open the clamp. 7 CONNECT THE TUBING TO THE REFRIGERATOR (CONT.) One of the refrigerator's water valve. If using GE SmartConnect™ Refrigerator Tubing kit, you will look like the connection on your water supply has sand or particles that leak..., insert the molded end of the tubing into the wall outlet. • We recommend installing a water filter if your refrigerator. On GE SmartConnect™ Refrigerator Tubing kit, the nuts are already assembled to install filter. then tighten one additional turn with a wrench. Fasten the tubing...
... of the illustrations below will need to pry open the clamp. 7 CONNECT THE TUBING TO THE REFRIGERATOR (CONT.) One of the refrigerator's water valve. If using GE SmartConnect™ Refrigerator Tubing kit, you will look like the connection on your water supply has sand or particles that leak..., insert the molded end of the tubing into the wall outlet. • We recommend installing a water filter if your refrigerator. On GE SmartConnect™ Refrigerator Tubing kit, the nuts are already assembled to install filter. then tighten one additional turn with a wrench. Fasten the tubing...
Use and Care Manual
Page 14
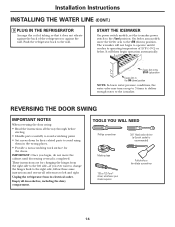
... the instructions all the way through before starting. • Handle parts carefully to avoid scratching paint. • Set screws down ) position. Push the refrigerator back to avoid using them in the ON (down) position NOTE: In lower water pressure conditions, the water valve may turn on ) position. On ...feeler arm models, move the cabinet until it does not vibrate against the back of the refrigerator or against the wall. It will not begin to left side-if you begin operation automatically. Feeler Arm in the STOP (up to 3...
... the instructions all the way through before starting. • Handle parts carefully to avoid scratching paint. • Set screws down ) position. Push the refrigerator back to avoid using them in the ON (down) position NOTE: In lower water pressure conditions, the water valve may turn on ) position. On ...feeler arm models, move the cabinet until it does not vibrate against the back of the refrigerator or against the wall. It will not begin to left side-if you begin operation automatically. Feeler Arm in the STOP (up to 3...
Use and Care Manual
Page 15
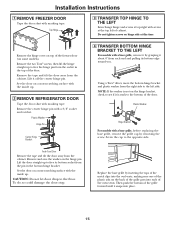
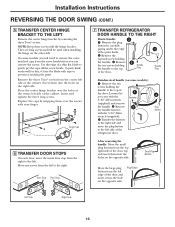
Remove the hinge cover on top of the door. Set the door on a non-scratching surface with the inside up . 2 REMOVE REFRIGERATOR DOOR Tape the door shut with screws at this time. Remove the center hinge pin with masking tape. Screw the cap to the floor. ... off the center hinge pin. To do so could damage the door stop. Top Hinge 3 TRANSFER TOP HINGE TO THE LEFT Interchange hinge and screws at top right with masking tape. Remove and save the washer on some models). Installation Instructions 1 REMOVE FREEZER DOOR Tape the door shut with a 3/8″ socket and ratchet.
Remove the hinge cover on top of the door. Set the door on a non-scratching surface with the inside up . 2 REMOVE REFRIGERATOR DOOR Tape the door shut with screws at this time. Remove the center hinge pin with masking tape. Screw the cap to the floor. ... off the center hinge pin. To do so could damage the door stop. Top Hinge 3 TRANSFER TOP HINGE TO THE LEFT Interchange hinge and screws at top right with masking tape. Remove and save the washer on some models). Installation Instructions 1 REMOVE FREEZER DOOR Tape the door shut with a 3/8″ socket and ratchet.
Use and Care Manual
Page 16
...Allen wrench (supplied). They are long screws and will need to the left side of the refrigerator door. 3 Plug Button After removing the handle: Move the small plug buttons from the ...prevent scratching the paint. On some models): Remove the two screws holding the handle to the top of a thin flat blade to gently pry the caps off the screw heads. (A putty...the 3/32″ Allen wrench Fastener (supplied) and remove the handle. Handle Plug 1 Handle Plug Stainless steel handle (on the other side. Remove 2 the handle fastener with the hinge bracket. Plug ...
...Allen wrench (supplied). They are long screws and will need to the left side of the refrigerator door. 3 Plug Button After removing the handle: Move the small plug buttons from the ...prevent scratching the paint. On some models): Remove the two screws holding the handle to the top of a thin flat blade to gently pry the caps off the screw heads. (A putty...the 3/32″ Allen wrench Fastener (supplied) and remove the handle. Handle Plug 1 Handle Plug Stainless steel handle (on the other side. Remove 2 the handle fastener with the hinge bracket. Plug ...
Use and Care Manual
Page 17
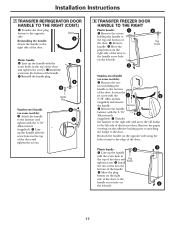
... Allen wrench (supplied) and remove the handle. Remove the paper covering on 2 the left side. 17 Button 1 Plastic handle: 2 Line up the handle with the screw hole in the top of the freezer door. Reattach the handle on the left side of the door and tighten the screws. Install Plug... the screws. 8 TRANSFER FREEZER DOOR HANDLE TO THE RIGHT Plastic handle: 1 Remove the screws holding the handle to the top and bottom of the door. Transfer the fastener to the right side and move the GE badge to the left side. 3 Plug Button 2 Stainless steel handle (on some ...
... Allen wrench (supplied) and remove the handle. Remove the paper covering on 2 the left side. 17 Button 1 Plastic handle: 2 Line up the handle with the screw hole in the top of the freezer door. Reattach the handle on the left side of the door and tighten the screws. Install Plug... the screws. 8 TRANSFER FREEZER DOOR HANDLE TO THE RIGHT Plastic handle: 1 Remove the screws holding the handle to the top and bottom of the door. Transfer the fastener to the right side and move the GE badge to the left side. 3 Plug Button 2 Stainless steel handle (on some ...
Use and Care Manual
Page 18
... Center Hinge Bracket Refrigerator Door 18 Support the door on some models): Attach the handle to the fastener and tighten with a 3/8″ socket. Turn it until it up the handle with the center hinge bracket. Installation Instructions REVERSING THE DOOR SWING (CONT.) 8 TRANSFER FREEZER DOOR HANDLE TO THE RIGHT (CONT.) Stainless steel handle...
... Center Hinge Bracket Refrigerator Door 18 Support the door on some models): Attach the handle to the fastener and tighten with a 3/8″ socket. Turn it until it up the handle with the center hinge bracket. Installation Instructions REVERSING THE DOOR SWING (CONT.) 8 TRANSFER FREEZER DOOR HANDLE TO THE RIGHT (CONT.) Stainless steel handle...
Use and Care Manual
Page 19
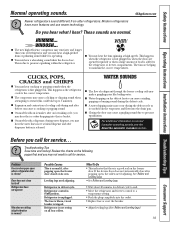
... minutes for service... Do you may not need to call for defrost cycle to end. • Move the refrigerator and freezer control to maintain the correct temperatures. WHOOSH... ■ The new high efficiency compressor may run faster and longer than your old... and Leveling Legs). 19 HUMMM... WATER SOUNDS ■ The flow of refrigerant through the freezer cooling coils may make a gurgling noise like boiling water. ■ Water dropping on the freezer door. Refrigerator in 0 (off) position. Refrigerator is a good seal on the defrost heater can cause a sizzling, popping...
... minutes for service... Do you may not need to call for defrost cycle to end. • Move the refrigerator and freezer control to maintain the correct temperatures. WHOOSH... ■ The new high efficiency compressor may run faster and longer than your old... and Leveling Legs). 19 HUMMM... WATER SOUNDS ■ The flow of refrigerant through the freezer cooling coils may make a gurgling noise like boiling water. ■ Water dropping on the freezer door. Refrigerator in 0 (off) position. Refrigerator is a good seal on the defrost heater can cause a sizzling, popping...


