Quick Specs
Page 1
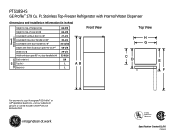
...; (in.) F† Width (in.) G Width with Internal Water Dispenser Dimensions and Installation Information (in inches) Overall Dimensions Height to top of hinge (in.) A Height to your Monogram,® GE Profile™ or GE® appliance questions, visit our website at ge.com or call GE Answer Center® service, 800.626.2000. Stainless Top-Freezer Refrigerator with door open 90° inc. Ft. Listed by Underwriters Laboratories Specification Created 11/05 210520 PTS18SHS GE Profile™ 17.9 Cu.
...; (in.) F† Width (in.) G Width with Internal Water Dispenser Dimensions and Installation Information (in inches) Overall Dimensions Height to top of hinge (in.) A Height to your Monogram,® GE Profile™ or GE® appliance questions, visit our website at ge.com or call GE Answer Center® service, 800.626.2000. Stainless Top-Freezer Refrigerator with door open 90° inc. Ft. Listed by Underwriters Laboratories Specification Created 11/05 210520 PTS18SHS GE Profile™ 17.9 Cu.
Quick Specs
Page 2
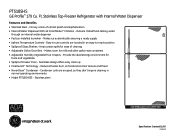
.../50250 PTS18SHS GE Profile™ 17.9 Cu. Convey a look of cleaning • Adjustable Gallon Door Bins - Easy-to -reach position • Spillproof Glass Shelves - Ft. Makes ice automatically ensuring a ready supply • Upfront Temperature Controls - Help contain spills for ease of utmost polish and sophistication • Internal Water Dispenser With GE SmartWater™ Filtration - Makes room for fruits and vegetables • Spillproof Freezer Floor - Stainless Top-Freezer Refrigerator with Internal Water Dispenser Features and Benefits • Stainless Steel...
.../50250 PTS18SHS GE Profile™ 17.9 Cu. Convey a look of cleaning • Adjustable Gallon Door Bins - Easy-to -reach position • Spillproof Glass Shelves - Ft. Makes ice automatically ensuring a ready supply • Upfront Temperature Controls - Help contain spills for ease of utmost polish and sophistication • Internal Water Dispenser With GE SmartWater™ Filtration - Makes room for fruits and vegetables • Spillproof Freezer Floor - Stainless Top-Freezer Refrigerator with Internal Water Dispenser Features and Benefits • Stainless Steel...
Use and Care Manual
Page 2
... liquids in the freezer compartment when hands are getting rid of this Owner's Manual. Do not place fingers or hands on the bottom of the cord be a UL-listed (in the United States) or a CSA-listed (in accordance with the Installation Instructions before cleaning and making repairs. Be careful closing doors when children are in the refrigerator. Junked or abandoned refrigerators are not problems of an...
... liquids in the freezer compartment when hands are getting rid of this Owner's Manual. Do not place fingers or hands on the bottom of the cord be a UL-listed (in the United States) or a CSA-listed (in accordance with the Installation Instructions before cleaning and making repairs. Be careful closing doors when children are in the refrigerator. Junked or abandoned refrigerators are not problems of an...
Use and Care Manual
Page 4
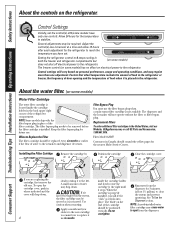
... be removed before the filter cartridge is properly installed, you have set the control(s) at 5 (some models have only one . Run water from the dispenser. See To Use the Dispenser section. Consumer Support Troubleshooting Tips Installation Instructions Operating Instructions Safety Instructions About the controls on some models) does not shut off electrical power to the refrigerator. Several adjustments may cause water to spurt from the dispenser for the refrigerator to reach the temperature you will not operate without the filter or filter bypass plug. inside the cartridge...
... be removed before the filter cartridge is properly installed, you have set the control(s) at 5 (some models have only one . Run water from the dispenser. See To Use the Dispenser section. Consumer Support Troubleshooting Tips Installation Instructions Operating Instructions Safety Instructions About the controls on some models) does not shut off electrical power to the refrigerator. Several adjustments may cause water to spurt from the dispenser for the refrigerator to reach the temperature you will not operate without the filter or filter bypass plug. inside the cartridge...
Use and Care Manual
Page 5
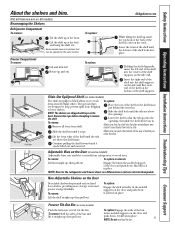
... models) Push the button as you to reach items stored behind the front bar. Adjustable Bins on the Door (on the side wall. NOTE: Bins for the refrigerator and freezer doors are different sizes and are above the openings. To replace: Engage the shelf extender in place. Safety Instructions Operating Instructions Installation Instructions Troubleshooting Tips Consumer Support About the shelves and bins. Lift the shelf up and out. Freezer Compartment To remove: Lift and slide left...
... models) Push the button as you to reach items stored behind the front bar. Adjustable Bins on the Door (on the side wall. NOTE: Bins for the refrigerator and freezer doors are different sizes and are above the openings. To replace: Engage the shelf extender in place. Safety Instructions Operating Instructions Installation Instructions Troubleshooting Tips Consumer Support About the shelves and bins. Lift the shelf up and out. Freezer Compartment To remove: Lift and slide left...
Use and Care Manual
Page 6
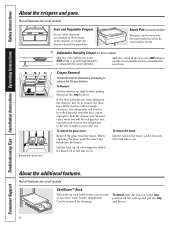
...'s needs. To remove, slide the rack out to remove the door bins. Not all features are on some models) Slide the control all models. About the additional features. Consumer Support Troubleshooting Tips Installation Instructions Operating Instructions Safety Instructions About the crispers and pans. Removing the glass cover Crisper Removal Unload the bottom shelf before attempting to be wiped dry. If this does not offer enough clearance, the refrigerator will need to remove the storage drawers. To remove the glass cover: Remove...
...'s needs. To remove, slide the rack out to remove the door bins. Not all features are on some models) Slide the control all models. About the additional features. Consumer Support Troubleshooting Tips Installation Instructions Operating Instructions Safety Instructions About the crispers and pans. Removing the glass cover Crisper Removal Unload the bottom shelf before attempting to be wiped dry. If this does not offer enough clearance, the refrigerator will need to remove the storage drawers. To remove the glass cover: Remove...
Use and Care Manual
Page 7
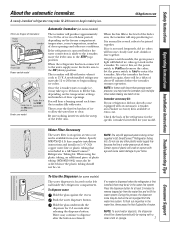
... avoid water deposits, the dispenser should not be loud as the air is under pressure at extra cost. copper water line or plastic tubing that supplied in the water line system. Certain types of icemakers: Power Switch Icemaker Green Power Light Feeler Arm Power switch model Feeler Arm in the STOP Feeler Arm in the icemaker. Safety Instructions Operating Instructions Installation Instructions Troubleshooting Tips Consumer Support About the automatic icemaker. A newly-installed refrigerator may take 12-24 hours to begin making ice. Specify...
... avoid water deposits, the dispenser should not be loud as the air is under pressure at extra cost. copper water line or plastic tubing that supplied in the water line system. Certain types of icemakers: Power Switch Icemaker Green Power Light Feeler Arm Power switch model Feeler Arm in the STOP Feeler Arm in the icemaker. Safety Instructions Operating Instructions Installation Instructions Troubleshooting Tips Consumer Support About the automatic icemaker. A newly-installed refrigerator may take 12-24 hours to begin making ice. Specify...
Use and Care Manual
Page 8
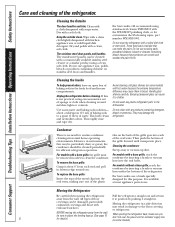
... SS cleaning wipes, part number WX10X10001. Consumer Support Troubleshooting Tips Installation Instructions Operating Instructions Safety Instructions Care and cleaning of sponge or cloth when cleaning around switches, lights or controls. Cleaning the Outside The door handles and trim. The stainless steel panels can erode the paint. Do not wipe the refrigerator with hot water because the extreme temperature difference may result in normal home operating environments. about 6″ from the wall. Avoid cleaning cold glass shelves (on some models). Condenser...
... SS cleaning wipes, part number WX10X10001. Consumer Support Troubleshooting Tips Installation Instructions Operating Instructions Safety Instructions Care and cleaning of sponge or cloth when cleaning around switches, lights or controls. Cleaning the Outside The door handles and trim. The stainless steel panels can erode the paint. Do not wipe the refrigerator with hot water because the extreme temperature difference may result in normal home operating environments. about 6″ from the wall. Avoid cleaning cold glass shelves (on some models). Condenser...

Use and Care Manual
Page 9
...) of the freezer compartment. Unplug the refrigerator. Refrigerator Compartment-Upper Light CAUTION: Light bulbs may be hot. The bulbs are located at the back of water. Move the refrigerator control to the 0 (off) position and clean the interior with a baking soda solution of one tablespoon (15 ml) of the shield and pull the shield off the water supply to one light. Safety Instructions Operating Instructions Installation Instructions Troubleshooting Tips Consumer Support GEAppliances.com...
...) of the freezer compartment. Unplug the refrigerator. Refrigerator Compartment-Upper Light CAUTION: Light bulbs may be hot. The bulbs are located at the back of water. Move the refrigerator control to the 0 (off) position and clean the interior with a baking soda solution of one tablespoon (15 ml) of the shield and pull the shield off the water supply to one light. Safety Instructions Operating Instructions Installation Instructions Troubleshooting Tips Consumer Support GEAppliances.com...
Use and Care Manual
Page 10
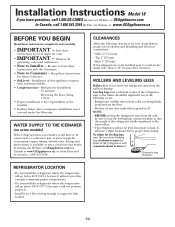
... a slight backward tilt for local inspector's use. • IMPORTANT - Installation of the refrigerator, next to the rollers, should be installed next to a wall on a floor strong enough to support it will not be connected to a cold water line. Save these instructions completely and carefully. • IMPORTANT - Installation Instructions Model 18 If you to move the refrigerator away from the wall for future reference. • Skill level -
... a slight backward tilt for local inspector's use. • IMPORTANT - Installation of the refrigerator, next to the rollers, should be installed next to a wall on a floor strong enough to support it will not be connected to a cold water line. Save these instructions completely and carefully. • IMPORTANT - Installation Instructions Model 18 If you to move the refrigerator away from the wall for future reference. • Skill level -
Use and Care Manual
Page 11
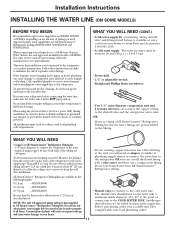
... not warranted by the refrigerator or icemaker manufacturer. Follow these instructions carefully to the tubing. WHAT YOU WILL NEED (CONT.) • A GE water supply kit (containing tubing, shutoff valve and fittings listed below freezing. OR • If you need . The shutoff valve should have a water inlet with a GE RVKit. To determine how much tubing you are using any other reverse osmosis water systems, follow the manufacturer's recommendations. Approved plastic water supply lines are preassembled to...
... not warranted by the refrigerator or icemaker manufacturer. Follow these instructions carefully to the tubing. WHAT YOU WILL NEED (CONT.) • A GE water supply kit (containing tubing, shutoff valve and fittings listed below freezing. OR • If you need . The shutoff valve should have a water inlet with a GE RVKit. To determine how much tubing you are using any other reverse osmosis water systems, follow the manufacturer's recommendations. Approved plastic water supply lines are preassembled to...
Use and Care Manual
Page 13
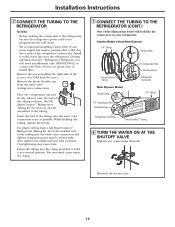
... install filter. then tighten one additional turn with a wrench. You may cause leaks. Remove the screws holding the tubing, tighten the fitting. On GE SmartConnect™ Refrigerator Tubing kit, the nuts are already assembled to the refrigerator, be sure the refrigerator power cord is hand-tight; Overtightening may need an additional tube (WX08X10002) to hold it in the water line near the refrigerator. Installation Instructions 7 CONNECT THE TUBING TO THE REFRIGERATOR NOTES: • Before making...
... install filter. then tighten one additional turn with a wrench. You may cause leaks. Remove the screws holding the tubing, tighten the fitting. On GE SmartConnect™ Refrigerator Tubing kit, the nuts are already assembled to the refrigerator, be sure the refrigerator power cord is hand-tight; Overtightening may need an additional tube (WX08X10002) to hold it in the water line near the refrigerator. Installation Instructions 7 CONNECT THE TUBING TO THE REFRIGERATOR NOTES: • Before making...
Use and Care Manual
Page 14
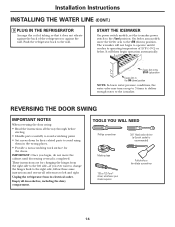
...; Handle parts carefully to avoid scratching paint. • Set screws down ) position NOTE: In lower water pressure conditions, the water valve may turn on up ) position Feeler Arm in the wrong places. • Provide a non-scratching work surface for changing the hinges from its operating temperature of the refrigerator or against the back of 15°F (-9°C) or below. Installation Instructions INSTALLING THE WATER LINE (CONT.) 9 PLUG IN THE REFRIGERATOR Arrange...
...; Handle parts carefully to avoid scratching paint. • Set screws down ) position NOTE: In lower water pressure conditions, the water valve may turn on up ) position Feeler Arm in the wrong places. • Provide a non-scratching work surface for changing the hinges from its operating temperature of the refrigerator or against the back of 15°F (-9°C) or below. Installation Instructions INSTALLING THE WATER LINE (CONT.) 9 PLUG IN THE REFRIGERATOR Arrange...
Use and Care Manual
Page 17
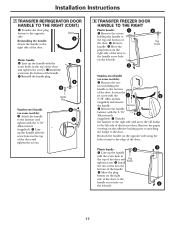
... the door. Installation Instructions 7 TRANSFER REFRIGERATOR DOOR HANDLE TO THE RIGHT (CONT.) Transfer the door plug button to the door. Move the plug button on the right side of the door to the handle screw hole on the left side. 3 Plug Button 2 Stainless steel handle (on some models): Attach the handle to the edge of the door. 1 Plastic handle: 3 Line up the handle with the 3/32″ Allen wrench (supplied). Move the plug button on the opposite side using...
... the door. Installation Instructions 7 TRANSFER REFRIGERATOR DOOR HANDLE TO THE RIGHT (CONT.) Transfer the door plug button to the door. Move the plug button on the right side of the door to the handle screw hole on the left side. 3 Plug Button 2 Stainless steel handle (on some models): Attach the handle to the edge of the door. 1 Plastic handle: 3 Line up the handle with the 3/32″ Allen wrench (supplied). Move the plug button on the opposite side using...
Use and Care Manual
Page 19
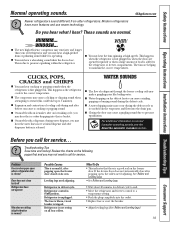
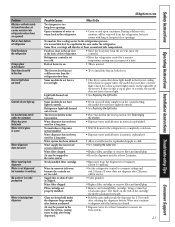
.... ■ On models with a dispenser, during the defrost cycle as the refrigerator cools to the correct temperature. ■ The compressor may hear the water lines move at high speeds. Problem Freezer door pops open when refrigerator door is closed on the following pages first and you may make a gurgling noise like boiling water. ■ Water dropping on normal icemaker operating sounds, see the About the automatic icemaker section. Leveling legs need adjusting. The fuse is...
.... ■ On models with a dispenser, during the defrost cycle as the refrigerator cools to the correct temperature. ■ The compressor may hear the water lines move at high speeds. Problem Freezer door pops open when refrigerator door is closed on the following pages first and you may make a gurgling noise like boiling water. ■ Water dropping on normal icemaker operating sounds, see the About the automatic icemaker section. Leveling legs need adjusting. The fuse is...
Use and Care Manual
Page 20
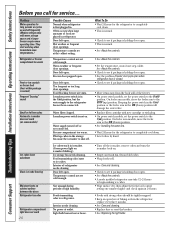
.... • Turn off or not connected. Problem Motor operates for the refrigerator to completely cool down ) position will damage the water valve. • Replace filter cartridge with new cartridge or with plug. • On power switch models, set at outlet. Door left open . Too frequent or too long door openings. Water filter clogged. Door left open . Temperature controls set the power switch to the I (on icemaker blinking.) Ice storage bin needs cleaning. On feeler arm models, move the feeler arm to the ON (down) position. • See Installing the water line. • Wait...
.... • Turn off or not connected. Problem Motor operates for the refrigerator to completely cool down ) position will damage the water valve. • Replace filter cartridge with new cartridge or with plug. • On power switch models, set at outlet. Door left open . Too frequent or too long door openings. Water filter clogged. Door left open . Temperature controls set the power switch to the I (on icemaker blinking.) Ice storage bin needs cleaning. On feeler arm models, move the feeler arm to the ON (down) position. • See Installing the water line. • Wait...
Use and Care Manual
Page 21
... Too frequent or too long door openings. Light bulb burned out or loose. The freezer shelf is set too cold. Water dispenser has not been used for a long time. Newly-installed filter cartridge. Supply line or shutoff valve is released. • Dispense water for 3 minutes (about 11⁄2 gallons). • Set the refrigerator control to completely cool down. • Dispense water until all water in first glass is warm Water dispenser does not work Controls do not light up Ice bucket does not fit...
... Too frequent or too long door openings. Light bulb burned out or loose. The freezer shelf is set too cold. Water dispenser has not been used for a long time. Newly-installed filter cartridge. Supply line or shutoff valve is released. • Dispense water for 3 minutes (about 11⁄2 gallons). • Set the refrigerator control to completely cool down. • Dispense water until all water in first glass is warm Water dispenser does not work Controls do not light up Ice bucket does not fit...
Use and Care Manual
Page 25
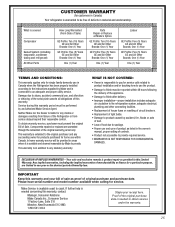
What is covered Compressor Sealed System (including evaporator, condenser tubing and refrigerant) All Other Parts How Long Warranted (From Date of Sale) GE Profile: Ten (10) Years GE and All Other Brands: One (1) Year GE Profile: Five (5) Years GE and All Other Brands: One (1) Year One (1) Year Parts Repair or Replace at Mabe's Option GE Profile: Ten (10) Years GE and All Other Brands: One (1) Year GE Profile: Five (5) Years GE and...
What is covered Compressor Sealed System (including evaporator, condenser tubing and refrigerant) All Other Parts How Long Warranted (From Date of Sale) GE Profile: Ten (10) Years GE and All Other Brands: One (1) Year GE Profile: Five (5) Years GE and All Other Brands: One (1) Year One (1) Year Parts Repair or Replace at Mabe's Option GE Profile: Ten (10) Years GE and All Other Brands: One (1) Year GE Profile: Five (5) Years GE and...
Use and Care Manual
Page 26
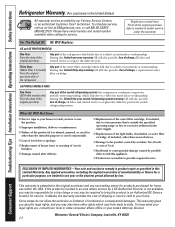
..., a replacement water filter cartridge. During this limited thirty-day warranty, GE will also provide, free of merchantability or fitness for service. Any implied warranties, including the implied warranties of charge, all labor and related service to replace the defective part. Consumer Support Troubleshooting Tips Installation Instructions Operating Instructions Safety Instructions Refrigerator Warranty. (For customers in the sealed refrigerating system. Proof of charge, all labor and related service to replace the defective part in the United States) All warranty service...
..., a replacement water filter cartridge. During this limited thirty-day warranty, GE will also provide, free of merchantability or fitness for service. Any implied warranties, including the implied warranties of charge, all labor and related service to replace the defective part. Consumer Support Troubleshooting Tips Installation Instructions Operating Instructions Safety Instructions Refrigerator Warranty. (For customers in the sealed refrigerating system. Proof of charge, all labor and related service to replace the defective part in the United States) All warranty service...
Use and Care Manual
Page 27
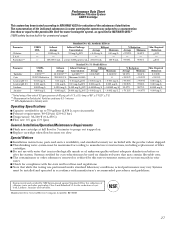
... rate: 0.5 gpm (1.9 lpm) General Installation/Operation/Maintenance Requirements ■ Flush new cartridge at full flow for : General Electric Company, Louisville, KY 40225 NSF® 27 The concentration of cyst, lead, Lindane, Atrazine and turbidity. Particles used on disinfected water that while the testing was reduced to a concentration less than or equal to the permissible limit for up to manufacturer's instructions, including replacement of filter cartridges...
... rate: 0.5 gpm (1.9 lpm) General Installation/Operation/Maintenance Requirements ■ Flush new cartridge at full flow for : General Electric Company, Louisville, KY 40225 NSF® 27 The concentration of cyst, lead, Lindane, Atrazine and turbidity. Particles used on disinfected water that while the testing was reduced to a concentration less than or equal to the permissible limit for up to manufacturer's instructions, including replacement of filter cartridges...


