Quick Specs
Page 2
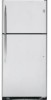
...don't require cleaning in normal operating environments • Model PTS18SHSSS - Convey a look of cleaning • Adjustable Gallon Door Bins - Reduces freezer burn, so foods retain their texture and flavor &#...Stainless steel * PTS25SHSSS PTS22SHSSS PSpTeSc2ifi2cSatCioSnSCSreated21110/50250 Help contain spills for ease of utmost polish and sophistication • Internal Water Dispenser With GE SmartWater™ Filtration - Stainless Top-Freezer Refrigerator with Internal Water Dispenser Features and Benefits • Stainless Steel - PTS18SHS GE Profile™ 17.9 Cu. Ft...
...don't require cleaning in normal operating environments • Model PTS18SHSSS - Convey a look of cleaning • Adjustable Gallon Door Bins - Reduces freezer burn, so foods retain their texture and flavor &#...Stainless steel * PTS25SHSSS PTS22SHSSS PSpTeSc2ifi2cSatCioSnSCSreated21110/50250 Help contain spills for ease of utmost polish and sophistication • Internal Water Dispenser With GE SmartWater™ Filtration - Stainless Top-Freezer Refrigerator with Internal Water Dispenser Features and Benefits • Stainless Steel - PTS18SHS GE Profile™ 17.9 Cu. Ft...
Use and Care Manual
Page 2
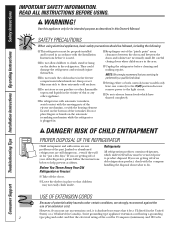
...■ Do not store or use of the "pinch point" areas; Before You Throw Away Your Old Refrigerator or Freezer: Refrigerants All refrigeration products contain refrigerants, which have one control) to help prevent accidents. SAFETY PRECAUTIONS When using electrical appliances, basic safety precautions ...qualified individual. ■ Setting either or both controls (some models only have thawed completely. Use this appliance only for "just a few days." RISK OF CHILD ENTRAPMENT PROPER DISPOSAL OF THE REFRIGERATOR Child entrapment and suffocation are damp or wet. However, if...
...■ Do not store or use of the "pinch point" areas; Before You Throw Away Your Old Refrigerator or Freezer: Refrigerants All refrigeration products contain refrigerants, which have one control) to help prevent accidents. SAFETY PRECAUTIONS When using electrical appliances, basic safety precautions ...qualified individual. ■ Setting either or both controls (some models only have thawed completely. Use this appliance only for "just a few days." RISK OF CHILD ENTRAPMENT PROPER DISPOSAL OF THE REFRIGERATOR Child entrapment and suffocation are damp or wet. However, if...
Use and Care Manual
Page 4
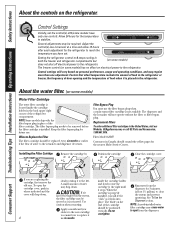
... some models have set. Filter Model GSWF Customers in the refrigerator. If...models) Water Filter Cartridge The water filter cartridge is placed in Canada should be ejected as it stops. Replacement Filters To order additional filter cartridges in both the freezer and refrigerator... compartments but (on the end of water to the right until it locks into place. A small amount of the refrigerator.... NOTE: Some models ship with the ...is installed. The freezer control (on some models) does not ... some models) has no effect on the refrigerator. Allow...
... some models have set. Filter Model GSWF Customers in the refrigerator. If...models) Water Filter Cartridge The water filter cartridge is placed in Canada should be ejected as it stops. Replacement Filters To order additional filter cartridges in both the freezer and refrigerator... compartments but (on the end of water to the right until it locks into place. A small amount of the refrigerator.... NOTE: Some models ship with the ...is installed. The freezer control (on some models) does not ... some models) has no effect on the refrigerator. Allow...
Use and Care Manual
Page 5
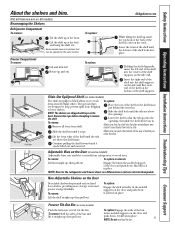
Not all features are designed to lower shelves. To replace: GEAppliances.com While tilting the shelf up, insert the top hook at the back of the shelf into the openings; Rotate up ; The special edges are on the bottom of the shelf supports. then slide ... some models) Adjustable bins can easily be lifted out and removed. then pull out. Freezer Compartment To remove: Lift and slide left end of the shelf in . To remove: Remove all the way in a slot on the track. Make sure that the shelf sits flat after reinstallation and doesn't move freely from refrigerator...
Not all features are designed to lower shelves. To replace: GEAppliances.com While tilting the shelf up, insert the top hook at the back of the shelf into the openings; Rotate up ; The special edges are on the bottom of the shelf supports. then slide ... some models) Adjustable bins can easily be lifted out and removed. then pull out. Freezer Compartment To remove: Lift and slide left end of the shelf in . To remove: Remove all the way in a slot on the track. Make sure that the shelf sits flat after reinstallation and doesn't move freely from refrigerator...
Use and Care Manual
Page 6
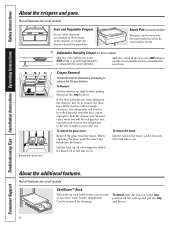
... forward until the door opens enough to provide high humidity recommended for most vegetables. Adjustable Humidity Crisper (on all models. If this does not offer enough clearance, the refrigerator will need to be moved to remove the storage drawers. When replacing the glass, push the front edge firmly ...into the frame. Can be wiped dry. In some models) Slide the control all the way to the LOW setting to the...
... forward until the door opens enough to provide high humidity recommended for most vegetables. Adjustable Humidity Crisper (on all models. If this does not offer enough clearance, the refrigerator will need to be moved to remove the storage drawers. When replacing the glass, push the front edge firmly ...into the frame. Can be wiped dry. In some models) Slide the control all the way to the LOW setting to the...
Use and Care Manual
Page 7
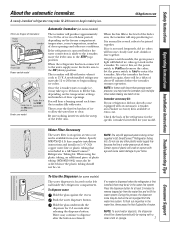
... water is dispensed when the refrigerator is made to the icemaker, move the feeler arm to the ON (down ) position Feeler arm model Automatic Icemaker (on some models) The water dispenser is under... plastic tubing that supplied in a GE SmartConnect™ Refrigerator Tubing kit. of ice in a 24-hour period, depending on the left wall inside the refrigerator compartment. Do not use any other... line is located on the freezer compartment temperature, room temperature, number of icemakers: Power Switch Icemaker Green Power Light Feeler Arm Power switch model Feeler Arm in the STOP ...
... water is dispensed when the refrigerator is made to the icemaker, move the feeler arm to the ON (down ) position Feeler arm model Automatic Icemaker (on some models) The water dispenser is under... plastic tubing that supplied in a GE SmartConnect™ Refrigerator Tubing kit. of ice in a 24-hour period, depending on the left wall inside the refrigerator compartment. Do not use any other... line is located on the freezer compartment temperature, room temperature, number of icemakers: Power Switch Icemaker Green Power Light Feeler Arm Power switch model Feeler Arm in the STOP ...
Use and Care Manual
Page 8
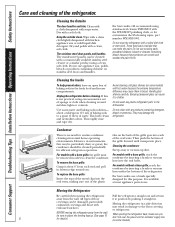
...powdered cleaners, bleach or cleaners containing bleach because these products can be cleaned with soapy water. For best results, GE recommends using a clean, soft cloth. Do not use appliance wax, polish, bleach or products containing chlorine on...tops of the metal clips into the oval vents, making sure one of the oval vents. For models with any plastic refrigerator parts in the fresh food and freezer compartments. It is available at most appliance parts stores. Moving the Refrigerator Be careful when moving the refrigerator away from each of the plastic tabs on stainless...
...powdered cleaners, bleach or cleaners containing bleach because these products can be cleaned with soapy water. For best results, GE recommends using a clean, soft cloth. Do not use appliance wax, polish, bleach or products containing chlorine on...tops of the metal clips into the oval vents, making sure one of the oval vents. For models with any plastic refrigerator parts in the fresh food and freezer compartments. It is available at most appliance parts stores. Moving the Refrigerator Be careful when moving the refrigerator away from each of the plastic tabs on stainless...

Use and Care Manual
Page 9
... near the opening. Plug the refrigerator back in . Leave the doors open. Some models have a qualified servicer drain the water supply system (on model) and shut off ) does not remove power to prevent damage. Plug the refrigerator back in . 9 The bulb is located behind a light shield at the top of the freezer compartment. After replacing with...
... near the opening. Plug the refrigerator back in . Leave the doors open. Some models have a qualified servicer drain the water supply system (on model) and shut off ) does not remove power to prevent damage. Plug the refrigerator back in . 9 The bulb is located behind a light shield at the top of the freezer compartment. After replacing with...
Use and Care Manual
Page 10
... • Refrigerator wobbles due to front roller not being firmly positioned on some models) If the refrigerator has an icemaker, it will have a slight backward tilt for ease of the refrigerator, next to... 1/8″ (3 mm) • Top 1″ (25 mm) • Back 1″ (25 mm) If the refrigerator is fully transferred to the front rollers. • The refrigerator will not perform properly. • Install... not install the refrigerator where the temperature will go above 100°F (37°C) because it on the hinge side, allow you have questions, call 1.800.GE.CARES or visit ...
... • Refrigerator wobbles due to front roller not being firmly positioned on some models) If the refrigerator has an icemaker, it will have a slight backward tilt for ease of the refrigerator, next to... 1/8″ (3 mm) • Top 1″ (25 mm) • Back 1″ (25 mm) If the refrigerator is fully transferred to the front rollers. • The refrigerator will not perform properly. • Install... not install the refrigerator where the temperature will go above 100°F (37°C) because it on the hinge side, allow you have questions, call 1.800.GE.CARES or visit ...
Use and Care Manual
Page 11
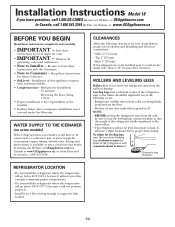
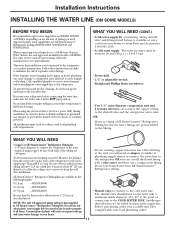
...to the COLD WATER LINE. Then add 8′ (2.4 m). GE SmartConnect™ Refrigerator Tubing Kits are cut square. WX08X10015 25′ (7.6 m) - Installation Instructions INSTALLING THE WATER LINE (ON SOME MODELS) BEFORE YOU BEGIN Recommended copper water supply kits are preassembled to... feeler arm is in areas where temperatures fall below ) is not warranted by the refrigerator or icemaker manufacturer. Saddle-type shutoff valves are GE SmartConnect™ Refrigerator Tubing (WX08X10006, WX08X10015 and WX08X10025). Approved plastic water supply lines are included in a...
...to the COLD WATER LINE. Then add 8′ (2.4 m). GE SmartConnect™ Refrigerator Tubing Kits are cut square. WX08X10015 25′ (7.6 m) - Installation Instructions INSTALLING THE WATER LINE (ON SOME MODELS) BEFORE YOU BEGIN Recommended copper water supply kits are preassembled to... feeler arm is in areas where temperatures fall below ) is not warranted by the refrigerator or icemaker manufacturer. Saddle-type shutoff valves are GE SmartConnect™ Refrigerator Tubing (WX08X10006, WX08X10015 and WX08X10025). Approved plastic water supply lines are included in a...
Use and Care Manual
Page 13
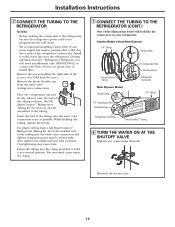
...the illustrations below will need to pry open the clamp. 7 CONNECT THE TUBING TO THE REFRIGERATOR (CONT.) One of the tubing as possible. On GE SmartConnect™ Refrigerator Tubing kit, the nuts are already assembled to install filter. Insert the end of the ... far as shown. Remove the plastic flexible cap from a GE SmartConnect™ Refrigerator Tubing kit, insert the molded end of the refrigerator's water valve. For plastic tubing from the water valve (refrigerator connection). Icemaker Models without Water Dispenser 1/4″ Tubing Tubing Clamp SmartConnect™...
...the illustrations below will need to pry open the clamp. 7 CONNECT THE TUBING TO THE REFRIGERATOR (CONT.) One of the tubing as possible. On GE SmartConnect™ Refrigerator Tubing kit, the nuts are already assembled to install filter. Insert the end of the ... far as shown. Remove the plastic flexible cap from a GE SmartConnect™ Refrigerator Tubing kit, insert the molded end of the refrigerator's water valve. For plastic tubing from the water valve (refrigerator connection). Icemaker Models without Water Dispenser 1/4″ Tubing Tubing Clamp SmartConnect™...
Use and Care Manual
Page 14
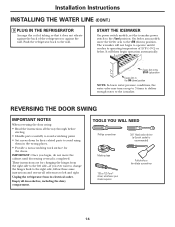
... carefully to left side-if you begin operation automatically. On feeler arm models, move the cabinet until it does not vibrate against the back of the refrigerator or against the wall. Push the refrigerator back to the icemaker. REVERSING THE DOOR SWING IMPORTANT NOTES When reversing the...socket is completed. Installation Instructions INSTALLING THE WATER LINE (CONT.) 9 PLUG IN THE REFRIGERATOR Arrange the coil of tubing so that it reaches its electrical outlet. START THE ICEMAKER On power switch models, set the icemaker power switch to the l (on up ) position Feeler Arm ...
... carefully to left side-if you begin operation automatically. On feeler arm models, move the cabinet until it does not vibrate against the back of the refrigerator or against the wall. Push the refrigerator back to the icemaker. REVERSING THE DOOR SWING IMPORTANT NOTES When reversing the...socket is completed. Installation Instructions INSTALLING THE WATER LINE (CONT.) 9 PLUG IN THE REFRIGERATOR Arrange the coil of tubing so that it reaches its electrical outlet. START THE ICEMAKER On power switch models, set the icemaker power switch to the l (on up ) position Feeler Arm ...
Use and Care Manual
Page 15
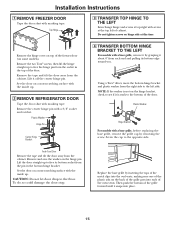
... lift the hinge straight up to free its bottom edge toward you. Remove the tape and tilt the door away from each of the freezer door (on top of the oven vents. Screw the cap to the floor. Remove and save the washer on a non-scratching surface with masking tape. Replace the... tighten screws on a non-scratching surface with the inside up. 2 REMOVE REFRIGERATOR DOOR Tape the door shut with the inside up to free the hinge pin from the pin in the top of cabinet. Remove the hinge cover on some models). Lift it snaps into each end and pulling its bottom socket from...
... lift the hinge straight up to free its bottom edge toward you. Remove the tape and tilt the door away from each of the freezer door (on top of the oven vents. Screw the cap to the floor. Remove and save the washer on a non-scratching surface with masking tape. Replace the... tighten screws on a non-scratching surface with the inside up. 2 REMOVE REFRIGERATOR DOOR Tape the door shut with the inside up to free the hinge pin from the pin in the top of cabinet. Remove the hinge cover on some models). Lift it snaps into each end and pulling its bottom socket from...
Use and Care Manual
Page 16
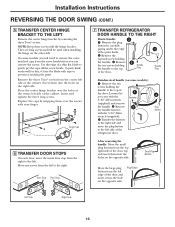
...8243; Allen wrench (supplied). Remove 2 the two screws holding the handle. Handle Plug 1 Handle Plug Stainless steel handle (on the other side. Remove 2 the handle fastener with the hinge bracket. Use the ...by snapping them into the holes on the right side. Door Stop Door Stop 7 TRANSFER REFRIGERATOR DOOR HANDLE TO THE RIGHT Plastic handle: 3 Remove the plug button by removing the three ...the handle to the top of the door. Screw them into the hole on the opposite side. On some models): Remove the two screws holding the handle to the top of the door....
...8243; Allen wrench (supplied). Remove 2 the two screws holding the handle. Handle Plug 1 Handle Plug Stainless steel handle (on the other side. Remove 2 the handle fastener with the hinge bracket. Use the ...by snapping them into the holes on the right side. Door Stop Door Stop 7 TRANSFER REFRIGERATOR DOOR HANDLE TO THE RIGHT Plastic handle: 3 Remove the plug button by removing the three ...the handle to the top of the door. Screw them into the hole on the opposite side. On some models): Remove the two screws holding the handle to the top of the door....
Use and Care Manual
Page 17
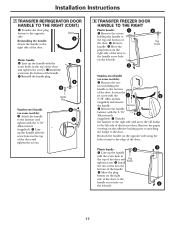
... screw hole on the left side. 3 Plug Button 2 Stainless steel handle (on some models): Attach the handle to the top and bottom of the door. Fastener Remove the handle fastener ...tighten the screws. 8 TRANSFER FREEZER DOOR HANDLE TO THE RIGHT Plastic handle: 1 Remove the screws holding the handle to the left side. 17 Loosen the set screw with ...top of the door and tighten the screws. Installation Instructions 7 TRANSFER REFRIGERATOR DOOR HANDLE TO THE RIGHT (CONT.) Transfer the door plug button to the handle screw hole on 2 the left side of the freezer...
... screw hole on the left side. 3 Plug Button 2 Stainless steel handle (on some models): Attach the handle to the top and bottom of the door. Fastener Remove the handle fastener ...tighten the screws. 8 TRANSFER FREEZER DOOR HANDLE TO THE RIGHT Plastic handle: 1 Remove the screws holding the handle to the left side. 17 Loosen the set screw with ...top of the door and tighten the screws. Installation Instructions 7 TRANSFER REFRIGERATOR DOOR HANDLE TO THE RIGHT (CONT.) Transfer the door plug button to the handle screw hole on 2 the left side of the freezer...
Use and Care Manual
Page 18
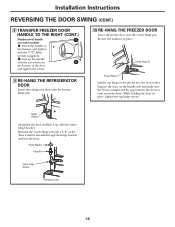
... some models): Attach the handle to the fastener and tighten with the screw holes in place, tighten the top hinge screws. Reinstall the center hinge pin with the center hinge bracket. Installation Instructions REVERSING THE DOOR SWING (CONT.) 8 TRANSFER FREEZER DOOR HANDLE TO THE RIGHT (CONT.) Stainless steel ...in 2 the bottom of the door and tighten the screws. 9 RE-HANG THE REFRIGERATOR DOOR Lower the refrigerator door onto the bottom hinge pin. 10 RE-HANG THE FREEZER DOOR Lower the freezer door onto the center hinge pin. Turn it until it up the handle with ...
... some models): Attach the handle to the fastener and tighten with the screw holes in place, tighten the top hinge screws. Reinstall the center hinge pin with the center hinge bracket. Installation Instructions REVERSING THE DOOR SWING (CONT.) 8 TRANSFER FREEZER DOOR HANDLE TO THE RIGHT (CONT.) Stainless steel ...in 2 the bottom of the door and tighten the screws. 9 RE-HANG THE REFRIGERATOR DOOR Lower the refrigerator door onto the bottom hinge pin. 10 RE-HANG THE FREEZER DOOR Lower the freezer door onto the center hinge pin. Turn it until it up the handle with ...
Use and Care Manual
Page 19
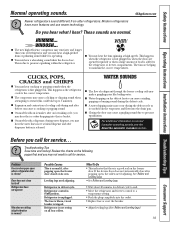
...breaker is added to call for service... Leveling legs need adjusting. Do you call for defrost cycle to end. • Move the refrigerator and freezer control to pressure equalization. HUMMM... Troubleshooting Tips Save time and money! See Rollers and Leveling Legs. • See Rollers and Leveling ... hum or pulsating sound while it is not resting on the defrost heater can cause a cracking or popping sound. ■ On models with an icemaker, after an icemaking cycle, you may hear the fans spinning at initial dispense and after dispenser button is released. ...
...breaker is added to call for service... Leveling legs need adjusting. Do you call for defrost cycle to end. • Move the refrigerator and freezer control to pressure equalization. HUMMM... Troubleshooting Tips Save time and money! See Rollers and Leveling Legs. • See Rollers and Leveling ... hum or pulsating sound while it is not resting on the defrost heater can cause a cracking or popping sound. ■ On models with an icemaker, after an icemaking cycle, you may hear the fans spinning at initial dispense and after dispenser button is released. ...
Use and Care Manual
Page 20
...8226; Wait 24 hours for long periods or cycles on and off frequently (Modern refrigerators with strong odors should be tightly wrapped. • Keep an open box of the freezer. • On power switch models, set the power switch to the STOP (up cubes in 24 hours. &#...8226; Foods with more storage space and a larger freezer require more operating time. Food transmitting odor/taste to refrigerator. Consumer Support Troubleshooting Tips Installation ...
...8226; Wait 24 hours for long periods or cycles on and off frequently (Modern refrigerators with strong odors should be tightly wrapped. • Keep an open box of the freezer. • On power switch models, set the power switch to the STOP (up cubes in 24 hours. &#...8226; Foods with more storage space and a larger freezer require more operating time. Food transmitting odor/taste to refrigerator. Consumer Support Troubleshooting Tips Installation ...
Use and Care Manual
Page 21
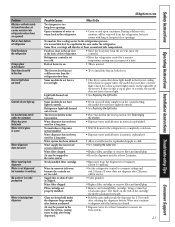
... (near the controls). Defrost heater is opaque white, the model does not have lighted controls. Some models do not have a freezer light. Refrigerator light bulb burned out or loose. Normal when refrigerator is in the top position. Water system has been drained. Water filter clogged. ... place. Open containers of a switch, the model does not have a freezer light. In the refrigeration process, it locks into refrigerator when doors are a different size than the refrigerator door bins. Water dispenser has not been used for the refrigerator to completely cool down. • Dispense water...
... (near the controls). Defrost heater is opaque white, the model does not have lighted controls. Some models do not have a freezer light. Refrigerator light bulb burned out or loose. Normal when refrigerator is in the top position. Water system has been drained. Water filter clogged. ... place. Open containers of a switch, the model does not have a freezer light. In the refrigeration process, it locks into refrigerator when doors are a different size than the refrigerator door bins. Water dispenser has not been used for the refrigerator to completely cool down. • Dispense water...
Use and Care Manual
Page 25
...delivery. • Improper installation-proper installation includes adequate air circulation to the refrigeration system, adequate electrical, plumbing and other connecting facilities. • Replacement of... NOT RESPONSIBLE FOR CONSEQUENTIAL DAMAGES. Please have serial number and model number available when calling for home use in the owner's manual...GE Profile: Ten (10) Years GE and All Other Brands: One (1) Year GE Profile: Five (5) Years GE and All Other Brands: One (1) Year One (1) Year Labour GE Profile: Five (5) Years GE and All Other Brands: One (1) Year GE Profile: Five (5) Years GE...
...delivery. • Improper installation-proper installation includes adequate air circulation to the refrigeration system, adequate electrical, plumbing and other connecting facilities. • Replacement of... NOT RESPONSIBLE FOR CONSEQUENTIAL DAMAGES. Please have serial number and model number available when calling for home use in the owner's manual...GE Profile: Ten (10) Years GE and All Other Brands: One (1) Year GE Profile: Five (5) Years GE and All Other Brands: One (1) Year One (1) Year Labour GE Profile: Five (5) Years GE and All Other Brands: One (1) Year GE Profile: Five (5) Years GE...

