
Owners Manual
Page 1
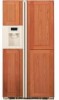
Profile Side by Side Refrigerators GEAppliances.com Safety Instructions 2-4 Operating Instructions Automatic Icemaker 15, 16 Care and Cleaning 18, 19 ClimateKeeper2 6 Crispers and Pans 14 CustomCool 7, 9 Ice and Water Dispenser 17-18 Quick Ice 17 Refrigerator...Installation Instructions Installing the Refrigerator . . . . . .30-33 Moving the Refrigerator 26-29 Preparing to Install the Refrigerator 25 Trim Kits and...Manual and Installation Models 22, 23, 25, 26, 27 and 29 Profile Côte à C&#...aise commence à la page 47 Profile Lado a Lado Refrigeradores Manual del propietario...
Profile Side by Side Refrigerators GEAppliances.com Safety Instructions 2-4 Operating Instructions Automatic Icemaker 15, 16 Care and Cleaning 18, 19 ClimateKeeper2 6 Crispers and Pans 14 CustomCool 7, 9 Ice and Water Dispenser 17-18 Quick Ice 17 Refrigerator...Installation Instructions Installing the Refrigerator . . . . . .30-33 Moving the Refrigerator 26-29 Preparing to Install the Refrigerator 25 Trim Kits and...Manual and Installation Models 22, 23, 25, 26, 27 and 29 Profile Côte à C&#...aise commence à la page 47 Profile Lado a Lado Refrigeradores Manual del propietario...

Owners Manual
Page 2
...the "pinch point" areas; SAFETY PRECAUTIONS When using electrical appliances, basic safety precautions should be followed, including the following: ■ This refrigerator must be performed by a qualified individual. ■ Non-LCD models: Setting either or both controls to 0 (off) does not remove... fingers out of the ejector mechanism, or with the Installation Instructions before cleaning and making repairs. WARNING! They could damage the refrigerator and seriously injure themselves. ■ Do not touch the cold surfaces in this appliance only for its intended purpose as described ...
...the "pinch point" areas; SAFETY PRECAUTIONS When using electrical appliances, basic safety precautions should be followed, including the following: ■ This refrigerator must be performed by a qualified individual. ■ Non-LCD models: Setting either or both controls to 0 (off) does not remove... fingers out of the ejector mechanism, or with the Installation Instructions before cleaning and making repairs. WARNING! They could damage the refrigerator and seriously injure themselves. ■ Do not touch the cold surfaces in this appliance only for its intended purpose as described ...
Owners Manual
Page 3
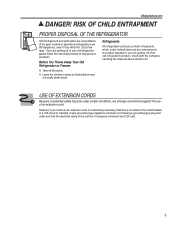
... help prevent accidents. If you are still dangerous...even if they will sit for "just a few days." Junked or abandoned refrigerators are getting rid of an old refrigeration product, check with the company handling the disposal about what to do. RISK OF CHILD ENTRAPMENT PROPER DISPOSAL OF THE...hazards under federal law must use of the past. However, if you are not problems of an extension cord. Before You Throw Away Your Old Refrigerator or Freezer: ■ Take off the doors. ■ Leave the shelves in Canada), 3-wire grounding type appliance extension cord having a grounding ...
... help prevent accidents. If you are still dangerous...even if they will sit for "just a few days." Junked or abandoned refrigerators are getting rid of an old refrigeration product, check with the company handling the disposal about what to do. RISK OF CHILD ENTRAPMENT PROPER DISPOSAL OF THE...hazards under federal law must use of the past. However, if you are not problems of an extension cord. Before You Throw Away Your Old Refrigerator or Freezer: ■ Take off the doors. ■ Leave the shelves in Canada), 3-wire grounding type appliance extension cord having a grounding ...

Owners Manual
Page 4
... individual electrical outlet which could cause a fire hazard from this appliance must be properly grounded. IMPORTANT SAFETY INFORMATION. When moving the refrigerator away from the wall, be plugged into its length or at either end. READ AND FOLLOW THIS SAFETY INFORMATION CAREFULLY. WARNING!...not, under any circumstances, cut or remove the third (ground) prong from the outlet. The refrigerator should always be careful not to make sure the outlet is your refrigerator by a qualified electrician to roll over or damage the power cord. For personal safety, this appliance...
... individual electrical outlet which could cause a fire hazard from this appliance must be properly grounded. IMPORTANT SAFETY INFORMATION. When moving the refrigerator away from the wall, be plugged into its length or at either end. READ AND FOLLOW THIS SAFETY INFORMATION CAREFULLY. WARNING!...not, under any circumstances, cut or remove the third (ground) prong from the outlet. The refrigerator should always be careful not to make sure the outlet is your refrigerator by a qualified electrician to roll over or damage the power cord. For personal safety, this appliance...

Owners Manual
Page 5
... for the freezer and 37°F (3°C) for the refrigerator to maximize temperature control in the factory at ge.com or call 1.800.561.3344.) 5 Each time you have set the freezer and refrigerator temperatures to the actual refrigerator and freezer temperatures after 5 seconds. Turning the cooling system ... compartment. The SET light will come on -line, contact us at geappliances.ca or call 800.GE.CARES. In Canada, contact us at 37°F (3°C) for the refrigerator compartment and 0°F (-18°C) for the temperature to stabilize to 5. To turn the unit...
... for the freezer and 37°F (3°C) for the refrigerator to maximize temperature control in the factory at ge.com or call 1.800.561.3344.) 5 Each time you have set the freezer and refrigerator temperatures to the actual refrigerator and freezer temperatures after 5 seconds. Turning the cooling system ... compartment. The SET light will come on -line, contact us at geappliances.ca or call 800.GE.CARES. In Canada, contact us at 37°F (3°C) for the refrigerator compartment and 0°F (-18°C) for the temperature to stabilize to 5. To turn the unit...

Owners Manual
Page 6
... will cycle through all of food to approximately 34°F (1°C), then it Works The ClimateKeeper2™ is complete, the refrigerator compartment will return to keep food garden food loads and environmental conditions fresh longer and reduce freezer burn. After TurboCool is not ... period. The freezer temperature is complete, the TurboCool indicator light will exit and return to maintain this setting. When opening the refrigerator door during TurboCool. change. be changed during TurboCool, the fans will cycle on immediately and the fans will continue to retain...
... will cycle through all of food to approximately 34°F (1°C), then it Works The ClimateKeeper2™ is complete, the refrigerator compartment will return to keep food garden food loads and environmental conditions fresh longer and reduce freezer burn. After TurboCool is not ... period. The freezer temperature is complete, the TurboCool indicator light will exit and return to maintain this setting. When opening the refrigerator door during TurboCool. change. be changed during TurboCool, the fans will cycle on immediately and the fans will continue to retain...
Owners Manual
Page 7
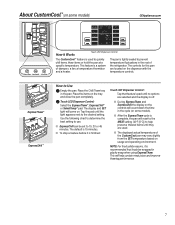
... to the desired setting. The display and SET light will help preserve thawed items until they are used. ■ The displayed actual temperature of the refrigerator. NOTE: For food safety reasons, it is recommended that feature's pad until the light appears next to Use Empty the pan. Tap the pad until...
... to the desired setting. The display and SET light will help preserve thawed items until they are used. ■ The displayed actual temperature of the refrigerator. NOTE: For food safety reasons, it is recommended that feature's pad until the light appears next to Use Empty the pan. Tap the pad until...
Owners Manual
Page 8
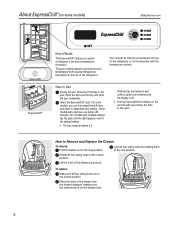
... the front of the drawer into the drawer supports, making sure the swing locks fit on the drawer slots. 8 The pan is a system of the refrigerator or on the tray and close the pan completely. How to the stop a feature before it Works The ExpressChill™ feature is tightly sealed to...
... the front of the drawer into the drawer supports, making sure the swing locks fit on the drawer slots. 8 The pan is a system of the refrigerator or on the tray and close the pan completely. How to the stop a feature before it Works The ExpressChill™ feature is tightly sealed to...
Owners Manual
Page 10
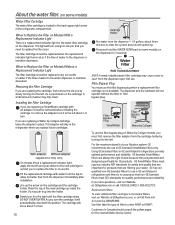
... the cartridge and the cartridge holder. When to the right until the filter cartridge stops. This light will stay in GE and Hotpoint refrigerators and there is a replacement indicator light for products that you are replacing a Water by slowly turning it up into position...Filter Cartridge If you are replacing a SmartWater cartridge with water from the tap to allow for GE products. To remove the adapter, turn . 10 For the maximum benefit of the refrigerator compartment. If you that are patented and designed specifically for better flow from the dispenser 1-1/2 ...
... the cartridge and the cartridge holder. When to the right until the filter cartridge stops. This light will stay in GE and Hotpoint refrigerators and there is a replacement indicator light for products that you are replacing a Water by slowly turning it up into position...Filter Cartridge If you are replacing a SmartWater cartridge with water from the tap to allow for GE products. To remove the adapter, turn . 10 For the maximum benefit of the refrigerator compartment. If you that are patented and designed specifically for better flow from the dispenser 1-1/2 ...
Owners Manual
Page 11
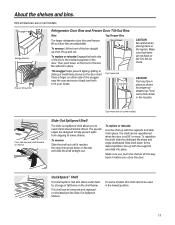
... for proper ice dispensing. To replace or relocate: Line the shelf up and out. Snugger Refrigerator bin Freezer tilt-out bin Refrigerator Door Bins and Freezer Door Tilt-Out Bins Bins Top Freezer Bins The larger refrigerator door bins and freezer tilt-out door bins are adjustable. Make sure you push the shelves...
... for proper ice dispensing. To replace or relocate: Line the shelf up and out. Snugger Refrigerator bin Freezer tilt-out bin Refrigerator Door Bins and Freezer Door Tilt-Out Bins Bins Top Freezer Bins The larger refrigerator door bins and freezer tilt-out door bins are adjustable. Make sure you push the shelves...
Owners Manual
Page 13
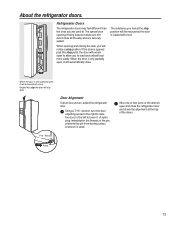
... are used .) 7/16 Wrench Raise After one or two turns of the wrench, open and close . Door Alignment If doors are securely sealed. About the refrigerator doors. When opening /closing the door, you to lower it. (A nylon plug, imbedded in the threads of the doors. 13 Using a 7/16 wrench, ...and closing feature makes sure the doors close . When the door is used to allow you will remain open , it will automatically close the refrigerator door and check the alignment at the stop the door will be reduced as the door is opened past this stop position will stay open...
... are used .) 7/16 Wrench Raise After one or two turns of the wrench, open and close . Door Alignment If doors are securely sealed. About the refrigerator doors. When opening /closing the door, you to lower it. (A nylon plug, imbedded in the threads of the doors. 13 Using a 7/16 wrench, ...and closing feature makes sure the doors close . When the door is used to allow you will remain open , it will automatically close the refrigerator door and check the alignment at the stop the door will be reduced as the door is opened past this stop position will stay open...
Owners Manual
Page 14
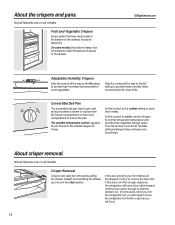
... removal. If the door prevents you from taking out the drawers, first try to the left or right as you will need to move the refrigerator to remove the door bins. In some models, the bottom drawer has full extension slides that may accumulate in the bottom of cold air from... the Climate Keeper Air The cold air duct is turned off. On some cases, when you roll the refrigerator out, you roll it out. 14 Variable Tower. Crisper Removal Crispers can be rolled forward until the door opens enough to provide lower humidity levels...
... removal. If the door prevents you from taking out the drawers, first try to the left or right as you will need to move the refrigerator to remove the door bins. In some models, the bottom drawer has full extension slides that may accumulate in the bottom of cold air from... the Climate Keeper Air The cold air duct is turned off. On some cases, when you roll the refrigerator out, you roll it out. 14 Variable Tower. Crisper Removal Crispers can be rolled forward until the door opens enough to provide lower humidity levels...
Owners Manual
Page 15
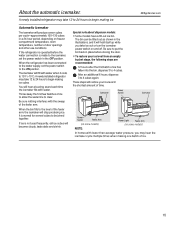
...set the power switch to 15°F (-10°C). GEAppliances.com Automatic Icemaker The icemaker will become cloudy, taste stale and shrink. When the refrigerator has been connected to the water supply, set the power switch in the illustrations, and it cools to the ON position. If ice is normal...the bin, dispense 3 to the level of ice. 15 The icemaker will stop producing ice. When the bin fills to 4 cubes. A newly installed refrigerator may hear the icemaker cycle multiple times when making one batch of the feeler arm, the icemaker will fill with water.
...set the power switch to 15°F (-10°C). GEAppliances.com Automatic Icemaker The icemaker will become cloudy, taste stale and shrink. When the refrigerator has been connected to the water supply, set the power switch in the illustrations, and it cools to the ON position. If ice is normal...the bin, dispense 3 to the level of ice. 15 The icemaker will stop producing ice. When the bin fills to 4 cubes. A newly installed refrigerator may hear the icemaker cycle multiple times when making one batch of the feeler arm, the icemaker will fill with water.
Owners Manual
Page 17
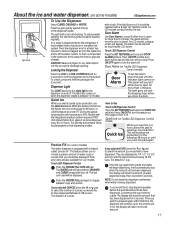
... off . To reduce water spotting, the shelf and its grille should be silenced by touching the LCD screen. If no water is dispensed when the refrigerator is first installed, there may be air in a hurry, press this feature is open for the following 48 hours or until the feature is turned...
... off . To reduce water spotting, the shelf and its grille should be silenced by touching the LCD screen. If no water is dispensed when the refrigerator is first installed, there may be air in a hurry, press this feature is open for the following 48 hours or until the feature is turned...
Owners Manual
Page 18
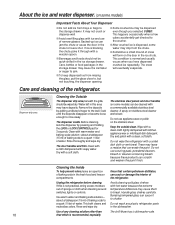
...not add ice from trays or bags to the storage drawer. those that contain petroleum distillates, can erode the paint. Unplug the refrigerator before cleaning. This both cleans and neutralizes odors. Do not wash any cleaning solution other than The chill/thaw tray is blocking the.... The door handles and trim. The stainless steel panels and door handles (on stainless steel cleaner works best. Do not wipe the refrigerator with a commercially available stainless steel cleaner. Remove the deposits by pressing and holding the LOCK or LOCK CONTROLS pad for 3 seconds. ...
...not add ice from trays or bags to the storage drawer. those that contain petroleum distillates, can erode the paint. Unplug the refrigerator before cleaning. This both cleans and neutralizes odors. Do not wash any cleaning solution other than The chill/thaw tray is blocking the.... The door handles and trim. The stainless steel panels and door handles (on stainless steel cleaner works best. Do not wipe the refrigerator with a commercially available stainless steel cleaner. Remove the deposits by pressing and holding the LOCK or LOCK CONTROLS pad for 3 seconds. ...
Owners Manual
Page 19
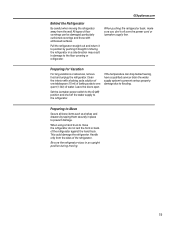
...drain the water supply system to prevent serious property damage due to move the refrigerator, do not rest the front or back of the refrigerator against the hand truck. This could damage the refrigerator. When pushing the refrigerator back, make sure you don't roll over the power cord or icemaker supply...with a baking soda solution of one tablespoon (15 ml) of baking soda to one quart (1 liter) of water. Be sure the refrigerator stays in place to the refrigerator. When using a hand truck to flooding. Set the icemaker power switch to the O (off) position and shut off the water ...
...drain the water supply system to prevent serious property damage due to move the refrigerator, do not rest the front or back of the refrigerator against the hand truck. This could damage the refrigerator. When pushing the refrigerator back, make sure you don't roll over the power cord or icemaker supply...with a baking soda solution of one tablespoon (15 ml) of baking soda to one quart (1 liter) of water. Be sure the refrigerator stays in place to the refrigerator. When using a hand truck to flooding. Set the icemaker power switch to the O (off) position and shut off the water ...

Owners Manual
Page 20
...models). Replace the screw (on the sides, and lift up and pull it counterclockwise. Your light shield will need to be removed. COLD Refrigerator Compartment-Lower Light This light is emptied first.) On some models, a screw at the front of the freezer compartment If this assembly needs...the pocket located at the back of the compartment, inside the light shield. LED Lighting Display Refrigerator Compartment (on models with LED lighting) Some models may have to be replaced, call GE Service at the top of the light shield housing. After replacing the bulb with an appliance ...
...models). Replace the screw (on the sides, and lift up and pull it counterclockwise. Your light shield will need to be removed. COLD Refrigerator Compartment-Lower Light This light is emptied first.) On some models, a screw at the front of the freezer compartment If this assembly needs...the pocket located at the back of the compartment, inside the light shield. LED Lighting Display Refrigerator Compartment (on models with LED lighting) Some models may have to be replaced, call GE Service at the top of the light shield housing. After replacing the bulb with an appliance ...
Owners Manual
Page 21
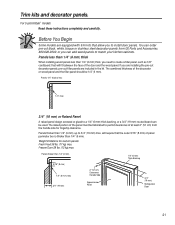
...raised portion of panel perimeter be 1/4" (6 mm). If you need to 3/4" (19 mm) max, will fit between the face of at least 2" (5.1 cm) from GE Parts and Accessories, 800.626.2002, or you can add wood panels to a 1/4" (6 mm) thick backing, or a 3/4" (19 mm) routed board can be ... wood panels less than 1/4" (6 mm) 5/16" (8 mm) 1/4" (6 mm) max 3/4" (19 mm) 2" (5.1 cm) Clearance Handle Side Appearance Panel 1/4" (6 mm) Thick Backing 3/4" (19 mm) Refrigerator Door 21 Panels thicker than 1/4" (6 mm) thick, you are included in the kit. Weight limitations for fingertip clearance.
...raised portion of panel perimeter be 1/4" (6 mm). If you need to 3/4" (19 mm) max, will fit between the face of at least 2" (5.1 cm) from GE Parts and Accessories, 800.626.2002, or you can add wood panels to a 1/4" (6 mm) thick backing, or a 3/4" (19 mm) routed board can be ... wood panels less than 1/4" (6 mm) 5/16" (8 mm) 1/4" (6 mm) max 3/4" (19 mm) 2" (5.1 cm) Clearance Handle Side Appearance Panel 1/4" (6 mm) Thick Backing 3/4" (19 mm) Refrigerator Door 21 Panels thicker than 1/4" (6 mm) thick, you are included in the kit. Weight limitations for fingertip clearance.
Owners Manual
Page 23
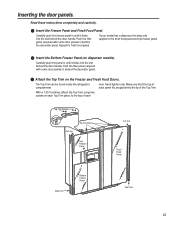
... of each Top Trim Screws Top Trim Screws Cut-Out Top Freezer Panel Cut-Out Fresh Food Panel Side Trim Bottom Freezer Panel Side Trim 23 door. With a T-20 Torxdriver, attach the Top Trim, using two screws on the Freezer and Fresh Food Doors. Push the filler panel (required with some... some door panels) in until it slides into the slot behind the lip of the Top Trim. The Top Trim can be found inside the refrigerator compartment. Make sure that the top of each panel fits snugly behind the door handle. Attach the Top Trim on each Top Trim piece, to...
... of each Top Trim Screws Top Trim Screws Cut-Out Top Freezer Panel Cut-Out Fresh Food Panel Side Trim Bottom Freezer Panel Side Trim 23 door. With a T-20 Torxdriver, attach the Top Trim, using two screws on the Freezer and Fresh Food Doors. Push the filler panel (required with some... some door panels) in until it slides into the slot behind the lip of the Top Trim. The Top Trim can be found inside the refrigerator compartment. Make sure that the top of each panel fits snugly behind the door handle. Attach the Top Trim on each Top Trim piece, to...
Owners Manual
Page 24
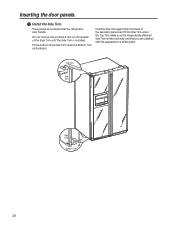
Make sure the magnetically attached Side Trim is installed. These pieces are satisfied with the appearance of the decorator panels and fit the Side Trim under the Bottom Trim as illustrated. Hold the Side Trim against the front face of all the parts. Install the Side Trim. Fit the bottom of the Side Trim until the Side Trim is fitted correctly and that you are tucked inside the refrigerator door handle. Top Trim Side Trim Side Trim Bottom Trim 24 Do not remove the protective film on the outside of the Side Trim under the Top Trim. Inserting the door panels.
Make sure the magnetically attached Side Trim is installed. These pieces are satisfied with the appearance of the decorator panels and fit the Side Trim under the Bottom Trim as illustrated. Hold the Side Trim against the front face of all the parts. Install the Side Trim. Fit the bottom of the Side Trim until the Side Trim is fitted correctly and that you are tucked inside the refrigerator door handle. Top Trim Side Trim Side Trim Bottom Trim 24 Do not remove the protective film on the outside of the Side Trim under the Top Trim. Inserting the door panels.


