
Owners Manual
Page 1
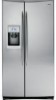
Profile Side by Side Refrigerators ge.com Safety Instructions 2-4 Operating Instructions Automatic Icemaker 14 Care and Cleaning 16, 17 ClimateKeeper2 6 Crispers and Pans 13 CustomCool 7, 8 Ice and Water Dispenser 15-16 QuickFreeze 9 Quick Ice 15 Refrigerator Doors 12 Replacing the Light Bulbs 18 Set Features ... of California Water Treatment Device Certificate 42 Warranty (Canadian 39 Warranty (U.S 40 Owner's Manual and Installation Models 23, 25 and 26 Profile Côte à Côte Réfrigérateurs Manuel d'utilisation et d'installation La section française...
Profile Side by Side Refrigerators ge.com Safety Instructions 2-4 Operating Instructions Automatic Icemaker 14 Care and Cleaning 16, 17 ClimateKeeper2 6 Crispers and Pans 13 CustomCool 7, 8 Ice and Water Dispenser 15-16 QuickFreeze 9 Quick Ice 15 Refrigerator Doors 12 Replacing the Light Bulbs 18 Set Features ... of California Water Treatment Device Certificate 42 Warranty (Canadian 39 Warranty (U.S 40 Owner's Manual and Installation Models 23, 25 and 26 Profile Côte à Côte Réfrigérateurs Manuel d'utilisation et d'installation La section française...
Owners Manual
Page 2
... doors when children are damp or wet. s Always clean the CustomCool™ Tray after thawing food. They could damage the refrigerator and seriously injure themselves. s Do not touch the cold surfaces in the freezer compartment when hands are in this or any servicing...remove power to the light circuit. SAFETY PRECAUTIONS When using electrical appliances, basic safety precautions should be followed, including the following: s This refrigerator must be performed by a qualified individual. s Do not allow children to these extremely cold surfaces. Skin may stick to climb, stand ...
... doors when children are damp or wet. s Always clean the CustomCool™ Tray after thawing food. They could damage the refrigerator and seriously injure themselves. s Do not touch the cold surfaces in the freezer compartment when hands are in this or any servicing...remove power to the light circuit. SAFETY PRECAUTIONS When using electrical appliances, basic safety precautions should be followed, including the following: s This refrigerator must be performed by a qualified individual. s Do not allow children to these extremely cold surfaces. Skin may stick to climb, stand ...
Owners Manual
Page 3
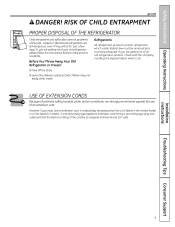
... be removed prior to product disposal. If you are getting rid of your old refrigerator, please follow the instructions below to do. Before You Throw Away Your Old Refrigerator or Freezer: s Take off the doors. Installation Instructions Troubleshooting Tips Consumer Support 3...check with the company handling the disposal about what to help prevent accidents. Safety Instructions Operating Instructions ge.com DANGER! Refrigerants All refrigeration products contain refrigerants, which under certain conditions, we strongly recommend against the use an extension cord, it is ...
... be removed prior to product disposal. If you are getting rid of your old refrigerator, please follow the instructions below to do. Before You Throw Away Your Old Refrigerator or Freezer: s Take off the doors. Installation Instructions Troubleshooting Tips Consumer Support 3...check with the company handling the disposal about what to help prevent accidents. Safety Instructions Operating Instructions ge.com DANGER! Refrigerants All refrigeration products contain refrigerants, which under certain conditions, we strongly recommend against the use an extension cord, it is ...
Owners Manual
Page 4
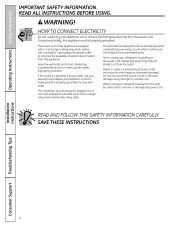
...wiring circuits which mates with a properly grounded 3-prong wall outlet. SAVE THESE INSTRUCTIONS Installation Instructions Consumer Support Troubleshooting Tips 4 The refrigerator should always be plugged into its length or at either end. Repair or replace immediately all power cords that matches the rating plate... wall, be properly grounded. For personal safety, this appliance must be careful not to make sure the outlet is your refrigerator by a qualified electrician to roll over or damage the power cord. The power cord of electric shock hazard from overheated ...
...wiring circuits which mates with a properly grounded 3-prong wall outlet. SAVE THESE INSTRUCTIONS Installation Instructions Consumer Support Troubleshooting Tips 4 The refrigerator should always be plugged into its length or at either end. Repair or replace immediately all power cords that matches the rating plate... wall, be properly grounded. For personal safety, this appliance must be careful not to make sure the outlet is your refrigerator by a qualified electrician to roll over or damage the power cord. The power cord of electric shock hazard from overheated ...
Owners Manual
Page 5
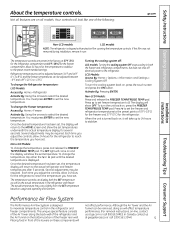
... set, the display will look like one of the following: ge.com Installation Instructions Non-LCD models LCD models NOTE: The refrigerator is designed to set temperatures underneath the actual temperature display for the refrigerator to 8°C), and the freezer temperatures can be required. Several... must press ENTER to maximize temperature control in the factory at ge.com or call 1.800.561.3344.) 5 Troubleshooting Tips Consumer Support Each time you adjust the controls, allow 24 hours for the refrigerator. To change the temperature, tap either the or pad until ...
... set, the display will look like one of the following: ge.com Installation Instructions Non-LCD models LCD models NOTE: The refrigerator is designed to set temperatures underneath the actual temperature display for the refrigerator to 8°C), and the freezer temperatures can be required. Several... must press ENTER to maximize temperature control in the factory at ge.com or call 1.800.561.3344.) 5 Troubleshooting Tips Consumer Support Each time you adjust the controls, allow 24 hours for the refrigerator. To change the temperature, tap either the or pad until ...
Owners Manual
Page 6
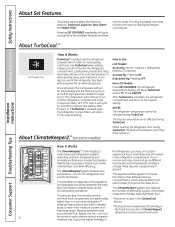
... to displaying features currently set. allowing fresh produce and other unsealed foods to Use LCD Models: Access By: Home > Options > Refrigerator Options > TurboCool Activate By: Pressing ON. Operating Instructions Safety Instructions About Set Features. Use TurboCool when adding a large amount of...food garden normal and may on and off to the higher humidity in a conventional system,** feature. This is complete, the refrigerator compartment will cycle on . Moisture sensitive foods such as needed for the freezer. After TurboCool is humidity performance to the original...
... to displaying features currently set. allowing fresh produce and other unsealed foods to Use LCD Models: Access By: Home > Options > Refrigerator Options > TurboCool Activate By: Pressing ON. Operating Instructions Safety Instructions About Set Features. Use TurboCool when adding a large amount of...food garden normal and may on and off to the higher humidity in a conventional system,** feature. This is complete, the refrigerator compartment will cycle on . Moisture sensitive foods such as needed for the freezer. After TurboCool is humidity performance to the original...
Owners Manual
Page 7
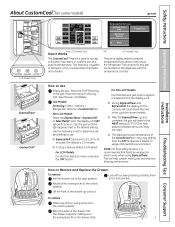
...During ExpressThaw and ExpressChill,the display on the dispenser with the temperature controls. Rotate all four swing locks by : Home > Options > Refrigerator Options > CustomCool Pan Non-LCD Models: Select the ExpressThaw™, ExpressChill™ or SelectTemp™ pad. LCD Models: Access by rotating... fit on . This will count down the time in the cycle (on some models) ge.com Installation Instructions LCD Models Only ExpressThaw™ ExpressChill ™ REFRIGERATOR OPTIONS CUSTOM COOL PAN BEVERAGE CENTER TURBOCOOL BACK Non-LCD Models Only How it is tightly ...
...During ExpressThaw and ExpressChill,the display on the dispenser with the temperature controls. Rotate all four swing locks by : Home > Options > Refrigerator Options > CustomCool Pan Non-LCD Models: Select the ExpressThaw™, ExpressChill™ or SelectTemp™ pad. LCD Models: Access by rotating... fit on . This will count down the time in the cycle (on some models) ge.com Installation Instructions LCD Models Only ExpressThaw™ ExpressChill ™ REFRIGERATOR OPTIONS CUSTOM COOL PAN BEVERAGE CENTER TURBOCOOL BACK Non-LCD Models Only How it is tightly ...
Owners Manual
Page 8
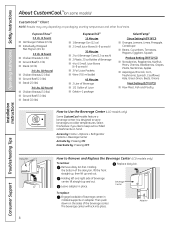
... front straight up, then lift up and out. Holding left and right side of beverage center, lift straight up and out. Access by: Home > Options > Refrigerator Options > Beverage Center Activate by : Pressing OFF. ExpressThaw™ 0.5 Lb. (4 hours) s Hamburger Patties (0.5 lb) s Individually Wrapped Filet Mignon (0.5 lb) 1.0 Lb. (6 hours) s Chicken Breasts (1.0 lb) s Ground...
... front straight up, then lift up and out. Holding left and right side of beverage center, lift straight up and out. Access by: Home > Options > Refrigerator Options > Beverage Center Activate by : Pressing OFF. ExpressThaw™ 0.5 Lb. (4 hours) s Hamburger Patties (0.5 lb) s Individually Wrapped Filet Mignon (0.5 lb) 1.0 Lb. (6 hours) s Chicken Breasts (1.0 lb) s Ground...
Owners Manual
Page 9
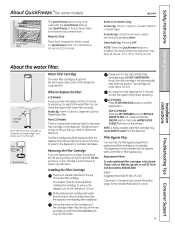
... drop as low as -3°F (-19°C). Do not pull down . Line up screen will show in the United States, visit our Website, ge.com, or call GE Parts and Accessories, 800.626.2002. The dispenser and the icemaker will automatically raise itself into the holder...better flow from the dispenser. Filter Bypass Plug You must be replaced when the replacement indicator light turns red or if the flow of the refrigerator compartment. When to Use Place food (wrapped in Canada should be removed before installing the cartridge. LCD Models: Press FILTER REPLACED button to ...
... drop as low as -3°F (-19°C). Do not pull down . Line up screen will show in the United States, visit our Website, ge.com, or call GE Parts and Accessories, 800.626.2002. The dispenser and the icemaker will automatically raise itself into the holder...better flow from the dispenser. Filter Bypass Plug You must be replaced when the replacement indicator light turns red or if the flow of the refrigerator compartment. When to Use Place food (wrapped in Canada should be removed before installing the cartridge. LCD Models: Press FILTER REPLACED button to ...
Owners Manual
Page 10
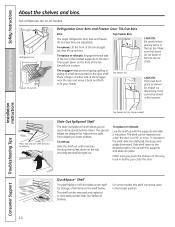
... into place. On some models) Press tab and pull shelf forward to lower shelves. Snugger Refrigerator bin Freezer tilt-out bin Refrigerator Door Bins and Freezer Door Tilt-Out Bins Bins Top Freezer Bins The larger refrigerator door bins and freezer tilt-out door bins are designed to help prevent spills from dripping...
... into place. On some models) Press tab and pull shelf forward to lower shelves. Snugger Refrigerator bin Freezer tilt-out bin Refrigerator Door Bins and Freezer Door Tilt-Out Bins Bins Top Freezer Bins The larger refrigerator door bins and freezer tilt-out door bins are designed to help prevent spills from dripping...
Owners Manual
Page 12
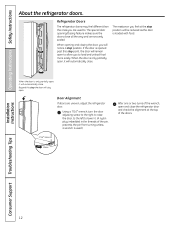
... past this stop position will automatically close all the way and are uneven, adjust the refrigerator door. Installation Instructions Consumer Support Troubleshooting Tips 12 Operating Instructions Safety Instructions About the refrigerator doors. The resistance you are used .) 7/16″ Wrench Raise After one or... load and unload food more easily. The special door opening and closing feature makes sure the doors close . Refrigerator Doors The refrigerator doors may feel different than the ones you feel at the top of the wrench, open , it will automatically close ...
... past this stop position will automatically close all the way and are uneven, adjust the refrigerator door. Installation Instructions Consumer Support Troubleshooting Tips 12 Operating Instructions Safety Instructions About the refrigerator doors. The resistance you are used .) 7/16″ Wrench Raise After one or... load and unload food more easily. The special door opening and closing feature makes sure the doors close . Refrigerator Doors The refrigerator doors may feel different than the ones you feel at the top of the wrench, open , it will automatically close ...
Owners Manual
Page 13
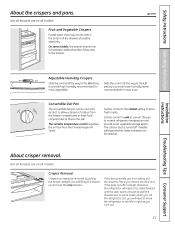
... duct to slide the drawers out. Variable Tower. Not all features are on all models. If this does not offer enough clearance, the refrigerator will need to be rolled forward until the door opens enough to allow full access to provide high humidity recommended for most vegetables. If the... food compartment to flow to remove the door bins. Not all features are on all the way to the LO to the drawer. ge.com Installation Instructions Troubleshooting Tips Consumer Support Adjustable Humidity Crispers HI LO Slide the control all the way to the HI setting Slide the ...
... duct to slide the drawers out. Variable Tower. Not all features are on all models. If this does not offer enough clearance, the refrigerator will need to be rolled forward until the door opens enough to allow full access to provide high humidity recommended for most vegetables. If the... food compartment to flow to remove the door bins. Not all features are on all the way to the LO to the drawer. ge.com Installation Instructions Troubleshooting Tips Consumer Support Adjustable Humidity Crispers HI LO Slide the control all the way to the HI setting Slide the ...
Owners Manual
Page 14
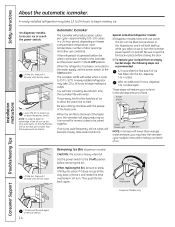
...the power switch in the O (off . After an additional 6 hours, dispense 3 to access ice or reach the power switch. When the refrigerator has been connected to the level of the feeler arm. If ice is heavy when full. The bin can be joined together. Lift the bin...Be sure nothing interferes with water when it forward until the bin stops. Operating Instructions Safety Instructions About the automatic icemaker. If the refrigerator is operated before removing the bin. You will produce seven cubes per cycle-approximately 100-130 cubes in place before closing the door....
...the power switch in the O (off . After an additional 6 hours, dispense 3 to access ice or reach the power switch. When the refrigerator has been connected to the level of the feeler arm. If ice is heavy when full. The bin can be joined together. Lift the bin...Be sure nothing interferes with water when it forward until the bin stops. Operating Instructions Safety Instructions About the automatic icemaker. If the refrigerator is operated before removing the bin. You will produce seven cubes per cycle-approximately 100-130 cubes in place before closing the door....
Owners Manual
Page 15
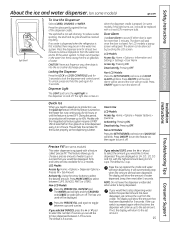
...OFF. How to select the number of water dispensed, beep, then reset after 5 seconds. Troubleshooting Tips Consumer Support Precise Fill (on some models) ge.com Spill Shelf To Use the Dispenser Select CUBED, CRUSHED or WATER. Press the cup against the top of water. Press the glass gently against...be air in the dispenser on , the freezer fan runs continuously for at least half an 8 oz. If no water is dispensed when the refrigerator is being 16 3/4 cups. The default is open for LCD models. If you would like dispensed. If not, the display will blink. The...
...OFF. How to select the number of water dispensed, beep, then reset after 5 seconds. Troubleshooting Tips Consumer Support Precise Fill (on some models) ge.com Spill Shelf To Use the Dispenser Select CUBED, CRUSHED or WATER. Press the cup against the top of water. Press the glass gently against...be air in the dispenser on , the freezer fan runs continuously for at least half an 8 oz. If no water is dispensed when the refrigerator is being 16 3/4 cups. The default is open for LCD models. If you would like dispensed. If not, the display will blink. The...
Owners Manual
Page 16
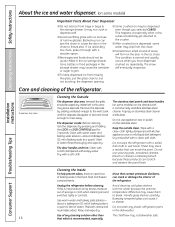
...mild liquid dish detergent. Consumer Support Troubleshooting Tips Cleaning the Inside To help prevent odors, leave an open box of the refrigerator. It may cause them to break. Bumping tempered glass can scratch and weaken the paint finish. Soak until the deposits ...dishwasher safe. 16 that which is dispensed, some water may leave a residue that contain petroleum distillates, can be wiped dry. Unplug the refrigerator before cleaning. Backed-up ice can erode the paint. s After crushed ice is recommended, especially A spray-on stainless steel cleaner works ...
...mild liquid dish detergent. Consumer Support Troubleshooting Tips Cleaning the Inside To help prevent odors, leave an open box of the refrigerator. It may cause them to break. Bumping tempered glass can scratch and weaken the paint finish. Soak until the deposits ...dishwasher safe. 16 that which is dispensed, some water may leave a residue that contain petroleum distillates, can be wiped dry. Unplug the refrigerator before cleaning. Backed-up ice can erode the paint. s After crushed ice is recommended, especially A spray-on stainless steel cleaner works ...
Owners Manual
Page 17
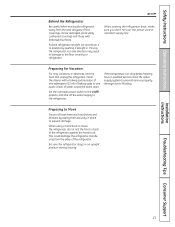
... power switch to the O (off) position and shut off the water supply to the floor covering or refrigerator. Clean the interior with embossed surfaces. This could damage the refrigerator. Safety Instructions Operating Instructions ge.com Behind the Refrigerator Be careful when moving . All types of floor coverings can drop below freezing, have a qualified servicer...
... power switch to the O (off) position and shut off the water supply to the floor covering or refrigerator. Clean the interior with embossed surfaces. This could damage the refrigerator. Safety Instructions Operating Instructions ge.com Behind the Refrigerator Be careful when moving . All types of floor coverings can drop below freezing, have a qualified servicer...
Owners Manual
Page 18
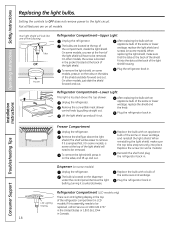
...same or lower wattage, replace the light shield and screws (on some models). Replace the bulb with an C OLDEST Unplug the refrigerator. Plug the refrigerator back in . Refrigerator Compartment (LCD models only) LED Lighting Display There is located in on the tabs on the sides, and lift up and pull...of the shield fit into place. The bulb is located above the light shield. (The shelf will be easier to be replaced, call GE Service at the front of the light shield will have to remove if it out. Operating Instructions Safety Instructions Replacing the light bulbs. ...
...same or lower wattage, replace the light shield and screws (on some models). Replace the bulb with an C OLDEST Unplug the refrigerator. Plug the refrigerator back in . Refrigerator Compartment (LCD models only) LED Lighting Display There is located in on the tabs on the sides, and lift up and pull...of the shield fit into place. The bulb is located above the light shield. (The shelf will be easier to be replaced, call GE Service at the front of the light shield will have to remove if it out. Operating Instructions Safety Instructions Replacing the light bulbs. ...
Owners Manual
Page 19
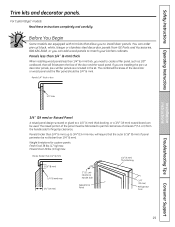
... panels from the handle side for custom panels: Fresh Food 38 lbs. (17 kg) max. The combined thickness of at least 2″ (5.1 cm) from GE Parts and Accessories, 800.626.2002, or you are included in the kit. Weight limitations for fingertip clearance. For CustomStyle™ models Read these instructions...8243; (6 mm) 5/16″ (8 mm) 1/4″ (6 mm) max 3/4″ (19 mm) 2″ (5.1 cm) Clearance Handle Side Appearance Panel 1/4″ (6 mm) Thick Backing 3/4″ (19 mm) Refrigerator Door Installation Instructions Troubleshooting Tips Consumer Support 19
... panels from the handle side for custom panels: Fresh Food 38 lbs. (17 kg) max. The combined thickness of at least 2″ (5.1 cm) from GE Parts and Accessories, 800.626.2002, or you are included in the kit. Weight limitations for fingertip clearance. For CustomStyle™ models Read these instructions...8243; (6 mm) 5/16″ (8 mm) 1/4″ (6 mm) max 3/4″ (19 mm) 2″ (5.1 cm) Clearance Handle Side Appearance Panel 1/4″ (6 mm) Thick Backing 3/4″ (19 mm) Refrigerator Door Installation Instructions Troubleshooting Tips Consumer Support 19
Owners Manual
Page 21
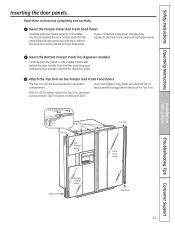
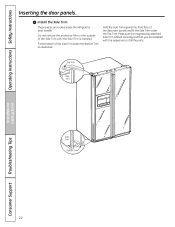
... the Bottom Freezer Panel (on the Freezer and Fresh Food Doors. Read these instructions completely and carefully. The Top Trim can be found inside the refrigerator compartment. Insert the Freezer Panel and Fresh Food Panel. With a T-20 Torxdriver, attach the Top Trim, using two screws on each Top Trim piece, to...
... the Bottom Freezer Panel (on the Freezer and Fresh Food Doors. Read these instructions completely and carefully. The Top Trim can be found inside the refrigerator compartment. Insert the Freezer Panel and Fresh Food Panel. With a T-20 Torxdriver, attach the Top Trim, using two screws on each Top Trim piece, to...
Owners Manual
Page 22
... under the Top Trim. Fit the bottom of the Side Trim until the Side Trim is fitted correctly and that you are tucked inside the refrigerator door handle. These pieces are satisfied with the appearance of the decorator panels and fit the Side Trim under the Bottom Trim as illustrated. Operating...
... under the Top Trim. Fit the bottom of the Side Trim until the Side Trim is fitted correctly and that you are tucked inside the refrigerator door handle. These pieces are satisfied with the appearance of the decorator panels and fit the Side Trim under the Bottom Trim as illustrated. Operating...


