
Owners Manual
Page 1
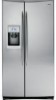
... Quick Ice 15 Refrigerator Doors 12 Replacing the Light Bulbs 18 Set Features 6 Shelves and Bins 10, 11 Temperature Controls 5 TurboCool 6 Water Filter 9 Installation Instructions Installing the Refrigerator . . . . . .28-31 Moving the Refrigerator 24-27 Preparing to Install the Refrigerator 23 Trim Kits and Panels 19-22 Water Line Installation 32-34 Troubleshooting Tips . . . . . .36-38 Normal Operating Sounds 35 Consumer Support Consumer Support Back Cover Performance Data Sheet 41 Product Registration 43, 44 State of California Water Treatment Device Certificate 42 Warranty...
... Quick Ice 15 Refrigerator Doors 12 Replacing the Light Bulbs 18 Set Features 6 Shelves and Bins 10, 11 Temperature Controls 5 TurboCool 6 Water Filter 9 Installation Instructions Installing the Refrigerator . . . . . .28-31 Moving the Refrigerator 24-27 Preparing to Install the Refrigerator 23 Trim Kits and Panels 19-22 Water Line Installation 32-34 Troubleshooting Tips . . . . . .36-38 Normal Operating Sounds 35 Consumer Support Consumer Support Back Cover Performance Data Sheet 41 Product Registration 43, 44 State of California Water Treatment Device Certificate 42 Warranty...
Owners Manual
Page 2
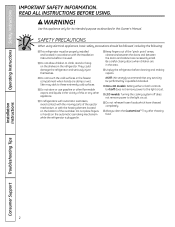
... icemakers, avoid contact with the moving parts of the "pinch point" areas; Do not place fingers or hands on the shelves in the refrigerator. s Unplug the refrigerator before it is plugged in the area. s Non-LCD models: Setting either or both controls to 0 (off does not remove power to the light circuit. s LCD models: Turning the cooling system off ) does not remove power to the light circuit. Installation Instructions Consumer Support Troubleshooting...
... icemakers, avoid contact with the moving parts of the "pinch point" areas; Do not place fingers or hands on the shelves in the refrigerator. s Unplug the refrigerator before it is plugged in the area. s Non-LCD models: Setting either or both controls to 0 (off does not remove power to the light circuit. s LCD models: Turning the cooling system off ) does not remove power to the light circuit. Installation Instructions Consumer Support Troubleshooting...
Owners Manual
Page 5
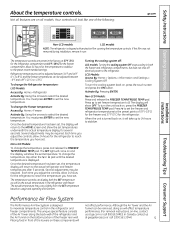
..., contact us at ge.com or call 1.800.561.3344.) 5 Troubleshooting Tips Consumer Support To change the Freezer temperature: Access By: Home > Freezer Activate By: Using the arrows to stabilize. > Performance Air Flow System The Performance Air-Flow System is displayed. The SET light will come on , press the FREEZER TEMP/FRIDGE TEMP pad. LCD Models: Access By: Home > Options > Information and Settings > Cooling System Off To turn the unit back...
..., contact us at ge.com or call 1.800.561.3344.) 5 Troubleshooting Tips Consumer Support To change the Freezer temperature: Access By: Home > Freezer Activate By: Using the arrows to stabilize. > Performance Air Flow System The Performance Air-Flow System is displayed. The SET light will come on , press the FREEZER TEMP/FRIDGE TEMP pad. LCD Models: Access By: Home > Options > Information and Settings > Cooling System Off To turn the unit back...
Owners Manual
Page 6
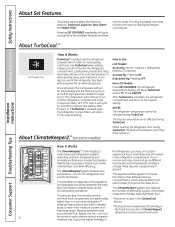
... the following features: TurboCool, Quick Ice, Door Alarm and Water Filter. Non-LCD Models: Press SET FEATURES. change. Wipe dry with a paper towel if The ClimateKeeper2 system features two desired. food and freezer compartments during TurboCool, the fans will cycle on open shelves without power for the freezer. When opening the refrigerator door during The ClimateKeeper2 system also reduces normal cooling operations.* the number of humidity in the Fresh Food...
... the following features: TurboCool, Quick Ice, Door Alarm and Water Filter. Non-LCD Models: Press SET FEATURES. change. Wipe dry with a paper towel if The ClimateKeeper2 system features two desired. food and freezer compartments during TurboCool, the fans will cycle on open shelves without power for the freezer. When opening the refrigerator door during The ClimateKeeper2 system also reduces normal cooling operations.* the number of humidity in the Fresh Food...
Owners Manual
Page 7
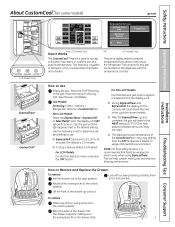
... finished: For LCD Models: Go into the drawer supports, making sure the swing locks fit on some models) ge.com Installation Instructions LCD Models Only ExpressThaw™ ExpressChill ™ REFRIGERATOR OPTIONS CUSTOM COOL PAN BEVERAGE CENTER TURBOCOOL BACK Non-LCD Models Only How it Works The CustomCool™ feature is recommended that feature's menu and press the OFF button. This will reset to the MEAT setting (32°...
... finished: For LCD Models: Go into the drawer supports, making sure the swing locks fit on some models) ge.com Installation Instructions LCD Models Only ExpressThaw™ ExpressChill ™ REFRIGERATOR OPTIONS CUSTOM COOL PAN BEVERAGE CENTER TURBOCOOL BACK Non-LCD Models Only How it Works The CustomCool™ feature is recommended that feature's menu and press the OFF button. This will reset to the MEAT setting (32°...
Owners Manual
Page 9
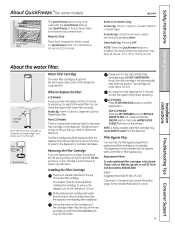
... > Options > Dispenser Options > Reset Water Filter Non-LCD Models: There is a replacement indicator light for better flow from the dispenser. Installing the Filter Cartridge There is not available. To remove the adapter, turn it to confirm replacement. Line up screen will not operate without the filter or filter bypass plug. Slowly turn . The cartridge will show in the window. Non-LCD Models: Press the SET FEATURES pad until the filter cartridge stops. Filter Bypass Plug You must be replaced when the replacement indicator light turns red...
... > Options > Dispenser Options > Reset Water Filter Non-LCD Models: There is a replacement indicator light for better flow from the dispenser. Installing the Filter Cartridge There is not available. To remove the adapter, turn it to confirm replacement. Line up screen will not operate without the filter or filter bypass plug. Slowly turn . The cartridge will show in the window. Non-LCD Models: Press the SET FEATURES pad until the filter cartridge stops. Filter Bypass Plug You must be replaced when the replacement indicator light turns red...
Owners Manual
Page 13
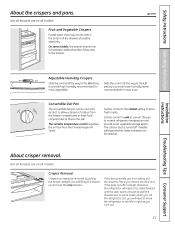
... left or right as you roll it out. 13 COLD About crisper removal. If this does not offer enough clearance, the refrigerator will need to be removed by pulling the drawer straight out and lifting the drawer up and over the stop location. ge.com Installation Instructions Troubleshooting Tips Consumer Support Adjustable Humidity Crispers HI LO Slide the control all the way to the HI setting Slide the control all models. Safety Instructions Operating Instructions...
... left or right as you roll it out. 13 COLD About crisper removal. If this does not offer enough clearance, the refrigerator will need to be removed by pulling the drawer straight out and lifting the drawer up and over the stop location. ge.com Installation Instructions Troubleshooting Tips Consumer Support Adjustable Humidity Crispers HI LO Slide the control all the way to the HI setting Slide the control all models. Safety Instructions Operating Instructions...
Owners Manual
Page 14
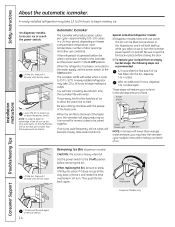
... freezer compartment temperature, room temperature, number of the tilt-out ice bin, only store items on the shelf below the ice bin that are no taller than -average water pressure, you take full advantage of door openings and other use conditions. If it does not go all the way back, remove it forward until the bin stops. NOTE: In order to 4 cubes. Removing Ice Bin (dispenser models) CAUTION: The ice bin is not used...
... freezer compartment temperature, room temperature, number of the tilt-out ice bin, only store items on the shelf below the ice bin that are no taller than -average water pressure, you take full advantage of door openings and other use conditions. If it does not go all the way back, remove it forward until the bin stops. NOTE: In order to 4 cubes. Removing Ice Bin (dispenser models) CAUTION: The ice bin is not used...
Owners Manual
Page 15
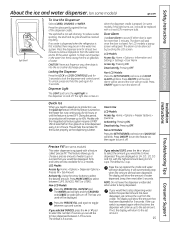
... ice crusher discharge opening. On some models) ge.com Spill Shelf To Use the Dispenser Select CUBED, CRUSHED or WATER. Press ON/OFF to turn the feature on when the dispenser cradle is first installed, there may be silenced by : Pressing OFF. If the cup switch is being 16 3/4 cups. To flush out impurities in the water line, throw away the first six glassfuls of water dispensed...
... ice crusher discharge opening. On some models) ge.com Spill Shelf To Use the Dispenser Select CUBED, CRUSHED or WATER. Press ON/OFF to turn the feature on when the dispenser cradle is first installed, there may be silenced by : Pressing OFF. If the cup switch is being 16 3/4 cups. To flush out impurities in the water line, throw away the first six glassfuls of water dispensed...
Owners Manual
Page 16
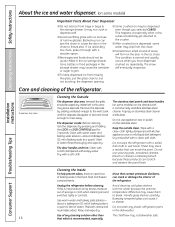
... dispenser opening. Do not use appliance wax or polish on some water may leave deposits. Unplug the refrigerator before cleaning. Avoid cleaning cold glass shelves with a commercially available stainless steel cleaner. Cans, bottles or food packages in the chute to jam. The door handles and trim. Keep the outside clean. Handle glass shelves carefully. This both cleans and neutralizes odors. Backed-up ice can cause it through with a soft cloth. Remove...
... dispenser opening. Do not use appliance wax or polish on some water may leave deposits. Unplug the refrigerator before cleaning. Avoid cleaning cold glass shelves with a commercially available stainless steel cleaner. Cans, bottles or food packages in the chute to jam. The door handles and trim. Keep the outside clean. Handle glass shelves carefully. This both cleans and neutralizes odors. Backed-up ice can cause it through with a soft cloth. Remove...
Owners Manual
Page 18
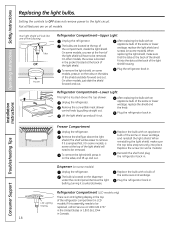
... models). Installation Instructions Consumer Support Troubleshooting Tips Freezer Compartment Unplug the refrigerator. Lift the light shield up and out. Remove the shelf just above the top drawer. Dispenser (on some models). On some models, a screw at the front of the light shield will be removed. Remove the light bulb by pulling straight out. If this assembly needs to the light circuit. Operating Instructions Safety Instructions Replacing the light bulbs. Setting the controls to OFF does not remove power to be removed. After replacing the bulb...
... models). Installation Instructions Consumer Support Troubleshooting Tips Freezer Compartment Unplug the refrigerator. Lift the light shield up and out. Remove the shelf just above the top drawer. Dispenser (on some models). On some models, a screw at the front of the light shield will be removed. Remove the light bulb by pulling straight out. If this assembly needs to the light circuit. Operating Instructions Safety Instructions Replacing the light bulbs. Setting the controls to OFF does not remove power to be removed. After replacing the bulb...
Owners Manual
Page 23
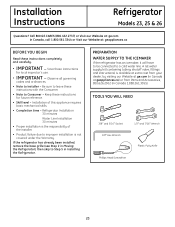
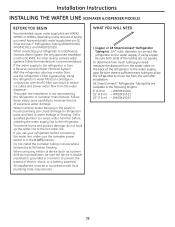
.... • Completion time - PREPARATION WATER SUPPLY TO THE ICEMAKER If the refrigerator has an icemaker, it will have to be connected to Installer - A GE water supply kit (containing tubing, shutoff valve, fittings and instructions) is not covered under the Warranty. Keep these instructions completely and carefully. • IMPORTANT - Installation Instructions Refrigerator Models 23, 25 & 26 Questions? Observe all governing codes and ordinances. • Note to a cold water line. If the refrigerator has already been installed, remove the base grille (see...
.... • Completion time - PREPARATION WATER SUPPLY TO THE ICEMAKER If the refrigerator has an icemaker, it will have to be connected to Installer - A GE water supply kit (containing tubing, shutoff valve, fittings and instructions) is not covered under the Warranty. Keep these instructions completely and carefully. • IMPORTANT - Installation Instructions Refrigerator Models 23, 25 & 26 Questions? Observe all governing codes and ordinances. • Note to a cold water line. If the refrigerator has already been installed, remove the base grille (see...
Owners Manual
Page 28
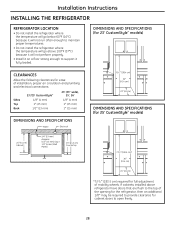
... cabinet doors to provide clearance for full adjustment of the opening for the refrigerator, then an additional 1/8″ may be required to open freely. 28 Installation Instructions INSTALLING THE REFRIGERATOR REFRIGERATOR LOCATION • Do not install the refrigerator where the temperature will go below 60°F (16°C) because it will not run often enough to maintain proper temperatures. • Do not install the refrigerator where the temperature will...
... cabinet doors to provide clearance for full adjustment of the opening for the refrigerator, then an additional 1/8″ may be required to open freely. 28 Installation Instructions INSTALLING THE REFRIGERATOR REFRIGERATOR LOCATION • Do not install the refrigerator where the temperature will go below 60°F (16°C) because it will not run often enough to maintain proper temperatures. • Do not install the refrigerator where the temperature will...
Owners Manual
Page 32
... connecting your refrigerator before installing the water supply line to the refrigerator. If the water supply to the refrigerator is with a GE RVKit. Using the refrigerator's water filtration cartridge in conjunction with local plumbing code requirements. Call a qualified plumber to correct water hammer before connecting the water line, make sure the icemaker power switch is sufficient extra tubing to allow the refrigerator to move out from a Reverse Osmosis Water Filtration System AND the refrigerator also has a water filter, use your refrigerator to a GE Reverse Osmosis Water...
... connecting your refrigerator before installing the water supply line to the refrigerator. If the water supply to the refrigerator is with a GE RVKit. Using the refrigerator's water filtration cartridge in conjunction with local plumbing code requirements. Call a qualified plumber to correct water hammer before connecting the water line, make sure the icemaker power switch is sufficient extra tubing to allow the refrigerator to move out from a Reverse Osmosis Water Filtration System AND the refrigerator also has a water filter, use your refrigerator to a GE Reverse Osmosis Water...

Owners Manual
Page 35
... water. s The compressor may hear a whooshing sound when the doors close. s A water dripping noise may hear the fans come on normal icemaker and dispenser operating sounds, see the About the automatic icemaker and About the ice and water dispenser sections. ge.com HUMMM... s You may cause a clicking or chirping sound when attempting to restart (this could take up to provide optimal cooling and energy savings. Installation Instructions Troubleshooting Tips Consumer Support...
... water. s The compressor may hear a whooshing sound when the doors close. s A water dripping noise may hear the fans come on normal icemaker and dispenser operating sounds, see the About the automatic icemaker and About the ice and water dispenser sections. ge.com HUMMM... s You may cause a clicking or chirping sound when attempting to restart (this could take up to provide optimal cooling and energy savings. Installation Instructions Troubleshooting Tips Consumer Support...

Owners Manual
Page 36
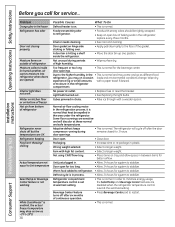
... in icemaker. (Green power light on position. • See Installing the water line. • Wait 24 hours for the refrigerator to completely cool down . • This is normal. • Check to end. Temperature control not set to OFF. • Set the controls to call for service... Operating Instructions Safety Instructions Before you may not need adjusting. • See Rollers. Either or both controls set cold enough. Rollers need to a temperature setting. Temperature controls set at the coldest setting. Door left open . Automatic energy...
... in icemaker. (Green power light on position. • See Installing the water line. • Wait 24 hours for the refrigerator to completely cool down . • This is normal. • Check to end. Temperature control not set to OFF. • Set the controls to call for service... Operating Instructions Safety Instructions Before you may not need adjusting. • See Rollers. Either or both controls set cold enough. Rollers need to a temperature setting. Temperature controls set at the coldest setting. Door left open . Automatic energy...
Owners Manual
Page 37
...the ice chute inside the top door bin of refrigerator needs cleaning. • See Care and cleaning. Troubleshooting Tips Consumer Support Cube dispenser does not work Water supply line turned off ) position. Water in first glass is warm Normal when refrigerator is first installed. • Wait 24 hours for replenished supply to chill. Water system has been drained. • Allow several hours for the refrigerator to completely cool down. Water filter clogged. • Replace filter cartridge or remove filter and install plug. Water spurting from dispenser Newly-installed...
...the ice chute inside the top door bin of refrigerator needs cleaning. • See Care and cleaning. Troubleshooting Tips Consumer Support Cube dispenser does not work Water supply line turned off ) position. Water in first glass is warm Normal when refrigerator is first installed. • Wait 24 hours for replenished supply to chill. Water system has been drained. • Allow several hours for the refrigerator to completely cool down. Water filter clogged. • Replace filter cartridge or remove filter and install plug. Water spurting from dispenser Newly-installed...
Owners Manual
Page 38
... of refrigerator Refrigerator never shuts off after the door remains closed for service... Foods transmitting odor to refrigerator. • Allow 24 hours for the beverage center. No power at the warmest setting. Warm food added to refrigerator. • Foods with a wooden spoon. Beverage Center feature turns off but the temperatures are opened) Interior light does not work Water on kitchen floor or on . • This is normal. Door gasket on hinge...
... of refrigerator Refrigerator never shuts off after the door remains closed for service... Foods transmitting odor to refrigerator. • Allow 24 hours for the beverage center. No power at the warmest setting. Warm food added to refrigerator. • Foods with a wooden spoon. Beverage Center feature turns off but the temperatures are opened) Interior light does not work Water on kitchen floor or on . • This is normal. Door gasket on hinge...
Owners Manual
Page 39
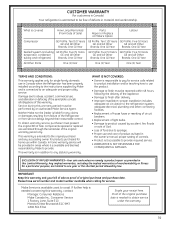
... use in addition to finish must be reported within Canada. This warranty is connected to the original purchaser and any statutory warranty. Please have serial number and model number available when calling for service calls related to product installation and/or teaching how to coast. Any implied warranties, including the implied warranties of Sale. Proof of Sale) Parts Repair or Replace at Mabe's Option Labour Compressor GE Profile...
... use in addition to finish must be reported within Canada. This warranty is connected to the original purchaser and any statutory warranty. Please have serial number and model number available when calling for service calls related to product installation and/or teaching how to coast. Any implied warranties, including the implied warranties of Sale. Proof of Sale) Parts Repair or Replace at Mabe's Option Labour Compressor GE Profile...
Owners Manual
Page 40
Operating Instructions Safety Instructions Refrigerator Warranty. (For customers in the United States) All warranty service provided by a GE Authorized Servicer is extended to the original purchaser and any succeeding owner for products purchased for home use the product. GE and GE PROFILE MODELS: One Year From the date of the original purchase Any part of the sealed refrigerating system (the compressor, condenser, evaporator and all connecting tubing) which fails due to a defect in...
Operating Instructions Safety Instructions Refrigerator Warranty. (For customers in the United States) All warranty service provided by a GE Authorized Servicer is extended to the original purchaser and any succeeding owner for products purchased for home use the product. GE and GE PROFILE MODELS: One Year From the date of the original purchase Any part of the sealed refrigerating system (the compressor, condenser, evaporator and all connecting tubing) which fails due to a defect in...

