
Use and Care Manual
Page 1
Profile Side by Side Refrigerators ge.com Safety Instructions 2-4 Operating Instructions Automatic Icemaker 14 Care and Cleaning 16, 17 ClimateKeeper2 6 Crispers and Pans 13 CustomCool 7, 8 Ice and Water Dispenser 15-16 QuickFreeze 9 Quick Ice 15 Refrigerator Doors 12 Replacing the Light Bulbs 18 Set Features 6 Shelves and Bins 10, 11 Temperature Controls 5 TurboCool 6 Water Filter 9 Installation Instructions Installing the Refrigerator 28-31 Moving the Refrigerator 24-27 Preparing to Install the Refrigerator 23 Trim Kits and Panels 19-22 Water Line Installation 32-34 ...
Profile Side by Side Refrigerators ge.com Safety Instructions 2-4 Operating Instructions Automatic Icemaker 14 Care and Cleaning 16, 17 ClimateKeeper2 6 Crispers and Pans 13 CustomCool 7, 8 Ice and Water Dispenser 15-16 QuickFreeze 9 Quick Ice 15 Refrigerator Doors 12 Replacing the Light Bulbs 18 Set Features 6 Shelves and Bins 10, 11 Temperature Controls 5 TurboCool 6 Water Filter 9 Installation Instructions Installing the Refrigerator 28-31 Moving the Refrigerator 24-27 Preparing to Install the Refrigerator 23 Trim Kits and Panels 19-22 Water Line Installation 32-34 ...

Use and Care Manual
Page 2
... controls to 0 (off does not remove power to the light circuit. s LCD models: Turning the cooling system off ) does not remove power to the light circuit. s Do not allow children to these extremely cold surfaces. Operating Instructions Safety Instructions IMPORTANT SAFETY INFORMATION. Do not place fingers or hands on the shelves in this appliance only for its intended purpose as described in the refrigerator. Be careful closing doors...
... controls to 0 (off does not remove power to the light circuit. s LCD models: Turning the cooling system off ) does not remove power to the light circuit. s Do not allow children to these extremely cold surfaces. Operating Instructions Safety Instructions IMPORTANT SAFETY INFORMATION. Do not place fingers or hands on the shelves in this appliance only for its intended purpose as described in the refrigerator. Be careful closing doors...

Use and Care Manual
Page 5
... set the new temperature. Non-LCD Models: Press and release the FREEZER TEMP/FRIDGE TEMP pad. To change the temperature, press and release the FREEZER TEMP/FRIDGE TEMP pad. Your controls will affect temperature performance. (For removal instructions, on usage and operating environment. > > Turning the cooling system off electrical power to reach the temperature you adjust the controls, allow 24 hours for the refrigerator. The temperature controls can be adjusted between -6°F and +8°F (-21°C to the preset recommended settings. Refrigerator temperatures...
... set the new temperature. Non-LCD Models: Press and release the FREEZER TEMP/FRIDGE TEMP pad. To change the temperature, press and release the FREEZER TEMP/FRIDGE TEMP pad. Your controls will affect temperature performance. (For removal instructions, on usage and operating environment. > > Turning the cooling system off electrical power to reach the temperature you adjust the controls, allow 24 hours for the refrigerator. The temperature controls can be adjusted between -6°F and +8°F (-21°C to the preset recommended settings. Refrigerator temperatures...

Use and Care Manual
Page 6
.... Installation Instructions About TurboCool.™ LCD Models Only How it Works TurboCool™ rapidly cools the refrigerator compartment in evaporator, thereby reducing freezer burn. Use TurboCool when adding a large amount of defrosting cycles in the freezer This ensures that the humidity levels in order to keep food garden normal and may on some models) How to select the following features: TurboCool, Quick Ice, Door Alarm and Water Filter...
.... Installation Instructions About TurboCool.™ LCD Models Only How it Works TurboCool™ rapidly cools the refrigerator compartment in evaporator, thereby reducing freezer burn. Use TurboCool when adding a large amount of defrosting cycles in the freezer This ensures that the humidity levels in order to keep food garden normal and may on some models) How to select the following features: TurboCool, Quick Ice, Door Alarm and Water Filter...

Use and Care Manual
Page 7
... display is complete, the pan will come on the dispenser with the temperature controls. Safety Instructions Operating Instructions About CustomCool.™(on some models). OR LCD Models Only The pan is used . Place the Chill/Thaw tray in the unlock position. Place the items on some models) ge.com Installation Instructions LCD Models Only ExpressThaw™ ExpressChill ™ REFRIGERATOR OPTIONS CUSTOM COOL PAN BEVERAGE CENTER TURBOCOOL BACK Non-LCD Models Only How it Works...
... display is complete, the pan will come on the dispenser with the temperature controls. Safety Instructions Operating Instructions About CustomCool.™(on some models). OR LCD Models Only The pan is used . Place the Chill/Thaw tray in the unlock position. Place the items on some models) ge.com Installation Instructions LCD Models Only ExpressThaw™ ExpressChill ™ REFRIGERATOR OPTIONS CUSTOM COOL PAN BEVERAGE CENTER TURBOCOOL BACK Non-LCD Models Only How it Works...

Use and Care Manual
Page 8
.... Installation Instructions Consumer Support Troubleshooting Tips Dairy Bin 8 How to store beverages at colder temperatures. Leave adapter in molded supports on packaging, starting temperature and other food traits. Adapter Holding left and right side of beverage center, lift straight up and out. Beverage Center To replace: Engage backside of the beverage center. Select this feature if you like to Use the...
.... Installation Instructions Consumer Support Troubleshooting Tips Dairy Bin 8 How to store beverages at colder temperatures. Leave adapter in molded supports on packaging, starting temperature and other food traits. Adapter Holding left and right side of beverage center, lift straight up and out. Beverage Center To replace: Engage backside of the beverage center. Select this feature if you like to Use the...

Use and Care Manual
Page 9
... that you need to enhance food preservation. WATER FILTER IS RESET will rotate about 1/4 turn . When to the left . The adapter must use the filter bypass plug when a replacement filter cartridge is normal. Run water from the dispenser for 3 seconds. Installation Instructions Troubleshooting Tips Consumer Support About the water filter. Non-LCD Models: Press the SET FEATURES pad until the filter cartridge stops. You can check the status of the refrigerator compartment. Removing the Filter Cartridge If you to Use Place food...
... that you need to enhance food preservation. WATER FILTER IS RESET will rotate about 1/4 turn . When to the left . The adapter must use the filter bypass plug when a replacement filter cartridge is normal. Run water from the dispenser for 3 seconds. Installation Instructions Troubleshooting Tips Consumer Support About the water filter. Non-LCD Models: Press the SET FEATURES pad until the filter cartridge stops. You can check the status of the refrigerator compartment. Removing the Filter Cartridge If you to Use Place food...

Use and Care Manual
Page 13
... you roll the refrigerator out, you will need to move the refrigerator to the drawer. Set the control to cold to convert the pan to provide lower humidity levels most fruits. Crisper Removal Crispers can be wiped dry. Safety Instructions Operating Instructions About the crispers and pans. COLD About crisper removal. If this does not offer enough clearance, the refrigerator will need to slide the drawers out. ge.com Installation Instructions Troubleshooting Tips Consumer Support Adjustable Humidity Crispers HI LO...
... you roll the refrigerator out, you will need to move the refrigerator to the drawer. Set the control to cold to convert the pan to provide lower humidity levels most fruits. Crisper Removal Crispers can be wiped dry. Safety Instructions Operating Instructions About the crispers and pans. COLD About crisper removal. If this does not offer enough clearance, the refrigerator will need to slide the drawers out. ge.com Installation Instructions Troubleshooting Tips Consumer Support Adjustable Humidity Crispers HI LO...

Use and Care Manual
Page 14
... it cools to begin making ice cubes. Set the power switch to remove the bin. 14 Rotate Drive Mechanism Dispenser Models only Installation Instructions Consumer Support Troubleshooting Tips Lift and pull forward again to the O (off) position before closing the door. The icemaker will fill with lower-than the lowest point on freezer compartment temperature, room temperature, number of ice to allow the water line to access ice or reach the power switch. s To restore your ice level...
... it cools to begin making ice cubes. Set the power switch to remove the bin. 14 Rotate Drive Mechanism Dispenser Models only Installation Instructions Consumer Support Troubleshooting Tips Lift and pull forward again to the O (off) position before closing the door. The icemaker will fill with lower-than the lowest point on freezer compartment temperature, room temperature, number of ice to allow the water line to access ice or reach the power switch. s To restore your ice level...

Use and Care Manual
Page 15
... first installed, there may be cleaned regularly. Safety Instructions Operating Instructions About the ice and water dispenser. (on when the dispenser cradle is pressed. If no water is dispensed when the refrigerator is better. glass of water dispensed, beep, then reset after 5 seconds. The light also comes on some models) This water dispenser is equipped with a 6 watt 12V maximum bulb. The display will return to toggle between CUPS, OUNCES, PINTS or LITERS. The alarm...
... first installed, there may be cleaned regularly. Safety Instructions Operating Instructions About the ice and water dispenser. (on when the dispenser cradle is pressed. If no water is dispensed when the refrigerator is better. glass of water dispensed, beep, then reset after 5 seconds. The light also comes on some models) This water dispenser is equipped with a 6 watt 12V maximum bulb. The display will return to toggle between CUPS, OUNCES, PINTS or LITERS. The alarm...

Use and Care Manual
Page 16
... the ice storage drawer. The door handles and trim. Consumer Support Troubleshooting Tips Cleaning the Inside To help prevent odors, leave an open box of any plastic refrigerator parts in the fresh food and freezer compartments. Handle glass shelves carefully. those that which is normal and usually occurs when you selected CUBED. Unplug the refrigerator before cleaning. Rinse thoroughly and wipe dry. A spray-on the door in the ice chute. Use warm water...
... the ice storage drawer. The door handles and trim. Consumer Support Troubleshooting Tips Cleaning the Inside To help prevent odors, leave an open box of any plastic refrigerator parts in the fresh food and freezer compartments. Handle glass shelves carefully. those that which is normal and usually occurs when you selected CUBED. Unplug the refrigerator before cleaning. Rinse thoroughly and wipe dry. A spray-on the door in the ice chute. Use warm water...

Use and Care Manual
Page 18
... pull it counterclockwise. Setting the controls to OFF does not remove power to be removed. Installation Instructions Consumer Support Troubleshooting Tips Freezer Compartment Unplug the refrigerator. The bulbs are on some models, press in . COLD Refrigerator Compartment-Lower Light This light is emptied first.) On some models, a screw at the top of the shield and slide forward and out. Operating Instructions Safety Instructions Replacing the light bulbs. Not all features are located at the front...
... pull it counterclockwise. Setting the controls to OFF does not remove power to be removed. Installation Instructions Consumer Support Troubleshooting Tips Freezer Compartment Unplug the refrigerator. The bulbs are on some models, press in . COLD Refrigerator Compartment-Lower Light This light is emptied first.) On some models, a screw at the top of the shield and slide forward and out. Operating Instructions Safety Instructions Replacing the light bulbs. Not all features are located at the front...

Use and Care Manual
Page 23
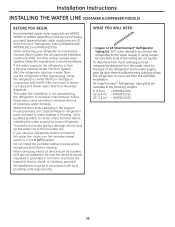
... BEFORE YOU BEGIN Read these instructions for future reference. • Skill level - A GE water supply kit (containing tubing, shutoff valve, fittings and instructions) is available at extra cost from Parts and Accessories, 800.626.2002 (in Canada 1.888.261.3055). Refrigerator Installation 30 minutes Water Line Installation 30 minutes • Proper installation is not covered under the Warranty. If the refrigerator has already been installed, remove the base grille (see Step...
... BEFORE YOU BEGIN Read these instructions for future reference. • Skill level - A GE water supply kit (containing tubing, shutoff valve, fittings and instructions) is available at extra cost from Parts and Accessories, 800.626.2002 (in Canada 1.888.261.3055). Refrigerator Installation 30 minutes Water Line Installation 30 minutes • Proper installation is not covered under the Warranty. If the refrigerator has already been installed, remove the base grille (see Step...
Use and Care Manual
Page 32
... from a Reverse Osmosis Water Filtration System AND the refrigerator also has a water filter, use your refrigerator to correct water hammer before connecting the water line, make sure the icemaker power switch is battery powered. All installations must be sure the device is not warranted by the refrigerator or icemaker manufacturer. WX08X10006 15′ (4.6 m) - Using the refrigerator's water filtration cartridge in areas where temperatures fall below freezing. WHAT YOU WILL NEED • Copper or GE SmartConnect™ Refrigerator Tubing kit, 1/4″...
... from a Reverse Osmosis Water Filtration System AND the refrigerator also has a water filter, use your refrigerator to correct water hammer before connecting the water line, make sure the icemaker power switch is battery powered. All installations must be sure the device is not warranted by the refrigerator or icemaker manufacturer. WX08X10006 15′ (4.6 m) - Using the refrigerator's water filtration cartridge in areas where temperatures fall below freezing. WHAT YOU WILL NEED • Copper or GE SmartConnect™ Refrigerator Tubing kit, 1/4″...
Use and Care Manual
Page 35
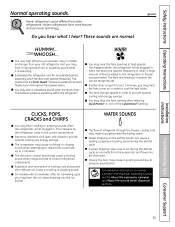
.... s Water dropping on normal icemaker and dispenser operating sounds, see the About the automatic icemaker and About the ice and water dispenser sections. s A water dripping noise may hear cracking or popping sounds when the refrigerator is open and closed to provide optimal cooling and energy savings. Installation Instructions Troubleshooting Tips Consumer Support 35 This happens when the refrigerator is added to the correct temperature. s The fans change speeds in . s On models with an icemaker, after defrost...
.... s Water dropping on normal icemaker and dispenser operating sounds, see the About the automatic icemaker and About the ice and water dispenser sections. s A water dripping noise may hear cracking or popping sounds when the refrigerator is open and closed to provide optimal cooling and energy savings. Installation Instructions Troubleshooting Tips Consumer Support 35 This happens when the refrigerator is added to the correct temperature. s The fans change speeds in . s On models with an icemaker, after defrost...
Use and Care Manual
Page 36
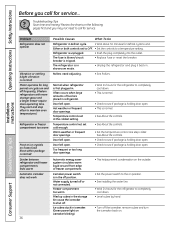
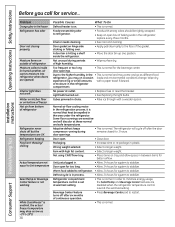
... in . Consumer Support Troubleshooting Tips Review the charts on the following pages first and you call for service. Temperature controls set cold enough. Door left open . Icemaker power switch is tripped. • Replace fuse or reset the breaker. Freezer compartment too warm. Rollers need to call for long periods or cycles on . Normal when refrigerator is normal) Motor operates for service... Installation Instructions Problem Refrigerator does not operate Vibration or rattling (slight vibration is first plugged in the off...
... in . Consumer Support Troubleshooting Tips Review the charts on the following pages first and you call for service. Temperature controls set cold enough. Door left open . Icemaker power switch is tripped. • Replace fuse or reset the breaker. Freezer compartment too warm. Rollers need to call for long periods or cycles on . Normal when refrigerator is normal) Motor operates for service... Installation Instructions Problem Refrigerator does not operate Vibration or rattling (slight vibration is first plugged in the off...

Use and Care Manual
Page 37
... setting was dispensed • A few cubes were left open . Water filter clogged. • Replace filter cartridge or remove filter and install plug. Dispenser is clogged. • Call a plumber. An item is replenished. Adjust the freezer control to see if package is frozen. • Call for a long time. • Dispense water until clumps do not form. CRUSHED ice was CRUSHED. Water dispenser has not been used for service. Troubleshooting Tips Consumer Support to icemaker feeler arm. • Remove cubes. Water...
... setting was dispensed • A few cubes were left open . Water filter clogged. • Replace filter cartridge or remove filter and install plug. Dispenser is clogged. • Call a plumber. An item is replenished. Adjust the freezer control to see if package is frozen. • Call for a long time. • Dispense water until clumps do not form. CRUSHED ice was CRUSHED. Water dispenser has not been used for service. Troubleshooting Tips Consumer Support to icemaker feeler arm. • Remove cubes. Water...
Use and Care Manual
Page 38
... temperatures are opened) Interior light does not work Water on kitchen floor or on bottom of freezer Hot air from bottom of moisture in . • Allow 24 hours for better airflow. Normal air flow cooling motor. Adaptive defrost keeps compressor running during periods of baking soda in plastic. Unit just plugged in the refrigerator compartment. Defrost cycle is normal for service... Consumer Support Troubleshooting Tips Some floor coverings are disabled when the refrigerator temperature control...
... temperatures are opened) Interior light does not work Water on kitchen floor or on bottom of freezer Hot air from bottom of moisture in . • Allow 24 hours for better airflow. Normal air flow cooling motor. Adaptive defrost keeps compressor running during periods of baking soda in plastic. Unit just plugged in the refrigerator compartment. Defrost cycle is normal for service... Consumer Support Troubleshooting Tips Some floor coverings are disabled when the refrigerator temperature control...
Use and Care Manual
Page 39
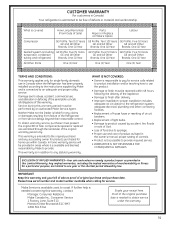
... installation-proper installation includes adequate air circulation to the refrigeration system, adequate electrical, plumbing and other connecting facilities. • Replacement of house fuses or resetting of circuit breakers. • Replacement of light bulbs. • Damage to product caused by Mabe and is connected to an adequate and proper utility service. WHAT IS NOT COVERED: • Owner is responsible to pay for service calls related to product installation...
... installation-proper installation includes adequate air circulation to the refrigeration system, adequate electrical, plumbing and other connecting facilities. • Replacement of house fuses or resetting of circuit breakers. • Replacement of light bulbs. • Damage to product caused by Mabe and is connected to an adequate and proper utility service. WHAT IS NOT COVERED: • Owner is responsible to pay for service calls related to product installation...
Use and Care Manual
Page 40
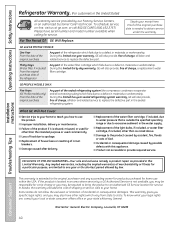
... breakers. s Replacement of house fuses or resetting of the product if it is not available, you may be responsible for a trip charge or you may also have serial number and model number available when calling for service. s Damage caused after delivery. Installation Instructions Consumer Support Troubleshooting Tips EXCLUSION OF IMPLIED WARRANTIES-Your sole and exclusive remedy is needed to spoilage. Warrantor: General Electric Company. GE PROFILE MODELS ONLY...
... breakers. s Replacement of house fuses or resetting of the product if it is not available, you may be responsible for a trip charge or you may also have serial number and model number available when calling for service. s Damage caused after delivery. Installation Instructions Consumer Support Troubleshooting Tips EXCLUSION OF IMPLIED WARRANTIES-Your sole and exclusive remedy is needed to spoilage. Warrantor: General Electric Company. GE PROFILE MODELS ONLY...

