
Owners Manual
Page 1
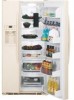
...Siders ge.com Safety Instructions 2-3 Operating Instructions Automatic Icemaker 11 Care and Cleaning 13, 14 Crispers and Pans 10 ExpressChill 5 Ice and Water Dispenser 12, 13 Refrigerator Doors 9 Replacing the Light Bulbs 15 Shelves and Bins 7, 8 Temperature Controls 4 TurboCool 4 Water Filter 6 Installation Instructions Installing the Refrigerator 21-24 Moving the Refrigerator 17-20 Preparing to Install the Refrigerator 16 Water Line Installation 25-27 Troubleshooting Tips 28-31 Normal Operating Sounds 28 Consumer Support Consumer Support Back Cover Performance Data Sheet...
...Siders ge.com Safety Instructions 2-3 Operating Instructions Automatic Icemaker 11 Care and Cleaning 13, 14 Crispers and Pans 10 ExpressChill 5 Ice and Water Dispenser 12, 13 Refrigerator Doors 9 Replacing the Light Bulbs 15 Shelves and Bins 7, 8 Temperature Controls 4 TurboCool 4 Water Filter 6 Installation Instructions Installing the Refrigerator 21-24 Moving the Refrigerator 17-20 Preparing to Install the Refrigerator 16 Water Line Installation 25-27 Troubleshooting Tips 28-31 Normal Operating Sounds 28 Consumer Support Consumer Support Back Cover Performance Data Sheet...
Owners Manual
Page 4
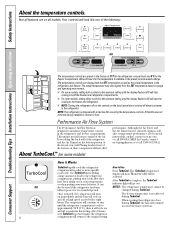
... changed during installation, remove it Works TurboCool rapidly cools the refrigerator compartment in order to maximize temperature control in both the SET temperature as well as the actual temperature in the factory at high speed as needed for the temperature to stabilize to run until the display flashes (off to the original setting. If this setting. Consumer Support Troubleshooting Tips Installation Instructions Operating Instructions Safety Instructions About the temperature controls. NOTE: The refrigerator is shipped with protective film covering the temperature controls...
... changed during installation, remove it Works TurboCool rapidly cools the refrigerator compartment in order to maximize temperature control in both the SET temperature as well as the actual temperature in the factory at high speed as needed for the temperature to stabilize to run until the display flashes (off to the original setting. If this setting. Consumer Support Troubleshooting Tips Installation Instructions Operating Instructions Safety Instructions About the temperature controls. NOTE: The refrigerator is shipped with protective film covering the temperature controls...

Owners Manual
Page 5
... Replace the Drawer To remove: Pull the drawer out to the stop a feature before it Works The ExpressChill™ feature is off. Select the ExpressChill™ pad. Place the items on the drawer slots. Safety Instructions Operating Instructions Installation Instructions Troubleshooting Tips Consumer Support About ExpressChill.™(on some models, you can then select the chill time (use chart to determine best setting). How to Use Empty the pan...
... Replace the Drawer To remove: Pull the drawer out to the stop a feature before it Works The ExpressChill™ feature is off. Select the ExpressChill™ pad. Place the items on the drawer slots. Safety Instructions Operating Instructions Installation Instructions Troubleshooting Tips Consumer Support About ExpressChill.™(on some models, you can then select the chill time (use chart to determine best setting). How to Use Empty the pan...
Owners Manual
Page 6
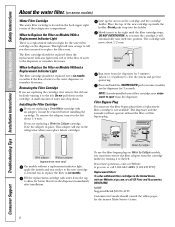
... at ge.com, or call 1.800.GE.CARES (1.800.432.2737). The cartridge will not operate without a replacement indicator light, apply the month and year sticker to the new cartridge to remind you must use the filter bypass plug on Water by Culligan cartridge, leave the adapter in six months. Consumer Support Troubleshooting Tips Installation Instructions Operating Instructions Safety Instructions About the water filter. (on some models) on the dispenser for 3 minutes (about 1/4 turn it to replace the filter in...
... at ge.com, or call 1.800.GE.CARES (1.800.432.2737). The cartridge will not operate without a replacement indicator light, apply the month and year sticker to the new cartridge to remind you must use the filter bypass plug on Water by Culligan cartridge, leave the adapter in six months. Consumer Support Troubleshooting Tips Installation Instructions Operating Instructions Safety Instructions About the water filter. (on some models) on the dispenser for 3 minutes (about 1/4 turn it to replace the filter in...

Owners Manual
Page 7
... bin above the rectangular molded supports on the door shelf. To replace or relocate: Line the shelf up with an ice chute inside the top freezer door bin, be repositioned when the door is at 90° or more. The shelf can be careful when placing items in the bin. To reposition the shelf, slide the shelf past the stops and angle downward. Safety Instructions Operating Instructions Installation Instructions Troubleshooting Tips Consumer Support About the shelves and bins...
... bin above the rectangular molded supports on the door shelf. To replace or relocate: Line the shelf up with an ice chute inside the top freezer door bin, be repositioned when the door is at 90° or more. The shelf can be careful when placing items in the bin. To reposition the shelf, slide the shelf past the stops and angle downward. Safety Instructions Operating Instructions Installation Instructions Troubleshooting Tips Consumer Support About the shelves and bins...

Owners Manual
Page 10
... coldest setting to OLDEST air duct to slide the drawers out. Adjustable Humidity Crispers HI LO Slide the control all the way to the HI setting Slide the control all the way to the LO to provide high humidity recommended for most vegetables. Variable settings between these extremes can easily be wiped dry. Consumer Support Troubleshooting Tips Installation Instructions Operating Instructions Safety Instructions COLD About the crispers and pans. Not...
... coldest setting to OLDEST air duct to slide the drawers out. Adjustable Humidity Crispers HI LO Slide the control all the way to the HI setting Slide the control all the way to the LO to provide high humidity recommended for most vegetables. Variable settings between these extremes can easily be wiped dry. Consumer Support Troubleshooting Tips Installation Instructions Operating Instructions Safety Instructions COLD About the crispers and pans. Not...
Owners Manual
Page 11
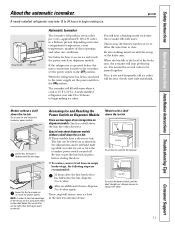
... replace the shelf. 11 When the refrigerator has been connected to the water supply, set the power switch in the shortest amount of ice to allow the water line to begin making ice cubes. One has a shelf above the ice bin Shelf Ice Bin To access ice, pull the bin forward. A newly installed refrigerator may take 12 to 24 hours to clear. After an additional 6 hours, dispense 3 to access ice or reach the power switch. s To restore your ice level...
... replace the shelf. 11 When the refrigerator has been connected to the water supply, set the power switch in the shortest amount of ice to allow the water line to begin making ice cubes. One has a shelf above the ice bin Shelf Ice Bin To access ice, pull the bin forward. A newly installed refrigerator may take 12 to 24 hours to clear. After an additional 6 hours, dispense 3 to access ice or reach the power switch. s To restore your ice level...

Owners Manual
Page 12
... replaced with ice and use of snow will eventually evaporate. To unlock, press and hold the pad again for more than 3 minutes. Dispenser Light This pad turns the night light in the storage drawer may not crush or dispense well. s Avoid overfilling glass with a 6 watt 12V maximum bulb. CAUTION: Never put the glass close the door. Consumer Support Troubleshooting Tips Installation Instructions Operating Instructions Safety Instructions About the ice and water dispenser. (on when the dispenser...
... replaced with ice and use of snow will eventually evaporate. To unlock, press and hold the pad again for more than 3 minutes. Dispenser Light This pad turns the night light in the storage drawer may not crush or dispense well. s Avoid overfilling glass with a 6 watt 12V maximum bulb. CAUTION: Never put the glass close the door. Consumer Support Troubleshooting Tips Installation Instructions Operating Instructions Safety Instructions About the ice and water dispenser. (on when the dispenser...
Owners Manual
Page 13
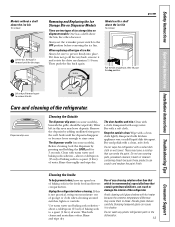
... lift past the stop position. Safety Instructions Operating Instructions Installation Instructions Troubleshooting Tips Consumer Support Models without a shelf above the bin, the other than that which is not practical, wring excess moisture out of ice bin: Always be wiped dry. Removing and Replacing the Ice Storage Bin on some models). Cleaning the Outside The dispenser drip area (on Dispenser Models There are two types of the refrigerator. Water left in the fresh food and freezer compartments. Rinse thoroughly...
... lift past the stop position. Safety Instructions Operating Instructions Installation Instructions Troubleshooting Tips Consumer Support Models without a shelf above the bin, the other than that which is not practical, wring excess moisture out of ice bin: Always be wiped dry. Removing and Replacing the Ice Storage Bin on some models). Cleaning the Outside The dispenser drip area (on Dispenser Models There are two types of the refrigerator. Water left in the fresh food and freezer compartments. Rinse thoroughly...

Owners Manual
Page 15
..., and lift up and pull it counterclockwise. Remove the shelf just above the top drawer. After replacing the bulb with an appliance bulb of the following: Tabs OR Refrigerator Compartment-Upper Light Unplug the refrigerator. Plug the refrigerator back in . Reinstall the shelf and plug the refrigerator back in . 15 Safety Instructions Operating Instructions Installation Instructions Troubleshooting Tips Consumer Support Replacing the light bulbs. On other models, just slide the shield forward and out. On...
..., and lift up and pull it counterclockwise. Remove the shelf just above the top drawer. After replacing the bulb with an appliance bulb of the following: Tabs OR Refrigerator Compartment-Upper Light Unplug the refrigerator. Plug the refrigerator back in . Reinstall the shelf and plug the refrigerator back in . 15 Safety Instructions Operating Instructions Installation Instructions Troubleshooting Tips Consumer Support Replacing the light bulbs. On other models, just slide the shield forward and out. On...
Owners Manual
Page 16
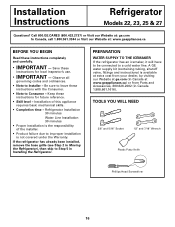
... instructions for local inspector's use. • IMPORTANT - Installation Instructions Refrigerator Models 22, 23, 25 & 27 Questions? Keep these instructions for future reference. • Skill level - Installation of the installer. • Product failure due to Step 5 in Canada 1.888.661.1616). PREPARATION WATER SUPPLY TO THE ICEMAKER If the refrigerator has an icemaker, it will have to be connected to Installer - A GE water supply kit (containing tubing, shutoff valve, fittings and instructions) is not covered under the Warranty...
... instructions for local inspector's use. • IMPORTANT - Installation Instructions Refrigerator Models 22, 23, 25 & 27 Questions? Keep these instructions for future reference. • Skill level - Installation of the installer. • Product failure due to Step 5 in Canada 1.888.661.1616). PREPARATION WATER SUPPLY TO THE ICEMAKER If the refrigerator has an icemaker, it will have to be connected to Installer - A GE water supply kit (containing tubing, shutoff valve, fittings and instructions) is not covered under the Warranty...

Owners Manual
Page 22
... in the refrigerator, make sure the icemaker power switch is set to provide one. Then tighten one if your water supply has sand or particles that could clog the screen of the refrigerator, as far as possible. Installation Instructions INSTALLING THE REFRIGERATOR (CONT.) 1 CONNECTING THE REFRIGERATOR TO THE HOUSE WATER LINE (icemaker and dispenser models) A cold water supply is required for any leaks. 3 PLUG IN THE REFRIGERATOR Before plugging in the water line near the refrigerator. Overtightening may need to the...
... in the refrigerator, make sure the icemaker power switch is set to provide one. Then tighten one if your water supply has sand or particles that could clog the screen of the refrigerator, as far as possible. Installation Instructions INSTALLING THE REFRIGERATOR (CONT.) 1 CONNECTING THE REFRIGERATOR TO THE HOUSE WATER LINE (icemaker and dispenser models) A cold water supply is required for any leaks. 3 PLUG IN THE REFRIGERATOR Before plugging in the water line near the refrigerator. Overtightening may need to the...

Owners Manual
Page 25
... the refrigerator to a GE Reverse Osmosis Water System, the only approved installation is from the water valve on the amount of electric shock, or is in the following lengths: 2′ (0.6 m) - If you use the refrigerator's filter bypass plug. WX08X10015 25′ (7.6 m) - Using the refrigerator's water filtration cartridge in accordance with the RO filter can cause damage to refrigerator parts and lead to correct water hammer before connecting the water line, make sure the icemaker power switch is battery powered...
... the refrigerator to a GE Reverse Osmosis Water System, the only approved installation is from the water valve on the amount of electric shock, or is in the following lengths: 2′ (0.6 m) - If you use the refrigerator's filter bypass plug. WX08X10015 25′ (7.6 m) - Using the refrigerator's water filtration cartridge in accordance with the RO filter can cause damage to refrigerator parts and lead to correct water hammer before connecting the water line, make sure the icemaker power switch is battery powered...

Owners Manual
Page 27
... tubing between the cold water line and the refrigerator. For plastic tubing from the wall after about one additional turn with the pipe clamp. Shut the water off at the water valve after installation. 7 CONNECT THE TUBING TO THE VALVE Place the compression nut and ferrule (sleeve) for copper tubing onto the end of water has been flushed through a hole drilled in Installing the Refrigerator. 27 Installation Instructions 4 FASTEN THE SHUTOFF VALVE...
... tubing between the cold water line and the refrigerator. For plastic tubing from the wall after about one additional turn with the pipe clamp. Shut the water off at the water valve after installation. 7 CONNECT THE TUBING TO THE VALVE Place the compression nut and ferrule (sleeve) for copper tubing onto the end of water has been flushed through a hole drilled in Installing the Refrigerator. 27 Installation Instructions 4 FASTEN THE SHUTOFF VALVE...

Owners Manual
Page 28
... freezer compartments. s You may make a gurgling noise like boiling water. The fans are normal. s The fans change speeds in . This happens as ice melts from older refrigerators. s Expansion and contraction of cooling coils during the defrost cycle. s The flow of food is operating. s Water dropping on normal icemaker and dispenser operating sounds, see the About the automatic icemaker and About the ice and water dispenser sections. 28 Consumer Support Troubleshooting Tips Installation Instructions Operating Instructions Safety Instructions...
... freezer compartments. s You may make a gurgling noise like boiling water. The fans are normal. s The fans change speeds in . This happens as ice melts from older refrigerators. s Expansion and contraction of cooling coils during the defrost cycle. s The flow of food is operating. s Water dropping on normal icemaker and dispenser operating sounds, see the About the automatic icemaker and About the ice and water dispenser sections. 28 Consumer Support Troubleshooting Tips Installation Instructions Operating Instructions Safety Instructions...
Owners Manual
Page 29
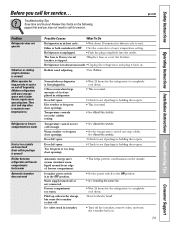
... icemaker back on. 29 Refrigerator is tripped. •Replace fuse or reset the breaker. Safety Instructions Operating Instructions Installation Instructions Troubleshooting Tips Consumer Support Before you may not need adjusting. •See Rollers. Review the charts on the following pages first and you call for service... The fuse is blown/circuit breaker is unplugged. • Push the plug completely into the outlet. Door left open. Hot weather or frequent door openings. Temperature controls set cold...
... icemaker back on. 29 Refrigerator is tripped. •Replace fuse or reset the breaker. Safety Instructions Operating Instructions Installation Instructions Troubleshooting Tips Consumer Support Before you may not need adjusting. •See Rollers. Review the charts on the following pages first and you call for service... The fuse is blown/circuit breaker is unplugged. • Push the plug completely into the outlet. Door left open. Hot weather or frequent door openings. Temperature controls set cold...

Owners Manual
Page 30
... for 3 seconds. •Run water from dispenser (on some models) Water is not dispensed (on some models) but icemaker is on icemaker or water supply. • Remove cubes. • Remove any item that might be blocking, or has fallen into the ice chute inside the top door bin of refrigerator needs cleaning. Water filter clogged. Temperature control not set cold enough. Water filter clogged. Water in storage container. Defrost heater is working Possible Causes Ice storage bin needs cleaning. Water dispenser has not been used for a long time...
... for 3 seconds. •Run water from dispenser (on some models) Water is not dispensed (on some models) but icemaker is on icemaker or water supply. • Remove cubes. • Remove any item that might be blocking, or has fallen into the ice chute inside the top door bin of refrigerator needs cleaning. Water filter clogged. Temperature control not set cold enough. Water filter clogged. Water in storage container. Defrost heater is working Possible Causes Ice storage bin needs cleaning. Water dispenser has not been used for a long time...

Owners Manual
Page 31
... area under the refrigerator. Dispenser is normal. replace every three months. • See Care and cleaning. •Wipe surface dry. Water filter clogged. Adaptive defrost keeps compressor running during periods of refrigerator Refrigerator never shuts off after the door remains closed for 3 seconds. •A few cubes were left in humid weather, air carries moisture into refrigerator when doors are opened) Interior light does not work Water on kitchen floor or on hinge side sticking or...
... area under the refrigerator. Dispenser is normal. replace every three months. • See Care and cleaning. •Wipe surface dry. Water filter clogged. Adaptive defrost keeps compressor running during periods of refrigerator Refrigerator never shuts off after the door remains closed for 3 seconds. •A few cubes were left in humid weather, air carries moisture into refrigerator when doors are opened) Interior light does not work Water on kitchen floor or on hinge side sticking or...
Owners Manual
Page 38
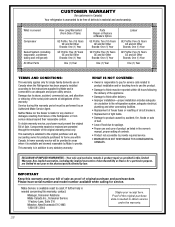
... law. Mabe Service is covered Compressor Sealed System (including evaporator, condenser tubing and refrigerant) All Other Parts How Long Warranted (From Date of Sale. Service during this warranty, contact: Manager, Consumer Relations Mabe Canada Inc., Consumer Service 1 Factory Lane, Suite 310 Moncton, New Brunswick E1C 9M3 1.800.561.3344 Staple your bill of sale as listed in the owner's manual, proper setting of food due...
... law. Mabe Service is covered Compressor Sealed System (including evaporator, condenser tubing and refrigerant) All Other Parts How Long Warranted (From Date of Sale. Service during this warranty, contact: Manager, Consumer Relations Mabe Canada Inc., Consumer Service 1 Factory Lane, Suite 310 Moncton, New Brunswick E1C 9M3 1.800.561.3344 Staple your bill of sale as listed in the owner's manual, proper setting of food due...

Owners Manual
Page 39
... the refrigerator Any part of the water filter cartridge which vary from state to an Authorized GE Service location for other than the intended purpose or used commercially. s Damage caused after delivery. s Replacement of the light bulbs, if included, or water filter cartridge, if included, other than as provided in an area where service by our Factory Service Centers, or an authorized Customer Care® technician. s Replacement of the water filter cartridge, if...
... the refrigerator Any part of the water filter cartridge which vary from state to an Authorized GE Service location for other than the intended purpose or used commercially. s Damage caused after delivery. s Replacement of the light bulbs, if included, or water filter cartridge, if included, other than as provided in an area where service by our Factory Service Centers, or an authorized Customer Care® technician. s Replacement of the water filter cartridge, if...

