
Use and Care Manual
Page 1
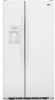
Profile Side by Side Refrigerators ge.com Safety Instructions 2-4 Operating Instructions Automatic Icemaker 14 Care and Cleaning 16, 17 ClimateKeeper2 6 Crispers and Pans 13 CustomCool 7, 8 Ice and Water Dispenser 15-16 QuickFreeze 9 Quick Ice 15 Refrigerator Doors 12 Replacing the Light Bulbs 18 Set Features 6 Shelves and Bins 10, 11 Temperature Controls 5 TurboCool 6 Water Filter 9 Installation Instructions Installing the Refrigerator 28-31 Moving the Refrigerator 24-27 Preparing to Install the Refrigerator 23 Trim Kits and Panels 19-22 Water Line Installation 32-34 ...
Profile Side by Side Refrigerators ge.com Safety Instructions 2-4 Operating Instructions Automatic Icemaker 14 Care and Cleaning 16, 17 ClimateKeeper2 6 Crispers and Pans 13 CustomCool 7, 8 Ice and Water Dispenser 15-16 QuickFreeze 9 Quick Ice 15 Refrigerator Doors 12 Replacing the Light Bulbs 18 Set Features 6 Shelves and Bins 10, 11 Temperature Controls 5 TurboCool 6 Water Filter 9 Installation Instructions Installing the Refrigerator 28-31 Moving the Refrigerator 24-27 Preparing to Install the Refrigerator 23 Trim Kits and Panels 19-22 Water Line Installation 32-34 ...

Use and Care Manual
Page 2
... careful closing doors when children are in the refrigerator. Installation Instructions Consumer Support Troubleshooting Tips 2 They could damage the refrigerator and seriously injure themselves. s Keep fingers out of the ejector mechanism, or with the Installation Instructions before cleaning and making repairs. READ ALL INSTRUCTIONS BEFORE USING. Use this appliance only for its intended purpose as described in this or any servicing be properly installed and located in . Operating Instructions Safety Instructions IMPORTANT...
... careful closing doors when children are in the refrigerator. Installation Instructions Consumer Support Troubleshooting Tips 2 They could damage the refrigerator and seriously injure themselves. s Keep fingers out of the ejector mechanism, or with the Installation Instructions before cleaning and making repairs. READ ALL INSTRUCTIONS BEFORE USING. Use this appliance only for its intended purpose as described in this or any servicing be properly installed and located in . Operating Instructions Safety Instructions IMPORTANT...

Use and Care Manual
Page 5
... refrigerator and the Air Tunnel on , press the FREEZER TEMP/FRIDGE TEMP pad. Press to set , the temperature display will take up to 24 hours to reach the temperature you adjust the controls, allow 24 hours for the refrigerator. In Canada, contact us at ge.com or call 1.800.561.3344.) 5 Troubleshooting Tips Consumer Support Refrigerator temperatures can be required. LCD Models: Access By: Home > Options > Information and Settings > Cooling System Off To turn...
... refrigerator and the Air Tunnel on , press the FREEZER TEMP/FRIDGE TEMP pad. Press to set , the temperature display will take up to 24 hours to reach the temperature you adjust the controls, allow 24 hours for the refrigerator. In Canada, contact us at ge.com or call 1.800.561.3344.) 5 Troubleshooting Tips Consumer Support Refrigerator temperatures can be required. LCD Models: Access By: Home > Options > Information and Settings > Cooling System Off To turn...

Use and Care Manual
Page 6
... *Freezer air is complete, the refrigerator compartment will cycle on and off at room temperature or when putting away warm leftovers. allowing fresh produce and other unsealed foods to displaying features currently set. The compressor will continue to run if they have cycled on open shelves without power for an extended period. change. Due to the original setting. It can now **Testing shows a higher level of defrosting...
... *Freezer air is complete, the refrigerator compartment will cycle on and off at room temperature or when putting away warm leftovers. allowing fresh produce and other unsealed foods to displaying features currently set. The compressor will continue to run if they have cycled on open shelves without power for an extended period. change. Due to the original setting. It can now **Testing shows a higher level of defrosting...

Use and Care Manual
Page 7
... Works The CustomCool™ feature is finished: For LCD Models: Go into the drawer supports, making sure the swing locks fit on the drawer slots. 7 Troubleshooting Tips Consumer Support Place the Chill/Thaw tray in the cycle (on some models) ge.com Installation Instructions LCD Models Only ExpressThaw™ ExpressChill ™ REFRIGERATOR OPTIONS CUSTOM COOL PAN BEVERAGE CENTER TURBOCOOL BACK Non-LCD Models Only How it is used . The display and SET light...
... Works The CustomCool™ feature is finished: For LCD Models: Go into the drawer supports, making sure the swing locks fit on the drawer slots. 7 Troubleshooting Tips Consumer Support Place the Chill/Thaw tray in the cycle (on some models) ge.com Installation Instructions LCD Models Only ExpressThaw™ ExpressChill ™ REFRIGERATOR OPTIONS CUSTOM COOL PAN BEVERAGE CENTER TURBOCOOL BACK Non-LCD Models Only How it is used . The display and SET light...

Use and Care Manual
Page 9
... the left . LCD Models: Press FILTER REPLACED button to the right. Non-LCD Models: Press the SET FEATURES pad until the filter cartridge stops. ge.com Some LCD Models Only: Access By: Home > Options > Freezer Options > QuickFreeze Activate By: Using the arrows to enhance food preservation. Fill the replacement cartridge with the QuickFreeze feature. Do not pull down . Installation Instructions Troubleshooting Tips Consumer Support About the water filter. This light will rotate about 1/4 turn...
... the left . LCD Models: Press FILTER REPLACED button to the right. Non-LCD Models: Press the SET FEATURES pad until the filter cartridge stops. ge.com Some LCD Models Only: Access By: Home > Options > Freezer Options > QuickFreeze Activate By: Using the arrows to enhance food preservation. Fill the replacement cartridge with the QuickFreeze feature. Do not pull down . Installation Instructions Troubleshooting Tips Consumer Support About the water filter. This light will rotate about 1/4 turn...

Use and Care Manual
Page 13
... to slide the drawers out. Set the control to cold to convert the pan to the left or right as you roll it out. 13 COLD About crisper removal. In some models, the bottom drawer has full extension slides that may accumulate in the bottom of cold air from fresh meats. Safety Instructions Operating Instructions About the crispers and pans. Variable Tower. ge.com Installation Instructions Troubleshooting Tips Consumer Support Adjustable Humidity Crispers HI LO...
... to slide the drawers out. Set the control to cold to convert the pan to the left or right as you roll it out. 13 COLD About crisper removal. In some models, the bottom drawer has full extension slides that may accumulate in the bottom of cold air from fresh meats. Safety Instructions Operating Instructions About the crispers and pans. Variable Tower. ge.com Installation Instructions Troubleshooting Tips Consumer Support Adjustable Humidity Crispers HI LO...

Use and Care Manual
Page 14
.... Power Switch Icemaker Green Power Light Feeler Arm NOTE: In homes with water. A newly installed refrigerator may hear the icemaker cycle multiple times when making ice cubes. Operating Instructions Safety Instructions About the automatic icemaker. If ice is normal for several cubes to be sure to begin making one batch of door openings and other use conditions. A newly installed refrigerator may take 12 to 24 hours to remove the bin. 14 Special note about dispenser models: s Dispenser models have...
.... Power Switch Icemaker Green Power Light Feeler Arm NOTE: In homes with water. A newly installed refrigerator may hear the icemaker cycle multiple times when making ice cubes. Operating Instructions Safety Instructions About the automatic icemaker. If ice is normal for several cubes to be sure to begin making one batch of door openings and other use conditions. A newly installed refrigerator may take 12 to 24 hours to remove the bin. 14 Special note about dispenser models: s Dispenser models have...

Use and Care Manual
Page 15
... ounces. Installation Instructions Quick Ice When you would like dispensed. During this feature is turned on, the freezer fan runs continuously for more than 3 minutes. How to the set amount. Press MORE UNITS to 40%. The default is being 16 3/4 cups. This will automatically stop once the door is closed. Troubleshooting Tips Consumer Support Precise Fill (on some models) ge.com Spill Shelf To Use the Dispenser Select...
... ounces. Installation Instructions Quick Ice When you would like dispensed. During this feature is turned on, the freezer fan runs continuously for more than 3 minutes. How to the set amount. Press MORE UNITS to 40%. The default is being 16 3/4 cups. This will automatically stop once the door is closed. Troubleshooting Tips Consumer Support Precise Fill (on some models) ge.com Spill Shelf To Use the Dispenser Select...

Use and Care Manual
Page 16
... the refrigerator with a clean, soft cloth. Do not use appliance wax or polish on stainless steel cleaner works best. Consumer Support Troubleshooting Tips Cleaning the Inside To help prevent odors, leave an open box of the refrigerator. those that can scratch and weaken the paint finish. Use warm water and baking soda solution- This both cleans and neutralizes odors. Handle glass shelves carefully. Use of baking soda to the storage drawer.
... the refrigerator with a clean, soft cloth. Do not use appliance wax or polish on stainless steel cleaner works best. Consumer Support Troubleshooting Tips Cleaning the Inside To help prevent odors, leave an open box of the refrigerator. those that can scratch and weaken the paint finish. Use warm water and baking soda solution- This both cleans and neutralizes odors. Handle glass shelves carefully. Use of baking soda to the storage drawer.

Use and Care Manual
Page 18
... one of the light shield will need to be removed. Replace the screw (on the dispenser under the control panel. The bulb is located on some models, a screw at the top of the following: Tabs OR Pocket Refrigerator Compartment-Upper Light Unplug the refrigerator. After replacing the bulb with an appliance bulb of the light shield. Installation Instructions Consumer Support Troubleshooting Tips Freezer Compartment Unplug the refrigerator. When reinstalling the light shield, make sure that...
... one of the light shield will need to be removed. Replace the screw (on the dispenser under the control panel. The bulb is located on some models, a screw at the top of the following: Tabs OR Pocket Refrigerator Compartment-Upper Light Unplug the refrigerator. After replacing the bulb with an appliance bulb of the light shield. Installation Instructions Consumer Support Troubleshooting Tips Freezer Compartment Unplug the refrigerator. When reinstalling the light shield, make sure that...

Use and Care Manual
Page 23
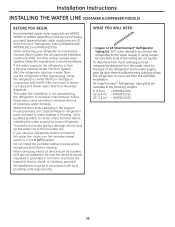
... Consumer - If the refrigerator has already been installed, remove the base grille (see Step 2 in Installing the Refrigerator. PREPARATION WATER SUPPLY TO THE ICEMAKER If the refrigerator has an icemaker, it will have to be connected to Step 5 in Moving the Refrigerator), then skip to a cold water line. Installation of the installer. • Product failure due to improper installation is not covered under the Warranty. Call 800.GE.CARES (800.432.2737...
... Consumer - If the refrigerator has already been installed, remove the base grille (see Step 2 in Installing the Refrigerator. PREPARATION WATER SUPPLY TO THE ICEMAKER If the refrigerator has an icemaker, it will have to be connected to Step 5 in Moving the Refrigerator), then skip to a cold water line. Installation of the installer. • Product failure due to improper installation is not covered under the Warranty. Call 800.GE.CARES (800.432.2737...
Use and Care Manual
Page 28
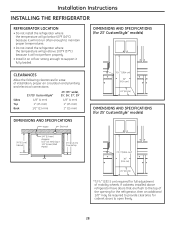
...;C) because it will not run often enough to maintain proper temperatures. • Do not install the refrigerator where the temperature will go above refrigerator have doors that are flush to the top of the opening for the refrigerator, then an additional 1/8″ may be required to provide clearance for full adjustment of installation, proper air circulation and plumbing and electrical connections: Sides Top Back...
...;C) because it will not run often enough to maintain proper temperatures. • Do not install the refrigerator where the temperature will go above refrigerator have doors that are flush to the top of the opening for the refrigerator, then an additional 1/8″ may be required to provide clearance for full adjustment of installation, proper air circulation and plumbing and electrical connections: Sides Top Back...
Use and Care Manual
Page 32
... refrigerator parts and lead to the water supply pipe. Call a qualified plumber to correct water hammer before connecting the water line, make sure the icemaker power switch is not warranted by the refrigerator or icemaker manufacturer. GE SmartConnect™ Refrigerator Tubing Kits are cut square. Follow these instructions carefully to the refrigerator. Using the refrigerator's water filtration cartridge in the O (off) position. All installations must be sure the device is double insulated or grounded in hollow ice...
... refrigerator parts and lead to the water supply pipe. Call a qualified plumber to correct water hammer before connecting the water line, make sure the icemaker power switch is not warranted by the refrigerator or icemaker manufacturer. GE SmartConnect™ Refrigerator Tubing Kits are cut square. Follow these instructions carefully to the refrigerator. Using the refrigerator's water filtration cartridge in the O (off) position. All installations must be sure the device is double insulated or grounded in hollow ice...
Use and Care Manual
Page 35
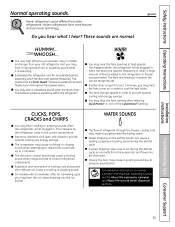
... to cool the light bulbs. Installation Instructions Troubleshooting Tips Consumer Support 35 This is working to pressure equalization. s Electronic dampers click open for an extended period, especially when the doors are opened frequently. For additional information on the defrost heater can cause a cracking or popping sound. s You may hear cracking or popping sounds when the refrigerator is added to the correct temperature. s The fans change speeds...
... to cool the light bulbs. Installation Instructions Troubleshooting Tips Consumer Support 35 This is working to pressure equalization. s Electronic dampers click open for an extended period, especially when the doors are opened frequently. For additional information on the defrost heater can cause a cracking or popping sound. s You may hear cracking or popping sounds when the refrigerator is added to the correct temperature. s The fans change speeds...
Use and Care Manual
Page 36
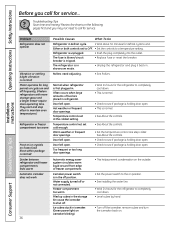
... the refrigerator and plug it back in the storage bin cause the icemaker to the on the following pages first and you call for service... Door left open . • This helps prevent condensation on the outside. • Set the power switch to shut off or not connected. Piled up cubes in . Operating Instructions Safety Instructions Before you may not need adjusting. • See Rollers. Water supply turned off . Ice cubes stuck in defrost...
... the refrigerator and plug it back in the storage bin cause the icemaker to the on the following pages first and you call for service... Door left open . • This helps prevent condensation on the outside. • Set the power switch to shut off or not connected. Piled up cubes in . Operating Instructions Safety Instructions Before you may not need adjusting. • See Rollers. Water supply turned off . Ice cubes stuck in defrost...

Use and Care Manual
Page 37
...water supply turned off or not connected. • See Installing the water line. Water filter clogged. • Replace filter cartridge or remove filter and install plug. No water or ice cube production Supply line or shutoff valve is normal. This is clogged. • Call a plumber. Troubleshooting Tips Consumer Support Safety Instructions Operating Instructions ge.com Installation Instructions Problem Possible Causes What To Do Frequent "buzzing" sound Icemaker power switch is in I (on ) position, but Last setting was dispensed • A few cubes were left open...
...water supply turned off or not connected. • See Installing the water line. Water filter clogged. • Replace filter cartridge or remove filter and install plug. No water or ice cube production Supply line or shutoff valve is normal. This is clogged. • Call a plumber. Troubleshooting Tips Consumer Support Safety Instructions Operating Instructions ge.com Installation Instructions Problem Possible Causes What To Do Frequent "buzzing" sound Icemaker power switch is in I (on ) position, but Last setting was dispensed • A few cubes were left open...
Use and Care Manual
Page 38
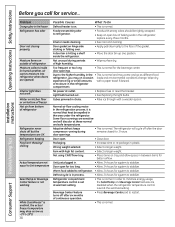
.... Normal air flow cooling motor. Not using Chill/Thaw tray. • Place items on tray and allow space in humid weather, air carries moisture into refrigerator when doors are opened) Interior light does not work Water on kitchen floor or on outside of high humidity. • Wipe surface dry. A door bin is set at outlet. • Replace fuse or reset the breaker. Installation Instructions Problem Orange glow in the freezer Refrigerator has odor Door not closing...
.... Normal air flow cooling motor. Not using Chill/Thaw tray. • Place items on tray and allow space in humid weather, air carries moisture into refrigerator when doors are opened) Interior light does not work Water on kitchen floor or on outside of high humidity. • Wipe surface dry. A door bin is set at outlet. • Replace fuse or reset the breaker. Installation Instructions Problem Orange glow in the freezer Refrigerator has odor Door not closing...
Use and Care Manual
Page 39
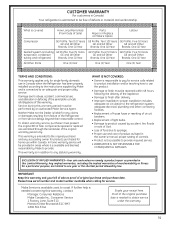
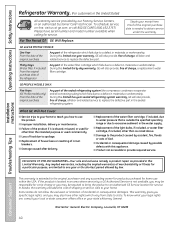
... serial number and model number available when calling for service. Damage due to abuse, accident, commercial use within 48 hours following the delivery of the appliance. • Damage to finish after delivery. • Improper installation-proper installation includes adequate air circulation to the refrigeration system, adequate electrical, plumbing and other connecting facilities. • Replacement of house fuses or resetting of circuit breakers. • Replacement of light bulbs...
... serial number and model number available when calling for service. Damage due to abuse, accident, commercial use within 48 hours following the delivery of the appliance. • Damage to finish after delivery. • Improper installation-proper installation includes adequate air circulation to the refrigeration system, adequate electrical, plumbing and other connecting facilities. • Replacement of house fuses or resetting of circuit breakers. • Replacement of light bulbs...
Use and Care Manual
Page 40
... needed to a defect in the water supply. s Incidental or consequential damage caused by possible defects with this limited five-year sealed refrigerating system warranty, GE will also provide, free of the original purchase date is outside the specified operating range or due to an Authorized GE Service location for a trip charge or you how to a defect in materials or workmanship. Installation Instructions Consumer Support Troubleshooting...
... needed to a defect in the water supply. s Incidental or consequential damage caused by possible defects with this limited five-year sealed refrigerating system warranty, GE will also provide, free of the original purchase date is outside the specified operating range or due to an Authorized GE Service location for a trip charge or you how to a defect in materials or workmanship. Installation Instructions Consumer Support Troubleshooting...

