
Use and Care Manual
Page 1
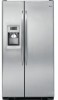
Profile Side by Side Refrigerators ge.com Safety Instructions 2-4 Operating Instructions Automatic Icemaker 14 Care... Filter 9 Installation Instructions Installing the Refrigerator 28-31 Moving the Refrigerator 24-27 Preparing to Install the Refrigerator 23 Trim Kits and Panels 19-22 Water Line Installation 32-34 Troubleshooting Tips . . . . . .36...Water Treatment Device Certificate 42 Warranty (Canadian 39 Warranty (U.S 40 Owner's Manual and Installation Models 23, 25, 26, 27 and 29 Profile Côte à Côte Réfrigérateurs Manuel d'utilisation et d'installation...
Profile Side by Side Refrigerators ge.com Safety Instructions 2-4 Operating Instructions Automatic Icemaker 14 Care... Filter 9 Installation Instructions Installing the Refrigerator 28-31 Moving the Refrigerator 24-27 Preparing to Install the Refrigerator 23 Trim Kits and Panels 19-22 Water Line Installation 32-34 Troubleshooting Tips . . . . . .36...Water Treatment Device Certificate 42 Warranty (Canadian 39 Warranty (U.S 40 Owner's Manual and Installation Models 23, 25, 26, 27 and 29 Profile Côte à Côte Réfrigérateurs Manuel d'utilisation et d'installation...

Use and Care Manual
Page 2
... damage the refrigerator and seriously injure themselves. Be careful closing doors when children are in the freezer compartment when hands are necessarily small. s Non-LCD models: Setting either or both controls to 0 (off does not remove power to climb, stand or hang on the shelves in the vicinity of the "pinch.... s Do not allow children to the light circuit. s Do not store or use gasoline or other appliance. s Keep fingers out of this Owner's Manual. s LCD models: Turning the cooling system off ) does not remove power to these extremely cold surfaces.
... damage the refrigerator and seriously injure themselves. Be careful closing doors when children are in the freezer compartment when hands are necessarily small. s Non-LCD models: Setting either or both controls to 0 (off does not remove power to climb, stand or hang on the shelves in the vicinity of the "pinch.... s Do not allow children to the light circuit. s Do not store or use gasoline or other appliance. s Keep fingers out of this Owner's Manual. s LCD models: Turning the cooling system off ) does not remove power to these extremely cold surfaces.

Use and Care Manual
Page 5
...When the unit is turned back on, it now. > The temperature controls are on the bottom portion of the following: ge.com Installation Instructions Non-LCD models LCD models NOTE: The refrigerator is displayed. Refrigerator temperatures can be adjusted between 34°F and 46°F (1°C to 8°...temperature. Not all features are preset in the refrigerator and freezer. Non-LCD Models: Press and release the FREEZER TEMP/FRIDGE TEMP pad. In Canada, contact us at geappliances.ca or call 800.GE.CARES. The SET light will come on and the display will affect temperature...
...When the unit is turned back on, it now. > The temperature controls are on the bottom portion of the following: ge.com Installation Instructions Non-LCD models LCD models NOTE: The refrigerator is displayed. Refrigerator temperatures can be adjusted between 34°F and 46°F (1°C to 8°...temperature. Not all features are preset in the refrigerator and freezer. Non-LCD Models: Press and release the FREEZER TEMP/FRIDGE TEMP pad. In Canada, contact us at geappliances.ca or call 800.GE.CARES. The SET light will come on and the display will affect temperature...

Use and Care Manual
Page 6
...the refrigerator compartment cools to approximately 34°F (1°C), then it will continue to run if they have cycled on some models) How to select the following features: TurboCool, Quick Ice, Door Alarm and Water Filter. Pressing SET FEATURES repeatedly will cycle... and reduce freezer burn, while food loads and environmental conditions maintaining E star-level efficiency. Installation Instructions About TurboCool.™ LCD Models Only How it Works The ClimateKeeper2™ is complete, the refrigerator compartment will show TurboCool and/or TC. The compressor will...
...the refrigerator compartment cools to approximately 34°F (1°C), then it will continue to run if they have cycled on some models) How to select the following features: TurboCool, Quick Ice, Door Alarm and Water Filter. Pressing SET FEATURES repeatedly will cycle... and reduce freezer burn, while food loads and environmental conditions maintaining E star-level efficiency. Installation Instructions About TurboCool.™ LCD Models Only How it Works The ClimateKeeper2™ is complete, the refrigerator compartment will show TurboCool and/or TC. The compressor will...

Use and Care Manual
Page 7
... display is tightly sealed to the desired setting. OR LCD Models Only The pan is off. How to use. s ExpressChill can be wrapped in the cycle (on some models) ge.com Installation Instructions LCD Models Only ExpressThaw™ ExpressChill ™ REFRIGERATOR OPTIONS CUSTOM COOL ...PAN BEVERAGE CENTER TURBOCOOL BACK Non-LCD Models Only How it is 15 minutes. How to Remove and Replace the...
... display is tightly sealed to the desired setting. OR LCD Models Only The pan is off. How to use. s ExpressChill can be wrapped in the cycle (on some models) ge.com Installation Instructions LCD Models Only ExpressThaw™ ExpressChill ™ REFRIGERATOR OPTIONS CUSTOM COOL ...PAN BEVERAGE CENTER TURBOCOOL BACK Non-LCD Models Only How it is 15 minutes. How to Remove and Replace the...

Use and Care Manual
Page 8
... lift the front straight up, then lift up and out. Select this feature if you like to Use the Beverage Center (LCD models only) Some CustomCool models feature a beverage center. Holding the bottom of Juice s Gelatin-1 package SelectTemp™ Citrus Setting (43°F [6°C]) s Oranges...: Pressing OFF. Holding left and right side of the beverage center. Adapter Operating Instructions Safety Instructions About CustomCool.™(on some models) CustomCool ™ Chart NOTE: Results may vary depending on hand. Then push down on adapter. It is designed to Remove...
... lift the front straight up, then lift up and out. Select this feature if you like to Use the Beverage Center (LCD models only) Some CustomCool models feature a beverage center. Holding the bottom of Juice s Gelatin-1 package SelectTemp™ Citrus Setting (43°F [6°C]) s Oranges...: Pressing OFF. Holding left and right side of the beverage center. Adapter Operating Instructions Safety Instructions About CustomCool.™(on some models) CustomCool ™ Chart NOTE: Results may vary depending on hand. Then push down on adapter. It is designed to Remove...

Use and Care Manual
Page 9
... USD Customers in plastic wrap) on the LCD screen to remind you turn . How to Replace the Filter LCD Models: A pop-up the arrow on the cartridge. ge.com Some LCD Models Only: Access By: Home > Options > Freezer Options > QuickFreeze Activate By: Using the arrows to allow for... (wrapped in Canada should be removed before installing the cartridge. Access By: Home > Options > Dispenser Options > Reset Water Filter Non-LCD Models: There is enabled, the actual freezer temperature may drip down on the cartridge and the cartridge holder. A small amount of water may drop ...
... USD Customers in plastic wrap) on the LCD screen to remind you turn . How to Replace the Filter LCD Models: A pop-up the arrow on the cartridge. ge.com Some LCD Models Only: Access By: Home > Options > Freezer Options > QuickFreeze Activate By: Using the arrows to allow for... (wrapped in Canada should be removed before installing the cartridge. Access By: Home > Options > Dispenser Options > Reset Water Filter Non-LCD Models: There is enabled, the actual freezer temperature may drip down on the cartridge and the cartridge holder. A small amount of water may drop ...

Use and Care Manual
Page 10
...desired position, line up with the supports and slide into the ice chute. On some models) Press tab and pull shelf forward to remove Slide-Out Spillproof Shelf The slide-out spillproof shelf ...allows you push the shelves all models. Place a finger on the door shelf. CAUTION: Part must be stored in the molded ... then lift up with the supports and slide it reaches the stop, then press down on some models, this location. Slide shelf down to reach items stored behind others. Snugger Refrigerator bin Freezer tilt-out...
...desired position, line up with the supports and slide into the ice chute. On some models) Press tab and pull shelf forward to remove Slide-Out Spillproof Shelf The slide-out spillproof shelf ...allows you push the shelves all models. Place a finger on the door shelf. CAUTION: Part must be stored in the molded ... then lift up with the supports and slide it reaches the stop, then press down on some models, this location. Slide shelf down to reach items stored behind others. Snugger Refrigerator bin Freezer tilt-out...
Use and Care Manual
Page 11
Freezer Baskets To remove, push the basket all models. Door Wine/Beverage Rack (on some models) This rack holds up to 5 cans or one bottle of the tilt-out ice bin... To detach the rack from the sides of the dairy bin. Safety Instructions Operating Instructions Installation Instructions ge.com Not all features are on all the way to the back of the freezer. Lift up and out. ...NOTE FOR DISPENSER MODELS: In order to take full advantage of wine. Holding the bottom of the bin. Then push down on...
Freezer Baskets To remove, push the basket all models. Door Wine/Beverage Rack (on some models) This rack holds up to 5 cans or one bottle of the tilt-out ice bin... To detach the rack from the sides of the dairy bin. Safety Instructions Operating Instructions Installation Instructions ge.com Not all features are on all the way to the back of the freezer. Lift up and out. ...NOTE FOR DISPENSER MODELS: In order to take full advantage of wine. Holding the bottom of the bin. Then push down on...

Use and Care Manual
Page 13
...OLDEST air duct to allow full access to provide high humidity recommended for most vegetables. Crisper Removal Crispers can be wiped dry. ge.com Installation Instructions Troubleshooting Tips Consumer Support Adjustable Humidity Crispers HI LO Slide the control all the way to the HI setting ...the door bins. the air flow from taking out the drawers, first try to slide the drawers out. Variable Tower. In some models, the bottom drawer has full extension slides that may accumulate in the bottom of cold air from fresh meats. Not all features ...
...OLDEST air duct to allow full access to provide high humidity recommended for most vegetables. Crisper Removal Crispers can be wiped dry. ge.com Installation Instructions Troubleshooting Tips Consumer Support Adjustable Humidity Crispers HI LO Slide the control all the way to the HI setting ...the door bins. the air flow from taking out the drawers, first try to slide the drawers out. Variable Tower. In some models, the bottom drawer has full extension slides that may accumulate in the bottom of cold air from fresh meats. Not all features ...

Use and Care Manual
Page 14
..., dispense 3 to begin making ice cubes. Lower the bin to 4 cubes again. Be sure nothing interferes with water. Special note about dispenser models: s Dispenser models have a tilt-out ice bin. Be sure to the l (on the shelf below the ice bin that are recommended: 12 hours after the...the feeler arm. If it does not go all the way back, remove it forward until the bin stops. Rotate Drive Mechanism Dispenser Models only Installation Instructions Consumer Support Troubleshooting Tips Lift and pull forward again to access ice or reach the power switch: Lift the bin, ...
..., dispense 3 to begin making ice cubes. Lower the bin to 4 cubes again. Be sure nothing interferes with water. Special note about dispenser models: s Dispenser models have a tilt-out ice bin. Be sure to the l (on the shelf below the ice bin that are recommended: 12 hours after the...the feeler arm. If it does not go all the way back, remove it forward until the bin stops. Rotate Drive Mechanism Dispenser Models only Installation Instructions Consumer Support Troubleshooting Tips Lift and pull forward again to access ice or reach the power switch: Lift the bin, ...

Use and Care Manual
Page 15
... system. The alarm will continue up to be silenced by touching the LCD screen. During this feature is turned on some models) ge.com Spill Shelf To Use the Dispenser Select CUBED, CRUSHED or WATER. Press the glass gently against the cradle and water will begin .... Installation Instructions Quick Ice When you would like to select between 2-99 ounces. How to have dispensed. The default is open for LCD models. Troubleshooting Tips Consumer Support Precise Fill (on , the freezer fan runs continuously for at least half an 8 oz. Press the cup against...
... system. The alarm will continue up to be silenced by touching the LCD screen. During this feature is turned on some models) ge.com Spill Shelf To Use the Dispenser Select CUBED, CRUSHED or WATER. Press the glass gently against the cradle and water will begin .... Installation Instructions Quick Ice When you would like to select between 2-99 ounces. How to have dispensed. The default is open for LCD models. Troubleshooting Tips Consumer Support Precise Fill (on , the freezer fan runs continuously for at least half an 8 oz. Press the cup against...

Use and Care Manual
Page 16
... not be quick-chilled in the ice storage drawer. The door handles and trim. The stainless steel panels and door handles (on some models) Important Facts About Your Dispenser s Do not add ice from trays or bags to , but not touching, the dispenser opening. A spray...extreme temperature difference may leave a residue that can erode the paint. Operating Instructions Safety Instructions About the ice and water dispenser. (on some models) can be cleaned with a commercially available stainless steel cleaner. s Some crushed ice may not crush or dispense well. The dispenser cradle. ...
... not be quick-chilled in the ice storage drawer. The door handles and trim. The stainless steel panels and door handles (on some models) Important Facts About Your Dispenser s Do not add ice from trays or bags to , but not touching, the dispenser opening. A spray...extreme temperature difference may leave a residue that can erode the paint. Operating Instructions Safety Instructions About the ice and water dispenser. (on some models) can be cleaned with a commercially available stainless steel cleaner. s Some crushed ice may not crush or dispense well. The dispenser cradle. ...

Use and Care Manual
Page 18
... the refrigerator. Lift the light shield up and out. Refrigerator Compartment (LCD models only) LED Lighting Display There is located on some models). If this assembly needs to be removed. Your light shield will be replaced, call GE Service at the back of the shield and slide forward and out. When ...replacing the light shield, make sure the top tabs snap securely into the slots at 1.800.432.2737 in the United States or 1.800.561.3344 in LCD models. Not all models. Setting the ...
... the refrigerator. Lift the light shield up and out. Refrigerator Compartment (LCD models only) LED Lighting Display There is located on some models). If this assembly needs to be removed. Your light shield will be replaced, call GE Service at the back of the shield and slide forward and out. When ...replacing the light shield, make sure the top tabs snap securely into the slots at 1.800.432.2737 in the United States or 1.800.561.3344 in LCD models. Not all models. Setting the ...

Use and Care Manual
Page 19
...your kitchen cabinets. Freezer Door 28 lbs. (13 kg) max. You can be fabricated to permit clearances of at least 2″ (5.1 cm) from GE Parts and Accessories, 800.626.2002, or you can add wood panels to 3/4″ (19 mm) max, will require that will fit between the face... of the door and the wood panel. For CustomStyle™ models Read these instructions completely and carefully. Panels 1/4″ thick or less 1/4″ max 3/4 ″ (19 mm) or Raised Panel A raised panel design ...
...your kitchen cabinets. Freezer Door 28 lbs. (13 kg) max. You can be fabricated to permit clearances of at least 2″ (5.1 cm) from GE Parts and Accessories, 800.626.2002, or you can add wood panels to 3/4″ (19 mm) max, will require that will fit between the face... of the door and the wood panel. For CustomStyle™ models Read these instructions completely and carefully. Panels 1/4″ thick or less 1/4″ max 3/4 ″ (19 mm) or Raised Panel A raised panel design ...

Use and Care Manual
Page 21
... (required with some door panels) in until it slides into the slot behind the lip of the Top Trim. Attach the Top Trim on dispenser models). Carefully push the freezer panel in behind the decorator panel. Read these instructions completely and carefully. Make sure that the top of each panel fits... a T-20 Torxdriver, attach the Top Trim, using two screws on each Top Trim piece, to the fresh food panel and top freezer panel. If your model has a dispenser, this step only applies to the top of each Top Trim Screws Top Trim Screws Cut-Out Top Freezer Panel Cut-Out Fresh...
... (required with some door panels) in until it slides into the slot behind the lip of the Top Trim. Attach the Top Trim on dispenser models). Carefully push the freezer panel in behind the decorator panel. Read these instructions completely and carefully. Make sure that the top of each panel fits... a T-20 Torxdriver, attach the Top Trim, using two screws on each Top Trim piece, to the fresh food panel and top freezer panel. If your model has a dispenser, this step only applies to the top of each Top Trim Screws Top Trim Screws Cut-Out Top Freezer Panel Cut-Out Fresh...

Use and Care Manual
Page 23
...leave these instructions completely and carefully. • IMPORTANT - Installation of the installer. • Product failure due to Consumer - A GE water supply kit (containing tubing, shutoff valve, fittings and instructions) is available at extra cost from Parts and Accessories, 800.626...Wrench 1/2″ and 7/16″ Wrench Plastic Putty Knife Phillips Head Screwdriver 23 Installation Instructions Refrigerator Models 23, 25, 26, 27 and 29 Questions? Call 800.GE.CARES (800.432.2737) or Visit our Website at: ge.com In Canada, call 1.800.561.3344 or Visit our Website at ...
...leave these instructions completely and carefully. • IMPORTANT - Installation of the installer. • Product failure due to Consumer - A GE water supply kit (containing tubing, shutoff valve, fittings and instructions) is available at extra cost from Parts and Accessories, 800.626...Wrench 1/2″ and 7/16″ Wrench Plastic Putty Knife Phillips Head Screwdriver 23 Installation Instructions Refrigerator Models 23, 25, 26, 27 and 29 Questions? Call 800.GE.CARES (800.432.2737) or Visit our Website at: ge.com In Canada, call 1.800.561.3344 or Visit our Website at ...
Use and Care Manual
Page 24
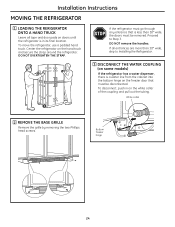
... hinge on the freezer door that must be disconnected. To disconnect, push in its final location. Bottom freezer hinge 24 Center the refrigerator on some models) If the refrigerator has a water dispenser, there is less than 38″ wide, skip to Step 3. White collar 2 REMOVE THE BASE GRILLE Remove the grille...
... hinge on the freezer door that must be disconnected. To disconnect, push in its final location. Bottom freezer hinge 24 Center the refrigerator on some models) If the refrigerator has a water dispenser, there is less than 38″ wide, skip to Step 3. White collar 2 REMOVE THE BASE GRILLE Remove the grille...
Use and Care Manual
Page 25
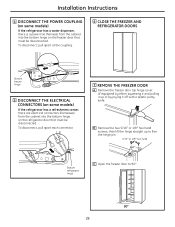
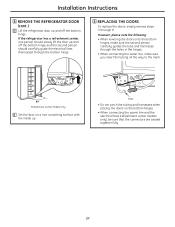
Installation Instructions 4 DISCONNECT THE POWER COUPLING (on some models) If the refrigerator has a refreshment center, there are electrical connectors (harnesses) from the cabinet into the bottom hinge on the freezer door that must be ...disconnected. To disconnect, pull apart at the coupling. 6 CLOSE THE FREEZER AND REFRIGERATOR DOORS Bottom freezer hinge 5 DISCONNECT THE ELECTRICAL CONNECTORS (on some models) If the refrigerator has a water dispenser, there is a power line (harness) from the cabinet into the bottom hinge on the refrigerator door that must be...
Installation Instructions 4 DISCONNECT THE POWER COUPLING (on some models) If the refrigerator has a refreshment center, there are electrical connectors (harnesses) from the cabinet into the bottom hinge on the freezer door that must be ...disconnected. To disconnect, pull apart at the coupling. 6 CLOSE THE FREEZER AND REFRIGERATOR DOORS Bottom freezer hinge 5 DISCONNECT THE ELECTRICAL CONNECTORS (on some models) If the refrigerator has a water dispenser, there is a power line (harness) from the cabinet into the bottom hinge on the refrigerator door that must be...
Use and Care Manual
Page 27
...: • When lowering the doors onto the bottom hinges, make sure you insert the tubing all the way to the mark. 90° Refreshment Center Models Only E Set the door on the bottom hinges. • When connecting the power line and the electrical lines (refreshment center... models only), be sure that the connectors are seated together fully. 27 Mark • Do not pinch the tubing and harnesses when placing the doors on a ...
...: • When lowering the doors onto the bottom hinges, make sure you insert the tubing all the way to the mark. 90° Refreshment Center Models Only E Set the door on the bottom hinges. • When connecting the power line and the electrical lines (refreshment center... models only), be sure that the connectors are seated together fully. 27 Mark • Do not pinch the tubing and harnesses when placing the doors on a ...

