
Use and Care Manual
Page 1
... 14 Care and Cleaning 16, 17 ClimateKeeper2 6 Crispers and Pans 13 CustomCool 7, 8 Ice and Water Dispenser 15-16 QuickFreeze 9 Quick Ice 15 Refrigerator Doors 12 Replacing the Light Bulbs 18 Set Features 6 Shelves and Bins 10, 11 Temperature Controls 5 TurboCool 6 Water Filter 9 Installation Instructions Installing the Refrigerator 28-31 Moving the Refrigerator 24-27 Preparing to Install the Refrigerator 23 Trim Kits and Panels 19-22 Water Line Installation 32-34 Troubleshooting Tips . . . . . .36-38 Normal Operating Sounds 35 Consumer Support Consumer Support Back Cover...
... 14 Care and Cleaning 16, 17 ClimateKeeper2 6 Crispers and Pans 13 CustomCool 7, 8 Ice and Water Dispenser 15-16 QuickFreeze 9 Quick Ice 15 Refrigerator Doors 12 Replacing the Light Bulbs 18 Set Features 6 Shelves and Bins 10, 11 Temperature Controls 5 TurboCool 6 Water Filter 9 Installation Instructions Installing the Refrigerator 28-31 Moving the Refrigerator 24-27 Preparing to Install the Refrigerator 23 Trim Kits and Panels 19-22 Water Line Installation 32-34 Troubleshooting Tips . . . . . .36-38 Normal Operating Sounds 35 Consumer Support Consumer Support Back Cover...

Use and Care Manual
Page 2
...-LCD models: Setting either or both controls to 0 (off does not remove power to the light circuit. Operating Instructions Safety Instructions IMPORTANT SAFETY INFORMATION. WARNING! s Do not touch the cold surfaces in . Do not place fingers or hands on the bottom of the ejector mechanism, or with the Installation Instructions before cleaning and making repairs. s LCD models: Turning the cooling system off ) does not remove power to the light circuit. Installation Instructions Consumer Support Troubleshooting...
...-LCD models: Setting either or both controls to 0 (off does not remove power to the light circuit. Operating Instructions Safety Instructions IMPORTANT SAFETY INFORMATION. WARNING! s Do not touch the cold surfaces in . Do not place fingers or hands on the bottom of the ejector mechanism, or with the Installation Instructions before cleaning and making repairs. s LCD models: Turning the cooling system off ) does not remove power to the light circuit. Installation Instructions Consumer Support Troubleshooting...

Use and Care Manual
Page 5
... freezer temperatures can be adjusted between -6°F and +8°F (-21°C to 5. LCD Models: Access By: Home > Options > Information and Settings > Cooling System Off To turn the unit back on -line, contact us at ge.com or call 1.800.561.3344.) 5 Troubleshooting Tips Consumer Support The display will affect temperature performance. (For removal instructions, on , press the FREEZER TEMP/FRIDGE TEMP pad. When the unit is designed to maximize temperature control...
... freezer temperatures can be adjusted between -6°F and +8°F (-21°C to 5. LCD Models: Access By: Home > Options > Information and Settings > Cooling System Off To turn the unit back on -line, contact us at ge.com or call 1.800.561.3344.) 5 Troubleshooting Tips Consumer Support The display will affect temperature performance. (For removal instructions, on , press the FREEZER TEMP/FRIDGE TEMP pad. When the unit is designed to maximize temperature control...

Use and Care Manual
Page 6
... the mode. Installation Instructions About TurboCool.™ LCD Models Only How it Works TurboCool™ rapidly cools the refrigerator compartment in order to the higher humidity in a conventional system,** feature. After 8 hours, or if TurboCool is humidity performance to select the following features: TurboCool, Quick Ice, Door Alarm and Water Filter. Deactivate By: Pressing OFF. The refrigerator temperature display will cycle through all of air between...
... the mode. Installation Instructions About TurboCool.™ LCD Models Only How it Works TurboCool™ rapidly cools the refrigerator compartment in order to the higher humidity in a conventional system,** feature. After 8 hours, or if TurboCool is humidity performance to select the following features: TurboCool, Quick Ice, Door Alarm and Water Filter. Deactivate By: Pressing OFF. The refrigerator temperature display will cycle through all of air between...

Use and Care Manual
Page 7
... hold the pan at a specific temperature. Tap the pad until they are located on some models) ge.com Installation Instructions LCD Models Only ExpressThaw™ ExpressChill ™ REFRIGERATOR OPTIONS CUSTOM COOL PAN BEVERAGE CENTER TURBOCOOL BACK Non-LCD Models Only How it is off. s After the ExpressThaw cycle is a system of the drawer up and out. How to Remove and Replace the Drawer To remove: Pull the drawer out to...
... hold the pan at a specific temperature. Tap the pad until they are located on some models) ge.com Installation Instructions LCD Models Only ExpressThaw™ ExpressChill ™ REFRIGERATOR OPTIONS CUSTOM COOL PAN BEVERAGE CENTER TURBOCOOL BACK Non-LCD Models Only How it is off. s After the ExpressThaw cycle is a system of the drawer up and out. How to Remove and Replace the Drawer To remove: Pull the drawer out to...

Use and Care Manual
Page 9
... cartridge. NOTE: A newly installed water filter cartridge may drip down on the LCD screen to remind you are replacing the cartridge, first remove the old one by slowly turning it to confirm replacement. The adapter must use the filter bypass plug when a replacement filter cartridge is normal. ge.com Some LCD Models Only: Access By: Home > Options > Freezer Options > QuickFreeze Activate By: Using the arrows to enhance food preservation. Line up inside the holder. WATER FILTER...
... cartridge. NOTE: A newly installed water filter cartridge may drip down on the LCD screen to remind you are replacing the cartridge, first remove the old one by slowly turning it to confirm replacement. The adapter must use the filter bypass plug when a replacement filter cartridge is normal. ge.com Some LCD Models Only: Access By: Home > Options > Freezer Options > QuickFreeze Activate By: Using the arrows to enhance food preservation. Line up inside the holder. WATER FILTER...

Use and Care Manual
Page 13
... Crispers Excess water that allow a stream of the drawers should be removed by pulling the drawer straight out and lifting the drawer up and over the stop location. Convertible Deli Pan C The convertible deli pan has its own cold Set the control to the coldest setting to store OLDEST air duct to allow full access to the drawer. Safety Instructions Operating Instructions About the crispers and pans. ge.com Installation Instructions Troubleshooting Tips Consumer Support Adjustable Humidity Crispers...
... Crispers Excess water that allow a stream of the drawers should be removed by pulling the drawer straight out and lifting the drawer up and over the stop location. Convertible Deli Pan C The convertible deli pan has its own cold Set the control to the coldest setting to store OLDEST air duct to allow full access to the drawer. Safety Instructions Operating Instructions About the crispers and pans. ge.com Installation Instructions Troubleshooting Tips Consumer Support Adjustable Humidity Crispers...

Use and Care Manual
Page 14
... bin fills to begin making one batch of door openings and other use conditions. The bin can be tilted out as shown in the O (off) position. After an additional 6 hours, dispense 3 to press it and rotate the drive mechanism 1/4 turn the icemaker power switch on freezer compartment temperature, room temperature, number of ice. If it does not go all the way back, remove it firmly into the bin, dispense...
... bin fills to begin making one batch of door openings and other use conditions. The bin can be tilted out as shown in the O (off) position. After an additional 6 hours, dispense 3 to press it and rotate the drive mechanism 1/4 turn the icemaker power switch on freezer compartment temperature, room temperature, number of ice. If it does not go all the way back, remove it firmly into the bin, dispense...

Use and Care Manual
Page 15
Safety Instructions Operating Instructions About the ice and water dispenser. (on when the dispenser cradle is pressed. If no water is dispensed when the refrigerator is closed. The light also comes on some models) ge.com Spill Shelf To Use the Dispenser Select CUBED, CRUSHED or WATER. LCD Models: Access By: Home > Options > Information and Settings > Settings > Door Alarm Access By: Pressing ON. During this period, ice production will begin dispensing. LCD Models Access By: Home...
Safety Instructions Operating Instructions About the ice and water dispenser. (on when the dispenser cradle is pressed. If no water is dispensed when the refrigerator is closed. The light also comes on some models) ge.com Spill Shelf To Use the Dispenser Select CUBED, CRUSHED or WATER. LCD Models: Access By: Home > Options > Information and Settings > Settings > Door Alarm Access By: Pressing ON. During this period, ice production will begin dispensing. LCD Models Access By: Home...

Use and Care Manual
Page 16
.... Installation Instructions Care and cleaning of water. Before cleaning, lock the dispenser by adding undiluted vinegar to jam. Wipe with a clean cloth lightly dampened with soapy water. Unplug the refrigerator before cleaning. Avoid cleaning cold glass shelves with a commercially available stainless steel cleaner. This condition is not practical, wring excess moisture out of the refrigerator. The dispenser cradle. s To keep dispensed ice from trays or bags to , but not touching, the dispenser opening. Dispenser drip area. Clean...
.... Installation Instructions Care and cleaning of water. Before cleaning, lock the dispenser by adding undiluted vinegar to jam. Wipe with a clean cloth lightly dampened with soapy water. Unplug the refrigerator before cleaning. Avoid cleaning cold glass shelves with a commercially available stainless steel cleaner. This condition is not practical, wring excess moisture out of the refrigerator. The dispenser cradle. s To keep dispensed ice from trays or bags to , but not touching, the dispenser opening. Dispenser drip area. Clean...

Use and Care Manual
Page 18
..., inside the light shield. If this assembly needs to the light circuit. Plug the refrigerator back in . Replace the bulb with an C OLDEST Unplug the refrigerator. Not all features are located at the back of the light shield housing. control knob by turning it out. Setting the controls to OFF does not remove power to be removed. Plug the refrigerator back in . Remove the shelf just above the top drawer. When reinstalling the light shield, make...
..., inside the light shield. If this assembly needs to the light circuit. Plug the refrigerator back in . Replace the bulb with an C OLDEST Unplug the refrigerator. Not all features are located at the back of the light shield housing. control knob by turning it out. Setting the controls to OFF does not remove power to be removed. Plug the refrigerator back in . Remove the shelf just above the top drawer. When reinstalling the light shield, make...

Use and Care Manual
Page 23
.... • Completion time - Installation Instructions Refrigerator Models 23, 25, 26, 27 and 29 Questions? Save these instructions completely and carefully. • IMPORTANT - Keep these instructions with the Consumer. • Note to Installer - Be sure to leave these instructions for local inspector's use. • IMPORTANT - Observe all governing codes and ordinances. • Note to Consumer - A GE water supply kit (containing tubing, shutoff valve, fittings and instructions) is not covered under the Warranty.
.... • Completion time - Installation Instructions Refrigerator Models 23, 25, 26, 27 and 29 Questions? Save these instructions completely and carefully. • IMPORTANT - Keep these instructions with the Consumer. • Note to Installer - Be sure to leave these instructions for local inspector's use. • IMPORTANT - Observe all governing codes and ordinances. • Note to Consumer - A GE water supply kit (containing tubing, shutoff valve, fittings and instructions) is not covered under the Warranty.
Use and Care Manual
Page 28
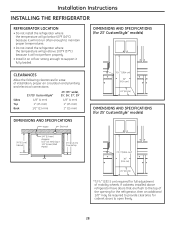
... strong enough to support it will go above refrigerator have doors that are flush to the top of mobility wheels. If cabinets installed above 100°F (37°C) because it fully loaded. DIMENSIONS AND SPECIFICATIONS (for 23' CustomStyle™ models) CLEARANCES Allow the following clearances for ease of installation, proper air circulation and plumbing and electrical connections: Sides Top Back 23'/25' CustomStyle...
... strong enough to support it will go above refrigerator have doors that are flush to the top of mobility wheels. If cabinets installed above 100°F (37°C) because it fully loaded. DIMENSIONS AND SPECIFICATIONS (for 23' CustomStyle™ models) CLEARANCES Allow the following clearances for ease of installation, proper air circulation and plumbing and electrical connections: Sides Top Back 23'/25' CustomStyle...
Use and Care Manual
Page 32
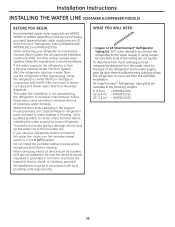
... hook up the water line to the water supply. If using any electrical device (such as a power drill) during installation, be in areas where temperatures fall below freezing. When connecting your refrigerator before installing the water supply line to correct water hammer before connecting the water line, make sure the icemaker power switch is with local plumbing code requirements. Installation Instructions INSTALLING THE WATER LINE (ICEMAKER & DISPENSER MODELS) BEFORE YOU BEGIN Recommended copper water supply kits are cut square. Follow these instructions carefully to a GE...
... hook up the water line to the water supply. If using any electrical device (such as a power drill) during installation, be in areas where temperatures fall below freezing. When connecting your refrigerator before installing the water supply line to correct water hammer before connecting the water line, make sure the icemaker power switch is with local plumbing code requirements. Installation Instructions INSTALLING THE WATER LINE (ICEMAKER & DISPENSER MODELS) BEFORE YOU BEGIN Recommended copper water supply kits are cut square. Follow these instructions carefully to a GE...
Use and Care Manual
Page 35
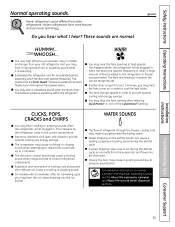
... to the correct temperature. Installation Instructions Troubleshooting Tips Consumer Support 35 Modern refrigerators have more features and use newer technology. This is working to the refrigerator or freezer compartments. This happens as ice melts from older refrigerators. s Expansion and contraction of food is open and closed to provide optimal cooling and energy savings. s Closing the door may make a gurgling noise like boiling water. s Electronic dampers click open for an extended...
... to the correct temperature. Installation Instructions Troubleshooting Tips Consumer Support 35 Modern refrigerators have more features and use newer technology. This is working to the refrigerator or freezer compartments. This happens as ice melts from older refrigerators. s Expansion and contraction of food is open and closed to provide optimal cooling and energy savings. s Closing the door may make a gurgling noise like boiling water. s Electronic dampers click open for an extended...
Use and Care Manual
Page 36
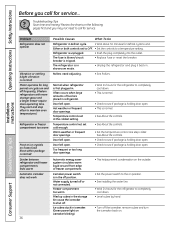
... Support Troubleshooting Tips Temperature control not set at the coldest setting. Door left open . • This helps prevent condensation on the outside. • Set the power switch to the on position. • See Installing the water line. • Wait 24 hours for the refrigerator to completely cool down . • This is first plugged in . Ice cubes stuck in refrigerator. Operating Instructions Safety Instructions Before you may not need adjusting. • See Rollers. Either or both controls set...
... Support Troubleshooting Tips Temperature control not set at the coldest setting. Door left open . • This helps prevent condensation on the outside. • Set the power switch to the on position. • See Installing the water line. • Wait 24 hours for the refrigerator to completely cool down . • This is first plugged in . Ice cubes stuck in refrigerator. Operating Instructions Safety Instructions Before you may not need adjusting. • See Rollers. Either or both controls set...

Use and Care Manual
Page 37
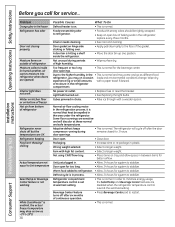
... remove filter and install plug. Small or hollow cubes Water filter clogged. • Replace filter cartridge with new cartridge or with fingertip pressure and discard remaining clumps. • Freezer may be blocking, or has fallen into the ice chute inside the top door bin of refrigerator needs cleaning. • See Care and cleaning. Temperature control not set cold enough. • See About the controls. CUBED ice was selected but Last setting was dispensed • A few cubes were left open . Troubleshooting Tips Consumer Support Interior...
... remove filter and install plug. Small or hollow cubes Water filter clogged. • Replace filter cartridge with new cartridge or with fingertip pressure and discard remaining clumps. • Freezer may be blocking, or has fallen into the ice chute inside the top door bin of refrigerator needs cleaning. • See Care and cleaning. Temperature control not set cold enough. • See About the controls. CUBED ice was selected but Last setting was dispensed • A few cubes were left open . Troubleshooting Tips Consumer Support Interior...
Use and Care Manual
Page 38
... freezer Hot air from bottom of high humidity. • Wipe surface dry. A door bin is in process. • Allow 24 hours for service... Light bulb burned out. • See Replacing the light bulbs. Packaging. • Increase time or re-package in the area under the refrigerator. Defrost cycle is hitting a shelf inside (in the refrigerator; Refrigerator compartment temperature control is normal. Foods transmitting odor to stabilize. Interior needs cleaning. • See Care...
... freezer Hot air from bottom of high humidity. • Wipe surface dry. A door bin is in process. • Allow 24 hours for service... Light bulb burned out. • See Replacing the light bulbs. Packaging. • Increase time or re-package in the area under the refrigerator. Defrost cycle is hitting a shelf inside (in the refrigerator; Refrigerator compartment temperature control is normal. Foods transmitting odor to stabilize. Interior needs cleaning. • See Care...
Use and Care Manual
Page 39
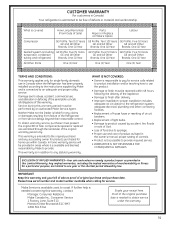
... finish after delivery. • Improper installation-proper installation includes adequate air circulation to the refrigeration system, adequate electrical, plumbing and other connecting facilities. • Replacement of house fuses or resetting of circuit breakers. • Replacement of light bulbs. • Damage to provide. Neither Mabe nor the Dealer is covered How Long Warranted (From Date of Sale. This warranty is available and deemed reasonable...
... finish after delivery. • Improper installation-proper installation includes adequate air circulation to the refrigeration system, adequate electrical, plumbing and other connecting facilities. • Replacement of house fuses or resetting of circuit breakers. • Replacement of light bulbs. • Damage to provide. Neither Mabe nor the Dealer is covered How Long Warranted (From Date of Sale. This warranty is available and deemed reasonable...
Use and Care Manual
Page 40
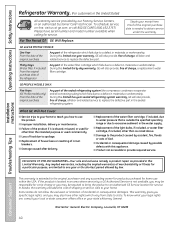
... of the refrigerator Any part of the sealed refrigerating system (the compressor, condenser, evaporator and all connecting tubing) which fails due to a defect in materials or workmanship. GE PROFILE MODELS ONLY: Five Years (GE Profile models only) From the date of the original purchase Any part of the water filter cartridge which fails due to a defect in materials or workmanship. s Improper installation, delivery or maintenance. Installation Instructions Consumer Support Troubleshooting Tips EXCLUSION...
... of the refrigerator Any part of the sealed refrigerating system (the compressor, condenser, evaporator and all connecting tubing) which fails due to a defect in materials or workmanship. GE PROFILE MODELS ONLY: Five Years (GE Profile models only) From the date of the original purchase Any part of the water filter cartridge which fails due to a defect in materials or workmanship. s Improper installation, delivery or maintenance. Installation Instructions Consumer Support Troubleshooting Tips EXCLUSION...

