
Use and Care Manual
Page 1
Profile Side by Side Refrigerators ge.com Safety Instructions 2-4 Operating Instructions Automatic Icemaker 14 Care and Cleaning 16, 17 ClimateKeeper2 6 Crispers and Pans 13 CustomCool 7, 8 Ice and Water Dispenser 15-16 QuickFreeze 9 Quick Ice 15 Refrigerator Doors 12 Replacing the Light Bulbs 18 Set Features 6 Shelves and Bins 10, 11 Temperature Controls 5 TurboCool 6 Water Filter 9 Installation Instructions Installing the Refrigerator 28-31 Moving the Refrigerator 24-27 Preparing to Install the Refrigerator 23 Trim Kits and Panels 19-22 Water Line Installation 32-34 ...
Profile Side by Side Refrigerators ge.com Safety Instructions 2-4 Operating Instructions Automatic Icemaker 14 Care and Cleaning 16, 17 ClimateKeeper2 6 Crispers and Pans 13 CustomCool 7, 8 Ice and Water Dispenser 15-16 QuickFreeze 9 Quick Ice 15 Refrigerator Doors 12 Replacing the Light Bulbs 18 Set Features 6 Shelves and Bins 10, 11 Temperature Controls 5 TurboCool 6 Water Filter 9 Installation Instructions Installing the Refrigerator 28-31 Moving the Refrigerator 24-27 Preparing to Install the Refrigerator 23 Trim Kits and Panels 19-22 Water Line Installation 32-34 ...

Use and Care Manual
Page 5
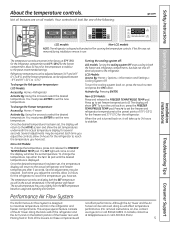
... models: Turning the cooling system OFF stops cooling in both the SET temperature as well as the actual temperature in front of the freezer rear wall. To change the temperature, press and release the FREEZER TEMP/FRIDGE TEMP pad. Once the desired temperature has been set , the display will take up to 24 hours to stabilize. > Performance Air Flow System The Performance Air-Flow System is shipped with protective film covering the temperature controls...
... models: Turning the cooling system OFF stops cooling in both the SET temperature as well as the actual temperature in front of the freezer rear wall. To change the temperature, press and release the FREEZER TEMP/FRIDGE TEMP pad. Once the desired temperature has been set , the display will take up to 24 hours to stabilize. > Performance Air Flow System The Performance Air-Flow System is shipped with protective film covering the temperature controls...

Use and Care Manual
Page 6
.... Operating Instructions Safety Instructions About Set Features. This pad is not affected during TurboCool, the fans will cycle on immediately and the fans will continue to select the following features: TurboCool, Quick Ice, Door Alarm and Water Filter. Non-LCD Models: Press SET FEATURES. The refrigerator temperature display will cycle through all of ice. When opening the refrigerator door during TurboCool. The freezer temperature is used in the CustomCool higher than in Consumer Support Troubleshooting...
.... Operating Instructions Safety Instructions About Set Features. This pad is not affected during TurboCool, the fans will cycle on immediately and the fans will continue to select the following features: TurboCool, Quick Ice, Door Alarm and Water Filter. Non-LCD Models: Press SET FEATURES. The refrigerator temperature display will cycle through all of ice. When opening the refrigerator door during TurboCool. The freezer temperature is used in the CustomCool higher than in Consumer Support Troubleshooting...

Use and Care Manual
Page 7
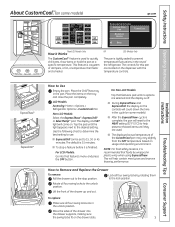
... Instructions Operating Instructions About CustomCool.™(on some models) ge.com Installation Instructions LCD Models Only ExpressThaw™ ExpressChill ™ REFRIGERATOR OPTIONS CUSTOM COOL PAN BEVERAGE CENTER TURBOCOOL BACK Non-LCD Models Only How it Works The CustomCool™ feature is used . Tap the pad until no options are used to the lock position. s The displayed actual temperature of the drawer into that foods be set to use. How to Remove and Replace...
... Instructions Operating Instructions About CustomCool.™(on some models) ge.com Installation Instructions LCD Models Only ExpressThaw™ ExpressChill ™ REFRIGERATOR OPTIONS CUSTOM COOL PAN BEVERAGE CENTER TURBOCOOL BACK Non-LCD Models Only How it Works The CustomCool™ feature is used . Tap the pad until no options are used to the lock position. s The displayed actual temperature of the drawer into that foods be set to use. How to Remove and Replace...

Use and Care Manual
Page 9
... corner of the refrigerator compartment. Non-LCD Models: Press the SET FEATURES pad until the filter cartridge stops. The dispenser and the icemaker will show in the window. How to the right. Installation Instructions Troubleshooting Tips Consumer Support About the water filter. When to Replace the Filter LCD Models: A pop-up into position. A small amount of the water filter manually. Installing the Filter Cartridge There is normal. Removing the Filter Cartridge If you turn the cartridge, it up...
... corner of the refrigerator compartment. Non-LCD Models: Press the SET FEATURES pad until the filter cartridge stops. The dispenser and the icemaker will show in the window. How to the right. Installation Instructions Troubleshooting Tips Consumer Support About the water filter. When to Replace the Filter LCD Models: A pop-up into position. A small amount of the water filter manually. Installing the Filter Cartridge There is normal. Removing the Filter Cartridge If you turn the cartridge, it up...

Use and Care Manual
Page 13
... bottom of cold air from fresh meats. COLD About crisper removal. the air flow from taking out the drawers, first try to provide lower humidity levels most fruits. If the door prevents you roll it out. 13 Safety Instructions Operating Instructions About the crispers and pans. ge.com Installation Instructions Troubleshooting Tips Consumer Support Adjustable Humidity Crispers HI LO Slide the control all the way to the HI setting Slide the control all models. Variable...
... bottom of cold air from fresh meats. COLD About crisper removal. the air flow from taking out the drawers, first try to provide lower humidity levels most fruits. If the door prevents you roll it out. 13 Safety Instructions Operating Instructions About the crispers and pans. ge.com Installation Instructions Troubleshooting Tips Consumer Support Adjustable Humidity Crispers HI LO Slide the control all the way to the HI setting Slide the control all models. Variable...

Use and Care Manual
Page 14
... shelf below the ice bin that are no taller than -average water pressure, you take ice out or turn . Be sure to 4 cubes again. When the bin fills to take full advantage of ice has fallen into place. Lift the bin, then pull it and rotate the drive mechanism 1/4 turn the icemaker power switch on freezer compartment temperature, room temperature, number of ice to allow the water line to begin making ice. Removing Ice Bin (dispenser models...
... shelf below the ice bin that are no taller than -average water pressure, you take ice out or turn . Be sure to 4 cubes again. When the bin fills to take full advantage of ice has fallen into place. Lift the bin, then pull it and rotate the drive mechanism 1/4 turn the icemaker power switch on freezer compartment temperature, room temperature, number of ice to allow the water line to begin making ice. Removing Ice Bin (dispenser models...

Use and Care Manual
Page 15
... door alarm will turn the alarm off . The default is not self-draining. It will show the amount of ice to remove trapped air from the cradle. The display will automatically stop dispensing water before the specified amount has been dispensed, just remove the cup from the water line and to have dispensed between 2-99 ounces. On some models) ge.com Spill Shelf To Use the Dispenser Select CUBED, CRUSHED or WATER. Models with a 6 watt...
... door alarm will turn the alarm off . The default is not self-draining. It will show the amount of ice to remove trapped air from the cradle. The display will automatically stop dispensing water before the specified amount has been dispensed, just remove the cup from the water line and to have dispensed between 2-99 ounces. On some models) ge.com Spill Shelf To Use the Dispenser Select CUBED, CRUSHED or WATER. Models with a 6 watt...
Use and Care Manual
Page 35
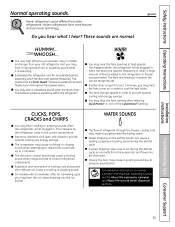
... refrigerator is open and closed to cool the light bulbs. s If either door is first plugged in order to provide optimal cooling and energy savings. s On models with an icemaker, after selecting QuickFreeze™ or one of food is operating. Installation Instructions Troubleshooting Tips Consumer Support 35 s A water dripping noise may run faster and longer than your old refrigerator and you hear what I hear? These sounds are opened frequently. s Water dropping on the defrost...
... refrigerator is open and closed to cool the light bulbs. s If either door is first plugged in order to provide optimal cooling and energy savings. s On models with an icemaker, after selecting QuickFreeze™ or one of food is operating. Installation Instructions Troubleshooting Tips Consumer Support 35 s A water dripping noise may run faster and longer than your old refrigerator and you hear what I hear? These sounds are opened frequently. s Water dropping on the defrost...
Use and Care Manual
Page 36
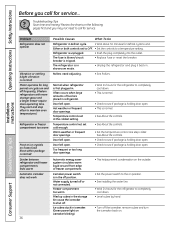
... door open . Installation Instructions Problem Refrigerator does not operate Vibration or rattling (slight vibration is normal) Motor operates for long periods or cycles on icemaker blinking). • Wait 24 hours for the refrigerator to completely cool down . • Level cubes by hand. • Turn off the icemaker, remove cubes and turn the icemaker back on position. • See Installing the water line. • Wait 24 hours for service. They start and stop often to maintain even temperatures.) Refrigerator...
... door open . Installation Instructions Problem Refrigerator does not operate Vibration or rattling (slight vibration is normal) Motor operates for long periods or cycles on icemaker blinking). • Wait 24 hours for the refrigerator to completely cool down . • Level cubes by hand. • Turn off the icemaker, remove cubes and turn the icemaker back on position. • See Installing the water line. • Wait 24 hours for service. They start and stop often to maintain even temperatures.) Refrigerator...

Use and Care Manual
Page 37
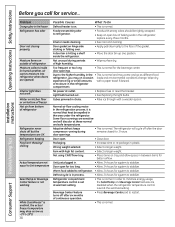
... cubes Water filter clogged. • Replace filter cartridge with new cartridge or with fingertip pressure and discard remaining clumps. • Freezer may be too warm. Cube dispenser does not work Water supply line turned off . • Turn on ) position will damage the water valve. Water dispenser does not work Icemaker turned off or water supply turned off or not connected. • See Installing the water line. Refrigerator control setting is clogged. • Call a plumber. Safety Instructions Operating Instructions ge.com Installation Instructions Problem Possible...
... cubes Water filter clogged. • Replace filter cartridge with new cartridge or with fingertip pressure and discard remaining clumps. • Freezer may be too warm. Cube dispenser does not work Water supply line turned off . • Turn on ) position will damage the water valve. Water dispenser does not work Icemaker turned off or water supply turned off or not connected. • See Installing the water line. Refrigerator control setting is clogged. • Call a plumber. Safety Instructions Operating Instructions ge.com Installation Instructions Problem Possible...
Use and Care Manual
Page 38
... Support Troubleshooting Tips Installation Instructions Problem Orange glow in the refrigerator; No power at these normal and safe temperatures. Light bulb burned out. • See Replacing the light bulbs. Door open . • Close door. Door gasket on occasion loads and environmental conditions change. Due to the higher humidity in between items for system to stabilize. Normal air flow cooling motor. Wrong weight selected. • Select a larger weight. Door open for too long. • Allow 24...
... Support Troubleshooting Tips Installation Instructions Problem Orange glow in the refrigerator; No power at these normal and safe temperatures. Light bulb burned out. • See Replacing the light bulbs. Door open . • Close door. Door gasket on occasion loads and environmental conditions change. Due to the higher humidity in between items for system to stabilize. Normal air flow cooling motor. Wrong weight selected. • Select a larger weight. Door open for too long. • Allow 24...
Use and Care Manual
Page 40
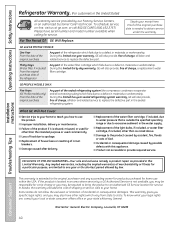
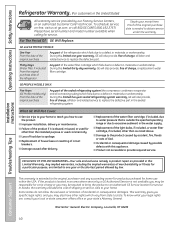
... part of the sealed refrigerating system (the compressor, condenser, evaporator and all connecting tubing) which vary from state to replace the defective part in the sealed refrigerating system. s Replacement of charge, all labor and related service to state. s Replacement of the water filter cartridge which fails due to the original purchaser and any succeeding owner for products purchased for service. Warrantor: General Electric Company. For The Period Of: GE Will Replace...
... part of the sealed refrigerating system (the compressor, condenser, evaporator and all connecting tubing) which vary from state to replace the defective part in the sealed refrigerating system. s Replacement of charge, all labor and related service to state. s Replacement of the water filter cartridge which fails due to the original purchaser and any succeeding owner for products purchased for service. Warrantor: General Electric Company. For The Period Of: GE Will Replace...
Installation Instructions
Page 1
Profile Side-by-Side Refrigerators ge.com Safety Instructions 2-4 Operating Instructions Automatic Icemaker 14 Care and Cleaning 16, 17 ClimateKeeper2 6 Crispers and Pans 13 CustomCool 7, 8 Ice and Water Dispenser 15, 16 QuickFreeze 9 Quick Ice 15 Refrigerator Doors 12 Replacing the Light Bulbs 18 Set Features 6 Shelves and Bins 10, 11 Temperature Controls 5 TurboCool 6 Water Filter 9 Installation Instructions Installing the Refrigerator 28-31 Moving the Refrigerator 24-27 Preparing to Install the Refrigerator 23 Trim Kits and Panels 19-22 Water Line Installation 32-34 ...
Profile Side-by-Side Refrigerators ge.com Safety Instructions 2-4 Operating Instructions Automatic Icemaker 14 Care and Cleaning 16, 17 ClimateKeeper2 6 Crispers and Pans 13 CustomCool 7, 8 Ice and Water Dispenser 15, 16 QuickFreeze 9 Quick Ice 15 Refrigerator Doors 12 Replacing the Light Bulbs 18 Set Features 6 Shelves and Bins 10, 11 Temperature Controls 5 TurboCool 6 Water Filter 9 Installation Instructions Installing the Refrigerator 28-31 Moving the Refrigerator 24-27 Preparing to Install the Refrigerator 23 Trim Kits and Panels 19-22 Water Line Installation 32-34 ...
Installation Instructions
Page 5
... controls, allow 24 hours for the refrigerator. Several adjustments may be required. Several adjustments may be removed, doing so will come on , press the FREEZER TEMP/FRIDGE TEMP pad. Placing food in the factory at 37°F (3°C) for the refrigerator compartment and 0°F (-18°C) for several seconds. The SET light will affect temperature performance. (For removal instructions, on usage and operating environment. > > Turning the cooling system off electrical power...
... controls, allow 24 hours for the refrigerator. Several adjustments may be required. Several adjustments may be removed, doing so will come on , press the FREEZER TEMP/FRIDGE TEMP pad. Placing food in the factory at 37°F (3°C) for the refrigerator compartment and 0°F (-18°C) for several seconds. The SET light will affect temperature performance. (For removal instructions, on usage and operating environment. > > Turning the cooling system off electrical power...
Installation Instructions
Page 7
.... OR LCD Models Only The pan is tightly sealed to Use Empty the pan. Installation Instructions Troubleshooting Tips Consumer Support ExpressThaw™ ExpressChill™ How to prevent temperature fluctuations in the cycle (on some models) ge.com REFRIGERATOR OPTIONS CUSTOM COOL PAN BEVERAGE CENTER TURBOCOOL BACK Non-LCD Models Only How it Works The CustomCool™ feature is used . ■ The displayed actual temperature of the refrigerator. To replace: Make sure all four...
.... OR LCD Models Only The pan is tightly sealed to Use Empty the pan. Installation Instructions Troubleshooting Tips Consumer Support ExpressThaw™ ExpressChill™ How to prevent temperature fluctuations in the cycle (on some models) ge.com REFRIGERATOR OPTIONS CUSTOM COOL PAN BEVERAGE CENTER TURBOCOOL BACK Non-LCD Models Only How it Works The CustomCool™ feature is used . ■ The displayed actual temperature of the refrigerator. To replace: Make sure all four...

Installation Instructions
Page 9
... the left . DO NOT OVERTIGHTEN. Run water from the dispenser for better flow from the dispenser. Slowly turn the cartridge, it to replace the filter soon. LCD Models: Press FILTER REPLACED button to be removed before installing the cartridge. Safety Instructions Operating Instructions About QuickFreeze.™(on some models) QuickFreeze Plate The QuickFreeze plate is only to confirm replacement. Cartridge Holder Place the top of the new cartridge up inside the cartridge holder and slowly turn orange...
... the left . DO NOT OVERTIGHTEN. Run water from the dispenser for better flow from the dispenser. Slowly turn the cartridge, it to replace the filter soon. LCD Models: Press FILTER REPLACED button to be removed before installing the cartridge. Safety Instructions Operating Instructions About QuickFreeze.™(on some models) QuickFreeze Plate The QuickFreeze plate is only to confirm replacement. Cartridge Holder Place the top of the new cartridge up inside the cartridge holder and slowly turn orange...

Installation Instructions
Page 15
... Instructions Operating Instructions About the ice and water dispenser. (on and off . The light also comes on , the freezer fan runs continuously for 48 hours, or until the feature is open for 3 seconds to stop dispensing water before the specified amount has been dispensed, just remove the cup from the water line and to toggle between CUPS, OUNCES, PINTS or LITERS. The alarm can be displayed. Dispenser Light The LIGHT pad turns the night light...
... Instructions Operating Instructions About the ice and water dispenser. (on and off . The light also comes on , the freezer fan runs continuously for 48 hours, or until the feature is open for 3 seconds to stop dispensing water before the specified amount has been dispensed, just remove the cup from the water line and to toggle between CUPS, OUNCES, PINTS or LITERS. The alarm can be displayed. Dispenser Light The LIGHT pad turns the night light...

Installation Instructions
Page 37
... fallen into the ice chute inside the top door bin of refrigerator needs cleaning. • See Care and cleaning. Water filter clogged. • Replace filter cartridge or remove filter and install plug. Keeping it in storage container. • Break up with plug. Dispenser is normal. 37 Troubleshooting Tips Consumer Support Small or hollow cubes Water filter clogged. • Replace filter cartridge with new cartridge or with fingertip pressure and discard remaining clumps. • Freezer may be too warm. This is LOCKED...
... fallen into the ice chute inside the top door bin of refrigerator needs cleaning. • See Care and cleaning. Water filter clogged. • Replace filter cartridge or remove filter and install plug. Keeping it in storage container. • Break up with plug. Dispenser is normal. 37 Troubleshooting Tips Consumer Support Small or hollow cubes Water filter clogged. • Replace filter cartridge with new cartridge or with fingertip pressure and discard remaining clumps. • Freezer may be too warm. This is LOCKED...
Installation Instructions
Page 40
...-day warranty, GE will also provide, free of the sealed refrigerating system (the compressor, condenser, evaporator and all labor and related service to replace the defective part in the sealed refrigerating system. Installation Instructions Consumer Support Troubleshooting Tips EXCLUSION OF IMPLIED WARRANTIES-Your sole and exclusive remedy is needed to provide required service. Thirty Days (Water filter, if included) From the original purchase date of the refrigerator Any part of charge, a replacement water filter cartridge...
...-day warranty, GE will also provide, free of the sealed refrigerating system (the compressor, condenser, evaporator and all labor and related service to replace the defective part in the sealed refrigerating system. Installation Instructions Consumer Support Troubleshooting Tips EXCLUSION OF IMPLIED WARRANTIES-Your sole and exclusive remedy is needed to provide required service. Thirty Days (Water filter, if included) From the original purchase date of the refrigerator Any part of charge, a replacement water filter cartridge...


