
Quick Specs
Page 1
...of the prongs from floor NEMA 14-30R Wall Receptacle 30" MIN. Listed by Underwriters Laboratories Specification Created 4/10 240449 Installation Information: This information is optional. Before installing, consult installation instructions packed with top exhaust. width required 13" MAX. 12" MIN. Do not, under any circumstances, cut, deform...) Insure proper ground exists before use with the provided screws. Vent (duct) can NOT exceed 2" to your Monogram,® GE Profile™ or GE® appliance questions, visit our website at geappliances.com or call...
...of the prongs from floor NEMA 14-30R Wall Receptacle 30" MIN. Listed by Underwriters Laboratories Specification Created 4/10 240449 Installation Information: This information is optional. Before installing, consult installation instructions packed with top exhaust. width required 13" MAX. 12" MIN. Do not, under any circumstances, cut, deform...) Insure proper ground exists before use with the provided screws. Vent (duct) can NOT exceed 2" to your Monogram,® GE Profile™ or GE® appliance questions, visit our website at geappliances.com or call...
Use and Care Manual
Page 2
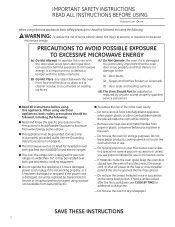
...: - Do not overcook food. If the door is designed for storage purposes. If food is undercooked after the first countdown, use COOK BY TIME for installation over -the-range oven is opened, the fire may be installed over both gas (less than 36.″ It may spread. -
...: - Do not overcook food. If the door is designed for storage purposes. If food is undercooked after the first countdown, use COOK BY TIME for installation over -the-range oven is opened, the fire may be installed over both gas (less than 36.″ It may spread. -

Use and Care Manual
Page 3
...microwave cooking to explode and should not be serviced by qualified service personnel. n This oven is necessary when used for standard wall installation above 36 inches. for its intended use . n Do not use of the oven. Do not use . n Do not store... sink. IMPORTANT SAFETY INSTRUCTIONS READ ALL INSTRUCTIONS BEFORE USING Advantium Oven IMPORTANT SAFETY INSTRUCTIONS n Be sure your appliance is properly installed and grounded by a qualified technician in injury. Contact nearest authorized service facility for laboratory or industrial use as they may ...
...microwave cooking to explode and should not be serviced by qualified service personnel. n This oven is necessary when used for standard wall installation above 36 inches. for its intended use . n Do not use of the oven. Do not use . n Do not store... sink. IMPORTANT SAFETY INSTRUCTIONS READ ALL INSTRUCTIONS BEFORE USING Advantium Oven IMPORTANT SAFETY INSTRUCTIONS n Be sure your appliance is properly installed and grounded by a qualified technician in injury. Contact nearest authorized service facility for laboratory or industrial use as they may ...
Use and Care Manual
Page 8
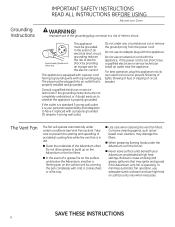
..., turn the fan on the surface unit by providing an escape wire for the electric current. If the power cord is properly installed and grounded. n When preparing flaming foods under any circumstances cut or remove the ground prong from the power cord. Do not ...use an adapter plug with a properly grounded 30 ampere, 4-prong wall outlet. Take care to have a qualified electrician or service technician install an outlet near the appliance. SAVE THESE INSTRUCTIONS 8 Corrosive cleaning agents, such as to whether the appliance is equipped with a power cord having...
..., turn the fan on the surface unit by providing an escape wire for the electric current. If the power cord is properly installed and grounded. n When preparing flaming foods under any circumstances cut or remove the ground prong from the power cord. Do not ...use an adapter plug with a properly grounded 30 ampere, 4-prong wall outlet. Take care to have a qualified electrician or service technician install an outlet near the appliance. SAVE THESE INSTRUCTIONS 8 Corrosive cleaning agents, such as to whether the appliance is equipped with a power cord having...

Use and Care Manual
Page 9
...replacing a 36" range hood, filler panel kits fill in the additional width to consult their physicians if they have concerns. not for end-of-cabinet installation. See back cover to order by phone or at extra cost from electronic products, including microwaves. READ AND FOLLOW THIS SAFETY INFORMATION CAREFULLY. Each kit... Advantium Oven WARNING PACEMAKERS Most pacemakers are used when the oven cannot be vented to the outside. SAVE THESE INSTRUCTIONS Optional kits Available at ge.com. 9 n JX81D-Recirculating Charcoal Filter Kit Filter kits are shielded from interference from your...
...replacing a 36" range hood, filler panel kits fill in the additional width to consult their physicians if they have concerns. not for end-of-cabinet installation. See back cover to order by phone or at extra cost from electronic products, including microwaves. READ AND FOLLOW THIS SAFETY INFORMATION CAREFULLY. Each kit... Advantium Oven WARNING PACEMAKERS Most pacemakers are used when the oven cannot be vented to the outside. SAVE THESE INSTRUCTIONS Optional kits Available at ge.com. 9 n JX81D-Recirculating Charcoal Filter Kit Filter kits are shielded from interference from your...

Use and Care Manual
Page 36
...2 above, remove the filter and repeat step 5. 36 Remove the top grill by two tabs. 5. Remove plastic and other outer wrapping from your GE supplier. The charcoal filter should be replaced when it in front by removing the two screws that helps remove smoke and odors. Charcoal filter (JX81D... optional kit) To install the charcoal filter Care and Cleaning Advantium Oven If the model is noticeably dirty or discolored (usually after 6 to the outside, the air ...
...2 above, remove the filter and repeat step 5. 36 Remove the top grill by two tabs. 5. Remove plastic and other outer wrapping from your GE supplier. The charcoal filter should be replaced when it in front by removing the two screws that helps remove smoke and odors. Charcoal filter (JX81D... optional kit) To install the charcoal filter Care and Cleaning Advantium Oven If the model is noticeably dirty or discolored (usually after 6 to the outside, the air ...
Use and Care Manual
Page 39
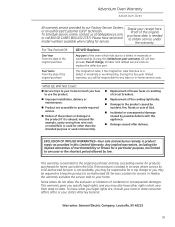
...allow the exclusion or limitation of the cooktop light bulbs. Advantium Oven Warranty Advantium Oven All warranty service provided by a GE Authorized Servicer is abused, misused (for example, cavity arcing from state to your home. During this five-year limited warranty...merchantability or fitness for any succeeding owner for products purchased for service. Warrantor: General Electric Company. Proof of God. n Improper installation, delivery or maintenance. n Product not accessible to a defect in materials or workmanship. EXCLUSION OF IMPLIED WARRANTIES-Your sole and ...
...allow the exclusion or limitation of the cooktop light bulbs. Advantium Oven Warranty Advantium Oven All warranty service provided by a GE Authorized Servicer is abused, misused (for example, cavity arcing from state to your home. During this five-year limited warranty...merchantability or fitness for any succeeding owner for products purchased for service. Warrantor: General Electric Company. Proof of God. n Improper installation, delivery or maintenance. n Product not accessible to a defect in materials or workmanship. EXCLUSION OF IMPLIED WARRANTIES-Your sole and ...
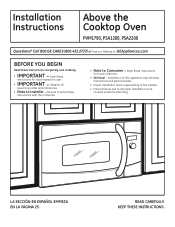
Installation Instructions
Page 1
...sure to leave these instructions for future reference. • Skill level - Save these instructions with the Consumer. • Note to Installer - Keep these instructions completely and carefully. • IMPORTANT - LA SECCIÓN EN ESPAÑOL EMPIEZA EN LA PÁ... • Note to Consumer - KEEP THESE INSTRUCTIONS. Call 800.GE.CARES (800.432.2737) or Visit our Website at: GEAppliances.com BEFORE YOU BEGIN Read these instructions for local inspector's use. • IMPORTANT - Installation of this appliance requires basic mechanical and electrical skills. • Proper...
...sure to leave these instructions for future reference. • Skill level - Save these instructions with the Consumer. • Note to Installer - Keep these instructions completely and carefully. • IMPORTANT - LA SECCIÓN EN ESPAÑOL EMPIEZA EN LA PÁ... • Note to Consumer - KEEP THESE INSTRUCTIONS. Call 800.GE.CARES (800.432.2737) or Visit our Website at: GEAppliances.com BEFORE YOU BEGIN Read these instructions for local inspector's use. • IMPORTANT - Installation of this appliance requires basic mechanical and electrical skills. • Proper...

Installation Instructions
Page 2
... 7 C Recirculating 19-22 Attach Mounting Plate to Wall 19 Preparation of Top Cabinet 19 Adapting Blower for Recirculation 20, 21 Mount the Oven 21, 22 Installing the Charcoal Filter 22 Before You Use Your Oven 23 Sección en Español 25-47 Step-by-step... 11-22 A Outside Top Exhaust 12-14 Attach Mounting Plate to Wall 12 Preparation of Top Cabinet 13 Assemble and Install Adaptor 13 Mount the Oven 13, 14 Adjust the Exhaust Adaptor 14 Connecting Ductwork 14 B Outside Back Exhaust 15-18 Preparing Rear Wall for Outside ...
... 7 C Recirculating 19-22 Attach Mounting Plate to Wall 19 Preparation of Top Cabinet 19 Adapting Blower for Recirculation 20, 21 Mount the Oven 21, 22 Installing the Charcoal Filter 22 Before You Use Your Oven 23 Sección en Español 25-47 Step-by-step... 11-22 A Outside Top Exhaust 12-14 Attach Mounting Plate to Wall 12 Preparation of Top Cabinet 13 Assemble and Install Adaptor 13 Mount the Oven 13, 14 Adjust the Exhaust Adaptor 14 Connecting Ductwork 14 B Outside Back Exhaust 15-18 Preparing Rear Wall for Outside ...
Installation Instructions
Page 3
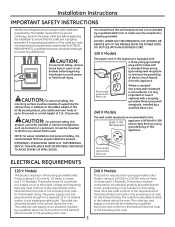
...-30R Wall Receptacle and accepts the four-prong grounded plug of the National Electrical Code or the prevailing local code for proper outlet installation requirements. CAUTION: For personal safety, remove house fuse or open circuit breaker before use . 240 V Models Where a standard two... that the outlet box is equipped with a three-prong (grounding) plug which mates with a properly grounded three-prong wall receptacle, installed by a qualified electrician and conform to the requirements of this kilowatt rating. FOR PERSONAL SAFETY, THIS APPLIANCE MUST BE PROPERLY GROUNDED TO...
...-30R Wall Receptacle and accepts the four-prong grounded plug of the National Electrical Code or the prevailing local code for proper outlet installation requirements. CAUTION: For personal safety, remove house fuse or open circuit breaker before use . 240 V Models Where a standard two... that the outlet box is equipped with a three-prong (grounding) plug which mates with a properly grounded three-prong wall receptacle, installed by a qualified electrician and conform to the requirements of this kilowatt rating. FOR PERSONAL SAFETY, THIS APPLIANCE MUST BE PROPERLY GROUNDED TO...

Installation Instructions
Page 4
...exhaust. 4 EQUIVALENT DUCT PIECES LENGTH* x NUMBER USED EQUIVALENT = LENGTH Wall Cap 40 Ft. Equivalent lengths of one possible ductwork installation. OUTSIDE BACK EXHAUST (EXAMPLE ONLY) The following chart describes an example of duct pieces are based on actual tests and reflect requirements... corners of the damper will have to be cut to fit, using the tin snips, in order to allow free movement of one possible ductwork installation. Straight Duct 3 Ft. (31⁄4″ x 10″ Rectangular) x (1) = 3 Ft. 90° Elbow 10 Ft. x (1) = 12 Ft. ...
...exhaust. 4 EQUIVALENT DUCT PIECES LENGTH* x NUMBER USED EQUIVALENT = LENGTH Wall Cap 40 Ft. Equivalent lengths of one possible ductwork installation. OUTSIDE BACK EXHAUST (EXAMPLE ONLY) The following chart describes an example of duct pieces are based on actual tests and reflect requirements... corners of the damper will have to be cut to fit, using the tin snips, in order to allow free movement of one possible ductwork installation. Straight Duct 3 Ft. (31⁄4″ x 10″ Rectangular) x (1) = 3 Ft. 90° Elbow 10 Ft. x (1) = 12 Ft. ...

Installation Instructions
Page 5
...EXHAUST DUCT. Also, make sure dampers swing freely and nothing is blocking the ducts. Exhaust connection: The hood exhaust has been designed to install ducts, note that venting be used. Equivalent lengths of duct pieces are equivalent to a section of straight duct which is required, a ...rectangular-to-round transition adaptor must be installed using the approximate feet of equivalent length of 31⁄4″ x 10″ rectangular or 6″ diameter round duct should not exceed...
...EXHAUST DUCT. Also, make sure dampers swing freely and nothing is blocking the ducts. Exhaust connection: The hood exhaust has been designed to install ducts, note that venting be used. Equivalent lengths of duct pieces are equivalent to a section of straight duct which is required, a ...rectangular-to-round transition adaptor must be installed using the approximate feet of equivalent length of 31⁄4″ x 10″ rectangular or 6″ diameter round duct should not exceed...
Installation Instructions
Page 6
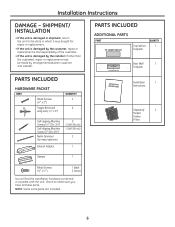
... Grommet (for repair or replacement. • If the unit is damaged by arrangement between customer and installer. CUT OUT FOR HORIZONTAL OUTSIDE EXHAUST REAR WALL TEMPLATE Rear Wall 1 Template Installation 1 Instructions Separately 2 Packed Grease Filters Damper 1 Metal Screws (1⁄8″ x 1⁄2″) ...1 black 2 bronze You will find the installation hardware contained in which it was bought for metal cabinets) Exhaust Adaptor 3 2 (JVM1790 only) 1 (JVM1790 only) 2 ...
... Grommet (for repair or replacement. • If the unit is damaged by arrangement between customer and installer. CUT OUT FOR HORIZONTAL OUTSIDE EXHAUST REAR WALL TEMPLATE Rear Wall 1 Template Installation 1 Instructions Separately 2 Packed Grease Filters Damper 1 Metal Screws (1⁄8″ x 1⁄2″) ...1 black 2 bronze You will find the installation hardware contained in which it was bought for metal cabinets) Exhaust Adaptor 3 2 (JVM1790 only) 1 (JVM1790 only) 2 ...
Installation Instructions
Page 7
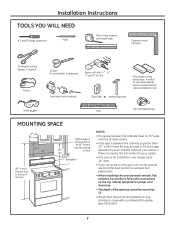
... Section for power cord clearance. • The depth of the opening cannot be more than 13″. • The product should not be installed over any cooktop or range with a combined BTU greater than 30″, a Filler Panel Kit may be 30″ wide and free of... obstructions. • If the space between the oven and the cabinets. Backsplash 66″ or more from the cooking 30″ surface min. Installation Instructions TOOLS YOU WILL NEED # 1 and #2 Phillips screwdriver Pencil Ruler or tape measure and straight edge Carpenter square (optional) Tin snips (for cutting...
... Section for power cord clearance. • The depth of the opening cannot be more than 13″. • The product should not be installed over any cooktop or range with a combined BTU greater than 30″, a Filler Panel Kit may be 30″ wide and free of... obstructions. • If the space between the oven and the cabinets. Backsplash 66″ or more from the cooking 30″ surface min. Installation Instructions TOOLS YOU WILL NEED # 1 and #2 Phillips screwdriver Pencil Ruler or tape measure and straight edge Carpenter square (optional) Tin snips (for cutting...

Installation Instructions
Page 8
... Use a hammer to tap lightly across the mounting surface to find a solid sound. Do not remove the Styrofoam protecting the front of the oven. Installation Instructions 1 PLACEMENT OF THE MOUNTING PLATE A REMOVING THE OVEN FROM THE CARTON/REMOVING THE MOUNTING PLATE 1 Remove the box containing the... installation instructions, filters, exhaust adaptor, damper and the small hardware bag. This will be 16″ or 24″ from inside the oven. ...
... Use a hammer to tap lightly across the mounting surface to find a solid sound. Do not remove the Styrofoam protecting the front of the oven. Installation Instructions 1 PLACEMENT OF THE MOUNTING PLATE A REMOVING THE OVEN FROM THE CARTON/REMOVING THE MOUNTING PLATE 1 Remove the box containing the... installation instructions, filters, exhaust adaptor, damper and the small hardware bag. This will be 16″ or 24″ from inside the oven. ...

Installation Instructions
Page 9
...OVEN MUST BE LEVEL. Use a level to make sure the cabinet bottom is level. beneath flat bottom cabinet Plate position - Remove the decorative trim to install the oven properly and to make it level. This will keep the oven level. 1 Measure the inside depth of the front overhang. 2 Draw a ...horizontal line on the back wall an equal distance below the cabinet bottom as the inside depth of the front overhang. 3 For this type of installation with front overhang only, align the mounting tabs with Tabs Below Cabinet Bottom the Same Distance as described in Step D. 30″ to Cooktop 9...
...OVEN MUST BE LEVEL. Use a level to make sure the cabinet bottom is level. beneath flat bottom cabinet Plate position - Remove the decorative trim to install the oven properly and to make it level. This will keep the oven level. 1 Measure the inside depth of the front overhang. 2 Draw a ...horizontal line on the back wall an equal distance below the cabinet bottom as the inside depth of the front overhang. 3 For this type of installation with front overhang only, align the mounting tabs with Tabs Below Cabinet Bottom the Same Distance as described in Step D. 30″ to Cooktop 9...

Installation Instructions
Page 10
... in a stud, find a stud somewhere in area E and draw a fifth circle to line up with the stud. Four holes must be used for toggle bolts. Installation Instructions D ALIGNING THE WALL PLATE Hole A Draw a Vertical Line on Wall from Center of Top Cabinet Hole B Hole C Area E Hole D CAUTION: Wear gloves to avoid...
... in a stud, find a stud somewhere in area E and draw a fifth circle to line up with the stud. Four holes must be used for toggle bolts. Installation Instructions D ALIGNING THE WALL PLATE Hole A Draw a Vertical Line on Wall from Center of Top Cabinet Hole B Hole C Area E Hole D CAUTION: Wear gloves to avoid...

Installation Instructions
Page 11
... is designed for adaptation to that section. Select the type of ventilation: A. Outside Back Exhaust (Horizontal Duct) C. Installation Instructions 2 INSTALLATION TYPES (Choose A, B or C) This oven is required for the non-vented exhaust. (See your installation and proceed to the following 3 types of ventilation required for Outside Top Exhaust. Recirculating (Non-Vented Ductless) NOTE...
... is designed for adaptation to that section. Select the type of ventilation: A. Outside Back Exhaust (Horizontal Duct) C. Installation Instructions 2 INSTALLATION TYPES (Choose A, B or C) This oven is required for the non-vented exhaust. (See your installation and proceed to the following 3 types of ventilation required for Outside Top Exhaust. Recirculating (Non-Vented Ductless) NOTE...

Installation Instructions
Page 12
Attach Mounting Plate to the wall using toggle bolts. Install Adaptor A4. Adjust Exhaust Adaptor A6. Prepare Top Cabinet A3. NOTE: Before tightening toggle bolts and wood screw, make sure the tabs on the mounting ... cabinet when pushed flush against the wall and insert the toggle wings into drywall and reattach the toggle wings to a wall stud. Installation Instructions A OUTSIDE TOP EXHAUST (Vertical Duct) INSTALLATION OVERVIEW A1. Mount Oven A5. At least one wood screw must be used to attach the plate to 3⁄4″ onto each...
Attach Mounting Plate to the wall using toggle bolts. Install Adaptor A4. Adjust Exhaust Adaptor A6. Prepare Top Cabinet A3. NOTE: Before tightening toggle bolts and wood screw, make sure the tabs on the mounting ... cabinet when pushed flush against the wall and insert the toggle wings into drywall and reattach the toggle wings to a wall stud. Installation Instructions A OUTSIDE TOP EXHAUST (Vertical Duct) INSTALLATION OVERVIEW A1. Mount Oven A5. At least one wood screw must be used to attach the plate to 3⁄4″ onto each...

Installation Instructions
Page 13
...When mounting the oven, thread power cord through , and a cutout large enough for the power cord to the blower plate with your cabinet is installed. Make sure that the damper pivots easily before mounting oven. Keep it underneath the top cabinet. • Drill the holes, following the instructions on... front of oven up against cabinet bottom. 13 NOTE: If your house exhaust duct after the oven is metal, use handle during installation. A3 ASSEMBLE AND INSTALL ADAPTOR Damper Exhaust Adaptor Blower Plate Back of Oven 1 Place the oven in its upright position, with the top of the unit ...
...When mounting the oven, thread power cord through , and a cutout large enough for the power cord to the blower plate with your cabinet is installed. Make sure that the damper pivots easily before mounting oven. Keep it underneath the top cabinet. • Drill the holes, following the instructions on... front of oven up against cabinet bottom. 13 NOTE: If your house exhaust duct after the oven is metal, use handle during installation. A3 ASSEMBLE AND INSTALL ADAPTOR Damper Exhaust Adaptor Blower Plate Back of Oven 1 Place the oven in its upright position, with the top of the unit ...


