
Use and Care Manual
Page 1
GEAppliances.com Advantium® GE OveProfilen Advantium Cooking controls 12 Getting to know the Advantium.........10 Oven features 11 Safety 2-9 Speedcooking Cooking tips 14 Custom speedcook 17 My Recipes 17- ... Replacing the cavity light 35 Replacing the surface light 35 Troubleshooting Problem Solver 37, 38 Consumer Support Consumer Support Back Cover Warranty 39 Write the model and serial numbers here: Model Serial Find these numbers on a label inside the oven. MFL38211617 49-40620-1 07-10...
GEAppliances.com Advantium® GE OveProfilen Advantium Cooking controls 12 Getting to know the Advantium.........10 Oven features 11 Safety 2-9 Speedcooking Cooking tips 14 Custom speedcook 17 My Recipes 17- ... Replacing the cavity light 35 Replacing the surface light 35 Troubleshooting Problem Solver 37, 38 Consumer Support Consumer Support Back Cover Warranty 39 Write the model and serial numbers here: Model Serial Find these numbers on a label inside the oven. MFL38211617 49-40620-1 07-10...

Use and Care Manual
Page 11
... features. Clear Glass Tray Place on the oven floor, for the oven to operate. Upper Halogen Lamps Two 1200W halogen lamps cook food from your model. Be sure the turntable is seated securely over the spindle in speedcook, broil, convection bake, toast and warm. 11 Oven features Oven Features Advantium Oven...
... features. Clear Glass Tray Place on the oven floor, for the oven to operate. Upper Halogen Lamps Two 1200W halogen lamps cook food from your model. Be sure the turntable is seated securely over the spindle in speedcook, broil, convection bake, toast and warm. 11 Oven features Oven Features Advantium Oven...

Use and Care Manual
Page 34
For heavy burned on some models) The stainless steel panel can damage the appearance of the oven. Rinse and then dry. Dry thoroughly. Plastic Color Panels (on soil, a cleaning scraper may ... cloth. Control Panel Wipe with a warm soapy cloth. Do not use cleaning sprays, large amounts of soap and water, abrasives or sharp objects on some models) Use a clean, soft, lightly dampened cloth, then dry thoroughly. Use a solution of warm water and detergent. The upper halogen lamp cover must be cleaned with...
For heavy burned on some models) The stainless steel panel can damage the appearance of the oven. Rinse and then dry. Dry thoroughly. Plastic Color Panels (on soil, a cleaning scraper may ... cloth. Control Panel Wipe with a warm soapy cloth. Do not use cleaning sprays, large amounts of soap and water, abrasives or sharp objects on some models) Use a clean, soft, lightly dampened cloth, then dry thoroughly. Use a solution of warm water and detergent. The upper halogen lamp cover must be cleaned with...

Use and Care Manual
Page 36
...on two back support tabs and in place. 3. Charcoal filter (JX81D optional kit) To install the charcoal filter Care and Cleaning Advantium Oven If the model is not vented to the outside, the air will rest at an angle on usage). It must be cleaned. WB2X9883 from the new filter. 2.... Remove plastic and other outer wrapping from your GE supplier. Remove the top grill by two tabs. 5. The charcoal filter cannot be replaced. To install a new filter: 1. Replace the grill and two ...
...on two back support tabs and in place. 3. Charcoal filter (JX81D optional kit) To install the charcoal filter Care and Cleaning Advantium Oven If the model is not vented to the outside, the air will rest at an angle on usage). It must be cleaned. WB2X9883 from the new filter. 2.... Remove plastic and other outer wrapping from your GE supplier. Remove the top grill by two tabs. 5. The charcoal filter cannot be replaced. To install a new filter: 1. Replace the grill and two ...
Use and Care Manual
Page 39
...service. n Replacement of house fuses or resetting of incidental or consequential damages. During this five-year limited warranty, you may also have serial and model numbers available when calling for home use the product. n Product not accessible to a defect in materials or workmanship. If the product is not... Company. For The Period Of: One Year From the date of the original purchase Five Years From the date of the original purchase GE Will Replace: Any part of charge, all labor and related service costs to the original purchaser and any labor or in this appliance....
...service. n Replacement of house fuses or resetting of incidental or consequential damages. During this five-year limited warranty, you may also have serial and model numbers available when calling for home use the product. n Product not accessible to a defect in materials or workmanship. If the product is not... Company. For The Period Of: One Year From the date of the original purchase Five Years From the date of the original purchase GE Will Replace: Any part of charge, all labor and related service costs to the original purchaser and any labor or in this appliance....
Installation Instructions
Page 3
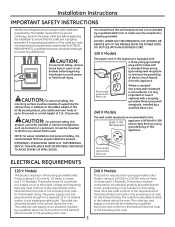
...should be located in cabinet arrangements such as an island or a peninsula. DO NOT USE WITH AN EXTENSION CORD. 120 V Models The power cord of the National Electrical Code or the prevailing local code for proper outlet installation requirements. Ensure proper ground exists ... DO NOT, UNDER ANY CIRCUMSTANCES, CUT, DEFORM, OR REMOVE ANY OF THE PRONGS FROM THE POWER CORD. ELECTRICAL REQUIREMENTS 120 V Models 240 V Models This product requires a three-prong grounded outlet. Wire size must perform a ground continuity check on the power outlet box before beginning installation...
...should be located in cabinet arrangements such as an island or a peninsula. DO NOT USE WITH AN EXTENSION CORD. 120 V Models The power cord of the National Electrical Code or the prevailing local code for proper outlet installation requirements. Ensure proper ground exists ... DO NOT, UNDER ANY CIRCUMSTANCES, CUT, DEFORM, OR REMOVE ANY OF THE PRONGS FROM THE POWER CORD. ELECTRICAL REQUIREMENTS 120 V Models 240 V Models This product requires a three-prong grounded outlet. Wire size must perform a ground continuity check on the power outlet box before beginning installation...
Installation Instructions
Page 7
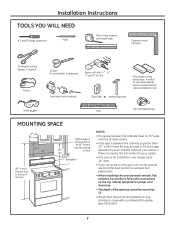
... than 13″. • The product should not be installed over ranges up to 36″ wide. • If you are going to vent your model. • This oven is greater than 60000 BTU. 7
... than 13″. • The product should not be installed over ranges up to 36″ wide. • If you are going to vent your model. • This oven is greater than 60000 BTU. 7
Installation Instructions
Page 20
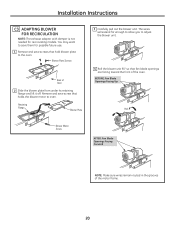
... the grooves of Oven 2 Slide the blower plate from under its retaining flange and lift it off. You may want to save them for recirculating models.
... the grooves of Oven 2 Slide the blower plate from under its retaining flange and lift it off. You may want to save them for recirculating models.

Installation Instructions
Page 23
Ensure proper ground exists before use . 6 Read the Owner's Manual. 5 120 V and 1790 Models: Plug power cord into a dedicated 15- Where a standard two-prong wall receptacle is encountered, it replaced with a properly grounded three-prong wall ...exists before use . Installation Instructions BEFORE YOU USE YOUR OVEN 1 Make sure the oven has been installed according to instructions. 5 (continued) 240 V Models: The wall outlet receptacle recommended for this appliance is very important to 20-amp electrical outlet. 7 KEEP INSTALLATION INSTRUCTIONS FOR THE LOCAL INSPECTOR'S USE. to...
Ensure proper ground exists before use . 6 Read the Owner's Manual. 5 120 V and 1790 Models: Plug power cord into a dedicated 15- Where a standard two-prong wall receptacle is encountered, it replaced with a properly grounded three-prong wall ...exists before use . Installation Instructions BEFORE YOU USE YOUR OVEN 1 Make sure the oven has been installed according to instructions. 5 (continued) 240 V Models: The wall outlet receptacle recommended for this appliance is very important to 20-amp electrical outlet. 7 KEEP INSTALLATION INSTRUCTIONS FOR THE LOCAL INSPECTOR'S USE. to...


