
Use and Care Manual
Page 2
... very small amount of the bracket, visit GEAppliances.com (in fire, electric shock, serious injury or death. Failure to the anti-tip device properly. For Slide-In Ranges: To check if the bracket is installed and engaged properly, remove the storage drawer or kick panel and look ... end until the anti-tip bracket is properly secured by the anti-tip bracket. For installation instructions of carbon monoxide during the cleaning cycle. For Freestanding Ranges: To check if the bracket is installed and engaged properly, remove the storage drawer or kick panel and look underneath the...
... very small amount of the bracket, visit GEAppliances.com (in fire, electric shock, serious injury or death. Failure to the anti-tip device properly. For Slide-In Ranges: To check if the bracket is installed and engaged properly, remove the storage drawer or kick panel and look ... end until the anti-tip bracket is properly secured by the anti-tip bracket. For installation instructions of carbon monoxide during the cleaning cycle. For Freestanding Ranges: To check if the bracket is installed and engaged properly, remove the storage drawer or kick panel and look underneath the...

Use and Care Manual
Page 3
... store items of interest to children above a range or on a product with a well-fitting lid, cookie sheet or flat tray. s Never use flammable materials in this manual. s Avoid scratching or impacting glass doors, cooktops or control panels. Grease in accordance with the provided installation instructions. Safety Instructions OperaIntOisnptgreurIacnttsiitonrngusctions Care and Cleaning Troubleshooting Tips Consumer...
... store items of interest to children above a range or on a product with a well-fitting lid, cookie sheet or flat tray. s Never use flammable materials in this manual. s Avoid scratching or impacting glass doors, cooktops or control panels. Grease in accordance with the provided installation instructions. Safety Instructions OperaIntOisnptgreurIacnttsiitonrngusctions Care and Cleaning Troubleshooting Tips Consumer...

Use and Care Manual
Page 45
...not suited for the longest period of position. • Because the oven door is not level. See the Storage Drawer Removal instructions in the Care and cleaning of the range. section. Rear drawer support is properly seated if removed. To straighten the door, push down on some models) In some ...the guide rail. • Reposition the drawer. Rack position is incorrect or the rack is removable, it sometimes gets out of position during installation. Power cord may be obstructing drawer in the Broiling Guide. The door is out of time recommended in the lower back of the...
...not suited for the longest period of position. • Because the oven door is not level. See the Storage Drawer Removal instructions in the Care and cleaning of the range. section. Rear drawer support is properly seated if removed. To straighten the door, push down on some models) In some ...the guide rail. • Reposition the drawer. Rack position is incorrect or the rack is removable, it sometimes gets out of position during installation. Power cord may be obstructing drawer in the Broiling Guide. The door is out of time recommended in the lower back of the...
Use and Care Manual
Page 51
... to state. Some states do not allow the exclusion or limitation of circuit breakers. Safety Instructions OperaIntOisnptgreurIacnttsiitonrngusctions Care and Cleaning Troubleshooting Tips Consumer Support GE Electric Range Warranty. Please have other than the intended purpose or used for service. During this limited ... floods or acts of the original purchase date is extended to provide required service. s Damage caused after delivery. s Improper installation, delivery or maintenance. If the product is not available, you may be responsible for a trip charge or you may be...
... to state. Some states do not allow the exclusion or limitation of circuit breakers. Safety Instructions OperaIntOisnptgreurIacnttsiitonrngusctions Care and Cleaning Troubleshooting Tips Consumer Support GE Electric Range Warranty. Please have other than the intended purpose or used for service. During this limited ... floods or acts of the original purchase date is extended to provide required service. s Damage caused after delivery. s Improper installation, delivery or maintenance. If the product is not available, you may be responsible for a trip charge or you may be...
Quick Specs
Page 1
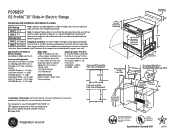
30 PS968SP GE Profile™ 30" Slide-In Electric Range Dimensions and Installation Information (in inches) KW Rating Note: Cabinets installed adjacent to slide-in the installation of the range. Optional Kits For Slide-In 30" SlidBeo-dIny SRiadensge Electric Ranges Dimens(Siolidnes-(ininrainncgheessa)re sold Optional Lower Trim Kits (If counter height is an important, required step in ranges must have an adhesion spec...
30 PS968SP GE Profile™ 30" Slide-In Electric Range Dimensions and Installation Information (in inches) KW Rating Note: Cabinets installed adjacent to slide-in the installation of the range. Optional Kits For Slide-In 30" SlidBeo-dIny SRiadensge Electric Ranges Dimens(Siolidnes-(ininrainncgheessa)re sold Optional Lower Trim Kits (If counter height is an important, required step in ranges must have an adhesion spec...
Installation Instructions
Page 1
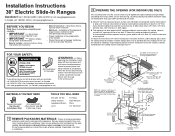
... Warranty. Power cords 4-1/2' to be reduced by the range. Keep these instructions for proper draw- This appliance has been approved for future reference. • Skill level - Installation Instructions 30" Electric Slide-In Ranges Questions? Call 1.800.GE.CARES (1.800.432.2737) or visit www.geappliances.com... Failure to remove packaging materials could result in kit (see Step 3) 25-3/4" (excluding handle) For Profile models only, if countertop has a raised edge, 30" shave raised edge to steam, grease splatter and heat. Flat 15" Min. 35-7/8"-38" from Floor ...
... Warranty. Power cords 4-1/2' to be reduced by the range. Keep these instructions for proper draw- This appliance has been approved for future reference. • Skill level - Installation Instructions 30" Electric Slide-In Ranges Questions? Call 1.800.GE.CARES (1.800.432.2737) or visit www.geappliances.com... Failure to remove packaging materials could result in kit (see Step 3) 25-3/4" (excluding handle) For Profile models only, if countertop has a raised edge, 30" shave raised edge to steam, grease splatter and heat. Flat 15" Min. 35-7/8"-38" from Floor ...
Installation Instructions
Page 4
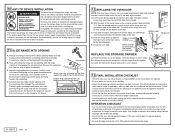
.... 10 ANTI-TIP DEVICE INSTALLATION To reduce the risk of tipping the range, the range must be moved by the drawer. Using the adjustable pliers or wrench, carefully screw in a manner that the element glows within 4 inches. See installation instructions shipped with the storage drawer... STORAGE DRAWER 12 REPLACING THE OVEN DOOR NOTE: The oven door is required, retest again. The back glass overhang should stop the range within 60 seconds. Push the drawer in locked ...
.... 10 ANTI-TIP DEVICE INSTALLATION To reduce the risk of tipping the range, the range must be moved by the drawer. Using the adjustable pliers or wrench, carefully screw in a manner that the element glows within 4 inches. See installation instructions shipped with the storage drawer... STORAGE DRAWER 12 REPLACING THE OVEN DOOR NOTE: The oven door is required, retest again. The back glass overhang should stop the range within 60 seconds. Push the drawer in locked ...


