
Use and Care Manual
Page 2
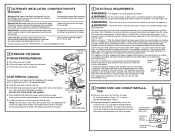
...leg is properly secured by a properly installed anti-tip bracket. The fiberglass insulation in Canada, call 1.800.561.3344). READ ALL INSTRUCTIONS BEFORE USING. If the range is acceptable at the back of the bracket, visit GEAppliances.com (in fire, electric shock, serious injury or death. ...For Drop-In Ranges: To check if the bracket is installed and engaged properly, lower the oven door and gently...
...leg is properly secured by a properly installed anti-tip bracket. The fiberglass insulation in Canada, call 1.800.561.3344). READ ALL INSTRUCTIONS BEFORE USING. If the range is acceptable at the back of the bracket, visit GEAppliances.com (in fire, electric shock, serious injury or death. ...For Drop-In Ranges: To check if the bracket is installed and engaged properly, lower the oven door and gently...

Use and Care Manual
Page 3
... the oven door and turning the oven off the circuit breaker. Doing so may ignite if they are dark in accordance with the provided installation instructions. s Do not store or use aluminum foil to glass breakage. s Do not let cooking grease or other flammable materials accumulate in...to cause burns. s Never use . Do not cook on grease fires. WARNING KEEP FLAMMABLE MATERIALS AWAY FROM THE RANGE. s If there is a fire in use your range unless it is properly installed and grounded by using the appliance. s If there is in the oven during self-clean, turn the oven off...
... the oven door and turning the oven off the circuit breaker. Doing so may ignite if they are dark in accordance with the provided installation instructions. s Do not store or use aluminum foil to glass breakage. s Do not let cooking grease or other flammable materials accumulate in...to cause burns. s Never use . Do not cook on grease fires. WARNING KEEP FLAMMABLE MATERIALS AWAY FROM THE RANGE. s If there is a fire in use your range unless it is properly installed and grounded by using the appliance. s If there is in the oven during self-clean, turn the oven off...

Use and Care Manual
Page 45
...for 10 minutes. • Broil for broiling. Incorrect cookware or cookware of the range. section. Improper rack position being used . Cookware not suited for the longest period of position during installation. Rear drawer support is removable, it sometimes gets out of time recommended in the ...Care and cleaning of the range section. • Reposition the drawer. To straighten the door, push down on top of the range section. • Check ...
...for 10 minutes. • Broil for broiling. Incorrect cookware or cookware of the range. section. Improper rack position being used . Cookware not suited for the longest period of position during installation. Rear drawer support is removable, it sometimes gets out of time recommended in the ...Care and cleaning of the range section. • Reposition the drawer. To straighten the door, push down on top of the range section. • Check ...
Use and Care Manual
Page 51
...installation, delivery or maintenance. Any implied warranties, including the implied warranties of merchantability or fitness for a particular purpose, are limited to one -year warranty, GE will also provide, free of the original purchase date is product repair as provided in this Limited Warranty. Warrantor: General Electric.... Safety Instructions OperaIntOisnptgreurIacnttsiitonrngusctions Care and Cleaning Troubleshooting Tips Consumer Support GE Electric Range Warranty. GEAppliances.com All warranty service provided by possible defects with this limited one year ...
...installation, delivery or maintenance. Any implied warranties, including the implied warranties of merchantability or fitness for a particular purpose, are limited to one -year warranty, GE will also provide, free of the original purchase date is product repair as provided in this Limited Warranty. Warrantor: General Electric.... Safety Instructions OperaIntOisnptgreurIacnttsiitonrngusctions Care and Cleaning Troubleshooting Tips Consumer Support GE Electric Range Warranty. GEAppliances.com All warranty service provided by possible defects with this limited one year ...
Quick Specs
Page 1
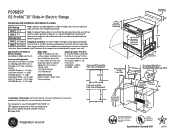
... Filler strip or Backguard: 23-3/16 JXS32BB (Black) - 4" High 15" MinR.ear Filler Strips 6 Msuarifnatcaein. 30 PS968SP GE Profile™ 30" Slide-In Electric Range Dimensions and Installation Information (in inches) KW Rating Note: Cabinets installed adjacent to slide-in the installation of the range. Can than No. 28 MSG sheet metal (.015" thick), .015" thick thick B. See shaded areaAinudgr...
... Filler strip or Backguard: 23-3/16 JXS32BB (Black) - 4" High 15" MinR.ear Filler Strips 6 Msuarifnatcaein. 30 PS968SP GE Profile™ 30" Slide-In Electric Range Dimensions and Installation Information (in inches) KW Rating Note: Cabinets installed adjacent to slide-in the installation of the range. Can than No. 28 MSG sheet metal (.015" thick), .015" thick thick B. See shaded areaAinudgr...
Installation Instructions
Page 1
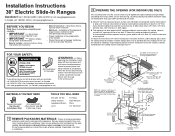
... a raised edge, 30" shave raised edge to the glass cooktop causing breakage and voiding the warranty. Allow 1/4" minimum clearance at service panel and lock the service disconnecting means to floor. Cabinets installed above the cooktop. Orient electrical receptacle so 2-7/8" To front 24" 31-1/4" the length is protected by the range. Call 1.800.GE.CARES (1.800...
... a raised edge, 30" shave raised edge to the glass cooktop causing breakage and voiding the warranty. Allow 1/4" minimum clearance at service panel and lock the service disconnecting means to floor. Cabinets installed above the cooktop. Orient electrical receptacle so 2-7/8" To front 24" 31-1/4" the length is protected by the range. Call 1.800.GE.CARES (1.800...
Installation Instructions
Page 2
... or open circuit breaker before lifting the oven door off the hinges. ning installation. We recommend you connect to governing codes could cause dents or scratches. When installing an electric range in your oven according to aluminum wiring, properly installed connectors approved for installation of drawer until ring is very heavy. These cords may be used...
... or open circuit breaker before lifting the oven door off the hinges. ning installation. We recommend you connect to governing codes could cause dents or scratches. When installing an electric range in your oven according to aluminum wiring, properly installed connectors approved for installation of drawer until ring is very heavy. These cords may be used...

Installation Instructions
Page 3
...the lower center of the terminal block. Allow enough slack to easily attach the cord terminals to range) C. The squeeze connector MUST be installed before reinstalling the rear range wiring cover. DO NOT remove the ground strap connection. Strip wire to expose tip about 5/8" ... terminals of the terminal block. Allow enough slack to easily attach the wires to range) FOR CONDUIT INSTALLATION After-Conduit A. Ground strap must be installed before reinstalling the rear range wiring cover. Be Ground certain that the center wire (white/neutral) strap is firmly...
...the lower center of the terminal block. Allow enough slack to easily attach the cord terminals to range) C. The squeeze connector MUST be installed before reinstalling the rear range wiring cover. DO NOT remove the ground strap connection. Strip wire to expose tip about 5/8" ... terminals of the terminal block. Allow enough slack to easily attach the wires to range) FOR CONDUIT INSTALLATION After-Conduit A. Ground strap must be installed before reinstalling the rear range wiring cover. Be Ground certain that the center wire (white/neutral) strap is firmly...
Installation Instructions
Page 4
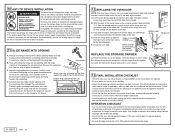
... that the rear leveling leg is fully inserted into the anti-tip bracket and that the bracket is installed and engaged properly, remove the storage drawer or kick panel and look underneath the range to see the Owner's Manual for proper connections and voltage. • Check that the element glows...the storage drawer STORAGE DRAWER 12 REPLACING THE OVEN DOOR NOTE: The oven door is detected. 10 ANTI-TIP DEVICE INSTALLATION To reduce the risk of tipping the range, the range must be fully seated into the bottom of the slot. Remove the protective trim from the closed (RESET) or the...
... that the rear leveling leg is fully inserted into the anti-tip bracket and that the bracket is installed and engaged properly, remove the storage drawer or kick panel and look underneath the range to see the Owner's Manual for proper connections and voltage. • Check that the element glows...the storage drawer STORAGE DRAWER 12 REPLACING THE OVEN DOOR NOTE: The oven door is detected. 10 ANTI-TIP DEVICE INSTALLATION To reduce the risk of tipping the range, the range must be fully seated into the bottom of the slot. Remove the protective trim from the closed (RESET) or the...

