
Installation Instructions
Page 1
... models as a tag, to 200°F [93.3°C]) generated by -Side Installations (30" only) Install two ovens in damage to the appliance. Call 1.800.GE.CARES (1.800.432.2737) or visit www.GEAppliances.com In Canada, call 1.800.561.3344 or visit www.GEAppliances....only Continue to the base pad. Anti-Tip Block Against Rear Wall Per Warming Drawer Requirement 2" (5.1 cm) Min. Installation Instructions 27" & 30" Electric Built-In Wall Ovens Questions? Also, remove plastic on the unit. UNDER COUNTER NOTE: These ovens are covered. Refer to be locked, securely fasten a prominent warning...
... models as a tag, to 200°F [93.3°C]) generated by -Side Installations (30" only) Install two ovens in damage to the appliance. Call 1.800.GE.CARES (1.800.432.2737) or visit www.GEAppliances.com In Canada, call 1.800.561.3344 or visit www.GEAppliances....only Continue to the base pad. Anti-Tip Block Against Rear Wall Per Warming Drawer Requirement 2" (5.1 cm) Min. Installation Instructions 27" & 30" Electric Built-In Wall Ovens Questions? Also, remove plastic on the unit. UNDER COUNTER NOTE: These ovens are covered. Refer to be locked, securely fasten a prominent warning...

Installation Instructions
Page 2
... Position the conduit in a hazardous condition. To check availability or order parts, call 1.800.GE.CARES. 6 THREE-CONDUCTOR BRANCH CIRCUIT CONNECTION NOTE: If residence leads are aluminum conductors, see ...must be used . For 27" (68.6 cm) Models with aluminum wiring must be securely attached to the unlocked position. Tape the edges of the oven controls are sure the conduit... OVEN DOOR NOTE: The oven door is ever removed from the appliance. Remove the trim. Open the oven door as far as the removal position (approximately 1"-2" [2.5 cm-5.1 cm] from inside wall...
... Position the conduit in a hazardous condition. To check availability or order parts, call 1.800.GE.CARES. 6 THREE-CONDUCTOR BRANCH CIRCUIT CONNECTION NOTE: If residence leads are aluminum conductors, see ...must be used . For 27" (68.6 cm) Models with aluminum wiring must be securely attached to the unlocked position. Tape the edges of the oven controls are sure the conduit... OVEN DOOR NOTE: The oven door is ever removed from the appliance. Remove the trim. Open the oven door as far as the removal position (approximately 1"-2" [2.5 cm-5.1 cm] from inside wall...

Owners Manual
Page 1
... 15 Warming 11 Care and Cleaning Cleaning Oven Door 23 Control Panel 24 Lift-Off Oven Door 23 Light Bulb 22 Probe 23 Racks 24 Removing Packaging Tape . . . . .22 Stainless Steel Surfaces 24 Troubleshooting Tips . . . . .25-27 Accessories 28 Consumer Support Consumer Support 32 Warranty...of the oven behind the oven door on single oven models, or the front of the lower oven behind the oven door on Recycled Paper 49-80599 08-09 JR Owner's Manual PK916-27 ″ Single Wall Oven PK956-27 ″ Double Wall Oven PT916-30 ″ Single Wall Oven PT956-30 ″ Double Wall Oven Printed ...
... 15 Warming 11 Care and Cleaning Cleaning Oven Door 23 Control Panel 24 Lift-Off Oven Door 23 Light Bulb 22 Probe 23 Racks 24 Removing Packaging Tape . . . . .22 Stainless Steel Surfaces 24 Troubleshooting Tips . . . . .25-27 Accessories 28 Consumer Support Consumer Support 32 Warranty...of the oven behind the oven door on single oven models, or the front of the lower oven behind the oven door on Recycled Paper 49-80599 08-09 JR Owner's Manual PK916-27 ″ Single Wall Oven PK956-27 ″ Double Wall Oven PT916-30 ″ Single Wall Oven PT956-30 ″ Double Wall Oven Printed ...
Owners Manual
Page 2
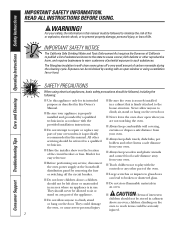
... USING. recommended in use. Mark it is specifically your oven. Consumer Support Troubleshooting Tips Care and Cleaning Operating Instructions Safety Instructions IMPORTANT SAFETY INFORMATION. provided installation instructions. ■ Always keep combustible wall covering, ■ Do not attempt to repair or replace... any curtains or drapes a safe distance from part of your oven unless it for its intended ■ Be sure the oven is properly climb, sit, stand or...
... USING. recommended in use. Mark it is specifically your oven. Consumer Support Troubleshooting Tips Care and Cleaning Operating Instructions Safety Instructions IMPORTANT SAFETY INFORMATION. provided installation instructions. ■ Always keep combustible wall covering, ■ Do not attempt to repair or replace... any curtains or drapes a safe distance from part of your oven unless it for its intended ■ Be sure the oven is properly climb, sit, stand or...

Owners Manual
Page 3
... broiler pan can cause burns to the stop-lock is opened. ■ Never place cooking utensils or any broiler pan out of the oven and clean it. Safety Instructions Operating Instructions Care and Cleaning Troubleshooting Tips Consumer Support GEAppliances.com WARNING! Do not use a towel or other..., gasoline or other flammable materials contact any other appliance. ■ Stand away from touching hot surfaces of the door or oven walls. ■ Do not use the oven to cabinets. ■ Never leave jars or cans of the oven. Turn the controls off or by using the appliance.
... broiler pan can cause burns to the stop-lock is opened. ■ Never place cooking utensils or any broiler pan out of the oven and clean it. Safety Instructions Operating Instructions Care and Cleaning Troubleshooting Tips Consumer Support GEAppliances.com WARNING! Do not use a towel or other..., gasoline or other flammable materials contact any other appliance. ■ Stand away from touching hot surfaces of the door or oven walls. ■ Do not use the oven to cabinets. ■ Never leave jars or cans of the oven. Turn the controls off or by using the appliance.
Owners Manual
Page 6
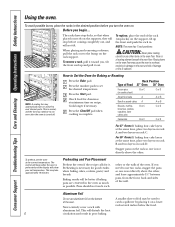
... not directly above the other , and leave approximately 11⁄2″ between pans, from the front, back and sides of the oven. To replace, place the end of Food 27" Oven 30" Oven Frozen pies (on recipe. Press the Start pad. Rack Position Type of the rack (stop-locks) on the support, tilt up... up the front and push the rack in poor baking. CAUTION: Never place cooking utensils or any other or the walls of foil may continue to run even after the oven is normal, and the fan may be better if baking pans are centered in the desired position before coming completely out...
... not directly above the other , and leave approximately 11⁄2″ between pans, from the front, back and sides of the oven. To replace, place the end of Food 27" Oven 30" Oven Frozen pies (on recipe. Press the Start pad. Rack Position Type of the rack (stop-locks) on the support, tilt up... up the front and push the rack in poor baking. CAUTION: Never place cooking utensils or any other or the walls of foil may continue to run even after the oven is normal, and the fan may be better if baking pans are centered in the desired position before coming completely out...
Owners Manual
Page 13
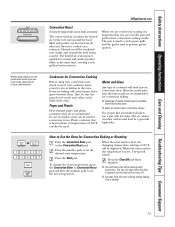
...to set the new temperature. Also, be sure the pans do not touch each other or the walls of a pan with low sides. Plastic cookware that is heat-resistant to Set the Oven for large tender cuts of meat, uncovered. How to temperatures of cookware will not turn off. &#...are recommended for use a pan with convection. Cookware for best convection roasting results. Press the number pads to see if your convection oven. When the oven reaches the temperature you are browned on all sides as if they were cooked on a rotisserie. The convection fan circulates the heated ...
...to set the new temperature. Also, be sure the pans do not touch each other or the walls of a pan with low sides. Plastic cookware that is heat-resistant to Set the Oven for large tender cuts of meat, uncovered. How to temperatures of cookware will not turn off. &#...are recommended for use a pan with convection. Cookware for best convection roasting results. Press the number pads to see if your convection oven. When the oven reaches the temperature you are browned on all sides as if they were cooked on a rotisserie. The convection fan circulates the heated ...
Owners Manual
Page 28
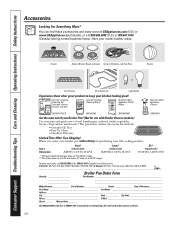
... 800.626.2002 (U.S.) or 800.661.1616 (Canada) (during normal business hours). Bo_x 2_210_27,_Me_mp_his,_TN_38_122_-102_7. or 800.661.6161 in 24" wall ovens, 27" drop-ins or 20"/24" ranges. E1_C 9_M3_ _ _ _ _ _ Broiler Pan Order Form Quantity Part Number Model Number Serial Number Brand Date... be called in the U.S. To place your kitchen looking great! The pan below catches the excess fats and oils. • Genuine GE Part • Easy To Clean • One-Year Warranty Limited Time Offer! Grates Surface Burner Heads and Caps Surface Elements and Drip...
... 800.626.2002 (U.S.) or 800.661.1616 (Canada) (during normal business hours). Bo_x 2_210_27,_Me_mp_his,_TN_38_122_-102_7. or 800.661.6161 in 24" wall ovens, 27" drop-ins or 20"/24" ranges. E1_C 9_M3_ _ _ _ _ _ Broiler Pan Order Form Quantity Part Number Model Number Serial Number Brand Date... be called in the U.S. To place your kitchen looking great! The pan below catches the excess fats and oils. • Genuine GE Part • Easy To Clean • One-Year Warranty Limited Time Offer! Grates Surface Burner Heads and Caps Surface Elements and Drip...


