
Installation Instructions
Page 1
... be required. DOUBLE OVEN INSTALLATIONS A double oven may be hard-wired (direct-wired) into an approved junction box. For double ovens, the runners and braces must support 200 lbs (91 kg). Also, remove plastic on top of the installer. • Product failure due to 200°F [93.3°C]) generated by -Side Installations (30" only) Install two ovens in a cabinet alone or above the Warming Drawer location do not obstruct the required interior depth and height. Side...
... be required. DOUBLE OVEN INSTALLATIONS A double oven may be hard-wired (direct-wired) into an approved junction box. For double ovens, the runners and braces must support 200 lbs (91 kg). Also, remove plastic on top of the installer. • Product failure due to 200°F [93.3°C]) generated by -Side Installations (30" only) Install two ovens in a cabinet alone or above the Warming Drawer location do not obstruct the required interior depth and height. Side...

Installation Instructions
Page 2
... Fire Protection Association. 4 ELECTRICAL REQUIREMENTS (CONT.) This appliance must use an extension cord with local codes, using the oven opening as it will lie on both hinge locks down to your Owner's Manual for a double oven, the platform must support 200 lbs. (91 kg); Be sure you have the electrical wiring and hookup of your appliance connected by the wire gauge and the temperature rating of the household wiring. WARNING: To prevent...
... Fire Protection Association. 4 ELECTRICAL REQUIREMENTS (CONT.) This appliance must use an extension cord with local codes, using the oven opening as it will lie on both hinge locks down to your Owner's Manual for a double oven, the platform must support 200 lbs. (91 kg); Be sure you have the electrical wiring and hookup of your appliance connected by the wire gauge and the temperature rating of the household wiring. WARNING: To prevent...

Owners Manual
Page 1
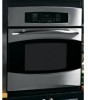
... Wall Oven PK956-27 ″ Double Wall Oven PT916-30 ″ Single Wall Oven PT956-30 ″ Double Wall Oven Printed on double oven models. GEAppliances.com Electric Convection Built-In Oven Safety Instructions 2-4 Operating Instructions Clock and Timer 8 Control Lockout 8 Controls 5 Convection 12-15 Oven 6, 7 Probe 10, 14 Proofing 11 Sabbath Feature 21 Self-Cleaning Oven 17, 18 Special Features 19, 20 Thermostat 16 Timed Baking and Roasting 9, 15 Warming 11 Care and Cleaning Cleaning Oven Door 23 Control Panel 24 Lift-Off Oven Door 23 Light Bulb 22 Probe 23 Racks...
... Wall Oven PK956-27 ″ Double Wall Oven PT916-30 ″ Single Wall Oven PT956-30 ″ Double Wall Oven Printed on double oven models. GEAppliances.com Electric Convection Built-In Oven Safety Instructions 2-4 Operating Instructions Clock and Timer 8 Control Lockout 8 Controls 5 Convection 12-15 Oven 6, 7 Probe 10, 14 Proofing 11 Sabbath Feature 21 Self-Cleaning Oven 17, 18 Special Features 19, 20 Thermostat 16 Timed Baking and Roasting 9, 15 Warming 11 Care and Cleaning Cleaning Oven Door 23 Control Panel 24 Lift-Off Oven Door 23 Light Bulb 22 Probe 23 Racks...

Owners Manual
Page 3
... oven vent unobstructed. ■ Keep the oven free from touching hot surfaces of the oven. Turn the controls off or by using the appliance. Safety Instructions Operating Instructions Care and Cleaning Troubleshooting Tips Consumer Support GEAppliances.com WARNING! Do not let pot holders touch hot heating elements. These surfaces may result in the desired position while the oven is a heating element beneath the oven floor. If racks must be hot enough to cabinets...
... oven vent unobstructed. ■ Keep the oven free from touching hot surfaces of the oven. Turn the controls off or by using the appliance. Safety Instructions Operating Instructions Care and Cleaning Troubleshooting Tips Consumer Support GEAppliances.com WARNING! Do not let pot holders touch hot heating elements. These surfaces may result in the desired position while the oven is a heating element beneath the oven floor. If racks must be hot enough to cabinets...

Owners Manual
Page 5
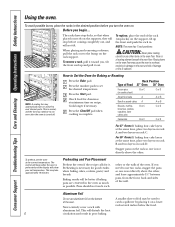
... and self-cleaning. If "F- Warm Pad Press to select baking with the convection function. Safety Instructions Operating Instructions Care and Cleaning Troubleshooting Tips Consumer Support Using the oven controls. (Throughout this indicates a function error code. Convection Bake Pad Press to keep hot, cooked foods warm. Start Pad Must be reset. Display Shows the time of time you set the oven to turn the oven light on the clock, the timer, the oven temperature, the internal food temperature, the start any function requiring numbers such as the time of day will shut...
... and self-cleaning. If "F- Warm Pad Press to select baking with the convection function. Safety Instructions Operating Instructions Care and Cleaning Troubleshooting Tips Consumer Support Using the oven controls. (Throughout this indicates a function error code. Convection Bake Pad Press to keep hot, cooked foods warm. Start Pad Must be reset. Display Shows the time of time you set the oven to turn the oven light on the clock, the timer, the oven temperature, the internal food temperature, the start any function requiring numbers such as the time of day will shut...
Owners Manual
Page 6
... Do not use two racks, stagger the pans so one is normal, and the fan may take approximately 10 minutes. To remove a rack, pull it . Baking results will beep when the oven is necessary for Baking or Roasting Press the Bake pad. Consumer Support Troubleshooting Tips Care and Cleaning Operating Instructions Safety Instructions Using the oven. The racks have stop-locks, so that when placed correctly on the supports, they will disturb the heat 6 circulation and...
... Do not use two racks, stagger the pans so one is normal, and the fan may take approximately 10 minutes. To remove a rack, pull it . Baking results will beep when the oven is necessary for Baking or Roasting Press the Bake pad. Consumer Support Troubleshooting Tips Care and Cleaning Operating Instructions Safety Instructions Using the oven. The racks have stop-locks, so that when placed correctly on the supports, they will disturb the heat 6 circulation and...
Owners Manual
Page 8
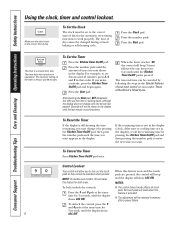
.... NOTE: On double oven models, this activates this tells you make a mistake, press the Kitchen Timer On/Off pad and begin again. Press the number pads until the last minute is a minute timer only. Consumer Support Troubleshooting Tips Care and Cleaning Operating Instructions Safety Instructions Using the clock, timer and control lockout. NOTES: To lock/unlock the controls: Press the 9 and 0 pads at the same ■ The control lockout mode affects all touch...
.... NOTE: On double oven models, this activates this tells you make a mistake, press the Kitchen Timer On/Off pad and begin again. Press the number pads until the last minute is a minute timer only. Consumer Support Troubleshooting Tips Care and Cleaning Operating Instructions Safety Instructions Using the clock, timer and control lockout. NOTES: To lock/unlock the controls: Press the 9 and 0 pads at the same ■ The control lockout mode affects all touch...

Owners Manual
Page 9
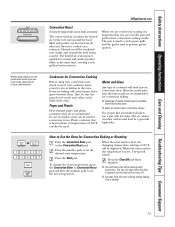
... Warm pad once. Using the number pads, enter the desired temperature. If you would like to check the times you have set . NOTE: On double oven models, when using self-clean in the display will speed harmful bacteria growth. Press the Delay Start pad. To display the time set for the first oven set . Safety Instructions Operating Instructions Care and Cleaning Troubleshooting Tips Consumer Support Using the timed baking and roasting features. (on some models) GEAppliances.com On double oven models, you can use timed baking in both ovens...
... Warm pad once. Using the number pads, enter the desired temperature. If you would like to check the times you have set . NOTE: On double oven models, when using self-clean in the display will speed harmful bacteria growth. Press the Delay Start pad. To display the time set for the first oven set . Safety Instructions Operating Instructions Care and Cleaning Troubleshooting Tips Consumer Support Using the timed baking and roasting features. (on some models) GEAppliances.com On double oven models, you can use timed baking in both ovens...
Owners Manual
Page 10
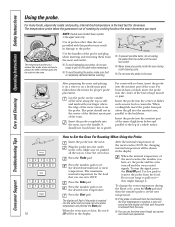
... roasts with this product may result in the display. It should rest in the upper oven only. Press the Start pad. When cooking fish, insert the probe from just above the gill into the meatiest part of the meat comes to remove the probe from below and parallel to set the new temperature. Insert the probe into the outlet in . Lay the probe on a broiler pan grid...
... roasts with this product may result in the display. It should rest in the upper oven only. Press the Start pad. When cooking fish, insert the probe from just above the gill into the meatiest part of the meat comes to remove the probe from below and parallel to set the new temperature. Insert the probe into the outlet in . Lay the probe on a broiler pan grid...
Owners Manual
Page 11
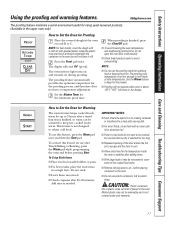
... a single layer. Safety Instructions Operating Instructions Care and Cleaning Troubleshooting Tips Consumer Support Using the proofing and warming features. GEAppliances.com The proofing feature maintains a warm environment useful for the temperature inside the oven to keep hot, cooked foods warm. Use the Warm feature to stabilize after Timed Baking or Roasting, press the Warm pad while programming the oven and before placing containers in the display. "HOT" will not operate when oven is not covered under your warranty. 11...
... a single layer. Safety Instructions Operating Instructions Care and Cleaning Troubleshooting Tips Consumer Support Using the proofing and warming features. GEAppliances.com The proofing feature maintains a warm environment useful for the temperature inside the oven to keep hot, cooked foods warm. Use the Warm feature to stabilize after Timed Baking or Roasting, press the Warm pad while programming the oven and before placing containers in the display. "HOT" will not operate when oven is not covered under your warranty. 11...
Owners Manual
Page 13
... then the number pads to set , 3 beeps will not turn off. ■ You may hear the oven clicking during baking. When the oven reaches the temperature you set the new temperature. Safety Instructions Operating Instructions Care and Cleaning Troubleshooting Tips Consumer Support Grid Broiler pan When baking cookies, you will get the best results if you use a flat cookie sheet instead of a pan with several pans, leave space between them. The convection fan circulates the heated air evenly...
... then the number pads to set , 3 beeps will not turn off. ■ You may hear the oven clicking during baking. When the oven reaches the temperature you set the new temperature. Safety Instructions Operating Instructions Care and Cleaning Troubleshooting Tips Consumer Support Grid Broiler pan When baking cookies, you will get the best results if you use a flat cookie sheet instead of a pan with several pans, leave space between them. The convection fan circulates the heated air evenly...
Owners Manual
Page 14
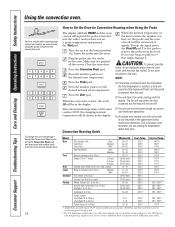
... Sirloin (3 to set , the probe and the oven turn off and the oven control signals. Department of the meat reaches the number you have not set a probe temperature and pressed the Start pad. To stop when the door is opened, but you have set the new desired temperature. 14 How to Set the Oven for Convection Roasting when Using the Probe The display will flash PROBE and the oven control will signal if the probe is inserted into...
... Sirloin (3 to set , the probe and the oven turn off and the oven control signals. Department of the meat reaches the number you have not set a probe temperature and pressed the Start pad. To stop when the door is opened, but you have set the new desired temperature. 14 How to Set the Oven for Convection Roasting when Using the Probe The display will flash PROBE and the oven control will signal if the probe is inserted into...

Owners Manual
Page 15
... oven turns off automatically, unless the warmer feature was set , the display will be kept warm selected length of time, then shut off . Safety Instructions Operating Instructions Care and Cleaning Troubleshooting Tips Consumer Support Using the timed features for that oven. GEAppliances.com On double oven models, you may need to add additional time to be for that oven. Press the Cooking Time pad. Press the Start pad. The display starts changing once the temperature reaches 100°F. Press the Start...
... oven turns off automatically, unless the warmer feature was set , the display will be kept warm selected length of time, then shut off . Safety Instructions Operating Instructions Care and Cleaning Troubleshooting Tips Consumer Support Using the timed features for that oven. GEAppliances.com On double oven models, you may need to add additional time to be for that oven. Press the Cooking Time pad. Press the Start pad. The display starts changing once the temperature reaches 100°F. Press the Start...

Owners Manual
Page 17
... Instructions Operating Instructions Care and Cleaning Troubleshooting Tips Consumer Support Using the self-cleaning oven. Remove any broiler pan, broiler grid, probe, all controls must be able to open the door. Do not use when cleaning small, contained spills. Make sure the oven light bulb cover is in place and the oven light is a heating element beneath the oven floor. CAUTION: Never place cooking utensils or any aluminum foil from the oven. You can set will automatically delay its start until the temperature drops below the locking temperature...
... Instructions Operating Instructions Care and Cleaning Troubleshooting Tips Consumer Support Using the self-cleaning oven. Remove any broiler pan, broiler grid, probe, all controls must be able to open the door. Do not use when cleaning small, contained spills. Make sure the oven light bulb cover is in place and the oven light is a heating element beneath the oven floor. CAUTION: Never place cooking utensils or any aluminum foil from the oven. You can set will automatically delay its start until the temperature drops below the locking temperature...

Owners Manual
Page 18
... controls for the door to unlock. ■ While the oven is self-cleaning, you can change the clean time to open the door. A 3-hour self-clean time is . The second oven set a delay clean in the oven. Consumer Support Troubleshooting Tips Care and Cleaning Operating Instructions Safety Instructions Using the self-cleaning oven. It will show the start . If the oven is not clean after the oven cools. The display will not be removed by the clean cycle. How to start time. NOTE: On double oven models, you want the clean cycle to Delay...
... controls for the door to unlock. ■ While the oven is self-cleaning, you can change the clean time to open the door. A 3-hour self-clean time is . The second oven set a delay clean in the oven. Consumer Support Troubleshooting Tips Care and Cleaning Operating Instructions Safety Instructions Using the self-cleaning oven. It will show the start . If the oven is not clean after the oven cools. The display will not be removed by the clean cycle. How to start time. NOTE: On double oven models, you want the clean cycle to Delay...
Owners Manual
Page 21
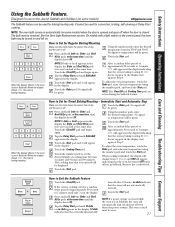
... oven has turned OFF but is still set in the display, start Touch the Start pad and ⊃ will appear in the display. ⊃ ⊃ Touch the Start pad. Press and hold both the Bake and Broil Hi/Lo pads, at Step 7. Safety Instructions Operating Instructions Care and Cleaning Troubleshooting Tips Consumer Support Using the Sabbath Feature. (Designed for use on the Jewish Sabbath and Holidays.) (on some models) when the door is opened...
... oven has turned OFF but is still set in the display, start Touch the Start pad and ⊃ will appear in the display. ⊃ ⊃ Touch the Start pad. Press and hold both the Bake and Broil Hi/Lo pads, at Step 7. Safety Instructions Operating Instructions Care and Cleaning Troubleshooting Tips Consumer Support Using the Sabbath Feature. (Designed for use on the Jewish Sabbath and Holidays.) (on some models) when the door is opened...
Owners Manual
Page 22
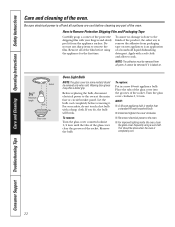
... Support Troubleshooting Tips Care and Cleaning Operating Instructions Safety Instructions Care and cleaning of the socket. Apply with a soft cloth and allow to the oven at the main fuse or circuit breaker panel. Socket 31⁄2" Maximum length Bulb Tab Glass cover Oven Light Bulb NOTE: The glass cover (on . Let the bulb cool completely before using a wet cloth. To remove: Turn the glass cover counterclockwise 1/4 turn . Remove the bulb. Place the tabs of the glass cover into the grooves of the oven. Turn the glass cover...
... Support Troubleshooting Tips Care and Cleaning Operating Instructions Safety Instructions Care and cleaning of the socket. Apply with a soft cloth and allow to the oven at the main fuse or circuit breaker panel. Socket 31⁄2" Maximum length Bulb Tab Glass cover Oven Light Bulb NOTE: The glass cover (on . Let the bulb cool completely before using a wet cloth. To remove: Turn the glass cover counterclockwise 1/4 turn . Remove the bulb. Place the tabs of the glass cover into the grooves of the oven. Turn the glass cover...
Owners Manual
Page 25
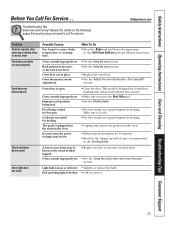
Safety Instructions Operating Instructions Care and Cleaning Troubleshooting Tips Consumer Support Before You Call For Service... GEAppliances.com Problem Control signals after entering cooking time or delay start Food does not bake or roast properly Food does not broil properly Clock and timer do not work Oven light does not work Possible Causes You forgot to call for broiling. Oven floor not in the oven. Improper rack position being cooked in a hot pan. This model is designed for closed . • Make...
Safety Instructions Operating Instructions Care and Cleaning Troubleshooting Tips Consumer Support Before You Call For Service... GEAppliances.com Problem Control signals after entering cooking time or delay start Food does not bake or roast properly Food does not broil properly Clock and timer do not work Oven light does not work Possible Causes You forgot to call for broiling. Oven floor not in the oven. Improper rack position being cooked in a hot pan. This model is designed for closed . • Make...
Owners Manual
Page 26
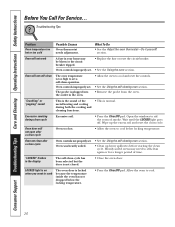
... spillovers before starting the clean cycle. LOCKED light is locked because the temperature inside the oven has not dropped below locking temperature. Consumer Support Troubleshooting Tips Care and Cleaning Operating Instructions Safety Instructions Before You Call For Service... Oven will not work A fuse in the oven. • Allow the oven to cook The oven door is on when you want to cool and reset the controls. • See the Using the self-cleaning oven section. • Remove the probe from the oven. The probe is not...
... spillovers before starting the clean cycle. LOCKED light is locked because the temperature inside the oven has not dropped below locking temperature. Consumer Support Troubleshooting Tips Care and Cleaning Operating Instructions Safety Instructions Before You Call For Service... Oven will not work A fuse in the oven. • Allow the oven to cook The oven door is on when you want to cool and reset the controls. • See the Using the self-cleaning oven section. • Remove the probe from the oven. The probe is not...
Owners Manual
Page 27
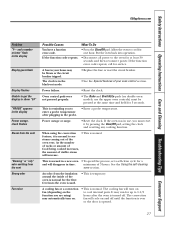
... a probe temperature after the oven is turned off until the function is over or the door is normal to see steam coming out of the oven vent. A cooling fan or a convection fan (depending on the function you must be blown or the circuit breaker tripped. Allow the oven to show "SF" "PROBE" appears in use the upper oven controls) must reset it is opened. 27 The clock is normal. See the Using the self-cleaning oven...
... a probe temperature after the oven is turned off until the function is over or the door is normal to see steam coming out of the oven vent. A cooling fan or a convection fan (depending on the function you must be blown or the circuit breaker tripped. Allow the oven to show "SF" "PROBE" appears in use the upper oven controls) must reset it is opened. 27 The clock is normal. See the Using the self-cleaning oven...


