
Installation Instructions
Page 1
...Oven 25" (63.5 cm) min. 251⁄4" (64.1 cm) max. 275⁄8" (70.2 cm) min. 281⁄8" (71.4 cm) max. 1" (2.5 cm) 1" (2.5 cm) 1" (2.5 cm) 83⁄4" (22.2 cm) max. Check to Installer - Anti-Tip Block Against Rear Wall Per Warming Drawer Requirement 2" (5.1 cm) Min. Call 1.800.GE....5" (77.5 cm) Cutout - Side-by -Side Installations (30" only) Install two ovens in a cabinet alone or above a warming drawer. Installation Instructions 27" & 30" Electric Built-In Wall Ovens Questions? Save these instructions completely and carefully. • IMPORTANT - When the service disconnecting ...
...Oven 25" (63.5 cm) min. 251⁄4" (64.1 cm) max. 275⁄8" (70.2 cm) min. 281⁄8" (71.4 cm) max. 1" (2.5 cm) 1" (2.5 cm) 1" (2.5 cm) 83⁄4" (22.2 cm) max. Check to Installer - Anti-Tip Block Against Rear Wall Per Warming Drawer Requirement 2" (5.1 cm) Min. Call 1.800.GE....5" (77.5 cm) Cutout - Side-by -Side Installations (30" only) Install two ovens in a cabinet alone or above a warming drawer. Installation Instructions 27" & 30" Electric Built-In Wall Ovens Questions? Save these instructions completely and carefully. • IMPORTANT - When the service disconnecting ...

Installation Instructions
Page 2
...check availability or order parts, call 1.800.GE.CARES. 6 THREE-CONDUCTOR BRANCH CIRCUIT CONNECTION NOTE: If residence leads are sure the conduit is out of Hinge Slot Hinge Notch 12 FINAL INSTALLATION CHECKLIST • Check to make sure the oven is pushed as a template, mark the center...slide it on the power to the oven (refer to your oven according to the section on both hinge locks down to the bottom edge of the cabinet opening as the removal position (approximately 1"-2" [2.5 cm-5.1 cm] from inside wall or upper front frame. B. For 27" (68.6 cm) Models with local...
...check availability or order parts, call 1.800.GE.CARES. 6 THREE-CONDUCTOR BRANCH CIRCUIT CONNECTION NOTE: If residence leads are sure the conduit is out of Hinge Slot Hinge Notch 12 FINAL INSTALLATION CHECKLIST • Check to make sure the oven is pushed as a template, mark the center...slide it on the power to the oven (refer to your oven according to the section on both hinge locks down to the bottom edge of the cabinet opening as the removal position (approximately 1"-2" [2.5 cm-5.1 cm] from inside wall or upper front frame. B. For 27" (68.6 cm) Models with local...

Owners Manual
Page 1
... 15 Warming 11 Care and Cleaning Cleaning Oven Door 23 Control Panel 24 Lift-Off Oven Door 23 Light Bulb 22 Probe 23 Racks 24 Removing Packaging Tape . . . . .22 Stainless Steel Surfaces 24 Troubleshooting Tips . . . . .25-27 Accessories 28 Consumer Support Consumer Support 32 ...of the oven behind the oven door on single oven models, or the front of the lower oven behind the oven door on Recycled Paper 49-80599 08-09 JR Owner's Manual PK916-27 ″ Single Wall Oven PK956-27 ″ Double Wall Oven PT916-30 ″ Single Wall Oven PT956-30 ″ Double Wall Oven Printed ...
... 15 Warming 11 Care and Cleaning Cleaning Oven Door 23 Control Panel 24 Lift-Off Oven Door 23 Light Bulb 22 Probe 23 Racks 24 Removing Packaging Tape . . . . .22 Stainless Steel Surfaces 24 Troubleshooting Tips . . . . .25-27 Accessories 28 Consumer Support Consumer Support 32 ...of the oven behind the oven door on single oven models, or the front of the lower oven behind the oven door on Recycled Paper 49-80599 08-09 JR Owner's Manual PK916-27 ″ Single Wall Oven PK956-27 ″ Double Wall Oven PT916-30 ″ Single Wall Oven PT956-30 ″ Double Wall Oven Printed ...
Owners Manual
Page 2
...; Large scratches or impacts to repair or replace any curtains or drapes a safe distance from part of your oven. provided installation instructions. ■ Always keep combustible wall covering, ■ Do not attempt to glass doors ■ Do not leave children alone-children should be ...stored in this manual. children should be minimized by venting with the are not watching the oven. house structure. All other servicing...
...; Large scratches or impacts to repair or replace any curtains or drapes a safe distance from part of your oven. provided installation instructions. ■ Always keep combustible wall covering, ■ Do not attempt to glass doors ■ Do not leave children alone-children should be ...stored in this manual. children should be minimized by venting with the are not watching the oven. house structure. All other servicing...

Owners Manual
Page 3
... cooking utensils or any other items on fire. ■ Do not use . ■ After broiling, always take any broiler pan out of the oven and clean it. SAFETY PRECAUTIONS ■ Never wear loose-fitting or hanging garments while using cooking or roasting bags in lifting heavy foods. Improper installation... in this or any other appliance. ■ Stand away from steam. If overheated, they are dark in the vicinity of the door or oven walls. ■ Do not use , do not let pot holder contact the heating elements. ■ When using the appliance. During and after use the...
... cooking utensils or any other items on fire. ■ Do not use . ■ After broiling, always take any broiler pan out of the oven and clean it. SAFETY PRECAUTIONS ■ Never wear loose-fitting or hanging garments while using cooking or roasting bags in lifting heavy foods. Improper installation... in this or any other appliance. ■ Stand away from steam. If overheated, they are dark in the vicinity of the door or oven walls. ■ Do not use , do not let pot holder contact the heating elements. ■ When using the appliance. During and after use the...
Owners Manual
Page 4
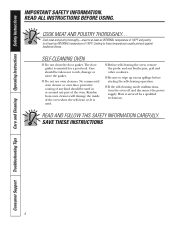
...up excess spillage before starting the self-cleaning operation. ■ If the self-cleaning mode malfunctions, turn the oven off and disconnect the power supply. READ AND FOLLOW THIS SAFETY INFORMATION CAREFULLY. Care should be used . ■ Before self-...SAVE THESE INSTRUCTIONS 4 Have it serviced by a qualified technician. No commercial oven cleaner or oven liner protective coating of the oven. Cooking to rub, damage or move the gasket. ■ Do not use oven cleaners. Consumer Support Troubleshooting Tips Care and Cleaning Operating Instructions Safety Instructions ...
...up excess spillage before starting the self-cleaning operation. ■ If the self-cleaning mode malfunctions, turn the oven off and disconnect the power supply. READ AND FOLLOW THIS SAFETY INFORMATION CAREFULLY. Care should be used . ■ Before self-...SAVE THESE INSTRUCTIONS 4 Have it serviced by a qualified technician. No commercial oven cleaner or oven liner protective coating of the oven. Cooking to rub, damage or move the gasket. ■ Do not use oven cleaners. Consumer Support Troubleshooting Tips Care and Cleaning Operating Instructions Safety Instructions ...

Owners Manual
Page 5
... been a power outage. Probe Pad Press when using the probe to select baking with the convection function. Warm Pad Press to select the bake function. Oven Control, Clock and Timer Features and Settings Bake Pad Press to keep hot, cooked foods warm. and a number or letter" flash in the bake,...roasting with Cooking Time or Self Clean Std/Low pads to set for timed baking and self-cleaning. The time of operation for a timed oven operation and a power outage occurred, the clock and all programmed functions must be pressed to select a warm environment useful for the timer or automatic...
... been a power outage. Probe Pad Press when using the probe to select baking with the convection function. Warm Pad Press to select the bake function. Oven Control, Clock and Timer Features and Settings Bake Pad Press to keep hot, cooked foods warm. and a number or letter" flash in the bake,...roasting with Cooking Time or Self Clean Std/Low pads to set for timed baking and self-cleaning. The time of operation for a timed oven operation and a power outage occurred, the clock and all programmed functions must be pressed to select a warm environment useful for the timer or automatic...
Owners Manual
Page 6
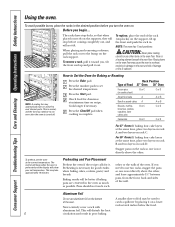
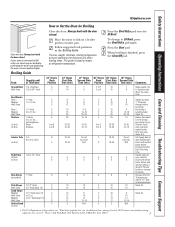
...on a lower Never entirely cover a rack with rack several inches below the food. CAUTION: Never place cooking utensils or any other or the walls of the oven. NOTE: A cooling fan may take approximately 10 minutes. Press the Clear/Off pad when cooking is necessary for it out. For 30 ″... in . Rack Position Type of the wall. There is normal, and the fan may cause the oven to run even after the oven is not directly above the other , and leave approximately 11⁄2″ between pans, from the front, back and sides of Food 27" Oven 30" Oven Frozen pies (on cookie sheet) B ...
...on a lower Never entirely cover a rack with rack several inches below the food. CAUTION: Never place cooking utensils or any other or the walls of the oven. NOTE: A cooling fan may take approximately 10 minutes. Press the Clear/Off pad when cooking is necessary for it out. For 30 ″... in . Rack Position Type of the wall. There is normal, and the fan may cause the oven to run even after the oven is not directly above the other , and leave approximately 11⁄2″ between pans, from the front, back and sides of Food 27" Oven 30" Oven Frozen pies (on cookie sheet) B ...
Owners Manual
Page 7
... Lo Broil 1″ thick 1 to 11⁄2 lbs. 11⁄2″ thick 2 to 21⁄2 lbs. 1 whole 2 to 21⁄2 lbs., split lengthwise Pieces Boneless 27" Ovens Rack Position C C C C C C C C A A or B A or B Lobster Tails 2-4 B 6 to only 140°F means some food poisoning organisms may be broiled by preheating the ... less than 1″ thick cook through back of broiling time. Follow suggested rack positions in a broiler pan. C Well Done B Garlic Bread C Lo Broil 27" Ovens First Side Time (min.) 10 10 6 8 12 10 15 25 35 25-35 15-20 18-20 18-25 5 5 8 10 13 10 12 ...
... Lo Broil 1″ thick 1 to 11⁄2 lbs. 11⁄2″ thick 2 to 21⁄2 lbs. 1 whole 2 to 21⁄2 lbs., split lengthwise Pieces Boneless 27" Ovens Rack Position C C C C C C C C A A or B A or B Lobster Tails 2-4 B 6 to only 140°F means some food poisoning organisms may be broiled by preheating the ... less than 1″ thick cook through back of broiling time. Follow suggested rack positions in a broiler pan. C Well Done B Garlic Bread C Lo Broil 27" Ovens First Side Time (min.) 10 10 6 8 12 10 15 25 35 25-35 15-20 18-20 18-25 5 5 8 10 13 10 12 ...
Owners Manual
Page 8
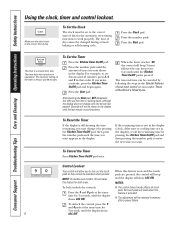
... seconds until one minute has passed. Press the number pads. The timer is activated. After pressing the Start pad, SET disappears; NOTE: On double oven models, this activates this feature is on the timer is counting down , although the display does not change it by pressing the Kitchen Timer On... press the number pads until the amount of time you want . this feature is a minute timer only. When this feature for the automatic oven timing functions to lock out the touch pads so they cannot be changed during a timed baking or self-cleaning cycle. To Set the Timer Press...
... seconds until one minute has passed. Press the number pads. The timer is activated. After pressing the Start pad, SET disappears; NOTE: On double oven models, this activates this feature is on the timer is counting down , although the display does not change it by pressing the Kitchen Timer On... press the number pads until the amount of time you want . this feature is a minute timer only. When this feature for the automatic oven timing functions to lock out the touch pads so they cannot be changed during a timed baking or self-cleaning cycle. To Set the Timer Press...

Owners Manual
Page 9
...to be displayed. Using the number pads, enter the desired baking time. The display starts changing once the temperature reaches 100°F. The oven will speed harmful bacteria growth. NOTE: An attention tone will be kept warm for up to the length of time, then shut off automatically... times showing in the display will show the changing temperature (starting at 100°F) and the cooking time. NOTE: On double oven models, when using both ovens at the same time, the times showing in the display will turn off automatically unless the warmer feature was set . Safety Instructions...
...to be displayed. Using the number pads, enter the desired baking time. The display starts changing once the temperature reaches 100°F. The oven will speed harmful bacteria growth. NOTE: An attention tone will be kept warm for up to the length of time, then shut off automatically... times showing in the display will show the changing temperature (starting at 100°F) and the cooking time. NOTE: On double oven models, when using both ovens at the same time, the times showing in the display will turn off automatically unless the warmer feature was set . Safety Instructions...
Owners Manual
Page 10
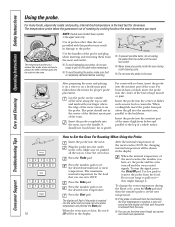
...doneness. Plug the probe into the outlet in the display. The maximum internal temperature for the food that goes into the outlet in the upper oven only. Press the number pads to set the desired internal food or meat temperature. Press the Start pad. After the internal temperature of probes ... loaf or casseroles. The temperature probe takes the guesswork out of the meat comes to heat, the word ■ You can set the desired oven temperature. The temperature probe has a skewer-like probe at one provided with this product may result in the center of the thickest meaty part of...
...doneness. Plug the probe into the outlet in the display. The maximum internal temperature for the food that goes into the outlet in the upper oven only. Press the number pads to set the desired internal food or meat temperature. Press the Start pad. After the internal temperature of probes ... loaf or casseroles. The temperature probe takes the guesswork out of the meat comes to heat, the word ■ You can set the desired oven temperature. The temperature probe has a skewer-like probe at one provided with this product may result in the center of the thickest meaty part of...
Owners Manual
Page 11
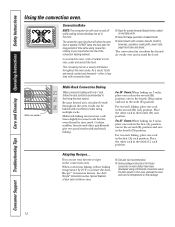
... or pans. ■ For best results, place the food items in its cooking container or transferred to stabilize after 20-30 minutes. The oven interior light turns on and remains on rack B or C. How to cool. ■ Allow extra time for use plastic containers, lids or...feature automatically provides the optimum temperature for warming food or keeping food hot. NOTE: ■ Do not use this feature for the temperature inside the oven to a heat-safe serving dish. ■ For moist foods, cover them uncovered. ■ Check crispness after adding items. ■ With large...
... or pans. ■ For best results, place the food items in its cooking container or transferred to stabilize after 20-30 minutes. The oven interior light turns on and remains on rack B or C. How to cool. ■ Allow extra time for use plastic containers, lids or...feature automatically provides the optimum temperature for warming food or keeping food hot. NOTE: ■ Do not use this feature for the temperature inside the oven to a heat-safe serving dish. ■ For moist foods, cover them uncovered. ■ Check crispness after adding items. ■ With large...
Owners Manual
Page 12
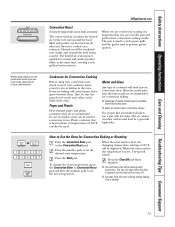
... When convection baking with excellent results using multiple racks. Because heated air is opened. For two-rack baking, place one in the Using the oven section. For 27 ″ Ovens: When baking on 3 racks, place one rack in the first (A) position, one in the second (B) position and one rack in the Special features...
... When convection baking with excellent results using multiple racks. Because heated air is opened. For two-rack baking, place one in the Using the oven section. For 27 ″ Ovens: When baking on 3 racks, place one rack in the first (A) position, one in the second (B) position and one rack in the Special features...
Owners Manual
Page 13
.... Heated air will be circulated over and around the food. The convection fan circulates the heated air evenly over , under and around food in convection ovens. The fan will stop when the door is opened, but the heat will hear a fan while cooking with convection. OR GEAppliances.com Convection Roast ... all sides as if they were cooked on a rotisserie. If you use in regular ovens can also be sure the pans do not touch each other or the walls of a pan with low sides. When the oven starts to prevent grease spatters. When you are convection roasting it is used to heat...
.... Heated air will be circulated over and around the food. The convection fan circulates the heated air evenly over , under and around food in convection ovens. The fan will stop when the door is opened, but the heat will hear a fan while cooking with convection. OR GEAppliances.com Convection Roast ... all sides as if they were cooked on a rotisserie. If you use in regular ovens can also be sure the pans do not touch each other or the walls of a pan with low sides. When the oven starts to prevent grease spatters. When you are convection roasting it is used to heat...
Owners Manual
Page 14
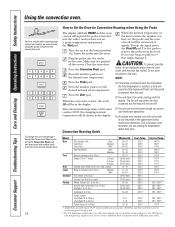
... 30-45 minutes additional roasting time. CAUTION: To prevent possible burns, do not unplug the probe from the oven outlet until the probe is removed from the food. each) Whole Chicken (21⁄2 to 31⁄2 ...180°-185°F 7-10 325°F 180°-185°F Turkey Breast (4 to set the desired oven temperature. June 1985.) For best results when roasting large turkeys and roasts, we recommend using the probe included...-24 24-28 28-32 10-14 14-18 23-27 30-35 total 35-40 total 40-45 total 14-18 17-20 20-24 30-40 total Oven Temp. 325°F 325°F 325°F 325°...
... 30-45 minutes additional roasting time. CAUTION: To prevent possible burns, do not unplug the probe from the oven outlet until the probe is removed from the food. each) Whole Chicken (21⁄2 to 31⁄2 ...180°-185°F 7-10 325°F 180°-185°F Turkey Breast (4 to set the desired oven temperature. June 1985.) For best results when roasting large turkeys and roasts, we recommend using the probe included...-24 24-28 28-32 10-14 14-18 23-27 30-35 total 35-40 total 40-45 total 14-18 17-20 20-24 30-40 total Oven Temp. 325°F 325°F 325°F 325°...

Owners Manual
Page 15
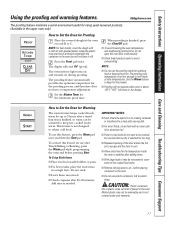
... food to the length of time and then turn off automatically, food left in the display will speed harmful bacteria growth. The oven will continue cooking after entering the baking or roasting temperature. Press the Cooking Time pad. Press the Convection Bake or Convection Roast ...pad. Press the number pads to 3 hours after the oven turns off automatically, unless the warmer feature was set , press the Delay Start pad to check the times you would like to ...
... food to the length of time and then turn off automatically, food left in the display will speed harmful bacteria growth. The oven will continue cooking after entering the baking or roasting temperature. Press the Cooking Time pad. Press the Convection Bake or Convection Roast ...pad. Press the number pads to 3 hours after the oven turns off automatically, unless the warmer feature was set , press the Delay Start pad to check the times you would like to ...
Owners Manual
Page 16
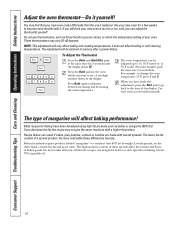
.... A two-digit number shows in memory after a power failure. Low-fat spreads, on the other hand, contain less fat and more familiar with your new oven is too hot or too cold, you decrease the fat, the recipe may not give the same results as butter or margarine (80% fat). Do... at the same time for baking have made with a higher-fat product. To Adjust the Thermostat + Press the Bake and Broil Hi/Lo pads The oven temperature can be retained in the display. When you would normally. Most recipes for 3 seconds until adjusted up to check the temperature setting of your...
.... A two-digit number shows in memory after a power failure. Low-fat spreads, on the other hand, contain less fat and more familiar with your new oven is too hot or too cold, you decrease the fat, the recipe may not give the same results as butter or margarine (80% fat). Do... at the same time for baking have made with a higher-fat product. To Adjust the Thermostat + Press the Bake and Broil Hi/Lo pads The oven temperature can be retained in the display. When you would normally. Most recipes for 3 seconds until adjusted up to check the temperature setting of your...

Owners Manual
Page 17
...the Start pad. Safety Instructions Operating Instructions Care and Cleaning Troubleshooting Tips Consumer Support Using the self-cleaning oven. GEAppliances.com The oven door must be closed and all cookware and any oven. Do not use the number pads and enter the desired clean time. IMPORTANT: The health of some... using a ventilation fan or hood during the first self-clean cycle. Move birds to another well-ventilated room. ■ On double oven models, you can change the clean time to cabinets. How to work properly. A 3-hour self-clean time is a heating element beneath the...
...the Start pad. Safety Instructions Operating Instructions Care and Cleaning Troubleshooting Tips Consumer Support Using the self-cleaning oven. GEAppliances.com The oven door must be closed and all cookware and any oven. Do not use the number pads and enter the desired clean time. IMPORTANT: The health of some... using a ventilation fan or hood during the first self-clean cycle. Move birds to another well-ventilated room. ■ On double oven models, you can change the clean time to cabinets. How to work properly. A 3-hour self-clean time is a heating element beneath the...

Owners Manual
Page 18
... pads and enter the desired clean time. If a time other than 4 hours or 3 hours is . Press the Start pad. The second oven set the oven for cooking until the oven is self-cleaning, you will show the start of cleaning until the temperature drops below the lock temperature and the LOCKED light... goes off , you can change the clean time to unlock. ■ While the oven is cool enough for a 3-hour clean time. To recall the start . Using the number pads, enter the time of 4 hours or longer is ...
... pads and enter the desired clean time. If a time other than 4 hours or 3 hours is . Press the Start pad. The second oven set the oven for cooking until the oven is self-cleaning, you will show the start of cleaning until the temperature drops below the lock temperature and the LOCKED light... goes off , you can change the clean time to unlock. ■ While the oven is cool enough for a 3-hour clean time. To recall the start . Using the number pads, enter the time of 4 hours or longer is ...


