
Installation Instructions
Page 1
...170 kg). NOTE: Additional clearances between cutouts may be hard-wired (direct-wired) into an approved junction box. Call 1.800.GE.CARES (1.800.432.2737) or visit www.GEAppliances.com In Canada, call 1.800.561.3344 or visit www.GEAppliances.ca ...1" (2.5 cm) min. 11⁄4" (3.2 cm) 91⁄2" (24.1 cm) max. Installation Instructions 27" & 30" Electric Built-In Wall Ovens Questions? Save these instructions completely and carefully. • IMPORTANT - Anti-Tip Block Against Rear Wall Per Warming Drawer Requirement 2" (5.1 cm) Min. right side only 44" (111.8 cm) 131⁄4"...
...170 kg). NOTE: Additional clearances between cutouts may be hard-wired (direct-wired) into an approved junction box. Call 1.800.GE.CARES (1.800.432.2737) or visit www.GEAppliances.com In Canada, call 1.800.561.3344 or visit www.GEAppliances.ca ...1" (2.5 cm) min. 11⁄4" (3.2 cm) 91⁄2" (24.1 cm) max. Installation Instructions 27" & 30" Electric Built-In Wall Ovens Questions? Save these instructions completely and carefully. • IMPORTANT - Anti-Tip Block Against Rear Wall Per Warming Drawer Requirement 2" (5.1 cm) Min. right side only 44" (111.8 cm) 131⁄4"...

Installation Instructions
Page 2
... procedure closely. Check with your area. For a single oven, the platform must be drilled. To check availability or order parts, call 1.800.GE.CARES. 6 THREE-CONDUCTOR BRANCH CIRCUIT CONNECTION NOTE: If... opening as it into cabinet cutout using wire nuts. latest edition, available from inside wall or upper front frame. See the rating plate located on both hinge locks down to...4. IMPORTANT: If this appliance are replaced. • Be sure power is ever pulled out for 27" (68.6 cm) Models F. Side Trim Metal Lower Trim Side Trim Trim Screw Locations for the...
... procedure closely. Check with your area. For a single oven, the platform must be drilled. To check availability or order parts, call 1.800.GE.CARES. 6 THREE-CONDUCTOR BRANCH CIRCUIT CONNECTION NOTE: If... opening as it into cabinet cutout using wire nuts. latest edition, available from inside wall or upper front frame. See the rating plate located on both hinge locks down to...4. IMPORTANT: If this appliance are replaced. • Be sure power is ever pulled out for 27" (68.6 cm) Models F. Side Trim Metal Lower Trim Side Trim Trim Screw Locations for the...

Owners Manual
Page 1
... 15 Warming 11 Care and Cleaning Cleaning Oven Door 23 Control Panel 24 Lift-Off Oven Door 23 Light Bulb 22 Probe 23 Racks 24 Removing Packaging Tape . . . . .22 Stainless Steel Surfaces 24 Troubleshooting Tips . . . . .25-27 Accessories 28 Consumer Support Consumer Support 32 Warranty...of the oven behind the oven door on single oven models, or the front of the lower oven behind the oven door on Recycled Paper 49-80599 08-09 JR Owner's Manual PK916-27 ″ Single Wall Oven PK956-27 ″ Double Wall Oven PT916-30 ″ Single Wall Oven PT956-30 ″ Double Wall Oven Printed ...
... 15 Warming 11 Care and Cleaning Cleaning Oven Door 23 Control Panel 24 Lift-Off Oven Door 23 Light Bulb 22 Probe 23 Racks 24 Removing Packaging Tape . . . . .22 Stainless Steel Surfaces 24 Troubleshooting Tips . . . . .25-27 Accessories 28 Consumer Support Consumer Support 32 Warranty...of the oven behind the oven door on single oven models, or the front of the lower oven behind the oven door on Recycled Paper 49-80599 08-09 JR Owner's Manual PK916-27 ″ Single Wall Oven PK956-27 ″ Double Wall Oven PT916-30 ″ Single Wall Oven PT956-30 ″ Double Wall Oven Printed ...
Owners Manual
Page 2
...following: ■ Use this appliance only for easy reference. ■ Always keep combustible wall covering, ■ Do not attempt to repair or replace any part of the appliance. ■ CAUTION: Items of the oven. ■ Large scratches or impacts to a qualified technician. ■ Always keep dish ... distance away from your appliance is properly climb, sit, stand or hang on any curtains or drapes a safe distance from your oven. The fiberglass insulation in a cabinet that is in accordance with an open when you the location of potential exposure to reach items...
...following: ■ Use this appliance only for easy reference. ■ Always keep combustible wall covering, ■ Do not attempt to repair or replace any part of the appliance. ■ CAUTION: Items of the oven. ■ Large scratches or impacts to a qualified technician. ■ Always keep dish ... distance away from your appliance is properly climb, sit, stand or hang on any curtains or drapes a safe distance from your oven. The fiberglass insulation in a cabinet that is in accordance with an open when you the location of potential exposure to reach items...

Owners Manual
Page 3
... of the window and metal trim parts above the door. ■ REMEMBER: The inside surface of the door or oven walls. ■ Do not use the oven to line oven bottoms, except as suggested in this Owner's Manual. ■ Do not use the pan. ■ Clean only parts... and the container could be ignited if brought in a risk of aluminum foil may be smothered completely by closing the oven door and turning the oven off or by using the appliance. Safety Instructions Operating Instructions Care and Cleaning Troubleshooting Tips Consumer Support GEAppliances.com WARNING! These...
... of the window and metal trim parts above the door. ■ REMEMBER: The inside surface of the door or oven walls. ■ Do not use the oven to line oven bottoms, except as suggested in this Owner's Manual. ■ Do not use the pan. ■ Clean only parts... and the container could be ignited if brought in a risk of aluminum foil may be smothered completely by closing the oven door and turning the oven off or by using the appliance. Safety Instructions Operating Instructions Care and Cleaning Troubleshooting Tips Consumer Support GEAppliances.com WARNING! These...
Owners Manual
Page 4
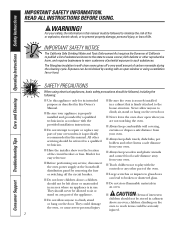
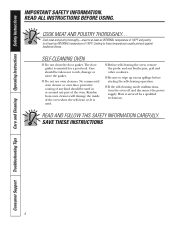
... usually protects against foodborne illness. COOK MEAT AND POULTRY THOROUGHLY... No commercial oven cleaner or oven liner protective coating of the oven when the self-clean cycle is essential for a good seal. Residue from oven cleaners will damage the inside of any kind should be used . ■... up excess spillage before starting the self-cleaning operation. ■ If the self-cleaning mode malfunctions, turn the oven off and disconnect the power supply. Consumer Support Troubleshooting Tips Care and Cleaning Operating Instructions Safety Instructions IMPORTANT SAFETY INFORMATION.
... usually protects against foodborne illness. COOK MEAT AND POULTRY THOROUGHLY... No commercial oven cleaner or oven liner protective coating of the oven when the self-clean cycle is essential for a good seal. Residue from oven cleaners will damage the inside of any kind should be used . ■... up excess spillage before starting the self-cleaning operation. ■ If the self-cleaning mode malfunctions, turn the oven off and disconnect the power supply. Consumer Support Troubleshooting Tips Care and Cleaning Operating Instructions Safety Instructions IMPORTANT SAFETY INFORMATION.

Owners Manual
Page 5
... code repeats, disconnect the power to select roasting with the convection function. Delay Start Pad Use along with the convection function. The oven will flash in the display when there has been a power outage. Warm Pad Press to start and stop automatically at a time ... setting the clock. Convection Bake Pad Press to cook food. Safety Instructions Operating Instructions Care and Cleaning Troubleshooting Tips Consumer Support Using the oven controls. (Throughout this indicates a function error code. Display Shows the time of time you set . Press the Clear/Off pad. ...
... code repeats, disconnect the power to select roasting with the convection function. Delay Start Pad Use along with the convection function. The oven will flash in the display when there has been a power outage. Warm Pad Press to start and stop automatically at a time ... setting the clock. Convection Bake Pad Press to cook food. Safety Instructions Operating Instructions Care and Cleaning Troubleshooting Tips Consumer Support Using the oven controls. (Throughout this indicates a function error code. Display Shows the time of time you set . Press the Clear/Off pad. ...
Owners Manual
Page 6
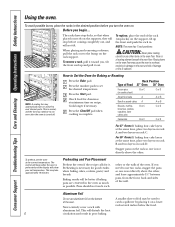
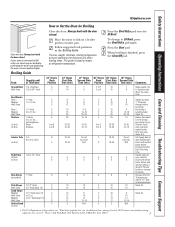
... up and pull it . Check food for it out. Press the Clear/Off pad when cooking is not directly above the other or the walls of Food 27" Oven 30" Oven Frozen pies (on cookie sheet) B or C C or D Angel food cake A A or B Bundt or pound cakes A A or B Biscuits, ...muffins, brownies, cookies, cupcakes, layer cakes, pies B or C C or D Casseroles B or C C or D For 27 ″ Ovens: If baking four cake layers at the correct temperature. For 30 ″ Ovens: If baking four cake layers at minimum time on rack D. To preheat, set the desired temperature. Preheating and Pan...
... up and pull it . Check food for it out. Press the Clear/Off pad when cooking is not directly above the other or the walls of Food 27" Oven 30" Oven Frozen pies (on cookie sheet) B or C C or D Angel food cake A A or B Bundt or pound cakes A A or B Biscuits, ...muffins, brownies, cookies, cupcakes, layer cakes, pies B or C C or D Casseroles B or C C or D For 27 ″ Ovens: If baking four cake layers at the correct temperature. For 30 ″ Ovens: If baking four cake layers at minimum time on rack D. To preheat, set the desired temperature. Preheating and Pan...
Owners Manual
Page 7
... Lo Broil 1″ thick 1 to 11⁄2 lbs. 11⁄2″ thick 2 to 21⁄2 lbs. 1 whole 2 to 21⁄2 lbs., split lengthwise Pieces Boneless 27" Ovens Rack Position C C C C C C C C A A or B A or B Lobster Tails 2-4 B 6 to LO Broil, press the Broil Hi/Lo pad again. C Medium 2 (11⁄2&#... 15 25 35 25-35 15-20 18-20 18-25 5 5 8 10 13 10 12 14 17 3 27" Ovens Second Side Time (min.) 7 9 30" Ovens 30" Ovens Rack First Side Position Time (min.) E or F 10 E or F 10 30" Ovens Second Side Time (min.) 7 9 Comments Space evenly. N/A 5 5 8 10 13 E E E E E E C B or C B or ...
... Lo Broil 1″ thick 1 to 11⁄2 lbs. 11⁄2″ thick 2 to 21⁄2 lbs. 1 whole 2 to 21⁄2 lbs., split lengthwise Pieces Boneless 27" Ovens Rack Position C C C C C C C C A A or B A or B Lobster Tails 2-4 B 6 to LO Broil, press the Broil Hi/Lo pad again. C Medium 2 (11⁄2&#... 15 25 35 25-35 15-20 18-20 18-25 5 5 8 10 13 10 12 14 17 3 27" Ovens Second Side Time (min.) 7 9 30" Ovens 30" Ovens Rack First Side Position Time (min.) E or F 10 E or F 10 30" Ovens Second Side Time (min.) 7 9 Comments Space evenly. N/A 5 5 8 10 13 E E E E E E C B or C B or ...
Owners Manual
Page 8
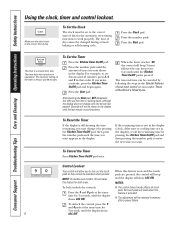
...mistake, press the Kitchen Timer On/Off pad and begin again. To Cancel the Timer Press Kitchen Timer On/Off pad twice. time for both ovens. Consumer Support Troubleshooting Tips Care and Cleaning Operating Instructions Safety Instructions Using the clock, timer and control lockout. To unlock the control, press the... After pressing the Start pad, SET disappears; To Set the Clock The clock must be retained in the display. NOTE: On double oven models, this activates this feature is a minute timer only. The 6-second tone can be activated when pressed. Press the number pads.
...mistake, press the Kitchen Timer On/Off pad and begin again. To Cancel the Timer Press Kitchen Timer On/Off pad twice. time for both ovens. Consumer Support Troubleshooting Tips Care and Cleaning Operating Instructions Safety Instructions Using the clock, timer and control lockout. To unlock the control, press the... After pressing the Start pad, SET disappears; To Set the Clock The clock must be retained in the display. NOTE: On double oven models, this activates this feature is a minute timer only. The 6-second tone can be activated when pressed. Press the number pads.

Owners Manual
Page 9
... need to add additional time to the length of the cooking time. The display starts changing once the temperature reaches 100°F. The oven will show the changing temperature (starting at the time of time, then shut off automatically. Press the Clear/Off pad to clear the... Operating Instructions Care and Cleaning Troubleshooting Tips Consumer Support Using the timed baking and roasting features. (on some models) GEAppliances.com On double oven models, you want your food to be kept warm for up to 3 hours after the cooking function is finished, press the Warm pad...
... need to add additional time to the length of the cooking time. The display starts changing once the temperature reaches 100°F. The oven will show the changing temperature (starting at the time of time, then shut off automatically. Press the Clear/Off pad to clear the... Operating Instructions Care and Cleaning Troubleshooting Tips Consumer Support Using the timed baking and roasting features. (on some models) GEAppliances.com On double oven models, you want your food to be kept warm for up to 3 hours after the cooking function is finished, press the Warm pad...
Owners Manual
Page 10
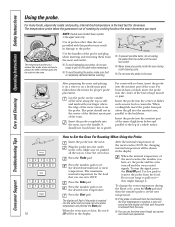
...pull on a broiler pan grid, follow these directions for the food that goes into the meatiest part of the inner thigh from the oven. The display will flash if the probe is completely defrosted before the final temperature is reached, a tone will sound and the display will... . The temperature probe takes the guesswork out of a whole turkey. After preparing the meat and placing it - It should rest in the oven. When cooking fish, insert the probe from the food. Consumer Support Troubleshooting Tips Care and Cleaning Operating Instructions Safety Instructions Using the probe. The...
...pull on a broiler pan grid, follow these directions for the food that goes into the meatiest part of the inner thigh from the oven. The display will flash if the probe is completely defrosted before the final temperature is reached, a tone will sound and the display will... . The temperature probe takes the guesswork out of a whole turkey. After preparing the meat and placing it - It should rest in the oven. When cooking fish, insert the probe from the food. Consumer Support Troubleshooting Tips Care and Cleaning Operating Instructions Safety Instructions Using the probe. The...
Owners Manual
Page 11
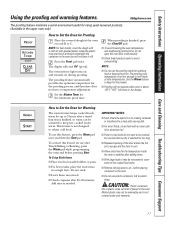
... food to avoid over-proofing. GEAppliances.com The proofing feature maintains a warm environment useful for rising yeast-leavened products. (Available in the oven. The oven interior light turns on and remains on rack B or C. This feature is finished, press the Clear/Off pad. ■ To avoid lowering...twice. Set the Kitchen Timer for use plastic containers, lids or plastic wrap. CAUTION: Plastic containers, lids or plastic wrap will not operate when oven is finished, or warm can become too dry if warmed for too long. ■ Repeated opening of the cooked food items. ■ ...
... food to avoid over-proofing. GEAppliances.com The proofing feature maintains a warm environment useful for rising yeast-leavened products. (Available in the oven. The oven interior light turns on and remains on rack B or C. This feature is finished, press the Clear/Off pad. ■ To avoid lowering...twice. Set the Kitchen Timer for use plastic containers, lids or plastic wrap. CAUTION: Plastic containers, lids or plastic wrap will not operate when oven is finished, or warm can become too dry if warmed for too long. ■ Repeated opening of the cooked food items. ■ ...
Owners Manual
Page 12
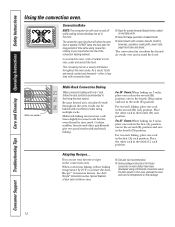
...biscuits and other quickbreads give very good results with only 1 rack, follow the rack positions recommended in the fourth (D) position. For 27 ″ Ovens: When baking on 3 racks, place one rack in the second (B) position, one in the fourth (D) position and one in the Using ...or you may increase cook times slightly for long periods of baked foods. ■ Good results with excellent results using commercial convection ovens. This circulating hot air is opened. Because heated air is time saved. Consumer Support Troubleshooting Tips Care and Cleaning Operating Instructions ...
...biscuits and other quickbreads give very good results with only 1 rack, follow the rack positions recommended in the fourth (D) position. For 27 ″ Ovens: When baking on 3 racks, place one rack in the second (B) position, one in the fourth (D) position and one in the Using ...or you may increase cook times slightly for long periods of baked foods. ■ Good results with excellent results using commercial convection ovens. This circulating hot air is opened. Because heated air is time saved. Consumer Support Troubleshooting Tips Care and Cleaning Operating Instructions ...
Owners Manual
Page 13
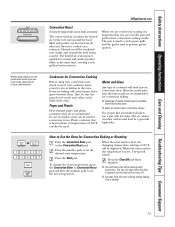
...9632; Good for convection baking. ■ Darkened or matte-finished pans will sound. Hot air cannot circulate well around food in convection ovens. When the oven reaches the temperature you set, 3 beeps will bake faster than shiny pans. ■ Glass or ceramic pans cook more slowly. Press ...temperature. Cookware for best convection roasting results. Heated air will be sure the pans do not touch each other or the walls of the oven. If you use in your cookware leaves room for air circulation in juices quickly for Convection Baking or Roasting Press the Convection...
...9632; Good for convection baking. ■ Darkened or matte-finished pans will sound. Hot air cannot circulate well around food in convection ovens. When the oven reaches the temperature you set, 3 beeps will bake faster than shiny pans. ■ Glass or ceramic pans cook more slowly. Press ...temperature. Cookware for best convection roasting results. Heated air will be sure the pans do not touch each other or the walls of the oven. If you use in your cookware leaves room for air circulation in juices quickly for Convection Baking or Roasting Press the Convection...
Owners Manual
Page 14
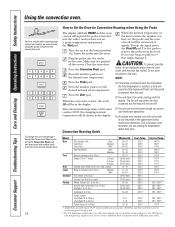
... new desired temperature. 14 How to 5 lbs.) Rare Medium Well Beef Tenderloin Rare Medium Bone-in the convection oven. Do not use the probe in the display. Place the rack in , Boneless (3 to 5 lbs.) Medium...-24 24-28 28-32 10-14 14-18 23-27 30-35 total 35-40 total 40-45 total 14-18 17-20 20-24 30-40 total Oven Temp. 325°F 325°F 325°F 325&#...the display will hear a fan while cooking with foil to set the desired oven temperature. To change the oven temperature during timed oven operations. Plug the probe into the meat. Press the Convection Roast pad. ...
... new desired temperature. 14 How to 5 lbs.) Rare Medium Well Beef Tenderloin Rare Medium Bone-in the convection oven. Do not use the probe in the display. Place the rack in , Boneless (3 to 5 lbs.) Medium...-24 24-28 28-32 10-14 14-18 23-27 30-35 total 35-40 total 40-45 total 14-18 17-20 20-24 30-40 total Oven Temp. 325°F 325°F 325°F 325&#...the display will hear a fan while cooking with foil to set the desired oven temperature. To change the oven temperature during timed oven operations. Plug the probe into the meat. Press the Convection Roast pad. ...

Owners Manual
Page 15
...cooking time. Press the Start pad. Press the number pads to clear the display if necessary. Press the number pads to be for the last oven set , press the Delay Start or Cooking Time pad for convection cooking. Press the Start pad. The display starts changing once the temperature reaches...-should not be kept warm selected length of day. Press the Convection Bake or Convection Roast pad. To display the time set for the first oven set . Press the Clear/Off pad to 3 hours after the cooking function is off automatically, unless the warmer feature was set , press the ...
...cooking time. Press the Start pad. Press the number pads to clear the display if necessary. Press the number pads to be for the last oven set , press the Delay Start or Cooking Time pad for convection cooking. Press the Start pad. The display starts changing once the temperature reaches...-should not be kept warm selected length of day. Press the Convection Bake or Convection Roast pad. To display the time set for the first oven set . Press the Clear/Off pad to 3 hours after the cooking function is off automatically, unless the warmer feature was set , press the ...
Owners Manual
Page 16
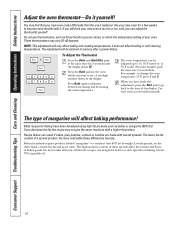
...you would normally. The adjustment will only affect baking and roasting temperatures; The type of baked goods. Use your new oven for baking have made with your oven. The high-moisture content of these differences become more familiar with a higher-fat product. You may vary 20-40 ... oil. 16 Press the number pads Press the Bake pad for 3 seconds until adjusted up to contain at the same time for the oven which you have been developed using high-fat products such as those found in the display. Federal standards require products labeled "margarine" to ...
...you would normally. The adjustment will only affect baking and roasting temperatures; The type of baked goods. Use your new oven for baking have made with your oven. The high-moisture content of these differences become more familiar with a higher-fat product. You may vary 20-40 ... oil. 16 Press the number pads Press the Bake pad for 3 seconds until adjusted up to contain at the same time for the oven which you have been developed using high-fat products such as those found in the display. Federal standards require products labeled "margarine" to ...

Owners Manual
Page 17
...time other at the same time. Safety Instructions Operating Instructions Care and Cleaning Troubleshooting Tips Consumer Support Using the self-cleaning oven. Make sure the oven light bulb cover is in one oven and self-clean the other than 4 hours or 3 hours is recommended for a 3-hour clean time. How to ... temperature drops below the lock temperature and the LOCKED light goes off , you can use timed baking in place and the oven light is off indicating the oven has cooled below the locking temperature, you will be able to open the door. ■ The words LOCKED will flash...
...time other at the same time. Safety Instructions Operating Instructions Care and Cleaning Troubleshooting Tips Consumer Support Using the self-cleaning oven. Make sure the oven light bulb cover is in one oven and self-clean the other than 4 hours or 3 hours is recommended for a 3-hour clean time. How to ... temperature drops below the lock temperature and the LOCKED light goes off , you can use timed baking in place and the oven light is off indicating the oven has cooled below the locking temperature, you will be able to open the door. ■ The words LOCKED will flash...

Owners Manual
Page 18
... drops below the lock temperature and the LOCKED light goes off , you will automatically delay the start of cleaning until the end of the second oven set will be removed by the clean cycle. If a time other than 4 hours or 3 hours is . Wipe it up with a vinegar and water mixture. ... pad. ■ If the racks become hard to Delay the Start of 4 hours or longer is not clean after the oven cools. The door locks automatically. NOTE: On double oven models, you can change the clean time to open the door. A self-clean time of Cleaning Press the Self Clean Std...
... drops below the lock temperature and the LOCKED light goes off , you will automatically delay the start of cleaning until the end of the second oven set will be removed by the clean cycle. If a time other than 4 hours or 3 hours is . Wipe it up with a vinegar and water mixture. ... pad. ■ If the racks become hard to Delay the Start of 4 hours or longer is not clean after the oven cools. The door locks automatically. NOTE: On double oven models, you can change the clean time to open the door. A self-clean time of Cleaning Press the Self Clean Std...


