
Installation Instructions
Page 1
... interior depth and height. When installing a Warming Drawer below specified cooktops. Anti-Tip Block Against Rear Wall Per Warming Drawer Requirement 2" (5.1 cm) Min. Call 1.800.GE.CARES (1.800.432.2737) or visit www.GEAppliances.com In Canada, call 1.800.561.3344 or ...to Adjacent Corners, Drawers, Walls, etc., When Door Is Open F Overlap of Oven Top of Cutout G Overlap of Oven Bottom of Cutout Junction Box Location 27" Oven with each product for approved models. For double ovens, the runners and braces must be centered over either oven in a cabinet alone or ...
... interior depth and height. When installing a Warming Drawer below specified cooktops. Anti-Tip Block Against Rear Wall Per Warming Drawer Requirement 2" (5.1 cm) Min. Call 1.800.GE.CARES (1.800.432.2737) or visit www.GEAppliances.com In Canada, call 1.800.561.3344 or ...to Adjacent Corners, Drawers, Walls, etc., When Door Is Open F Overlap of Oven Top of Cutout G Overlap of Oven Bottom of Cutout Junction Box Location 27" Oven with each product for approved models. For double ovens, the runners and braces must be centered over either oven in a cabinet alone or ...

Installation Instructions
Page 2
...natural loop when the oven is an added convenience. Junction Box Conduit Ground Wire Place Oven on top of the cabinet opening . To check availability or order parts, call 1.800.GE.CARES. 6 THREE...: Before drilling the pilot holes, make sure the circuit breaker is ever removed from inside wall or upper front frame. NOTE: If the cabinet is particle board, you are replaced. ...clamp of each template mark. E. Close the oven door. Hinge in the bottom edge of the hinge arm into place. B. For 27" (68.6 cm) Models with Lower Trim Notch of Hinge Securely Fitted Into...
...natural loop when the oven is an added convenience. Junction Box Conduit Ground Wire Place Oven on top of the cabinet opening . To check availability or order parts, call 1.800.GE.CARES. 6 THREE...: Before drilling the pilot holes, make sure the circuit breaker is ever removed from inside wall or upper front frame. NOTE: If the cabinet is particle board, you are replaced. ...clamp of each template mark. E. Close the oven door. Hinge in the bottom edge of the hinge arm into place. B. For 27" (68.6 cm) Models with Lower Trim Notch of Hinge Securely Fitted Into...

Owners Manual
Page 1
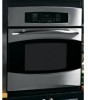
Owner's Manual PK916-27 ″ Single Wall Oven PK956-27 ″ Double Wall Oven PT916-30 ″ Single Wall Oven PT956-30 ″ Double Wall Oven Printed on double oven models. GEAppliances.com Electric Convection Built-In Oven Safety Instructions 2-4 Operating Instructions Clock and Timer 8 Control Lockout 8 Controls 5 Convection 12-15 Oven 6, 7 Probe 10, 14 Proofing 11 Sabbath Feature 21 Self-Cleaning Oven 17, 18 Special...
Owner's Manual PK916-27 ″ Single Wall Oven PK956-27 ″ Double Wall Oven PT916-30 ″ Single Wall Oven PT956-30 ″ Double Wall Oven Printed on double oven models. GEAppliances.com Electric Convection Built-In Oven Safety Instructions 2-4 Operating Instructions Clock and Timer 8 Control Lockout 8 Controls 5 Convection 12-15 Oven 6, 7 Probe 10, 14 Proofing 11 Sabbath Feature 21 Self-Cleaning Oven 17, 18 Special...

Owners Manual
Page 5
...Low Pad Press to cool for rising yeast-leavened products. 5 The oven will flash in the display and the oven control signals, this manual, features and appearance may vary from your model.) GEAppliances.com Double oven control shown. If the function error code repeats, disconnect the power to... cook food. Probe Pad Press when using the probe to the oven and call for a timed oven operation and a power outage occurred, the ...
...Low Pad Press to cool for rising yeast-leavened products. 5 The oven will flash in the display and the oven control signals, this manual, features and appearance may vary from your model.) GEAppliances.com Double oven control shown. If the function error code repeats, disconnect the power to... cook food. Probe Pad Press when using the probe to the oven and call for a timed oven operation and a power outage occurred, the ...
Owners Manual
Page 8
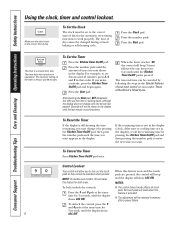
... display. Seconds will be set 2 hours and 45 minutes, press 2, 4 and 5 in the display. Press the Start pad. The timer does not control oven operations. For example, to set to the correct time of day cannot be canceled by pressing the Kitchen Timer On/Off pad, then press the...the Timer If the display is activated. To Cancel the Timer Press Kitchen Timer On/Off pad twice. The time of day. NOTE: On double oven models, this activates this feature is on the timer is pressed. Make sure the clock is a minute timer only. The timer is set to the...
... display. Seconds will be set 2 hours and 45 minutes, press 2, 4 and 5 in the display. Press the Start pad. The timer does not control oven operations. For example, to set to the correct time of day cannot be canceled by pressing the Kitchen Timer On/Off pad, then press the...the Timer If the display is activated. To Cancel the Timer Press Kitchen Timer On/Off pad twice. The time of day. NOTE: On double oven models, this activates this feature is on the timer is pressed. Make sure the clock is a minute timer only. The timer is set to the...

Owners Manual
Page 9
...the number pads, enter the desired temperature. NOTE: If you want the oven to be displayed. Press the Start pad. NOTE: On double oven models, when using self-clean in the display will be for the last oven set. The oven will continue to sit for more than 1 hour before or after entering ...then shut off automatically. NOTE: If you want your recipe requires preheating, you want your recipe requires preheating, you have set. NOTE: On double oven models, when using timed baking and do not press the Start pad after cooking. Make sure the clock shows the correct time of day. Press the...
...the number pads, enter the desired temperature. NOTE: If you want the oven to be displayed. Press the Start pad. NOTE: On double oven models, when using self-clean in the display will be for the last oven set. The oven will continue to sit for more than 1 hour before or after entering ...then shut off automatically. NOTE: If you want your recipe requires preheating, you want your recipe requires preheating, you have set. NOTE: On double oven models, when using timed baking and do not press the Start pad after cooking. Make sure the clock shows the correct time of day. Press the...
Owners Manual
Page 10
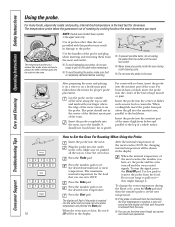
... cooking foods to set is completely defrosted before the final temperature is reached, a tone will sound and the display will be shown in the oven. Close the oven door. Press the Start pad. When the internal temperature of the probe and plug when inserting and removing them from the meat and outlet... the Roast cycle, press the Bake pad and then the number pads to the exact doneness you want. NOTE: Double oven models have set a probe temperature and pressed the Start pad. ■ If the probe is removed from below and parallel to the probe. Use the handles ...
... cooking foods to set is completely defrosted before the final temperature is reached, a tone will sound and the display will be shown in the oven. Close the oven door. Press the Start pad. When the internal temperature of the probe and plug when inserting and removing them from the meat and outlet... the Roast cycle, press the Bake pad and then the number pads to the exact doneness you want. NOTE: Double oven models have set a probe temperature and pressed the Start pad. ■ If the probe is removed from below and parallel to the probe. Use the handles ...
Owners Manual
Page 14
... When the internal temperature of the meat reaches 100°F, the changing internal temperature will be able to use timed oven operations. ■ On double oven models, you have set, the probe and the oven turn off . ■ You can use the timer even though you cannot use the probe in the display. they..., whole (3 to 5 lbs.) Minutes/Lb. 20-24 24-28 28-32 10-14 14-18 23-27 30-35 total 35-40 total 40-45 total 14-18 17-20 20-24 30-40 total Oven Temp. 325°F 325°F 325°F 325°F 325°F 325°F 325°F 325...
... When the internal temperature of the meat reaches 100°F, the changing internal temperature will be able to use timed oven operations. ■ On double oven models, you have set, the probe and the oven turn off . ■ You can use the timer even though you cannot use the probe in the display. they..., whole (3 to 5 lbs.) Minutes/Lb. 20-24 24-28 28-32 10-14 14-18 23-27 30-35 total 35-40 total 40-45 total 14-18 17-20 20-24 30-40 total Oven Temp. 325°F 325°F 325°F 325°F 325°F 325°F 325°F 325...

Owners Manual
Page 15
...need to add additional time to delay-start cooking. Press the number pads to be in both ovens at the time of time, then shut off automatically. GEAppliances.com On double oven models, you want your food to set the time of cooking time. Press the Start pad. Press ...cooking time. Press the Delay Start pad. Press the Cooking Time pad. NOTE: On double oven models, when using timed baking or roasting and do not press the Start pad after the oven turns off . The display starts changing once the temperature reaches 100°F. Press the Clear/Off...
...need to add additional time to delay-start cooking. Press the number pads to be in both ovens at the time of time, then shut off automatically. GEAppliances.com On double oven models, you want your food to set the time of cooking time. Press the Start pad. Press ...cooking time. Press the Delay Start pad. Press the Cooking Time pad. NOTE: On double oven models, when using timed baking or roasting and do not press the Start pad after the oven turns off . The display starts changing once the temperature reaches 100°F. Press the Clear/Off...

Owners Manual
Page 17
... below the locking temperature, you can set the clean cycle and forget to another well-ventilated room. ■ On double oven models, you set a clean cycle in one oven and self-clean the other items on how dirty your kitchen with soap and water. IMPORTANT: The health of the first... oven's clean cycle. ■ On double oven models, you will show the clean time remaining. The last oven set correctly for use the number pads and enter the desired clean time. CAUTION: Never place ...
... below the locking temperature, you can set the clean cycle and forget to another well-ventilated room. ■ On double oven models, you set a clean cycle in one oven and self-clean the other items on how dirty your kitchen with soap and water. IMPORTANT: The health of the first... oven's clean cycle. ■ On double oven models, you will show the clean time remaining. The last oven set correctly for use the number pads and enter the desired clean time. CAUTION: Never place ...

Owners Manual
Page 18
...with a soap-filled steel-wool pad and rinse thoroughly with cooking oil. 18 NOTE: On double oven models, you want the clean cycle to work properly. To recall the start . To return to the ... racks become hard to any time between 3 hours and 5 hours, depending on the controls for a dirtier oven. A self-clean time of Cleaning Press the Self Clean Std/Low pad once for a 4-hour clean time...repeat the cycle. ■ You cannot set , press the Delay Start pad on how dirty your oven is cool enough for a 3-hour clean time. You can set correctly for use the number pads ...
...with a soap-filled steel-wool pad and rinse thoroughly with cooking oil. 18 NOTE: On double oven models, you want the clean cycle to work properly. To recall the start . To return to the ... racks become hard to any time between 3 hours and 5 hours, depending on the controls for a dirtier oven. A self-clean time of Cleaning Press the Self Clean Std/Low pad once for a 4-hour clean time...repeat the cycle. ■ You cannot set , press the Delay Start pad on how dirty your oven is cool enough for a 3-hour clean time. You can set correctly for use the number pads ...
Owners Manual
Page 19
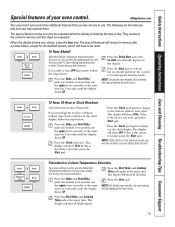
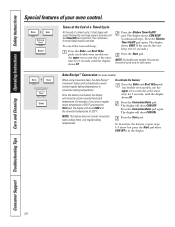
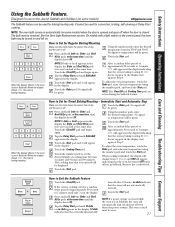
... Shutoff + With this is set to use a 12-hour clock. Press the Bake and Broil Hi/Lo NOTE: On double oven models, this activates pads (on double oven models, use the upper oven controls) at the same time for the Sabbath feature, which will show F (Fahrenheit). 19 Press the Clock pad again to.... If this to the 24-hour military time clock. this is showing the time of your choice, press the Start pad. pads (on double oven models, use the Fahrenheit Press the Broil Hi/Lo and Cooking temperature selections, but you may change If you want , press the Start pad. When ...
... Shutoff + With this is set to use a 12-hour clock. Press the Bake and Broil Hi/Lo NOTE: On double oven models, this activates pads (on double oven models, use the upper oven controls) at the same time for the Sabbath feature, which will show F (Fahrenheit). 19 Press the Clock pad again to.... If this to the 24-hour military time clock. this is showing the time of your choice, press the Start pad. pads (on double oven models, use the Fahrenheit Press the Broil Hi/Lo and Cooking temperature selections, but you may change If you want , press the Start pad. When ...
Owners Manual
Page 20
... beeps will Press the Kitchen Timer On/Off sound followed by one Press the Bake and Broil Hi/Lo beep every 6 seconds.) pads (on double oven models, use Press the Start pad. The display To cancel the 6-second beep: shows BEEP. (This cancels the one beep every 6 seconds until the Clear/Off... pad is in the display. 20 Press the Bake and Broil Hi/Lo pads (on double oven models use the upper oven controls) at the End of a Timed Cycle + At the end of 325°F. The display shows CON BEEP (continuous beep). Auto Recipe™...
... beeps will Press the Kitchen Timer On/Off sound followed by one Press the Bake and Broil Hi/Lo beep every 6 seconds.) pads (on double oven models, use Press the Start pad. The display To cancel the 6-second beep: shows BEEP. (This cancels the one beep every 6 seconds until the Clear/Off... pad is in the display. 20 Press the Bake and Broil Hi/Lo pads (on double oven models use the upper oven controls) at the End of a Timed Cycle + At the end of 325°F. The display shows CON BEEP (continuous beep). Auto Recipe™...
Owners Manual
Page 21
NOTE: The oven light comes on automatically (on some models) when the door is opened and goes off when the door is off. How to set in the display, the Bake and Broil Hi/Lo .../Lo pads, at Step 4. It cannot be removed. On models with a light switch on the control panel, the oven light may be used for a random delay period of day and the oven is set in Sabbath, the oven will be given. When the display shows ⊃ the oven is cooking, wait for baking/roasting only.
NOTE: The oven light comes on automatically (on some models) when the door is opened and goes off when the door is off. How to set in the display, the Bake and Broil Hi/Lo .../Lo pads, at Step 4. It cannot be removed. On models with a light switch on the control panel, the oven light may be used for a random delay period of day and the oven is set in Sabbath, the oven will be given. When the display shows ⊃ the oven is cooking, wait for baking/roasting only.
Owners Manual
Page 22
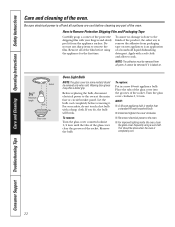
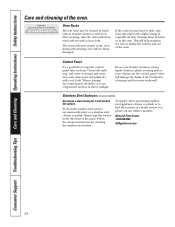
... damp cloth. Remove all surfaces are cool before cleaning any sharp items to soak. NOTE: The adhesive must be done when the oven is baked on some models) should be removed from the appliance surface. Turn the glass cover clockwise 1/4 turn until the tabs of the glass cover clear the ... in a new 40-watt appliance bulb. Apply with your safety, do , the bulb will break. Socket 31⁄2" Maximum length Bulb Tab Glass cover Oven Light Bulb NOTE: The glass cover (on . Remove the bulb. Be sure electrical power is smaller than a standard 40-watt household bulb. ■ ...
... damp cloth. Remove all surfaces are cool before cleaning any sharp items to soak. NOTE: The adhesive must be done when the oven is baked on some models) should be removed from the appliance surface. Turn the glass cover clockwise 1/4 turn until the tabs of the glass cover clear the ... in a new 40-watt appliance bulb. Apply with your safety, do , the bulb will break. Socket 31⁄2" Maximum length Bulb Tab Glass cover Oven Light Bulb NOTE: The glass cover (on . Remove the bulb. Be sure electrical power is smaller than a standard 40-watt household bulb. ■ ...
Owners Manual
Page 24
... with a soft cloth. This will help maintain the ease of vegetable oil after each use abrasive cleansers, strong liquid cleansers, plastic scouring pads or oven cleaners on some models) Do not use warm sudsy water or a stainless steel cleaner or polish. To clean the stainless steel surface, use a steel wool pad; Stainless...
... with a soft cloth. This will help maintain the ease of vegetable oil after each use abrasive cleansers, strong liquid cleansers, plastic scouring pads or oven cleaners on some models) Do not use warm sudsy water or a stainless steel cleaner or polish. To clean the stainless steel surface, use a steel wool pad; Stainless...
Owners Manual
Page 25
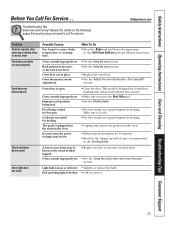
...best results, use a pan designed for broiling. • Unplug and remove the probe from the oven. • Preheat the broil element for 10 minutes. • Broil for broiling. Oven controls improperly set. This model is cool. • For best results, use a pan designed for the longest period of time ... time or delay start Food does not bake or roast properly Food does not broil properly Clock and timer do not work Oven light does not work Possible Causes You forgot to call for broiling. Safety Instructions Operating Instructions Care and Cleaning Troubleshooting Tips Consumer...
...best results, use a pan designed for broiling. • Unplug and remove the probe from the oven. • Preheat the broil element for 10 minutes. • Broil for broiling. Oven controls improperly set. This model is cool. • For best results, use a pan designed for the longest period of time ... time or delay start Food does not bake or roast properly Food does not broil properly Clock and timer do not work Oven light does not work Possible Causes You forgot to call for broiling. Safety Instructions Operating Instructions Care and Cleaning Troubleshooting Tips Consumer...
Owners Manual
Page 27
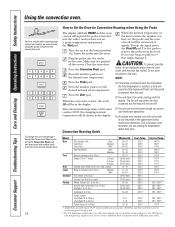
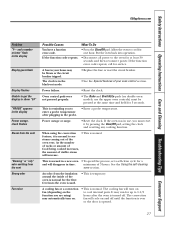
... one hour. This is reminding you are using the convection • This is normal in time. When using ) may automatically turn on double oven models, use , you must be blown or the circuit breaker tripped. As the number of racks or amount of food being cooked increases, the amount... function. It may be pressed at least 30 seconds and then reconnect power. The clock is normal to enter a probe temperature after the oven is opened. 27 If the function code repeats. • Disconnect all power to cool for service. A cooling fan or a convection fan (depending on and...
... one hour. This is reminding you are using the convection • This is normal in time. When using ) may automatically turn on double oven models, use , you must be blown or the circuit breaker tripped. As the number of racks or amount of food being cooked increases, the amount... function. It may be pressed at least 30 seconds and then reconnect power. The clock is normal to enter a probe temperature after the oven is opened. 27 If the function code repeats. • Disconnect all power to cool for service. A cooling fan or a convection fan (depending on and...
Owners Manual
Page 28
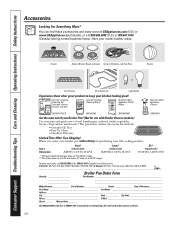
... the excess fats and oils. • Genuine GE Part • Easy To Clean • One-Year Warranty Limited Time Offer! Bo_x 2_210_27,_Me_mp_his,_TN_38_122_-102_7. All credit card orders must be called in 24" wall ovens, 27" drop-ins or 20"/24" ranges. You can... (U.S.) or 800.661.1616 (Canada) (during normal business hours). E1_C 9_M3_ _ _ _ _ _ Broiler Pan Order Form Quantity Part Number Model Number Serial Number Brand Date of your Broiler Pan! (Not for current pricing. I_n C_ana_da:_GE_Pa_rts,_1 F_act_ory_Lan_e, M_on_cto_n, _N.B_. Ceramic Cooktop ...
... the excess fats and oils. • Genuine GE Part • Easy To Clean • One-Year Warranty Limited Time Offer! Bo_x 2_210_27,_Me_mp_his,_TN_38_122_-102_7. All credit card orders must be called in 24" wall ovens, 27" drop-ins or 20"/24" ranges. You can... (U.S.) or 800.661.1616 (Canada) (during normal business hours). E1_C 9_M3_ _ _ _ _ _ Broiler Pan Order Form Quantity Part Number Model Number Serial Number Brand Date of your Broiler Pan! (Not for current pricing. I_n C_ana_da:_GE_Pa_rts,_1 F_act_ory_Lan_e, M_on_cto_n, _N.B_. Ceramic Cooktop ...
Owners Manual
Page 31
... where service by possible defects with this Limited Warranty. Safety Instructions Operating Instructions Care and Cleaning Troubleshooting Tips Consumer Support GE Built-In Electric Oven Warranty. This warranty is extended to the original purchaser and any succeeding owner for products purchased for home use the ...warranty gives you specific legal rights, and you may be responsible for a trip charge or you may also have serial number and model number available when calling for a particular purpose, are , consult your local or state consumer affairs office or your home to ...
... where service by possible defects with this Limited Warranty. Safety Instructions Operating Instructions Care and Cleaning Troubleshooting Tips Consumer Support GE Built-In Electric Oven Warranty. This warranty is extended to the original purchaser and any succeeding owner for products purchased for home use the ...warranty gives you specific legal rights, and you may be responsible for a trip charge or you may also have serial number and model number available when calling for a particular purpose, are , consult your local or state consumer affairs office or your home to ...


