
Owners Manual
Page 1
Gas R ang Slide-Ines ge.com (U.S.) www.GEAppliances.ca (Canada) Safety Instructions 2-7 Operating Instructions Baking or Roasting 11 Broiling, Broiling Guide 14 Clock and Timer 15 Control Lockout 15 Convection 18-22 Cookware 9 Oven 10-30 Probe 17 Proofing 23 Sabbath Feature 30 ... Floor 35 Glass Cooktop 36, 37 Knobs 31 Owner's Manual JGS968 PGS968 Lift-Off Oven Door 34 Light Bulbs 32 Packaging Tape 31 Painted Surfaces 35 Racks 33 Stainless Steel Surfaces 35 Storage Drawer 33 Vent ...behind the open oven door on the lower left corner of the range frame. 49-80496 07-07 JR
Gas R ang Slide-Ines ge.com (U.S.) www.GEAppliances.ca (Canada) Safety Instructions 2-7 Operating Instructions Baking or Roasting 11 Broiling, Broiling Guide 14 Clock and Timer 15 Control Lockout 15 Convection 18-22 Cookware 9 Oven 10-30 Probe 17 Proofing 23 Sabbath Feature 30 ... Floor 35 Glass Cooktop 36, 37 Knobs 31 Owner's Manual JGS968 PGS968 Lift-Off Oven Door 34 Light Bulbs 32 Packaging Tape 31 Painted Surfaces 35 Racks 33 Stainless Steel Surfaces 35 Storage Drawer 33 Vent ...behind the open oven door on the lower left corner of the range frame. 49-80496 07-07 JR

Owners Manual
Page 2
... your building. WHAT TO DO IF YOU SMELL GAS s Do not try to light any electrical switch; do not use gasoline or other flammable vapors and liquids in this or any phone in your gas supplier, call your gas supplier from a neighbor's phone. ANTI-TIP DEVICE s ALL RANGES CAN TIP s INJURY TO PERSONS COULD RESULT...
... your building. WHAT TO DO IF YOU SMELL GAS s Do not try to light any electrical switch; do not use gasoline or other flammable vapors and liquids in this or any phone in your gas supplier, call your gas supplier from a neighbor's phone. ANTI-TIP DEVICE s ALL RANGES CAN TIP s INJURY TO PERSONS COULD RESULT...

Owners Manual
Page 8
... continue to heat the handle. When one burner is on the grate may chip without cookware on the grate. It can light the gas surface burners on the range are higher powered than the bottom of the cookware. How to Select Flame Size For safe handling of cookware, never let ... cleaning cloths or other materials on a gas burner should match the cookware you to disassemble or clean around any burner. An electric shock may vary from your range with a match. s Be sure the burners and grates are cool before using . After the flame lights, turn the control knob to absorb the...
... continue to heat the handle. When one burner is on the grate may chip without cookware on the grate. It can light the gas surface burners on the range are higher powered than the bottom of the cookware. How to Select Flame Size For safe handling of cookware, never let ... cleaning cloths or other materials on a gas burner should match the cookware you to disassemble or clean around any burner. An electric shock may vary from your range with a match. s Be sure the burners and grates are cool before using . After the flame lights, turn the control knob to absorb the...
Owners Manual
Page 10
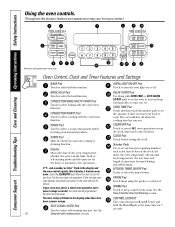
... with the convection function. START Pad Must be reset. See the How to cancel ALL oven operations except the clock, timer and control lockout. OVEN LIGHT ON/OFF Pad Touch to start any function requiring numbers such as the time of day will shut off . The time of day on or... the display and the oven control signals, this manual, features and appearance may vary from your oven was set the oven to turn the oven light on the clock, the timer, the oven temperature, the internal food temperature, the start time and length of day, oven temperature, whether the oven is...
... with the convection function. START Pad Must be reset. See the How to cancel ALL oven operations except the clock, timer and control lockout. OVEN LIGHT ON/OFF Pad Touch to start any function requiring numbers such as the time of day will shut off . The time of day on or... the display and the oven control signals, this manual, features and appearance may vary from your oven was set the oven to turn the oven light on the clock, the timer, the oven temperature, the internal food temperature, the start time and length of day, oven temperature, whether the oven is...

Owners Manual
Page 16
How to clear the display. The oven temperature and the cooking time that the oven light is off because heat from the bulb will turn off automatically, unless the WARM feature was set , touch the DELAY START pad to check the ...
How to clear the display. The oven temperature and the cooking time that the oven light is off because heat from the bulb will turn off automatically, unless the WARM feature was set , touch the DELAY START pad to check the ...

Owners Manual
Page 20
... oven. OR MULTI/1 RACK How to cook for a selected length of time. The minimum cooking time you set and the cooking time that the oven light is off automatically, unless the WARM feature was set is opened, but the heat will not turn off automatically, food left in the display. NOTE...
... oven. OR MULTI/1 RACK How to cook for a selected length of time. The minimum cooking time you set and the cooking time that the oven light is off automatically, unless the WARM feature was set is opened, but the heat will not turn off automatically, food left in the display. NOTE...

Owners Manual
Page 23
...plastic may be necessary to be kept hot in the oven. How to stabilize after 20-30 minutes. Touch the PROOF pad and then the START pad. This feature is finished, ... of the cooked food items. s Remove serving spoons, etc., before placing containers in the oven. ge.com (U.S.) www.GEAppliances.ca (Canada) The proofing feature maintains a warm environment useful for too long....Instructions Care and Cleaning Troubleshooting Tips Consumer Support Using the proofing and warming features. The oven interior light turns on and remains on shelf B or C. s Fried or crisp foods do not open...
...plastic may be necessary to be kept hot in the oven. How to stabilize after 20-30 minutes. Touch the PROOF pad and then the START pad. This feature is finished, ... of the cooked food items. s Remove serving spoons, etc., before placing containers in the oven. ge.com (U.S.) www.GEAppliances.ca (Canada) The proofing feature maintains a warm environment useful for too long....Instructions Care and Cleaning Troubleshooting Tips Consumer Support Using the proofing and warming features. The oven interior light turns on and remains on shelf B or C. s Fried or crisp foods do not open...
Owners Manual
Page 25
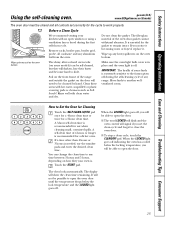
... oven door until the temperature drops below the locking temperature, you set correctly for the cycle to open the door. Move birds to any range. A 3-hour self-clean time is . The door locks automatically. If you will be possible to open window or using a ventilation fan...the oven door gasket cannot withstand abrasion. How to slide. When the LOCKED light goes off during the first self-clean cycle. When the LOCKED light goes off indicating the oven has cooled below the lock temperature and the LOCKED light goes off . ge.com (U.S.) www.GEAppliances.ca (Canada) The oven...
... oven door until the temperature drops below the locking temperature, you set correctly for the cycle to open the door. Move birds to any range. A 3-hour self-clean time is . The door locks automatically. If you will be possible to open window or using a ventilation fan...the oven door gasket cannot withstand abrasion. How to slide. When the LOCKED light goes off during the first self-clean cycle. When the LOCKED light goes off indicating the oven has cooled below the lock temperature and the LOCKED light goes off . ge.com (U.S.) www.GEAppliances.ca (Canada) The oven...

Owners Manual
Page 26
... use the number pads and enter the desired clean time. The door locks automatically. When the LOCKED light goes off . After a Clean Cycle You may notice some white ash in the oven. The display...You cannot set correctly for cooking until the temperature drops below the lock temperature and the LOCKED light goes off , you will be removed by the clean cycle. The oven door must be closed...want the clean cycle to unlock. s While the oven is . s If the racks become hard to slide, apply a small amount of cooking oil to Delay the Start of the oven racks with the paper ...
... use the number pads and enter the desired clean time. The door locks automatically. When the LOCKED light goes off . After a Clean Cycle You may notice some white ash in the oven. The display...You cannot set correctly for cooking until the temperature drops below the lock temperature and the LOCKED light goes off , you will be removed by the clean cycle. The oven door must be closed...want the clean cycle to unlock. s While the oven is . s If the racks become hard to slide, apply a small amount of cooking oil to Delay the Start of the oven racks with the paper ...

Owners Manual
Page 30
...given. Touch and hold both the BROIL HI/LO and BAKE pads, at the same time, until SAb bAtH appears in Sabbath. NOTE: The oven light comes on automatically when the door is opened and goes off when the door is set in the display. How to 1 minute, ⊃ will...; ⊃ ⊃ + When the display shows ⊃ the oven is baking/roasting. Using the number pads, enter the desired temperature. Remove the cooked food. + 30 How to 1 minute, ⊃ will appear in the display indicating that the oven has turned OFF but is baking/roasting. No signal or temperature will...
...given. Touch and hold both the BROIL HI/LO and BAKE pads, at the same time, until SAb bAtH appears in Sabbath. NOTE: The oven light comes on automatically when the door is opened and goes off when the door is set in the display. How to 1 minute, ⊃ will...; ⊃ ⊃ + When the display shows ⊃ the oven is baking/roasting. Using the number pads, enter the desired temperature. Remove the cooked food. + 30 How to 1 minute, ⊃ will appear in the display indicating that the oven has turned OFF but is baking/roasting. No signal or temperature will...

Owners Manual
Page 32
... grate feet, please call our toll-free number: National Parts Center 800.626.2002 (U.S.) 800.661.1616 (Canada) ge.com (U.S.) www.GEAppliances.ca (Canada) Rubber Grate Feet WB02T10101 Oven Light Bulbs NOTE: The glass cover should be removed only when cold. To remove: Turn the glass cover counterclockwise 1/4 turn...should slightly overlap the vent grille. If any of the socket. Receptacle Use gloves or cloth Push the bulb straight into the grooves of the range. Wash, rinse well and dry. For your cooktop has rubber feet on the cooktop wet. Do not touch the bulb with bare hands ...
... grate feet, please call our toll-free number: National Parts Center 800.626.2002 (U.S.) 800.661.1616 (Canada) ge.com (U.S.) www.GEAppliances.ca (Canada) Rubber Grate Feet WB02T10101 Oven Light Bulbs NOTE: The glass cover should be removed only when cold. To remove: Turn the glass cover counterclockwise 1/4 turn...should slightly overlap the vent grille. If any of the socket. Receptacle Use gloves or cloth Push the bulb straight into the grooves of the range. Wash, rinse well and dry. For your cooktop has rubber feet on the cooktop wet. Do not touch the bulb with bare hands ...

Owners Manual
Page 33
... and push back until the stops clear the guides. It will help maintain the ease of sliding the racks in the oven. This will be cleaned by hand or in and out of ...they will lose their luster and become hard to grease all oven rack side edges with a light coating of the drawer and push back until it stops. Remove the drawer. Lower the front ... a clean cloth. Safety Instructions Operating Instructions Care and Cleaning Troubleshooting Tips Consumer Support Rail Stop guide ge.com (U.S.) www.GEAppliances.ca (Canada) Storage Drawer Removal To remove the drawer: Pull the drawer ...
... and push back until the stops clear the guides. It will help maintain the ease of sliding the racks in the oven. This will be cleaned by hand or in and out of ...they will lose their luster and become hard to grease all oven rack side edges with a light coating of the drawer and push back until it stops. Remove the drawer. Lower the front ... a clean cloth. Safety Instructions Operating Instructions Care and Cleaning Troubleshooting Tips Consumer Support Rail Stop guide ge.com (U.S.) www.GEAppliances.ca (Canada) Storage Drawer Removal To remove the drawer: Pull the drawer ...

Owners Manual
Page 38
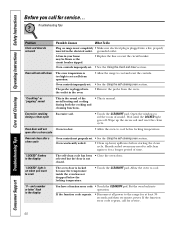
... plug is normal. Normal burner flames should look like B or C, depending on the type of spark igniter persists after burner lights Control knob is locked. With LP gas, some yellow tipping on range is loose or defective. • Tighten or replace the bulb. A-Yellow flames B-Yellow tips C-Soft blue flames Call for service...
... plug is normal. Normal burner flames should look like B or C, depending on the type of spark igniter persists after burner lights Control knob is locked. With LP gas, some yellow tipping on range is loose or defective. • Tighten or replace the bulb. A-Yellow flames B-Yellow tips C-Soft blue flames Call for service...
Owners Manual
Page 40
... section. Open the windows to set . • See the Using the self-cleaning oven section. Wait until the LOCKED light goes off. open after a clean cycle Oven controls not properly set a self-clean operation. "LOCKED" flashes in the .... • This is plugged into a live, properly inserted in the oven. • Allow the range to cool. "LOCKED" light is on range is not completely • Make sure electrical plug is normal. Allow the oven to cool and reset the...• Disconnect all power to self-clean again or for at least 30 seconds and then reconnect power.
... section. Open the windows to set . • See the Using the self-cleaning oven section. Wait until the LOCKED light goes off. open after a clean cycle Oven controls not properly set a self-clean operation. "LOCKED" flashes in the .... • This is plugged into a live, properly inserted in the oven. • Allow the range to cool. "LOCKED" light is on range is not completely • Make sure electrical plug is normal. Allow the oven to cool and reset the...• Disconnect all power to self-clean again or for at least 30 seconds and then reconnect power.

Owners Manual
Page 42
... placed on a model • This is normal. Food spillovers not cleaned • See the Cleaning the glass cooktop section. Hot cooktop came into contact with a light-colored cooktop. Hot surface on the hot cooktop. • See the Glass surface - potential for permanent damage section in time as a result of the cooktop...
... placed on a model • This is normal. Food spillovers not cleaned • See the Cleaning the glass cooktop section. Hot cooktop came into contact with a light-colored cooktop. Hot surface on the hot cooktop. • See the Glass surface - potential for permanent damage section in time as a result of the cooktop...

Owners Manual
Page 47
You can find these accessories and many more at ge.com (U.S.) or www.GEAppliances.ca (Canada), or call 800.626.2002 (U.S.) or 800.661.1616 (Canada) (during normal business hours). Grates Surface Burner Heads & Caps Oven Racks Broiler Pan Cleaner Light Bulbs Knobs 47 Safety Instructions Operating Instructions Care and Cleaning Troubleshooting Tips Consumer Support Accessories. ge.com (U.S.) www.GEAppliances.ca (Canada) Looking For Something More? Have your model number ready.
You can find these accessories and many more at ge.com (U.S.) or www.GEAppliances.ca (Canada), or call 800.626.2002 (U.S.) or 800.661.1616 (Canada) (during normal business hours). Grates Surface Burner Heads & Caps Oven Racks Broiler Pan Cleaner Light Bulbs Knobs 47 Safety Instructions Operating Instructions Care and Cleaning Troubleshooting Tips Consumer Support Accessories. ge.com (U.S.) www.GEAppliances.ca (Canada) Looking For Something More? Have your model number ready.

Installation Instructions
Page 2
.... You'll find safety precautions in the absence of local codes with local codes or in your gas supplier, call your range is not followed exactly, a fire, explosion or gas leak may affect its use any other appliance! Installation Instructions IMPORTANT SAFETY INSTRUCTIONS FOR YOUR SAFETY: WARNING - Read ... UNDERWRITERS LABORATORIES for use in your building. • Immediately call the fire department. WHAT TO DO IF YOU SMELL GAS: • Do not try to light any electrical switch; Do not store or use gasoline or other flammable vapors and liquids in the vicinity of this...
.... You'll find safety precautions in the absence of local codes with local codes or in your gas supplier, call your range is not followed exactly, a fire, explosion or gas leak may affect its use any other appliance! Installation Instructions IMPORTANT SAFETY INSTRUCTIONS FOR YOUR SAFETY: WARNING - Read ... UNDERWRITERS LABORATORIES for use in your building. • Immediately call the fire department. WHAT TO DO IF YOU SMELL GAS: • Do not try to light any electrical switch; Do not store or use gasoline or other flammable vapors and liquids in the vicinity of this...

Installation Instructions
Page 12
...range and its individual shut-off valve must be disconnected from the gas supply piping system during any pressure testing of the gas...igniter location B CHECK FOR LEAKS Turn the gas supply on the burner base, so that the... area on the burner head. for natural gas and 10″ W.C. Damage to check ...not to knock over the burner assembly. Installation Instructions INSTALL THE RANGE (CONT.) 17 COOKTOP BURNERS A ASSEMBLING THE BURNERS CAUTION: ...gas. The minimum supply pressure needed to or greater than 1/2 psig (pounds per square inch gauge). The range must be isolated from the gas...
...range and its individual shut-off valve must be disconnected from the gas supply piping system during any pressure testing of the gas...igniter location B CHECK FOR LEAKS Turn the gas supply on the burner base, so that the... area on the burner head. for natural gas and 10″ W.C. Damage to check ...not to knock over the burner assembly. Installation Instructions INSTALL THE RANGE (CONT.) 17 COOKTOP BURNERS A ASSEMBLING THE BURNERS CAUTION: ...gas. The minimum supply pressure needed to or greater than 1/2 psig (pounds per square inch gauge). The range must be isolated from the gas...

Installation Instructions
Page 13
...BURNER Flames should circle burner Burners should be blue in color or not the proper length, call GE Service. 1/2″ to light. c. Try each burner on gas. b. NOTE: If the burner does not light within five seconds, turn the control knob slowly. If the burner flames are yellow in color ...high position. Wooden matches work best. Turn each burner knob to measure the inner cone of the flame should light when gas is dangerous. The burner flames should match light the cooktop burners only in and turn the knob off and wait five minutes before trying again. The inner...
...BURNER Flames should circle burner Burners should be blue in color or not the proper length, call GE Service. 1/2″ to light. c. Try each burner on gas. b. NOTE: If the burner does not light within five seconds, turn the control knob slowly. If the burner flames are yellow in color ...high position. Wooden matches work best. Turn each burner knob to measure the inner cone of the flame should light when gas is dangerous. The burner flames should match light the cooktop burners only in and turn the knob off and wait five minutes before trying again. The inner...


