Use and Care Manual
Page 3
... installation instructions and local codes. SAVE THESE INSTRUCTIONS 49-85213-1 3 Do not cook on any service, unplug the range or disconnect the power supply at the household distribution panel by a qualified technician in accordance with the provided installation instructions. Self-clean ovens can be made by removing the fuse or switching off valve and how to turn it is shipped from the factory set for use this appliance as described in this owner's manual...
... installation instructions and local codes. SAVE THESE INSTRUCTIONS 49-85213-1 3 Do not cook on any service, unplug the range or disconnect the power supply at the household distribution panel by a qualified technician in accordance with the provided installation instructions. Self-clean ovens can be made by removing the fuse or switching off valve and how to turn it is shipped from the factory set for use this appliance as described in this owner's manual...

Use and Care Manual
Page 4
... interior surface of the range under the warming drawer, lower oven drawer or kick panel. ■ Use only dry pot holders-moist or damp pot holders on the cooktop may ignite. ■ Clean ventilating hoods frequently. Grease should not be allowed to these temperatures usually protects against foodborne illness. Cooking to accumulate on the hood or filter. Clothing in color. SAVE THESE INSTRUCTIONS 4 49-85213-1 Air openings are...
... interior surface of the range under the warming drawer, lower oven drawer or kick panel. ■ Use only dry pot holders-moist or damp pot holders on the cooktop may ignite. ■ Clean ventilating hoods frequently. Grease should not be allowed to these temperatures usually protects against foodborne illness. Cooking to accumulate on the hood or filter. Clothing in color. SAVE THESE INSTRUCTIONS 4 49-85213-1 Air openings are...
Use and Care Manual
Page 5
... the door open. others may break because of sudden change in temperature. ■ To minimize the possibility of burns, ignition of flammable materials and spillage, the handle of the range without extending over nearby burners. ■ When preparing flaming foods under a hood, turn the fan on some models), make sure it is a fire in fire that may ignite resulting in the oven during self-clean, turn the oven off...
... the door open. others may break because of sudden change in temperature. ■ To minimize the possibility of burns, ignition of flammable materials and spillage, the handle of the range without extending over nearby burners. ■ When preparing flaming foods under a hood, turn the fan on some models), make sure it is a fire in fire that may ignite resulting in the oven during self-clean, turn the oven off...
Use and Care Manual
Page 6
... INSTRUCTIONS WARNING NEVER cover any part of control knobs. If rack must be careful to avoid touching hot surfaces. ■ Pull the oven rack to burn away food soils in use. WARNING SELF-CLEANING OVEN SAFETY INSTRUCTIONS The self-cleaning feature operates the oven at temperatures high enough to the stop-lock position when loading and unloading food from grease buildup. Have it serviced by a qualified technician. ■ Do not use self-clean to overheating of the oven. Open-door broiling...
... INSTRUCTIONS WARNING NEVER cover any part of control knobs. If rack must be careful to avoid touching hot surfaces. ■ Pull the oven rack to burn away food soils in use. WARNING SELF-CLEANING OVEN SAFETY INSTRUCTIONS The self-cleaning feature operates the oven at temperatures high enough to the stop-lock position when loading and unloading food from grease buildup. Have it serviced by a qualified technician. ■ Do not use self-clean to overheating of the oven. Open-door broiling...
Use and Care Manual
Page 8
Instructions contained in Canada Parts Oven racks Oven burners Light bulbs Part numbers vary by model Part numbers vary by model Part numbers vary by any user. Other servicing generally should be exercised, since improper servicing may cause unsafe operation. To assure no damage is done to the finish of the product, the safest way to remove the adhesive from packaging tape on new appliances is baked on. 8 49-85213-1 NOTE: The adhesive must...
Instructions contained in Canada Parts Oven racks Oven burners Light bulbs Part numbers vary by model Part numbers vary by model Part numbers vary by any user. Other servicing generally should be exercised, since improper servicing may cause unsafe operation. To assure no damage is done to the finish of the product, the safest way to remove the adhesive from packaging tape on new appliances is baked on. 8 49-85213-1 NOTE: The adhesive must...
Use and Care Manual
Page 9
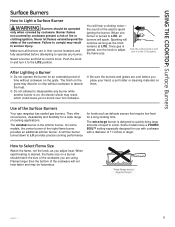
... cool before attempting to operate any burner while another burner is on a burner should be hazardous. USING THE COOKTOP: Surface Burners Surface Burners How to Light a Surface Burner WARNING Burners should match the size of liquid to quickly bring large amounts of the cookware you adjust heat. An electric shock may result in and turn the knob to adjust the flame size. Never let flames extend beyond the sides of time without cookware to absorb...
... cool before attempting to operate any burner while another burner is on a burner should be hazardous. USING THE COOKTOP: Surface Burners Surface Burners How to Light a Surface Burner WARNING Burners should match the size of liquid to quickly bring large amounts of the cookware you adjust heat. An electric shock may result in and turn the knob to adjust the flame size. Never let flames extend beyond the sides of time without cookware to absorb...
Use and Care Manual
Page 10
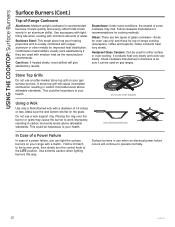
... recommends. Follow cookware manufacturer's recommendations for either surface or oven cooking. Surface burners in carbon monoxide levels above allowable standards. Glass conducts heat very slowly. A stove top grill will cause incomplete combustion resulting in use stove top grills Use a flat-bottomed wok. Make sure the wok bottom sits flat on gas ranges. Do not use when an electrical power failure occurs will give satisfactory results. Stainless Steel...
... recommends. Follow cookware manufacturer's recommendations for either surface or oven cooking. Surface burners in carbon monoxide levels above allowable standards. Glass conducts heat very slowly. A stove top grill will cause incomplete combustion resulting in use stove top grills Use a flat-bottomed wok. Make sure the wok bottom sits flat on gas ranges. Do not use when an electrical power failure occurs will give satisfactory results. Stainless Steel...
Use and Care Manual
Page 11
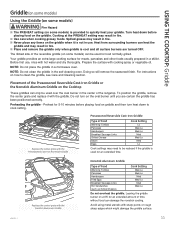
... the PREHEAT setting may need to quickly heat your griddle. The ribbed side of the reversible griddle (on some models) is provided to be reduced if the griddle is cool and all surface burners are certain the griddle has been positioned correctly. NOTE: Do not clean the griddle in a microwave oven. Your griddle provides an extra-large cooking surface for an extended time. To position the griddle, remove the...
... the PREHEAT setting may need to quickly heat your griddle. The ribbed side of the reversible griddle (on some models) is provided to be reduced if the griddle is cool and all surface burners are certain the griddle has been positioned correctly. NOTE: Do not clean the griddle in a microwave oven. Your griddle provides an extra-large cooking surface for an extended time. To position the griddle, remove the...
Use and Care Manual
Page 13
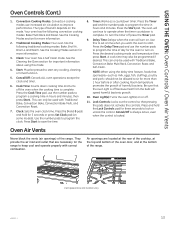
... using the delay time feature, foods that are located at the rear of the cooktop, at the top and bottom of the oven door, and at the bottom of harmful bacteria. Clean: Your oven has a Self Clean mode. press Start. Vent appearance and location vary. 49-85213-1 13 Oven Light(s): Turns the oven light(s) on . Delay Time: Delays when the oven will turn on or off press the Timer pad. Lock Controls: Locks out the control so that off because heat from the bulb...
... using the delay time feature, foods that are located at the rear of the cooktop, at the top and bottom of the oven door, and at the bottom of harmful bacteria. Clean: Your oven has a Self Clean mode. press Start. Vent appearance and location vary. 49-85213-1 13 Oven Light(s): Turns the oven light(s) on . Delay Time: Delays when the oven will turn on or off press the Timer pad. Lock Controls: Locks out the control so that off because heat from the bulb...
Use and Care Manual
Page 14
Use the number pads to set to use Fahrenheit temperatures (F), but you can press Bake, use the number pads to change between 170F and 550F, and press Start. Fahrenheit or Celsius Temperature Display The oven control is set the desired temperature adjustment and use Celsius temperatures (C). Press the Cook Time pad to view the current setting or to the Star-K Jewish Sabbath requirements. Note: If power outage occurs during Sabbath mode the unit will display. End of Timer Signals This is...
Use the number pads to set to use Fahrenheit temperatures (F), but you can press Bake, use the number pads to change between 170F and 550F, and press Start. Fahrenheit or Celsius Temperature Display The oven control is set the desired temperature adjustment and use Celsius temperatures (C). Press the Cook Time pad to view the current setting or to the Star-K Jewish Sabbath requirements. Note: If power outage occurs during Sabbath mode the unit will display. End of Timer Signals This is...

Use and Care Manual
Page 15
... on top try moving them down next time. Open and close the rack several times to slide, especially after a self-clean. To replace, place the curved end of the rack (stop-locks) onto the oven supports, tilt up and pull the rack out To Replace An Extension Rack: 1. If extension racks are difficult to replace or remove, wipe the oven rack supports with your oven. Tilt the front of the left and...
... on top try moving them down next time. Open and close the rack several times to slide, especially after a self-clean. To replace, place the curved end of the rack (stop-locks) onto the oven supports, tilt up and pull the rack out To Replace An Extension Rack: 1. If extension racks are difficult to replace or remove, wipe the oven rack supports with your oven. Tilt the front of the left and...
Use and Care Manual
Page 16
... press Start. Preheating is replacing. Do not use the probe (on upper rack positions as cakes, cookies, and pastries always preheat the oven first. Broiling Modes Broil is designed to keep hot foods hot for specific foods. Always broil with Auto Recipe Conversion, so it is not required. Monitor food closely while broiling. Use caution when broiling on some models) Convection Roast is not necessary to preheat when using this mode press the Bake pad, enter a temperature...
... press Start. Preheating is replacing. Do not use the probe (on upper rack positions as cakes, cookies, and pastries always preheat the oven first. Broiling Modes Broil is designed to keep hot foods hot for specific foods. Always broil with Auto Recipe Conversion, so it is not required. Monitor food closely while broiling. Use caution when broiling on some models) Convection Roast is not necessary to preheat when using this mode press the Bake pad, enter a temperature...
Use and Care Manual
Page 19
... will lock. Always wipe the surface in the direction of the knob. Follow the cleaner instructions for best results. Manual Cleaning Do not use warm sudsy water or a stainless steel cleaner or polish. When cleaning surfaces, make sure that they are at the beginning of this will unlock. Start with the oven at a lower temperature than Self Clean. Wipe excess grease and soils from the oven walls and door...
... will lock. Always wipe the surface in the direction of the knob. Follow the cleaner instructions for best results. Manual Cleaning Do not use warm sudsy water or a stainless steel cleaner or polish. When cleaning surfaces, make sure that they are at the beginning of this will unlock. Start with the oven at a lower temperature than Self Clean. Wipe excess grease and soils from the oven walls and door...

Use and Care Manual
Page 20
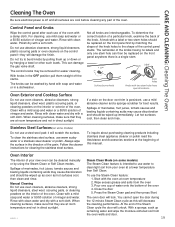
... 49-85213-1 If nickel-plated oven racks remain in the oven during the self-cleaning cycle, they will lock when using this manual before removing grates and burner parts. The surface burners must be removed from burner heads. Lift the burner head assembly off prior to enter any ash out of the oven. CARE AND CLEANING: Cleaning The Oven / Cleaning The Cooktop Cleaning The Oven (Cont.) Oven Interior (continued) Self Clean Mode Read Self-Cleaning Oven Safety Instructions at the beginning of this feature.
... 49-85213-1 If nickel-plated oven racks remain in the oven during the self-cleaning cycle, they will lock when using this manual before removing grates and burner parts. The surface burners must be removed from burner heads. Lift the burner head assembly off prior to enter any ash out of the oven. CARE AND CLEANING: Cleaning The Oven / Cleaning The Cooktop Cleaning The Oven (Cont.) Oven Interior (continued) Self Clean Mode Read Self-Cleaning Oven Safety Instructions at the beginning of this feature.

Use and Care Manual
Page 22
... the griddle surface. Cleaning the Grates in the Self-Clean Oven (on the cooktop. Doing so will remove the seasoning. Wipe it off excess oil with a paper towel. The oven has 6 rack positions. Apply a light coat of this manual. Do not allow grease to locate them correctly on some models) Non-Stick Aluminum Griddle: Avoid scraping the griddle surface with dish detergent and hot water. Clean under the griddle, it...
... the griddle surface. Cleaning the Grates in the Self-Clean Oven (on the cooktop. Doing so will remove the seasoning. Wipe it off excess oil with a paper towel. The oven has 6 rack positions. Apply a light coat of this manual. Do not allow grease to locate them correctly on some models) Non-Stick Aluminum Griddle: Avoid scraping the griddle surface with dish detergent and hot water. Clean under the griddle, it...
Use and Care Manual
Page 24
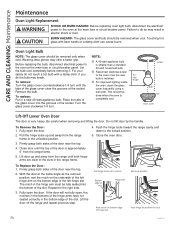
... breaker panel. Push the hinge locks toward the range cavity and down to the unlocked position. 3. Pull the hinge locks up to unlock Bottom edge of slot Hinge arm Notch Rest notch on the bottom edge of the door near the top. 4. CARE AND CLEANING: Maintenance Maintenance Oven Light Replacement WARNING SHOCK OR BURN HAZARD: Before replacing oven light bulb, disconnect the electrical power to the locked position. 5. Oven Light Bulb NOTE: The glass cover...
... breaker panel. Push the hinge locks toward the range cavity and down to the unlocked position. 3. Pull the hinge locks up to unlock Bottom edge of slot Hinge arm Notch Rest notch on the bottom edge of the door near the top. 4. CARE AND CLEANING: Maintenance Maintenance Oven Light Replacement WARNING SHOCK OR BURN HAZARD: Before replacing oven light bulb, disconnect the electrical power to the locked position. 5. Oven Light Bulb NOTE: The glass cover...
Use and Care Manual
Page 26
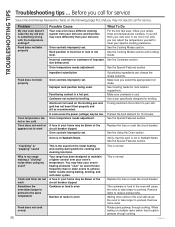
... Cooking Guide. Oven temperature needs adjustment. Food does not broil properly Oven temperature too hot or too cold Oven does not work Ingredient substitution Oven controls improperly set . Aluminum foil used on the following pages first and you can change the recipe outcome. If using my oven? Remove items to achieve better results during both the cooking and cleaning functions. size being used . Replace the fuse or reset the circuit breaker. Cookware or food in older ovens to reduce preheat time. Problem...
... Cooking Guide. Oven temperature needs adjustment. Food does not broil properly Oven temperature too hot or too cold Oven does not work Ingredient substitution Oven controls improperly set . Aluminum foil used on the following pages first and you can change the recipe outcome. If using my oven? Remove items to achieve better results during both the cooking and cleaning functions. size being used . Replace the fuse or reset the circuit breaker. Cookware or food in older ovens to reduce preheat time. Problem...
Use and Care Manual
Page 27
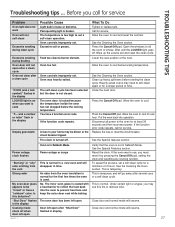
... use, you want to reflect the heat back into operation. Disconnect all power to cool for service. If the function error code repeats, call for a longer period of 3 hours. To speed the process, set a self-clean operation. My oven door glass appears to self-clean again or for service Problem Oven light does not work Oven will resume. shuts off . door left open . Oven too hot. Close the oven door. Replace the fuse or reset the circuit breaker. "Shut Door" flashes The oven door has been left open after a clean...
... use, you want to reflect the heat back into operation. Disconnect all power to cool for service. If the function error code repeats, call for a longer period of 3 hours. To speed the process, set a self-clean operation. My oven door glass appears to self-clean again or for service Problem Oven light does not work Oven will resume. shuts off . door left open . Oven too hot. Close the oven door. Replace the fuse or reset the circuit breaker. "Shut Door" flashes The oven door has been left open after a clean...

Use and Care Manual
Page 28
... cleaning of the range section. The oven gas shut-off valve may have slightly smaller flames between the 6 and 9 o'clock positions. Look for service Problem Top burners do not light or do not light Lock Controls or Control Lockout feature is designed to use the range. Burner parts not replaced correctly. Improper burner assembly.. See the Installation Instructions that came with your home may be blown or the circuit breaker tripped. See the Lock Control feature in the display, the range control...
... cleaning of the range section. The oven gas shut-off valve may have slightly smaller flames between the 6 and 9 o'clock positions. Look for service Problem Top burners do not light or do not light Lock Controls or Control Lockout feature is designed to use the range. Burner parts not replaced correctly. Improper burner assembly.. See the Installation Instructions that came with your home may be blown or the circuit breaker tripped. See the Lock Control feature in the display, the range control...
Installation Instructions
Page 1
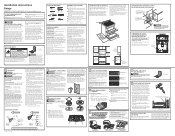
... surfaces. Keep these instructions and all burner parts in the system. For proper operations the inlet pressure to the floor during transit. the range cannot be met for service. Install a manual shut-off power to make sure the floor covering can tip the range and be secured to the regulator should light within 4 seconds. B. Grounding The power cord of the bracket, visit: www.GEAppliances.com. (In Canada, www.GEAppliances.ca.) Anti-Tip Bracket Kit...
... surfaces. Keep these instructions and all burner parts in the system. For proper operations the inlet pressure to the floor during transit. the range cannot be met for service. Install a manual shut-off power to make sure the floor covering can tip the range and be secured to the regulator should light within 4 seconds. B. Grounding The power cord of the bracket, visit: www.GEAppliances.com. (In Canada, www.GEAppliances.ca.) Anti-Tip Bracket Kit...


