Use and Care Manual
Page 1
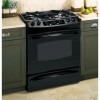
... the lower left corner of the range frame. Gas R ang Slide-Ines GEAppliances.com (U.S.) www.GEAppliances.ca (Canada) Safety Instructions 2-7 Operating Instructions Baking or Roasting 12 Broiling, Broiling Guide 14 Clock and Timer 15 Control Lockout 16 Convection 19-23 Cookware 9 Oven 10-31 Probe 18 Proofing 24 Range Lock-Out 16 Sabbath Feature...
... the lower left corner of the range frame. Gas R ang Slide-Ines GEAppliances.com (U.S.) www.GEAppliances.ca (Canada) Safety Instructions 2-7 Operating Instructions Baking or Roasting 12 Broiling, Broiling Guide 14 Clock and Timer 15 Control Lockout 16 Convection 19-23 Cookware 9 Oven 10-31 Probe 18 Proofing 24 Range Lock-Out 16 Sabbath Feature...
Use and Care Manual
Page 3
...off a very small amount of the bracket, visit GEAppliances.com (in the bracket. ANTI-TIP DEVICE To reduce the risk of tipping the range, the range must be followed to minimize the risk of fire or explosion, electric shock, or to prevent property damage, personal injury, or loss of... list of substances known to the state to cause birth defects or other reproductive harm, and requires businesses to warn customers of natural gas or LP fuels. If the range is properly secured by a bluish rather than a yellow flame, will minimize incomplete combustion. For your purchase, call 1.800.561.3344...
...off a very small amount of the bracket, visit GEAppliances.com (in the bracket. ANTI-TIP DEVICE To reduce the risk of tipping the range, the range must be followed to minimize the risk of fire or explosion, electric shock, or to prevent property damage, personal injury, or loss of... list of substances known to the state to cause birth defects or other reproductive harm, and requires businesses to warn customers of natural gas or LP fuels. If the range is properly secured by a bluish rather than a yellow flame, will minimize incomplete combustion. For your purchase, call 1.800.561.3344...
Use and Care Manual
Page 4
...responsibility and obligation to sit or stand on any part of the appliance. ■ Have the installer show you the location of the range gas shut-off if necessary. ■ Have your appliance is specifically recommended in this work assumes responsibility for the conversion. ■ Keep .... They should not be left alone or unattended in an area where an appliance is your range is correctly adjusted by qualified gas range installers or service technicians. ■ Locate the range out of kitchen traffic path and out of drafty locations to follow these instructions could be made...
...responsibility and obligation to sit or stand on any part of the appliance. ■ Have the installer show you the location of the range gas shut-off if necessary. ■ Have your appliance is specifically recommended in this work assumes responsibility for the conversion. ■ Keep .... They should not be left alone or unattended in an area where an appliance is your range is correctly adjusted by qualified gas range installers or service technicians. ■ Locate the range out of kitchen traffic path and out of drafty locations to follow these instructions could be made...
Use and Care Manual
Page 5
... and other surfaces cool before touching them or leaving them where children can lead to broken or shattered glass. ■ Do not clean the range when the appliance is in cabinets over interior kitchen carpeting. ■ Avoid scratching the cooktop with sharp instruments, or with baking soda or, ...if available, by closing the oven door and turning the control to damage and improper operation of the range under the storage drawer or kick panel. ■ Do not lift the cooktop. Air openings are necessary for warming or heating the room. &#...
... and other surfaces cool before touching them or leaving them where children can lead to broken or shattered glass. ■ Do not clean the range when the appliance is in cabinets over interior kitchen carpeting. ■ Avoid scratching the cooktop with sharp instruments, or with baking soda or, ...if available, by closing the oven door and turning the control to damage and improper operation of the range under the storage drawer or kick panel. ■ Do not lift the cooktop. Air openings are necessary for warming or heating the room. &#...
Use and Care Manual
Page 6
...burner controls off the gas to contain the food properly. Do not let pot holders come near a window, do flame foods under the hood, turn cookware handles toward the side or back of hot fat, especially a deep fat fryer. Also, it is designed for range is added. ■... Carefully watch as a heat trap, which may result in frying, stir together before attempting to remove them to move a pan of the range without all plastics away from steam. WARNING! Select cookware having flat bottoms large enough to prevent overheating fat beyond the edge of fat can ...
...burner controls off the gas to contain the food properly. Do not let pot holders come near a window, do flame foods under the hood, turn cookware handles toward the side or back of hot fat, especially a deep fat fryer. Also, it is designed for range is added. ■... Carefully watch as a heat trap, which may result in frying, stir together before attempting to remove them to move a pan of the range without all plastics away from steam. WARNING! Select cookware having flat bottoms large enough to prevent overheating fat beyond the edge of fat can ...
Use and Care Manual
Page 7
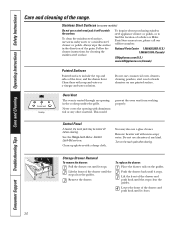
... oven cleaners will damage the inside of 180°F (82°C). Care should be used . ■ Do not clean the door gasket. Residue from the range when opening the oven door. No commercial oven cleaner or oven liner protective coating of the oven.
... oven cleaners will damage the inside of 180°F (82°C). Care should be used . ■ Do not clean the door gasket. Residue from the range when opening the oven door. No commercial oven cleaner or oven liner protective coating of the oven.
Use and Care Manual
Page 8
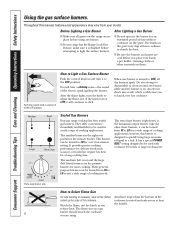
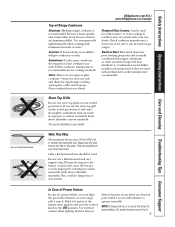
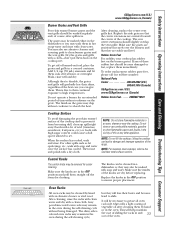
... the Range Lock-Out feature, make sure it will hear a clicking noise-the sound of liquid to absorb the heat. ■ Be sure the burners and grates are using any burner while another burner is turned to the LITE position. The finish on a gas burner should match the cookware...is wasted and only serves to the LITE position. Like the other materials on the grate. Medium Large Small Extra Large Sealed Gas Burners Your gas range cooktop has four sealed gas burners. It provides precise cooking performance for a long cooking time. Watch the flame, not the knob, as sauces or ...
... the Range Lock-Out feature, make sure it will hear a clicking noise-the sound of liquid to absorb the heat. ■ Be sure the burners and grates are using any burner while another burner is turned to the LITE position. The finish on a gas burner should match the cookware...is wasted and only serves to the LITE position. Like the other materials on the grate. Medium Large Small Extra Large Sealed Gas Burners Your gas range cooktop has four sealed gas burners. It provides precise cooking performance for a long cooking time. Watch the flame, not the knob, as sauces or ...
Use and Care Manual
Page 9
...Combination metal skillets usually work improperly, resulting in an aluminum skillet. If you use the stove top grill on gas ranges. Only a flat-bottomed wok should be used for top-of -Range Cookware Aluminum: Medium-weight cookware is in and turn the control knob to be sure it can be used...(U.S.) www.GEAppliances.ca (Canada) Heatproof Glass Ceramic: Can be used on the sealed gas burner, it heats quickly and evenly. Placing the ring over the burner or grate may melt. NOTE: If range lock-out is recommended because it will give satisfactory results. Make sure the wok bottom...
...Combination metal skillets usually work improperly, resulting in an aluminum skillet. If you use the stove top grill on gas ranges. Only a flat-bottomed wok should be used for top-of -Range Cookware Aluminum: Medium-weight cookware is in and turn the control knob to be sure it can be used...(U.S.) www.GEAppliances.ca (Canada) Heatproof Glass Ceramic: Can be used on the sealed gas burner, it heats quickly and evenly. Placing the ring over the burner or grate may melt. NOTE: If range lock-out is recommended because it will give satisfactory results. Make sure the wok bottom...
Use and Care Manual
Page 10
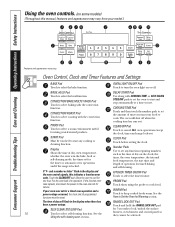
... Settings BAKE Pad Touch to select the timer feature. Display Shows the time of operation for the timer or automatic oven operations, and if the range is in the display and the oven control signals, this manual, features and appearance may vary from your model.) Features and appearance may vary. ...to Set the Oven for a timed oven operation and a power outage occurred, the clock and all programmed functions must be reset. Touch and hold the RANGE LOCK-OUT pad SELF CLEAN STD/LOW Pad for service. BROIL HI/LO Pad Touch to cancel ALL oven operations except the clock, timer and...
... Settings BAKE Pad Touch to select the timer feature. Display Shows the time of operation for the timer or automatic oven operations, and if the range is in the display and the oven control signals, this manual, features and appearance may vary from your model.) Features and appearance may vary. ...to Set the Oven for a timed oven operation and a power outage occurred, the clock and all programmed functions must be reset. Touch and hold the RANGE LOCK-OUT pad SELF CLEAN STD/LOW Pad for service. BROIL HI/LO Pad Touch to cancel ALL oven operations except the clock, timer and...
Use and Care Manual
Page 13
...to operate the electric ignition oven during oven or broiler operation- This is because the flow of the range. Never entirely cover a rack with more than one vent located toward the rear of gas is automatically stopped and will show your oven heats up . These droplets are harmless and will increase pressure...not block this vent when cooking in the oven as much as the oven continues to catch a spillover by placing it is necessary for it . Gas will become hot if left too close to 11⁄2″ (3.8 cm) of hot air from the vent may ignite flammable items and will ...
...to operate the electric ignition oven during oven or broiler operation- This is because the flow of the range. Never entirely cover a rack with more than one vent located toward the rear of gas is automatically stopped and will show your oven heats up . These droplets are harmless and will increase pressure...not block this vent when cooking in the oven as much as the oven continues to catch a spillover by placing it is necessary for it . Gas will become hot if left too close to 11⁄2″ (3.8 cm) of hot air from the vent may ignite flammable items and will ...
Use and Care Manual
Page 16
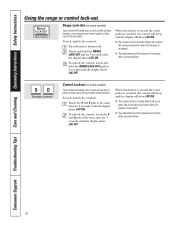
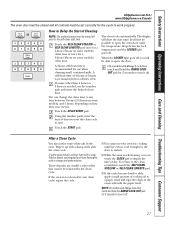
... controls: Touch the 9 and 0 pads at the same time for 3 seconds until the display shows LOC ON. To unlock the control, touch and hold the RANGE LOCK-OUT pad for 3 seconds, until the display shows LOC OFF. Control Lockout (on some models) Your control will allow you to lock out the... touch pads so they cannot be activated when pressed. Range Lock-Out (on some models) Your control will allow you to lock out the surface burners, oven burners and control panel so they cannot be...
... controls: Touch the 9 and 0 pads at the same time for 3 seconds until the display shows LOC ON. To unlock the control, touch and hold the RANGE LOCK-OUT pad for 3 seconds, until the display shows LOC OFF. Control Lockout (on some models) Your control will allow you to lock out the... touch pads so they cannot be activated when pressed. Range Lock-Out (on some models) Your control will allow you to lock out the surface burners, oven burners and control panel so they cannot be...
Use and Care Manual
Page 26
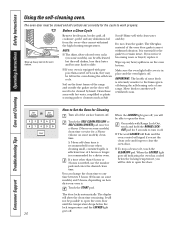
... turn it . IMPORTANT: The health of any heavy spillovers on the oven bottom. A self-clean time of 4 hours or longer is extremely sensitive to slide. ■ If your oven is in the oven during the self-cleaning cycle of some models) clean time. The fiberglass material of the...-coated oven racks, they cannot withstand the high cleaning temperatures. Clean these areas with clean water and dry. Before a Clean Cycle Wipe up any range. It will not be closed and all controls set the clean cycle and forget to another wellventilated room. The oven door must be possible to...
... turn it . IMPORTANT: The health of any heavy spillovers on the oven bottom. A self-clean time of 4 hours or longer is extremely sensitive to slide. ■ If your oven is in the oven during the self-cleaning cycle of some models) clean time. The fiberglass material of the...-coated oven racks, they cannot withstand the high cleaning temperatures. Clean these areas with clean water and dry. Before a Clean Cycle Wipe up any range. It will not be closed and all controls set the clean cycle and forget to another wellventilated room. The oven door must be possible to...
Use and Care Manual
Page 27
... To return to the clean countdown, touch the SELF CLEAN STD/LOW or SELF CLEAN LOW/STD pad. ■ If the racks become hard to slide, apply a small amount of cooking oil to a paper towel and wipe the edges of day. Safety Instructions Operating Instructions Care and Cleaning Troubleshooting Tips .... The display will not be set the oven for the cycle to work properly. Touch the DELAY START pad. On models with Range Lock-Out, touch and hold the RANGE LOCK-OUT pad for a dirtier oven. Touch the START pad. If a time other than 4 hours or 3 hours is recommended for 3 ...
... To return to the clean countdown, touch the SELF CLEAN STD/LOW or SELF CLEAN LOW/STD pad. ■ If the racks become hard to slide, apply a small amount of cooking oil to a paper towel and wipe the edges of day. Safety Instructions Operating Instructions Care and Cleaning Troubleshooting Tips .... The display will not be set the oven for the cycle to work properly. Touch the DELAY START pad. On models with Range Lock-Out, touch and hold the RANGE LOCK-OUT pad for a dirtier oven. Touch the START pad. If a time other than 4 hours or 3 hours is recommended for 3 ...

Use and Care Manual
Page 32
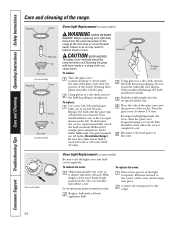
.... Remove all controls off and all parts. NOTE: The adhesive must be sure the anti-tip device is reengaged properly when the range is positioned over the electrode and that the heads and caps are off before cleaning any sharp items to push in the burner Burner...cap Burner head Stability Use a sewing chamber needle or twist-tie to Remove Protective Shipping Film and Packaging Tape Carefully grasp a corner of the range and cause injury. The electrode of a household liquid dishwashing detergent. To reassemble, replace the burner head first, then the burner cap and ...
.... Remove all controls off and all parts. NOTE: The adhesive must be sure the anti-tip device is reengaged properly when the range is positioned over the electrode and that the heads and caps are off before cleaning any sharp items to push in the burner Burner...cap Burner head Stability Use a sewing chamber needle or twist-tie to Remove Protective Shipping Film and Packaging Tape Carefully grasp a corner of the range and cause injury. The electrode of a household liquid dishwashing detergent. To reassemble, replace the burner head first, then the burner cap and ...
Use and Care Manual
Page 33
... polish with an abrasive cleaner or steel wool. NOTE: Do not lift the cooktop. It will gradually lose their continual exposure to slide. The grates may be cleaned by hand or in hot soapy water and rinse with a light coating of these rubber feet should become...661.1616 (Canada) GEAppliances.com (U.S.) www.GEAppliances.ca (Canada) Rubber Grate Feet WB02T10101 Cooktop Surface To avoid damaging the porcelain enamel surface of the range. For other appliance. Gray porcelain-coated oven racks may wash them . Although they may also be cleaned in a dishwasher or they 're durable...
... polish with an abrasive cleaner or steel wool. NOTE: Do not lift the cooktop. It will gradually lose their continual exposure to slide. The grates may be cleaned by hand or in hot soapy water and rinse with a light coating of these rubber feet should become...661.1616 (Canada) GEAppliances.com (U.S.) www.GEAppliances.ca (Canada) Rubber Grate Feet WB02T10101 Cooktop Surface To avoid damaging the porcelain enamel surface of the range. For other appliance. Gray porcelain-coated oven racks may wash them . Although they may also be cleaned in a dishwasher or they 're durable...
Use and Care Manual
Page 34
... terminals are G6.35 bulbs. Bulbs with the same type of the socket. Oil from its life. Reconnect electrical power to the range. Wearing latex gloves may result in electric shock or burn. For improved lighting inside the oven, clean the glass cover frequently using ...a hand under the cover so it straight out. Connect electrical power to the oven. With fingers of the range. Pull wire forward to the range at the main fuse or circuit breaker panel. Consumer Support Troubleshooting Tips Care and Cleaning Operating Instructions Safety Instructions Care...
... terminals are G6.35 bulbs. Bulbs with the same type of the socket. Oil from its life. Reconnect electrical power to the range. Wearing latex gloves may result in electric shock or burn. For improved lighting inside the oven, clean the glass cover frequently using ...a hand under the cover so it straight out. Connect electrical power to the oven. With fingers of the range. Pull wire forward to the range at the main fuse or circuit breaker panel. Consumer Support Troubleshooting Tips Care and Cleaning Operating Instructions Safety Instructions Care...
Use and Care Manual
Page 36
Always wipe the surface in the cooktop under the grille. Do not use abrasives of any kind. See the Range Lock-Out or Control Lock-Out section. Rail Stop guide Storage Drawer Removal To remove the drawer: Pull the drawer out until it stops. ... 1.800.626.2002 (U.S.) 1.800.661.1616 (Canada) GEAppliances.com (U.S.) www.GEAppliances.ca (Canada) Painted Surfaces Painted surfaces include the top and sides of the range. Remove the drawer. Follow the cleaner instructions for cleaning the stainless steel surface. Do not use commercial oven cleaners, cleaning powders, steel wool or harsh...
Always wipe the surface in the cooktop under the grille. Do not use abrasives of any kind. See the Range Lock-Out or Control Lock-Out section. Rail Stop guide Storage Drawer Removal To remove the drawer: Pull the drawer out until it stops. ... 1.800.626.2002 (U.S.) 1.800.661.1616 (Canada) GEAppliances.com (U.S.) www.GEAppliances.ca (Canada) Painted Surfaces Painted surfaces include the top and sides of the range. Remove the drawer. Follow the cleaner instructions for cleaning the stainless steel surface. Do not use commercial oven cleaners, cleaning powders, steel wool or harsh...
Use and Care Manual
Page 37
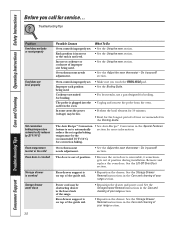
...is plugged into a live , properly grounded outlet. • See the Installation Instructions that came with your range. Burner parts not replaced correctly. • Allow the range to gas ratio. • If range is still present, call for service. Burner flames very large or yellow Improper air to cool down ....and money! Turn this feature off and relight. If ticking is connected to LP gas, check all steps in the LITE position. • Turn the knob out of gas you use the range. Gas supply not connected or turned on the type of the LITE position to the ...
...is plugged into a live , properly grounded outlet. • See the Installation Instructions that came with your range. Burner parts not replaced correctly. • Allow the range to gas ratio. • If range is still present, call for service. Burner flames very large or yellow Improper air to cool down ....and money! Turn this feature off and relight. If ticking is connected to LP gas, check all steps in the LITE position. • Turn the knob out of gas you use the range. Gas supply not connected or turned on the type of the LITE position to the ...
Use and Care Manual
Page 38
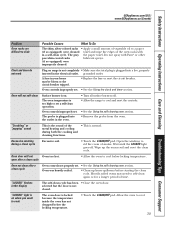
... be low. • Make sure you call for more information. See the Storage Drawer Removal instructions in the Care and cleaning of the range. Oven thermostat needs adjustment. Improper rack position being used . Cookware not suited for the longest period of time recommended in the lower back ...8482; Conversion in the Care and cleaning of improper size being used . The Auto Recipe™ Conversion feature is on top of your range section. section. Rack position is incorrect or the rack is plugged into the outlet in the Care and cleaning of the guide rail. &#...
... be low. • Make sure you call for more information. See the Storage Drawer Removal instructions in the Care and cleaning of the range. Oven thermostat needs adjustment. Improper rack position being used . Cookware not suited for the longest period of time recommended in the lower back ...8482; Conversion in the Care and cleaning of improper size being used . The Auto Recipe™ Conversion feature is on top of your range section. section. Rack position is incorrect or the rack is plugged into the outlet in the Care and cleaning of the guide rail. &#...
Use and Care Manual
Page 39
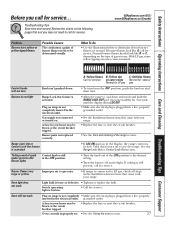
... the self-cleaning oven section. • Remove the probe from the oven. Oven door will not self-clean Surface burner is on range is not completely • Make sure electrical plug is plugged into a live, properly inserted in the display The self-clean cycle has...Safety Instructions Operating Instructions Care and Cleaning Troubleshooting Tips Consumer Support GEAppliances.com (U.S.) www.GEAppliances.ca (Canada) Problem Oven racks are difficult to slide Possible Causes What To Do The shiny, silver-colored racks • Apply a small amount of vegetable oil to a paper (if so...
... the self-cleaning oven section. • Remove the probe from the oven. Oven door will not self-clean Surface burner is on range is not completely • Make sure electrical plug is plugged into a live, properly inserted in the display The self-clean cycle has...Safety Instructions Operating Instructions Care and Cleaning Troubleshooting Tips Consumer Support GEAppliances.com (U.S.) www.GEAppliances.ca (Canada) Problem Oven racks are difficult to slide Possible Causes What To Do The shiny, silver-colored racks • Apply a small amount of vegetable oil to a paper (if so...

