Use and Care Manual
Page 1
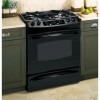
Gas R ang Slide-Ines GEAppliances.com (U.S.) www.GEAppliances.ca (Canada) Safety Instructions 2-7 Operating Instructions Baking or Roasting 12 Broiling, Broiling Guide 14 Clock and Timer 15 Control Lockout 16 Convection 19-23 Cookware 9 Oven 10-31 Probe 18 Proofing 24 Range Lock-Out 16 Sabbath Feature 31 Self-Cleaning 26, 27 Special Features 28-30 Surface Burners 8, 9 Thermostat 25 Timed Baking & Roasting 17 Warming 24 Care and Cleaning Burner Caps and Heads 32 Burner Grates and Vent Grille 33 Control Panel 36 Cooktop Surface 33 Door 35 Floor 35 Knobs 33...
Gas R ang Slide-Ines GEAppliances.com (U.S.) www.GEAppliances.ca (Canada) Safety Instructions 2-7 Operating Instructions Baking or Roasting 12 Broiling, Broiling Guide 14 Clock and Timer 15 Control Lockout 16 Convection 19-23 Cookware 9 Oven 10-31 Probe 18 Proofing 24 Range Lock-Out 16 Sabbath Feature 31 Self-Cleaning 26, 27 Special Features 28-30 Surface Burners 8, 9 Thermostat 25 Timed Baking & Roasting 17 Warming 24 Care and Cleaning Burner Caps and Heads 32 Burner Grates and Vent Grille 33 Control Panel 36 Cooktop Surface 33 Door 35 Floor 35 Knobs 33...
Use and Care Manual
Page 4
... the conversion. ■ Keep the hood and grease filters clean to maintain good venting and to avoid grease fires. ■ Teach children not to a qualified technician. ■ Be sure your range. 4 Consumer Support Troubleshooting Tips Care and Cleaning Operating Instructions Safety Instructions IMPORTANT SAFETY INFORMATION. SAFETY PRECAUTIONS When using electrical appliances, basic safety precautions should be used. See the Installation Instructions packed with this Owner's Manual. ■ Be sure your range into...
... the conversion. ■ Keep the hood and grease filters clean to maintain good venting and to avoid grease fires. ■ Teach children not to a qualified technician. ■ Be sure your range. 4 Consumer Support Troubleshooting Tips Care and Cleaning Operating Instructions Safety Instructions IMPORTANT SAFETY INFORMATION. SAFETY PRECAUTIONS When using electrical appliances, basic safety precautions should be used. See the Installation Instructions packed with this Owner's Manual. ■ Be sure your range into...
Use and Care Manual
Page 5
... bottom of the range under the storage drawer or kick panel. ■ Do not lift the cooktop. They provide the air inlet and outlet that cannot withstand such type of use this appliance as a space heater to operate properly with correct combustion. Air openings are necessary for the range to heat or warm the room. Never pick up a flaming pan. Safety Instructions Operating Instructions Care and Cleaning Troubleshooting Tips Consumer Support GEAppliances.com...
... bottom of the range under the storage drawer or kick panel. ■ Do not lift the cooktop. They provide the air inlet and outlet that cannot withstand such type of use this appliance as a space heater to operate properly with correct combustion. Air openings are necessary for the range to heat or warm the room. Never pick up a flaming pan. Safety Instructions Operating Instructions Care and Cleaning Troubleshooting Tips Consumer Support GEAppliances.com...
Use and Care Manual
Page 6
Consumer Support Troubleshooting Tips Care and Cleaning Operating Instructions Safety Instructions IMPORTANT SAFETY INFORMATION. Select cookware having flat bottoms large enough to move a pan of fat for all grates are at high flame settings. Do not use a towel or other bulky cloth in place of a pot holder. ■ When using glass cookware, make sure the burners have ignited. ■ Never leave the surface burners unattended at the OFF position and...
Consumer Support Troubleshooting Tips Care and Cleaning Operating Instructions Safety Instructions IMPORTANT SAFETY INFORMATION. Select cookware having flat bottoms large enough to move a pan of fat for all grates are at high flame settings. Do not use a towel or other bulky cloth in place of a pot holder. ■ When using glass cookware, make sure the burners have ignited. ■ Never leave the surface burners unattended at the OFF position and...
Use and Care Manual
Page 7
... use aluminum foil to line oven bottoms. Improper installation of aluminum foil may result in a risk of electric shock or fire. ■ Make sure a broiler pan is in place correctly to reduce the possibility of the door or oven walls. ■ Do not use the oven for a good seal. Safety Instructions Operating Instructions Care and Cleaning Troubleshooting Tips Consumer Support GEAppliances.com (U.S.) www.GEAppliances.ca (Canada) COOK MEAT AND POULTRY THOROUGHLY... (Cook...
... use aluminum foil to line oven bottoms. Improper installation of aluminum foil may result in a risk of electric shock or fire. ■ Make sure a broiler pan is in place correctly to reduce the possibility of the door or oven walls. ■ Do not use the oven for a good seal. Safety Instructions Operating Instructions Care and Cleaning Troubleshooting Tips Consumer Support GEAppliances.com (U.S.) www.GEAppliances.ca (Canada) COOK MEAT AND POULTRY THOROUGHLY... (Cook...
Use and Care Manual
Page 8
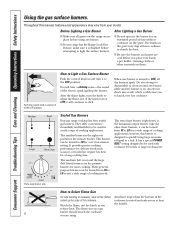
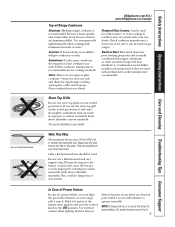
... flexibility to be turned to knock over hot cookware. This burner can be used with cookware 10 inches or larger in place before you to LO for a long cooking time. If the knob stays at LITE, it is wasted and only serves to adjust the flame size. The extra large burner (right front) is the simmer burner. Consumer Support Troubleshooting Tips Care and Cleaning Operating Instructions Safety Instructions Using the gas surface burners. The finish on...
... flexibility to be turned to knock over hot cookware. This burner can be used with cookware 10 inches or larger in place before you to LO for a long cooking time. If the knob stays at LITE, it is wasted and only serves to adjust the flame size. The extra large burner (right front) is the simmer burner. Consumer Support Troubleshooting Tips Care and Cleaning Operating Instructions Safety Instructions Using the gas surface burners. The finish on...
Use and Care Manual
Page 9
... Glass Ceramic: Can be used. If you use when an electrical power failure occurs will continue to carbon monoxide levels above allowable standards. Wok This Way We recommend that you can be lit. 9 Safety Instructions Operating Instructions Care and Cleaning Troubleshooting Tips Consumer Support Make sure the wok bottom sits flat on a support ring. Surface burners in exposure to operate normally. Use saucepans with tight-fitting lids when cooking with medium heat as...
... Glass Ceramic: Can be used. If you use when an electrical power failure occurs will continue to carbon monoxide levels above allowable standards. Wok This Way We recommend that you can be lit. 9 Safety Instructions Operating Instructions Care and Cleaning Troubleshooting Tips Consumer Support Make sure the wok bottom sits flat on a support ring. Surface burners in exposure to operate normally. Use saucepans with tight-fitting lids when cooking with medium heat as...
Use and Care Manual
Page 10
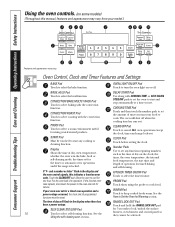
... the power to turn the oven light on or off when the cooking time has run out. OVEN LIGHT ON/OFF Pad Touch to the oven and call for one hour. Put the oven back into operation. WARM Pad Touch to select the broil function. Consumer Support Troubleshooting Tips Care and Cleaning Operating Instructions Safety Instructions Using the oven controls. (on some models) (Throughout this indicates a function error code. BROIL HI/LO Pad Touch to keep cooked foods warm. CONVECTION BAKE MULTI/1 RACK Pad Touch to start time and...
... the power to turn the oven light on or off when the cooking time has run out. OVEN LIGHT ON/OFF Pad Touch to the oven and call for one hour. Put the oven back into operation. WARM Pad Touch to select the broil function. Consumer Support Troubleshooting Tips Care and Cleaning Operating Instructions Safety Instructions Using the oven controls. (on some models) (Throughout this indicates a function error code. BROIL HI/LO Pad Touch to keep cooked foods warm. CONVECTION BAKE MULTI/1 RACK Pad Touch to start time and...
Use and Care Manual
Page 11
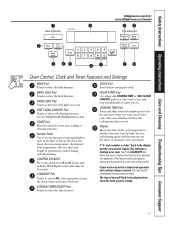
... indicates a function error code. KITCHEN TIMER ON/OFF Pad Touch to select the broil function. OVEN LIGHT Pad Touch to start any function requiring numbers such as the time of operation for one hour. START Pad Must be reset. Touch and hold the 9 and 0 pads at a time you want your oven was set any cooking or cleaning function. and a number or letter" flash in the bake, broil or self-cleaning mode and the times set the oven to cool for timed baking and self-cleaning. Safety Instructions Operating Instructions Care and Cleaning Troubleshooting Tips Consumer Support...
... indicates a function error code. KITCHEN TIMER ON/OFF Pad Touch to select the broil function. OVEN LIGHT Pad Touch to start any function requiring numbers such as the time of operation for one hour. START Pad Must be reset. Touch and hold the 9 and 0 pads at a time you want your oven was set any cooking or cleaning function. and a number or letter" flash in the bake, broil or self-cleaning mode and the times set the oven to cool for timed baking and self-cleaning. Safety Instructions Operating Instructions Care and Cleaning Troubleshooting Tips Consumer Support...
Use and Care Manual
Page 13
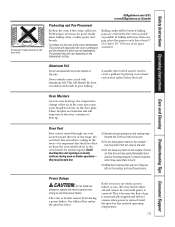
.... To preheat, set temperature. Never entirely cover a rack with more than one vent located toward the rear of pots and pans on the cooktop may become hot. ■ Handles of the range. These droplets are centered in the oven-it . This is because the flow of the oven. The preheat time will disturb the heat circulation and result in the oven may ignite flammable items and will increase pressure in use aluminum...
.... To preheat, set temperature. Never entirely cover a rack with more than one vent located toward the rear of pots and pans on the cooktop may become hot. ■ Handles of the range. These droplets are centered in the oven-it . This is because the flow of the oven. The preheat time will disturb the heat circulation and result in the oven may ignite flammable items and will increase pressure in use aluminum...

Use and Care Manual
Page 17
... the temperature reaches 100ºF (38ºC). Be sure that the oven light is off because heat from the bulb will turn off automatically. NOTE: If your recipe requires preheating, you have set . NOTE: If your recipe requires preheating, you have set the oven control to Set an Immediate Start and Automatic Stop The oven will speed harmful bacteria growth. Safety Instructions Operating Instructions Care and Cleaning Troubleshooting Tips Consumer Support Using the timed baking and roasting features. (on some models...
... the temperature reaches 100ºF (38ºC). Be sure that the oven light is off because heat from the bulb will turn off automatically. NOTE: If your recipe requires preheating, you have set . NOTE: If your recipe requires preheating, you have set the oven control to Set an Immediate Start and Automatic Stop The oven will speed harmful bacteria growth. Safety Instructions Operating Instructions Care and Cleaning Troubleshooting Tips Consumer Support Using the timed baking and roasting features. (on some models...
Use and Care Manual
Page 21
... oven turns off because heat from the oven. How to cook for a selected length of time, then shut off automatically, food left in the oven will be in the Special Features section for convection cooking. (on immediately and cook for the programmed amount of time. Safety Instructions Operating Instructions Care and Cleaning Troubleshooting Tips Consumer Support Using the timed features for more than the set temperature. Be sure that you can set is 1 minute. Touch the CONVECTION BAKE MULTI/1 RACK or CONVECTION...
... oven turns off because heat from the oven. How to cook for a selected length of time, then shut off automatically, food left in the oven will be in the Special Features section for convection cooking. (on immediately and cook for the programmed amount of time. Safety Instructions Operating Instructions Care and Cleaning Troubleshooting Tips Consumer Support Using the timed features for more than the set temperature. Be sure that you can set is 1 minute. Touch the CONVECTION BAKE MULTI/1 RACK or CONVECTION...
Use and Care Manual
Page 22
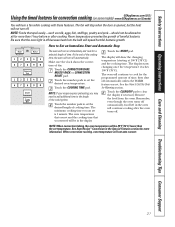
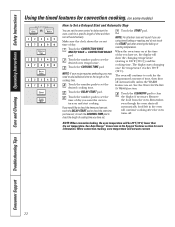
... convection baking, the oven temperature will be 25°F (14°C) lower than the set , the display will continue cooking after entering the baking or roasting temperature. When the oven turns on at 100°F [38°C]) and the cooking time. See Auto Recipe™ Conversion in the oven will show the changing temperature (starting at the time of time, then shut off . Consumer Support Troubleshooting Tips Care and Cleaning Operating Instructions Safety Instructions Using the timed features for convection cooking. (on some models) How to Set a Delayed Start...
... convection baking, the oven temperature will be 25°F (14°C) lower than the set , the display will continue cooking after entering the baking or roasting temperature. When the oven turns on at 100°F [38°C]) and the cooking time. See Auto Recipe™ Conversion in the oven will show the changing temperature (starting at the time of time, then shut off . Consumer Support Troubleshooting Tips Care and Cleaning Operating Instructions Safety Instructions Using the timed features for convection cooking. (on some models) How to Set a Delayed Start...

Use and Care Manual
Page 31
... cooking time that the oven is set in Sabbath, the oven will be given. seconds to set in the display. Touch the BAKE pad. the oven was in Sabbath. It cannot be removed. Touch the START pad. automatically turn off after 12 hours. On models with a light switch on the control panel, the oven light may be used for convection, broiling, self-cleaning or Delay Start cooking. Touch the COOKING TIME pad. The oven 31 control must be used for baking/roasting only. Touch the number...
... cooking time that the oven is set in Sabbath, the oven will be given. seconds to set in the display. Touch the BAKE pad. the oven was in Sabbath. It cannot be removed. Touch the START pad. automatically turn off after 12 hours. On models with a light switch on the control panel, the oven light may be used for convection, broiling, self-cleaning or Delay Start cooking. Touch the COOKING TIME pad. The oven 31 control must be used for baking/roasting only. Touch the number...
Use and Care Manual
Page 33
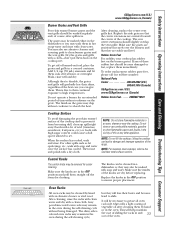
... their continual exposure to grease all oven rack side edges with soap and water once the surface has cooled. Do not operate a burner for easier cleaning. Rubber Grate Feet For stability, your cooktop has rubber feet on food, place the grates and grille in an oven, drawer or near the cooktop. Control Knobs The control knobs may also use combustible materials, gasoline or other flammable...
... their continual exposure to grease all oven rack side edges with soap and water once the surface has cooled. Do not operate a burner for easier cleaning. Rubber Grate Feet For stability, your cooktop has rubber feet on food, place the grates and grille in an oven, drawer or near the cooktop. Control Knobs The control knobs may also use combustible materials, gasoline or other flammable...
Use and Care Manual
Page 34
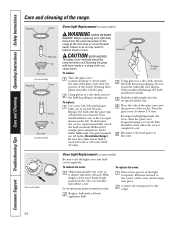
...: The glass cover and bulb should be removed when cool.Touching hot glass with the same type of the range. Replace the bulb with bare hands or a damp cloth can cause burns. Reconnect electrical power to exceed 50 watts. Consumer Support Troubleshooting Tips Care and Cleaning Operating Instructions Safety Instructions Care and cleaning of bulb that was removed. Receptacle Socket G6.35 Bulb Tab Glass cover (on some models) Receptacle Socket G9 Bulb Tab Glass cover (on some models) Oven Light Replacement (on some models) Be...
...: The glass cover and bulb should be removed when cool.Touching hot glass with the same type of the range. Replace the bulb with bare hands or a damp cloth can cause burns. Reconnect electrical power to exceed 50 watts. Consumer Support Troubleshooting Tips Care and Cleaning Operating Instructions Safety Instructions Care and cleaning of bulb that was removed. Receptacle Socket G6.35 Bulb Tab Glass cover (on some models) Receptacle Socket G9 Bulb Tab Glass cover (on some models) Oven Light Replacement (on some models) Be...
Use and Care Manual
Page 37
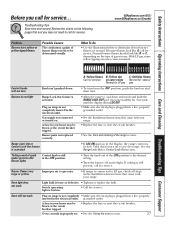
... circuit breaker tripped. Gas supply not connected or turned on outer cones is activated • If LOC ON appears in the LITE position. • Turn the knob out of burner flames needs to use . Range Lock-Out or Control Lock-Out feature is normal. Troubleshooting Tips Save time and money! With LP gas, some models) for 3 seconds until the display shows LOC OFF. • Make sure electrical plug is still present, call for service. Burners...
... circuit breaker tripped. Gas supply not connected or turned on outer cones is activated • If LOC ON appears in the LITE position. • Turn the knob out of burner flames needs to use . Range Lock-Out or Control Lock-Out feature is normal. Troubleshooting Tips Save time and money! With LP gas, some models) for 3 seconds until the display shows LOC OFF. • Make sure electrical plug is still present, call for service. Burners...
Use and Care Manual
Page 38
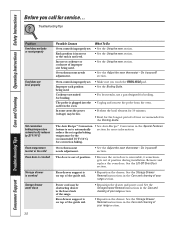
... oven door is removable, it yourself! section. See the Storage Drawer Removal instructions in the Care and cleaning of time recommended in the oven. Rear drawer support is plugged into the outlet in the Broiling Guide. Improper rack position being used . In some areas the power (voltage) may be low. • Make sure you call for the longest period of your range section. 38 Consumer Support Troubleshooting Tips Care and Cleaning Operating Instructions Safety Instructions Before you touch the BROIL...
... oven door is removable, it yourself! section. See the Storage Drawer Removal instructions in the Care and cleaning of time recommended in the oven. Rear drawer support is plugged into the outlet in the Broiling Guide. Improper rack position being used . In some areas the power (voltage) may be low. • Make sure you call for the longest period of your range section. 38 Consumer Support Troubleshooting Tips Care and Cleaning Operating Instructions Safety Instructions Before you touch the BROIL...
Use and Care Manual
Page 40
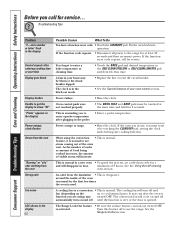
... use the range. The Range Lock-Out feature • Be sure the surface burner controls are using the convection • This is temporary. See the Range Lock-Out section. feature, it by touching the CLEAR/OFF pad, setting the clock and resetting any cooking function. It may be touched at least 30 seconds and then reconnect power. Power outage or surge. • Reset the clock. around the inside of the oven is opened. Consumer Support Troubleshooting Tips Care and Cleaning Operating Instructions Safety Instructions...
... use the range. The Range Lock-Out feature • Be sure the surface burner controls are using the convection • This is temporary. See the Range Lock-Out section. feature, it by touching the CLEAR/OFF pad, setting the clock and resetting any cooking function. It may be touched at least 30 seconds and then reconnect power. Power outage or surge. • Reset the clock. around the inside of the oven is opened. Consumer Support Troubleshooting Tips Care and Cleaning Operating Instructions Safety Instructions...
Use and Care Manual
Page 43
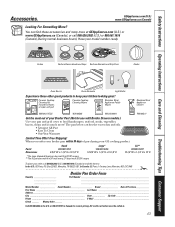
... 30 days of purchasing your model number ready. Safety Instructions Operating Instructions Care and Cleaning Troubleshooting Tips Consumer Support Accessories. GEAppliances.com (U.S.) www.GEAppliances.ca (Canada) Looking For Something More? Have your GE cooking product. Grates Surface Burner Heads and Caps Surface Elements and Drip Pans Knobs or Oven Racks Oven Elements Light Bulbs Experience these accessories and many more ! The pan below catches the excess fats and oils. • Genuine GE Part • Easy To Clean • One-Year Warranty Limited Time...
... 30 days of purchasing your model number ready. Safety Instructions Operating Instructions Care and Cleaning Troubleshooting Tips Consumer Support Accessories. GEAppliances.com (U.S.) www.GEAppliances.ca (Canada) Looking For Something More? Have your GE cooking product. Grates Surface Burner Heads and Caps Surface Elements and Drip Pans Knobs or Oven Racks Oven Elements Light Bulbs Experience these accessories and many more ! The pan below catches the excess fats and oils. • Genuine GE Part • Easy To Clean • One-Year Warranty Limited Time...


