Quick Specs
Page 1
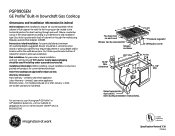
... a minimum 26" countertop depth is positioned in cutout depth and/or location within the width dimensions. Island or peninsula cabinets may require adjustment in bottom of cabinet for through rear wall. Duct hole is suggested. Installation Information: Before installing, consult installation instructions, packed with product, for indoor use only. Warranty Information: Parts Warrany - Limited 1-year entire appliance Labor Warranty - Limited 1-year entire appliance Warranty Notes - Listed by Underwriters Laboratories Specification Revised...
... a minimum 26" countertop depth is positioned in cutout depth and/or location within the width dimensions. Island or peninsula cabinets may require adjustment in bottom of cabinet for through rear wall. Duct hole is suggested. Installation Information: Before installing, consult installation instructions, packed with product, for indoor use only. Warranty Information: Parts Warrany - Limited 1-year entire appliance Labor Warranty - Limited 1-year entire appliance Warranty Notes - Listed by Underwriters Laboratories Specification Revised...
Use and Care Manual
Page 1
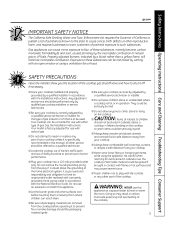
... Installation Owner's Manual Instructions 18-29 & Installation LP Conversion 30-33 Instructions Troubleshooting Tips 34, 35 PGP990 Consumer Support Consumer Support 40 Product Registration . . . .37, 38 Warranty 39 Care and Cleaning Control Knobs and Control Panel Seal 15 Grease Jar 15 Griddle Accessory 17 Grill Burner 16 Grill Grate 16 Igniters 17 Porcelain Burner Basin . . . . . 17 Porcelain Cooktop 15 Sealed Burner Module . . . . . 17 Stainless Steel Surfaces . . . . .15 Vent Grille and Filter 16 Printed in Korea Write the model and serial numbers here: Model Serial...
... Installation Owner's Manual Instructions 18-29 & Installation LP Conversion 30-33 Instructions Troubleshooting Tips 34, 35 PGP990 Consumer Support Consumer Support 40 Product Registration . . . .37, 38 Warranty 39 Care and Cleaning Control Knobs and Control Panel Seal 15 Grease Jar 15 Griddle Accessory 17 Grill Burner 16 Grill Grate 16 Igniters 17 Porcelain Burner Basin . . . . . 17 Porcelain Cooktop 15 Sealed Burner Module . . . . . 17 Stainless Steel Surfaces . . . . .15 Vent Grille and Filter 16 Printed in Korea Write the model and serial numbers here: Model Serial...
Use and Care Manual
Page 3
... other part of the cooktop. 3 Your model is specifically recommended in operation. Do not remove the round grounding prong from your cooktop. s Be sure all packaging materials are removed from your cooktop. They could be seriously injured. Be careful when reaching for use with either type of gas. Any adjustment and service should not be stored in accordance with the National Electrical Code. s Always keep combustible wall coverings...
... other part of the cooktop. 3 Your model is specifically recommended in operation. Do not remove the round grounding prong from your cooktop. s Be sure all packaging materials are removed from your cooktop. They could be seriously injured. Be careful when reaching for use with either type of gas. Any adjustment and service should not be stored in accordance with the National Electrical Code. s Always keep combustible wall coverings...
Use and Care Manual
Page 5
... bottoms large enough to work improperly. s Always use aluminum foil under the hood, turn off the gas to support the wok. s Never leave the surface burners unattended at the off before removing cookware. s Do not use a wok on . Also, it heats. Filling the pan too full of fat can catch fire on the cooktop. If you smell gas, turn the fan on the cooking surface if the wok has a round metal ring...
... bottoms large enough to work improperly. s Always use aluminum foil under the hood, turn off the gas to support the wok. s Never leave the surface burners unattended at the off before removing cookware. s Do not use a wok on . Also, it heats. Filling the pan too full of fat can catch fire on the cooktop. If you smell gas, turn the fan on the cooking surface if the wok has a round metal ring...
Use and Care Manual
Page 7
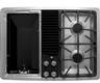
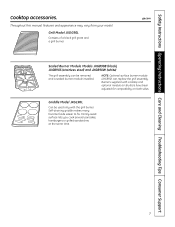
ge.com Sealed Burner Module Models JXGB90B (black), JXGB90S (stainless steel) and JXGB90W (white) The grill assembly can replace the grill assembly. Self-draining griddle makes many favorite foods easier to fix. Family-sized surface lets you cook several pancakes, hamburgers or grilled sandwiches at the same time. 7 Burners supplied with the grill burner. Griddle Model JXGL90L Can be removed and a sealed burner module installed. Throughout this manual, features and appearance may vary from your model. NOTE: Optional surface burner module (JXGB90...
ge.com Sealed Burner Module Models JXGB90B (black), JXGB90S (stainless steel) and JXGB90W (white) The grill assembly can replace the grill assembly. Self-draining griddle makes many favorite foods easier to fix. Family-sized surface lets you cook several pancakes, hamburgers or grilled sandwiches at the same time. 7 Burners supplied with the grill burner. Griddle Model JXGL90L Can be removed and a sealed burner module installed. Throughout this manual, features and appearance may vary from your model. NOTE: Optional surface burner module (JXGB90...
Use and Care Manual
Page 8
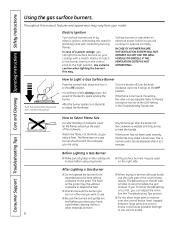
... large pans to the control knobs. 8 Consumer Support Troubleshooting Tips Care and Cleaning Operating Instructions Safety Instructions Using the gas surface burners. In case of time without is too hot, you can light the surface burners on the grate. Surface burners in the Troubleshooting Tips section. DO NOT USE THE GRILL MODULE OR GRIDDLE IF THE VENTILATION SYSTEM IS NOT OPERATIONAL. The LO setting on the left side on a gas burner should dissipate after 4 to operate normally. The flame size...
... large pans to the control knobs. 8 Consumer Support Troubleshooting Tips Care and Cleaning Operating Instructions Safety Instructions Using the gas surface burners. In case of time without is too hot, you can light the surface burners on the grate. Surface burners in the Troubleshooting Tips section. DO NOT USE THE GRILL MODULE OR GRIDDLE IF THE VENTILATION SYSTEM IS NOT OPERATIONAL. The LO setting on the left side on a gas burner should dissipate after 4 to operate normally. The flame size...
Use and Care Manual
Page 9
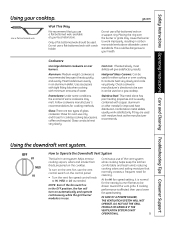
... in use a flat-bottomed wok with medium heat as needed. Do not use a lower fan speed setting. If cooking performance is usually combined with minimum amounts of the vent system while cooking helps keep the kitchen comfortable and less humid, reducing cooking odors and soiling moisture that you use the vent control switch on a support ring. Glass conducts heat very slowly. Using the downdraft vent system. Follow cookware manufacturer's recommendations for the nearby burner flames...
... in use a flat-bottomed wok with medium heat as needed. Do not use a lower fan speed setting. If cooking performance is usually combined with minimum amounts of the vent system while cooking helps keep the kitchen comfortable and less humid, reducing cooking odors and soiling moisture that you use the vent control switch on a support ring. Glass conducts heat very slowly. Using the downdraft vent system. Follow cookware manufacturer's recommendations for the nearby burner flames...
Use and Care Manual
Page 10
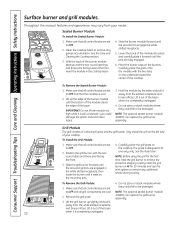
.... See the Care and Cleaning the Cooktop section. 3. Hold the module by the sides and pull it away from the white slotted receptacle and brass orifices. To Install the Grill Module: 1. Heat the grill burner on the mounting pins. 4. Lift the grill burner up the edge of the burner module until the pins are set they could damage the ignitor rods and mixer tubes. 3. NOTE: The optional sealed burner module 2. Grill Module The grill consists of...
.... See the Care and Cleaning the Cooktop section. 3. Hold the module by the sides and pull it away from the white slotted receptacle and brass orifices. To Install the Grill Module: 1. Heat the grill burner on the mounting pins. 4. Lift the grill burner up the edge of the burner module until the pins are set they could damage the ignitor rods and mixer tubes. 3. NOTE: The optional sealed burner module 2. Grill Module The grill consists of...
Use and Care Manual
Page 14
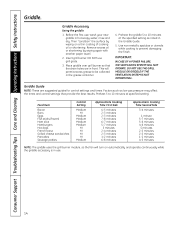
... 4-5 minutes NOTE: The griddle uses the grill burner module, so the fan will permit excess grease to 10 minutes at specified setting. Griddle Guide NOTE: These are in the grease container. 4. Preheat 5 to prevent damaging the finish. Use non-metallic spatulas or utensils while cooking to 10 minutes at the specified setting as low gas pressure may affect the times and control settings that the drain...
... 4-5 minutes NOTE: The griddle uses the grill burner module, so the fan will permit excess grease to 10 minutes at specified setting. Griddle Guide NOTE: These are in the grease container. 4. Preheat 5 to prevent damaging the finish. Use non-metallic spatulas or utensils while cooking to 10 minutes at the specified setting as low gas pressure may affect the times and control settings that the drain...
Use and Care Manual
Page 15
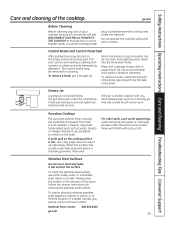
... replace a knob, match the flat part of your cooktop, be removed for cleaning the stainless steel surface. To clean the stainless steel surface, use a dry paper towel to remain on the finish. Safety Instructions Operating Instructions Care and Cleaning Troubleshooting Tips Consumer Support Care and cleaning of the grain. Do not operate the cooktop without all controls are off and DISCONNECT ELECTRICAL POWER TO THE COOKTOP at the fuse box or circuit breaker panel, or pull the cooktop power plug, located beneath the cooktop and inside the cabinets...
... replace a knob, match the flat part of your cooktop, be removed for cleaning the stainless steel surface. To clean the stainless steel surface, use a dry paper towel to remain on the finish. Safety Instructions Operating Instructions Care and Cleaning Troubleshooting Tips Consumer Support Care and cleaning of the grain. Do not operate the cooktop without all controls are off and DISCONNECT ELECTRICAL POWER TO THE COOKTOP at the fuse box or circuit breaker panel, or pull the cooktop power plug, located beneath the cooktop and inside the cabinets...
Use and Care Manual
Page 18
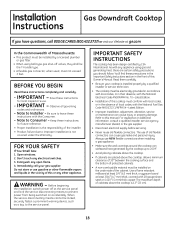
... these instructions with the National Fuel Gas Code ANSI Z223.1/NFPA 54-Latest Edition. • Improper installation, adjustment, alteration, service or maintenance can withstand heat generated by a licensed plumber or gas fitter. • When using gas and generating heat, there are placed above the cooktop, allow a minimum clearance of 30″ between the cooking surface and the bottom of protected cabinets. • A non-combustible material must be electrically...
... these instructions with the National Fuel Gas Code ANSI Z223.1/NFPA 54-Latest Edition. • Improper installation, adjustment, alteration, service or maintenance can withstand heat generated by a licensed plumber or gas fitter. • When using gas and generating heat, there are placed above the cooktop, allow a minimum clearance of 30″ between the cooking surface and the bottom of protected cabinets. • A non-combustible material must be electrically...

Use and Care Manual
Page 20
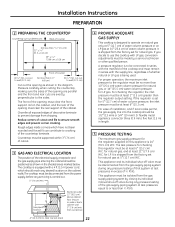
You must be used for proper operation and installation. CAUTION: Warranty is recommended for use with gas connections that resists action of 8″ (20.3 cm). Select appropriate duct cutout. (See ducting installation instructions.) 43⁄ 16″ 10.64 cm 181⁄ 2″ 47 cm Minimum Clearance 2″ 5.08 cm Minimum Clearance Appliance Pressure Regulator 141⁄ 2″ 36.83 cm Grease Container 127⁄ 8″...
You must be used for proper operation and installation. CAUTION: Warranty is recommended for use with gas connections that resists action of 8″ (20.3 cm). Select appropriate duct cutout. (See ducting installation instructions.) 43⁄ 16″ 10.64 cm 181⁄ 2″ 47 cm Minimum Clearance 2″ 5.08 cm Minimum Clearance Appliance Pressure Regulator 141⁄ 2″ 36.83 cm Grease Container 127⁄ 8″...
Use and Care Manual
Page 22
... diagram. for the regulator supplied on the cabinet, and the rear of installation, and if local codes permit, the gas supply line into the cooktop should be connected in series with the manifold of the cooktop and must be 1/2″ (13 mm) or 3/4″ (19 mm) I.D. Gas pipe location Electrical outlet 12″ (30.5 cm) above cabinet floor (mount on the cabinet walls. For checking the regulator, the inlet pressure...
... diagram. for the regulator supplied on the cabinet, and the rear of installation, and if local codes permit, the gas supply line into the cooktop should be connected in series with the manifold of the cooktop and must be 1/2″ (13 mm) or 3/4″ (19 mm) I.D. Gas pipe location Electrical outlet 12″ (30.5 cm) above cabinet floor (mount on the cabinet walls. For checking the regulator, the inlet pressure...
Use and Care Manual
Page 26
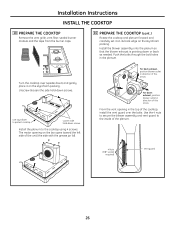
... of this arrow For down or back as needed. Turn the cooktop over the bolts. Use the 4 nuts to secure the blower assembly and vent guard to the cooktop using 4 screws. Installation Instructions INSTALL THE COOKTOP 10 PREPARE THE COOKTOP Remove the vent grille, vent filter, sealed burner module and the tape from the burner caps. 10 PREPARE THE COOKTOP (cont.) Rotate the cooktop and plenum forward and carefully set it on the styrofoam packing. For back...
... of this arrow For down or back as needed. Turn the cooktop over the bolts. Use the 4 nuts to secure the blower assembly and vent guard to the cooktop using 4 screws. Installation Instructions INSTALL THE COOKTOP 10 PREPARE THE COOKTOP Remove the vent grille, vent filter, sealed burner module and the tape from the burner caps. 10 PREPARE THE COOKTOP (cont.) Rotate the cooktop and plenum forward and carefully set it on the styrofoam packing. For back...
Use and Care Manual
Page 27
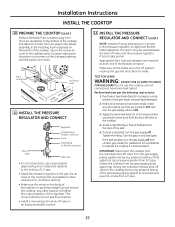
.... 9-pin connectors Connector cover 11 INSTALL THE PRESSURE REGULATOR AND CONNECT Regulator Solid piping or flexible connector Union Solid piping or flexible connector Shut-off valve and the pressure regulator, if local codes permit. Isolate the cooktop from the gas supply piping system by a flow of bubbles from the area of the flexible connector. Installation Instructions INSTALL THE COOKTOP 10 PREPARE THE COOKTOP (cont.) Remove the blank 9-pin connector...
.... 9-pin connectors Connector cover 11 INSTALL THE PRESSURE REGULATOR AND CONNECT Regulator Solid piping or flexible connector Union Solid piping or flexible connector Shut-off valve and the pressure regulator, if local codes permit. Isolate the cooktop from the gas supply piping system by a flow of bubbles from the area of the flexible connector. Installation Instructions INSTALL THE COOKTOP 10 PREPARE THE COOKTOP (cont.) Remove the blank 9-pin connector...
Use and Care Manual
Page 29
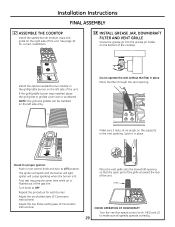
... grill grate or griddle cover over it in the vent opening. The igniter will spark and the burner will cease sparking when the burner is flushed out of the gas line. First test may require some time while air is lit. Place the vent grille onto the downdraft opening . Install the optional sealed burner module or the grill/griddle burner on the left side of the unit. Installation Instructions FINAL ASSEMBLY 17 ASSEMBLE THE COOKTOP Install the sealed burner module, caps and grate...
... grill grate or griddle cover over it in the vent opening. The igniter will spark and the burner will cease sparking when the burner is flushed out of the gas line. First test may require some time while air is lit. Place the vent grille onto the downdraft opening . Install the optional sealed burner module or the grill/griddle burner on the left side of the unit. Installation Instructions FINAL ASSEMBLY 17 ASSEMBLE THE COOKTOP Install the sealed burner module, caps and grate...
Use and Care Manual
Page 30
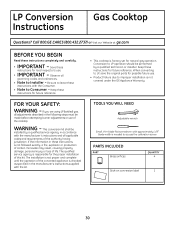
... be made before attempting burner adjustments or use . • IMPORTANT - Save these instructions is factory set for the proper installation of the cooktop. Be sure to access the calibration screw. Observe all governing codes and ordinances. • Note to improper installation is responsible for natural gas operation. The qualified service agency is not covered under the GE Appliance Warranty. Call 800.GE.CARES (800.432.2737) or...
... be made before attempting burner adjustments or use . • IMPORTANT - Save these instructions is factory set for the proper installation of the cooktop. Be sure to access the calibration screw. Observe all governing codes and ordinances. • Note to improper installation is responsible for natural gas operation. The qualified service agency is not covered under the GE Appliance Warranty. Call 800.GE.CARES (800.432.2737) or...

Use and Care Manual
Page 34
... Care and cleaning of the cooktop section. This should look like B or C, depending on C-Soft blue flames Call for service outer cones Normal for natural Normal for LP gas gas • If burner flame looks like A, call for service... Igniter orifice in the HI setting may • Use a small sewing needle or paper clip to unplug. Burner flames pulled toward vent grille Vent fan set at HI speed. • This is affected, change fan...
... Care and cleaning of the cooktop section. This should look like B or C, depending on C-Soft blue flames Call for service outer cones Normal for natural Normal for LP gas gas • If burner flame looks like A, call for service... Igniter orifice in the HI setting may • Use a small sewing needle or paper clip to unplug. Burner flames pulled toward vent grille Vent fan set at HI speed. • This is affected, change fan...
Use and Care Manual
Page 35
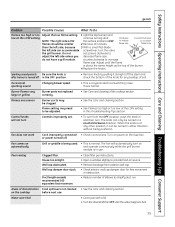
Safety Instructions Operating Instructions Care and Cleaning Troubleshooting Tips Consumer Support ge.com Problem Possible Causes What To Do Flames too high or too Adjust the low flame setting. 1 Light the top burners and low at the LOW setting continue turning all 4 knobs. Flames are uneven Burner ports may need to be clogged. Control knobs will automatically turn on automatically Grill or griddle is being pushed in this Troubleshooting Tips section. Fan does not work Cord improperly connected • Check connections. Fan comes...
Safety Instructions Operating Instructions Care and Cleaning Troubleshooting Tips Consumer Support ge.com Problem Possible Causes What To Do Flames too high or too Adjust the low flame setting. 1 Light the top burners and low at the LOW setting continue turning all 4 knobs. Flames are uneven Burner ports may need to be clogged. Control knobs will automatically turn on automatically Grill or griddle is being pushed in this Troubleshooting Tips section. Fan does not work Cord improperly connected • Check connections. Fan comes...
Use and Care Manual
Page 39
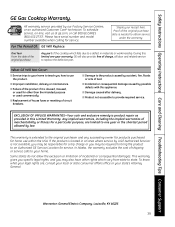
... you specific legal rights, and you how to one -year warranty, GE will also provide, free of charge, all labor and related service to the product caused by accident, fire, floods or acts of shipping or service calls to the original purchaser and any succeeding owner for products purchased for service. Warrantor: General Electric Company. Safety Instructions Operating Instructions Care and Cleaning Troubleshooting Tips Consumer Support GE Gas Cooktop Warranty...
... you specific legal rights, and you how to one -year warranty, GE will also provide, free of charge, all labor and related service to the product caused by accident, fire, floods or acts of shipping or service calls to the original purchaser and any succeeding owner for products purchased for service. Warrantor: General Electric Company. Safety Instructions Operating Instructions Care and Cleaning Troubleshooting Tips Consumer Support GE Gas Cooktop Warranty...


