Use and Care Manual
Page 1
...7 Lighting a Burner 5 Lighting the Griddle Burners 7 PowerBoil™ Burner 5 Sealed Gas Burners 5 Care and Cleaning Burners and Cooktop Electrodes 9 Burner Bases 9 Burner Grates 10 Burner Head and Cap Replacement 10 Control Knobs 8 Griddle 11 Porcelain Enamel Cooktop 8 Shipping Film and Tape 8 Stainless Steel Surfaces 8 Troubleshooting Tips 12 Consumer Support Consumer Support 18 Ownership Registration for Customers in Canada only 13, 14 Warranty (Canada 17 Warranty (U.S 16 In Canada: www.electromenagersge.ca Printed in the United States Write the model and serial numbers...
...7 Lighting a Burner 5 Lighting the Griddle Burners 7 PowerBoil™ Burner 5 Sealed Gas Burners 5 Care and Cleaning Burners and Cooktop Electrodes 9 Burner Bases 9 Burner Grates 10 Burner Head and Cap Replacement 10 Control Knobs 8 Griddle 11 Porcelain Enamel Cooktop 8 Shipping Film and Tape 8 Stainless Steel Surfaces 8 Troubleshooting Tips 12 Consumer Support Consumer Support 18 Ownership Registration for Customers in Canada only 13, 14 Warranty (Canada 17 Warranty (U.S 16 In Canada: www.electromenagersge.ca Printed in the United States Write the model and serial numbers...
Use and Care Manual
Page 3
... plug . Do not attempt to turn it is specifically recommended in this manual . ■ Your cooktop is in use . If required, these adjustments must be made by a qualified gas cooktop installers or service technicians . If in doubt about the grounding of the home electrical system, it is your cooktop installed and properly grounded by removing the fuse or switching off if necessary . ■ Plug your cooktop unless it off the circuit breaker...
... plug . Do not attempt to turn it is specifically recommended in this manual . ■ Your cooktop is in use . If required, these adjustments must be made by a qualified gas cooktop installers or service technicians . If in doubt about the grounding of the home electrical system, it is your cooktop installed and properly grounded by removing the fuse or switching off if necessary . ■ Plug your cooktop unless it off the circuit breaker...

Use and Care Manual
Page 4
... storing commonly used items in cabinets above the range and be allowed to the surface burners resulting in a gas leak and risk of the pan . Grease should not be careful when reaching over nearby burners . ■ When preparing flaming foods under a hood, turn the fan on . ■ Do not use a wok with a round metal support ring . WARNING IN THE EVENT OF A FIRE, TAKE THE FOLLOWING STEPS TO...
... storing commonly used items in cabinets above the range and be allowed to the surface burners resulting in a gas leak and risk of the pan . Grease should not be careful when reaching over nearby burners . ■ When preparing flaming foods under a hood, turn the fan on . ■ Do not use a wok with a round metal support ring . WARNING IN THE EVENT OF A FIRE, TAKE THE FOLLOWING STEPS TO...
Use and Care Manual
Page 5
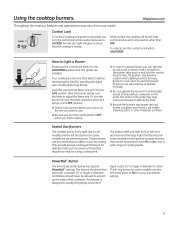
... some models) are the general-purpose burners that can be turned down and turn the control knob to LOCKED . To unlock, turn the knob to UNLOCKED . After the burner ignites, turn the control lock knob to adjust the flame size . Push the control knob down to show that require low heat for a very low setting . then push in use when an electrical power failure occurs will glow to LO for a long cooking time . They provide precise cooking performance for a very low simmer setting...
... some models) are the general-purpose burners that can be turned down and turn the control knob to LOCKED . To unlock, turn the knob to UNLOCKED . After the burner ignites, turn the control lock knob to adjust the flame size . Push the control knob down to show that require low heat for a very low setting . then push in use when an electrical power failure occurs will glow to LO for a long cooking time . They provide precise cooking performance for a very low simmer setting...
Use and Care Manual
Page 7
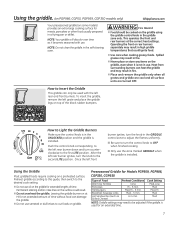
... - 5 min . Using the Griddle Most griddled foods require cooking on the griddle using the griddle control knob in the self-cleaning oven. Preseasoned Griddle for an extended time. 7 Permanent staining and/or craze lines on the griddle for extended lengths of the black rubber bumpers . Preheat griddle according to this guide, then switch to OFF when finished cooking ■ Only use oil on the surface could ignite food. Use care when cooking greasy foods.
... - 5 min . Using the Griddle Most griddled foods require cooking on the griddle using the griddle control knob in the self-cleaning oven. Preseasoned Griddle for an extended time. 7 Permanent staining and/or craze lines on the griddle for extended lengths of the black rubber bumpers . Preheat griddle according to this guide, then switch to OFF when finished cooking ■ Only use oil on the surface could ignite food. Use care when cooking greasy foods.
Use and Care Manual
Page 8
... sure electrical power is baked on your stainless steel range . 6. However, any spills, spots and grease from packaging tape on the finish . DO NOT USE for easier cleaning. Care and cleaning of the knobs are dry before replacing . It cannot be removed for cooktop or stainless steel parts cleaning: ■ It is important to use a soft cloth or paper towel every time the range is hot, use a steel wool pad; Put grates back in...
... sure electrical power is baked on your stainless steel range . 6. However, any spills, spots and grease from packaging tape on the finish . DO NOT USE for easier cleaning. Care and cleaning of the knobs are dry before replacing . It cannot be removed for cooktop or stainless steel parts cleaning: ■ It is important to use a soft cloth or paper towel every time the range is hot, use a steel wool pad; Put grates back in...
Use and Care Manual
Page 9
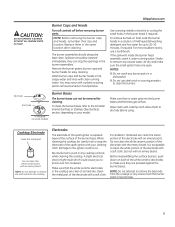
... electrode with your model . Before reassembling the surface burners, push down on food particles . Remove the burner grates, burner caps and burner heads for up to remove the electrode from the cooktop or any cooktop controls while cleaning the cooktop . Cooktop Electrode Clean this metal part Do not clean this white ceramic part with clean running water . Make sure that no water gets into the burner bases and the brass gas orifices . Do not clean the white ceramic portion of...
... electrode with your model . Before reassembling the surface burners, push down on food particles . Remove the burner grates, burner caps and burner heads for up to remove the electrode from the cooktop or any cooktop controls while cleaning the cooktop . Cooktop Electrode Clean this metal part Do not clean this white ceramic part with clean running water . Make sure that no water gets into the burner bases and the brass gas orifices . Do not clean the white ceramic portion of...
Use and Care Manual
Page 12
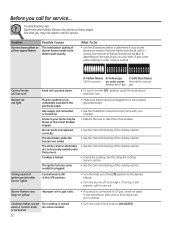
...; Turn the control lock knob to determine if your cooktop . Burner flames very large or yellow Improper air to gas ratio. • If cooktop is locked (on . Cooktop makes sound when a control knob is turned on 12 The cooktop is connected to call for service . A fuse in the Installation Instructions that came with your home may not need to LP gas, check all steps in your cooktop . • Replace the fuse or reset the circuit breaker . • See the Care and cleaning...
...; Turn the control lock knob to determine if your cooktop . Burner flames very large or yellow Improper air to gas ratio. • If cooktop is locked (on . Cooktop makes sound when a control knob is turned on 12 The cooktop is connected to call for service . A fuse in the Installation Instructions that came with your home may not need to LP gas, check all steps in your cooktop . • Replace the fuse or reset the circuit breaker . • See the Care and cleaning...
Use and Care Manual
Page 16
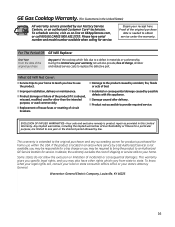
... warranty gives you specific legal rights, and you may also have serial number and model number available when calling for service. GE Gas Cooktop Warranty. (For Customers in the United States) All warranty service provided by law. During this Limited Warranty. Warrantor: General Electric Company, Louisville, KY 40225 16 Please have other than the intended purpose, or used for other rights which fails due to an Authorized GE Service location for service...
... warranty gives you specific legal rights, and you may also have serial number and model number available when calling for service. GE Gas Cooktop Warranty. (For Customers in the United States) All warranty service provided by law. During this Limited Warranty. Warrantor: General Electric Company, Louisville, KY 40225 16 Please have other than the intended purpose, or used for other rights which fails due to an Authorized GE Service location for service...
Use and Care Manual
Page 17
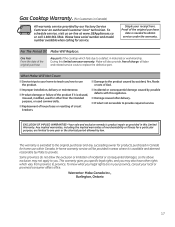
... part of the cooktop which fails due to a defect in areas where it is abused, misused, modified, used commercially. ■ Replacement of house fuses or resetting of circuit breakers. ■ Incidental or consequential damage caused by possible defects with this Limited Warranty. During this limited one year or the shortest period allowed by law. In-home warranty service will also provide, free...
... part of the cooktop which fails due to a defect in areas where it is abused, misused, modified, used commercially. ■ Replacement of house fuses or resetting of circuit breakers. ■ Incidental or consequential damage caused by possible defects with this Limited Warranty. During this limited one year or the shortest period allowed by law. In-home warranty service will also provide, free...
Use and Care Manual
Page 18
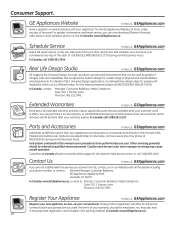
... range of all the details including your convenience! Get on -line anytime, or call 1.800.561.3344 Real Life Design Studio In the U .S .: GEAppliances.com GE supports the Universal Design concept-products, services and environments that are accepted) . Suite 310, 1 Factory Lane Moncton, N .B . You may cause unsafe operation. You can now download Owner's Manuals, order parts or even schedule service...
... range of all the details including your convenience! Get on -line anytime, or call 1.800.561.3344 Real Life Design Studio In the U .S .: GEAppliances.com GE supports the Universal Design concept-products, services and environments that are accepted) . Suite 310, 1 Factory Lane Moncton, N .B . You may cause unsafe operation. You can now download Owner's Manuals, order parts or even schedule service...
Installation Instructions
Page 1
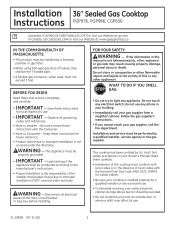
... the main circuit breaker or fuse box before installing. Be sure to leave these instructions for local inspector's use any electrical switch; do not use . • IMPORTANT - Call 800.GE.CARES (800.432.2737) or Visit our Website at: ge.com In Canada, call the fire department. Save these instructions completely and carefully. • IMPORTANT - Follow the gas supplier's instructions. • If you cannot reach your Owner's Manual. This cooktop has...
... the main circuit breaker or fuse box before installing. Be sure to leave these instructions for local inspector's use any electrical switch; do not use . • IMPORTANT - Call 800.GE.CARES (800.432.2737) or Visit our Website at: ge.com In Canada, call the fire department. Save these instructions completely and carefully. • IMPORTANT - Follow the gas supplier's instructions. • If you cannot reach your Owner's Manual. This cooktop has...
Installation Instructions
Page 2
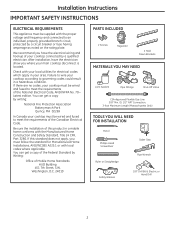
... be wired and fused to governing codes could result in a hazardous condition. Latest edition. Installation Instructions IMPORTANT SAFETY INSTRUCTIONS ELECTRICAL REQUIREMENTS This appliance must follow the standard for electrical codes which apply in your area. Be sure the installation of Mobile Home Standards HUD Building 451 7th Street, S.W. Washington, D.C. 24010 PARTS INCLUDED 2 Screws Regulator 2 Hold Down Brackets MATERIALS YOU MAY NEED Joint Sealant Pipe Fittings Shut-Off Valve...
... be wired and fused to governing codes could result in a hazardous condition. Latest edition. Installation Instructions IMPORTANT SAFETY INSTRUCTIONS ELECTRICAL REQUIREMENTS This appliance must follow the standard for electrical codes which apply in your area. Be sure the installation of Mobile Home Standards HUD Building 451 7th Street, S.W. Washington, D.C. 24010 PARTS INCLUDED 2 Screws Regulator 2 Hold Down Brackets MATERIALS YOU MAY NEED Joint Sealant Pipe Fittings Shut-Off Valve...
Installation Instructions
Page 3
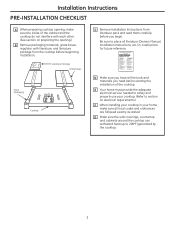
... you begin. G Make sure the wall coverings, countertop and cabinets around the cooktop can withstand heat (up to place all local codes and ordinances are followed exactly as stated. E Your home must provide the adequate electrical service needed to safely and properly use your cooktop. (Refer to section on preparing the opening , make sure all literature (Owners Manual, Installation Instructions, etc.) in your home, make sure...
... you begin. G Make sure the wall coverings, countertop and cabinets around the cooktop can withstand heat (up to place all local codes and ordinances are followed exactly as stated. E Your home must provide the adequate electrical service needed to safely and properly use your cooktop. (Refer to section on preparing the opening , make sure all literature (Owners Manual, Installation Instructions, etc.) in your home, make sure...
Installation Instructions
Page 5
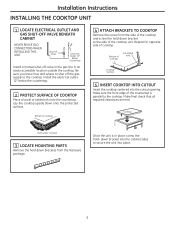
... screw the hold - Make final check that all required clearances are met. Bottom of cooktop 4 ATTACH BRACKETS TO COOKTOP Remove the screw from the literature package. Make sure the front edge of the cooktop unit. Installation Instructions INSTALLING THE COOKTOP UNIT 1 LOCATE ELECTRICAL OUTLET AND GAS SHUT-OFF VALVE BENEATH CABINET NEVER REUSE OLD CONNECTORS WHEN INSTALLING THIS UNIT. Install the electrical outlet 12″ below the countertop. 2 PROTECT SURFACE OF COOKTOP Place a towel...
... screw the hold - Make final check that all required clearances are met. Bottom of cooktop 4 ATTACH BRACKETS TO COOKTOP Remove the screw from the literature package. Make sure the front edge of the cooktop unit. Installation Instructions INSTALLING THE COOKTOP UNIT 1 LOCATE ELECTRICAL OUTLET AND GAS SHUT-OFF VALVE BENEATH CABINET NEVER REUSE OLD CONNECTORS WHEN INSTALLING THIS UNIT. Install the electrical outlet 12″ below the countertop. 2 PROTECT SURFACE OF COOKTOP Place a towel...
Installation Instructions
Page 10
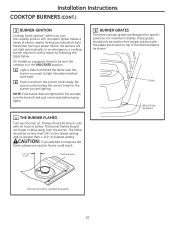
... specific positions. B Push in the UNLOCKED position. Be sure you are lighting. Flames should not flutter or blow away from the burner. NOTE: If the burner does not light within five seconds, turn the knob off and wait one minute before trying again. 4 THE BURNER FLAMES Turn each burner on highest setting. CAUTION: If you turn the control knob slowly. Installation Instructions COOKTOP BURNERS (CONT.) 3 BURNER IGNITION Cooktop Spark Ignition-When you attempt to measure the flame, please use...
... specific positions. B Push in the UNLOCKED position. Be sure you are lighting. Flames should not flutter or blow away from the burner. NOTE: If the burner does not light within five seconds, turn the knob off and wait one minute before trying again. 4 THE BURNER FLAMES Turn each burner on highest setting. CAUTION: If you turn the control knob slowly. Installation Instructions COOKTOP BURNERS (CONT.) 3 BURNER IGNITION Cooktop Spark Ignition-When you attempt to measure the flame, please use...

Installation Instructions
Page 12
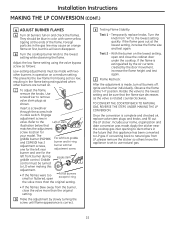
... 5/32″ tip size, 60mm long) 2 ADJUST YOUR COOKTOP FOR USE WITH LP GAS A Disconnect all codes and requirements of the spring retainer and press down to remove the retainer. • Carefully look at the main circuit breaker or fuse box. Failure to follow instructions could result in serious injury or property damage. B Shut off valve. Position LP Spring Retainer LP L.P./Propane Position Pressure Regulator • Turn the spring retainer...
... 5/32″ tip size, 60mm long) 2 ADJUST YOUR COOKTOP FOR USE WITH LP GAS A Disconnect all codes and requirements of the spring retainer and press down to remove the retainer. • Carefully look at the main circuit breaker or fuse box. Failure to follow instructions could result in serious injury or property damage. B Shut off valve. Position LP Spring Retainer LP L.P./Propane Position Pressure Regulator • Turn the spring retainer...
Installation Instructions
Page 13
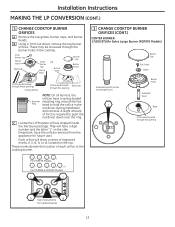
... show a series of force is required to hold the orifice in the cooktop. B Using a 7mm nut driver, remove the top burner orifices. These may be accessed through the burner holes in the nut driver during installation and removal. C Locate the LP/Propane orifices shipped inside the literature package. Installation Instructions MAKING THE LP CONVERSION (CONT.) 3 CHANGE COOKTOP BURNER ORIFICES A Remove the top grates, burner caps, and burner heads. Inner burner cap Burner base Electrode Outer burner cap Burner base OR Burner base Burner cap Burner head Orifice spuds located through...
... show a series of force is required to hold the orifice in the cooktop. B Using a 7mm nut driver, remove the top burner orifices. These may be accessed through the burner holes in the nut driver during installation and removal. C Locate the LP/Propane orifices shipped inside the literature package. Installation Instructions MAKING THE LP CONVERSION (CONT.) 3 CHANGE COOKTOP BURNER ORIFICES A Remove the top grates, burner caps, and burner heads. Inner burner cap Burner base Electrode Outer burner cap Burner base OR Burner base Burner cap Burner head Orifice spuds located through...
Installation Instructions
Page 15
... . Installation Instructions MAKING THE LP CONVERSION (CONT.) 4 ADJUST BURNER FLAMES A Turn all burners full on the lowest setting, open For all burners off. Turn the knob from being set to LO when making this will soon disappear. With the burner on and check the flames. They should be turned to use natural gas. 15 C To adjust the flame, remove the knobs. Engage adjustment screw in valve switch. Apply the sticker near the cooktop gas inlet opening to remove valve stem plugs...
... . Installation Instructions MAKING THE LP CONVERSION (CONT.) 4 ADJUST BURNER FLAMES A Turn all burners full on the lowest setting, open For all burners off. Turn the knob from being set to LO when making this will soon disappear. With the burner on and check the flames. They should be turned to use natural gas. 15 C To adjust the flame, remove the knobs. Engage adjustment screw in valve switch. Apply the sticker near the cooktop gas inlet opening to remove valve stem plugs...

Quick Specs
Page 1
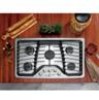
... GE Profile™ 36" Built-In Gas Cooktop Dimensions and Installation Information AGA Requirement: All gas cooktop models require 7/16" free area below cooktop height to adjacent overhead cabinets. Specification Revised 7/11 230239 Installation Information: Before installing, consult installation instructions, packed with product, for current dimensional data. Requires 18" minimum from countertop to combustible material. Refer to cooktop and wall oven/warming drawer installation instructions packed with product before installing. Electrical Rating: 120V, 60Hz, 5A Installation...
... GE Profile™ 36" Built-In Gas Cooktop Dimensions and Installation Information AGA Requirement: All gas cooktop models require 7/16" free area below cooktop height to adjacent overhead cabinets. Specification Revised 7/11 230239 Installation Information: Before installing, consult installation instructions, packed with product, for current dimensional data. Requires 18" minimum from countertop to combustible material. Refer to cooktop and wall oven/warming drawer installation instructions packed with product before installing. Electrical Rating: 120V, 60Hz, 5A Installation...


